background image

 English  


-28-


5. Installing Driver
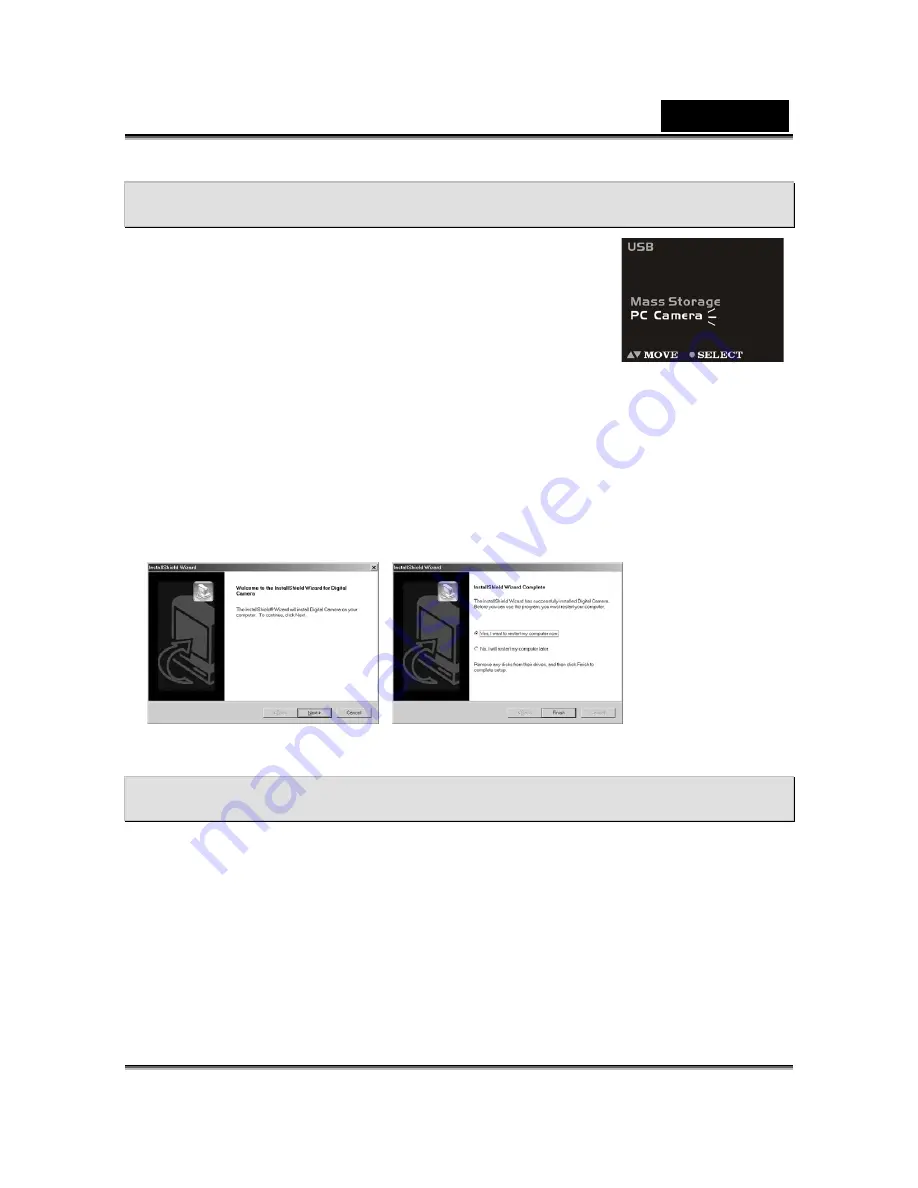


You can use the

 PC Camera

 and 

Mass Storage

 functions of the 

camera via PC. To install the proper camera driver, perform the 
following: 
 

Step 1 

Insert the software CD-ROM supplied with the package 

into the CD-ROM drive. 
 

Step 2 

The Auto-run program will be executed and the welcome screen appears:(If your 

CD-ROM drive doesn't support the auto-run function. Please double press on the 

"My Computer" 

icon on the desktop. Double press the CD-ROM drive icon and 

press the 

InstallMgr.exe

 file in the root directory. 


Step 3 

Press on the drivers to install them, and the following screen will appear : 


Step 4 

Press 

Next

 to continue the setup program. After the camera driver installed 

successfully, a message will appear on the screen as following: 


Step 5

 Press Finish to restart the computer and finish the driver installation. 


6. Connecting Your Computer


You need to connect the Digital Video Camera to your computer's USB port to transfer 
photos into your computer. This section shows how you can connect the Digital Video 
Camera to your computer. 
 
You must install the Digital Video Camera Driver from the software CD-ROM before 
connecting to ensure your computer functions properly with USB. See the section 

"Installing Software"

 for details on how to install the driver. 


Summary of Contents for G-Shot PalmDV310

Page 1: ...Information technology equipment personal computer peripheral input device for home and office use EU EFTA member states intended for use EU Austria Belgium Denmark Finland France German Greece Irelan...

Page 2: ...w Digital Video Camera and install all the softwares included in the software CD ROM You ll find clear instructions on how to take pictures record movies and voice and use your Digital Video Camera as...

Page 3: ...Photos 15 16 To take Close up pictures 16 To take portrait and distant Pictures 16 Digital Zoom 16 Snapshot Menu 16 White Balance Setting 16 17 Image Size Setting 17 Image Quality Setting 17 Exposure...

Page 4: ...unctions well Any additional loss caused by the malfunction of this product such as costs of photography or any loss of benefit generated by the photography is not the responsibility of our company an...

Page 5: ...e Digital Video Camera immediately turn the power off and remove the batteries How to maintain your Digital Video Camera 1 If lens or LCD monitor surface is dirty please use lens brush or soft cloth t...

Page 6: ...ide View Set Button Press the button to get into the Setup mode Mode Switch You can select the following modes by sliding this Mode switch 1 Capture Mode 2 Movie Mode 3 Voice Mode Battery Cover and SD...

Page 7: ...off when the strobe is turned off Power LED As the Digital Video Camera power turned on the power LED will light It blinks and goes off when batteries exhaust Power Button Press the button one second...

Page 8: ...or remove the card push and pull Then push the memory card all the way into the memory compartment and close the battery door push the battery door down and then slide it closed NOTE y When memory ca...

Page 9: ...l Video Camera And Power LED will light on Step 2 The LCD Display will be turned on automatically NOTE y The LCD Display will be turned off automatically if you do not operate Camera over 30 seconds t...

Page 10: ...ol 4 Format Formatting the internal memory or memory cards 5 Default Reset to preliminary settings 6 TV TV output format setting NTSC PAL 7 Frequency Fluorescent frequency 50Hz 60Hz 8 GAME Tetris Raci...

Page 11: ...press it Step 4 The Digital Video Camera then begins formatting the memory card Wait for the formatting process to finish Step 5 After the memory card has been formatted all the pictures and datas in...

Page 12: ...Start the Tetris Come in the Tetris menu Start Select the start and press OK button to start the new game Level In the level menu have three type level for the player Mode MODE0 have eight type object...

Page 13: ...ation Menu button Pause the game and display the game menu Start the Racing Select the start and press OK button to start the new game The Racing game have six grade the one grade have two minute to c...

Page 14: ...you are recording on the LCD Display Step 2 And while recording a red icon blinks on the upper left side of the LCD Display and the recording time counts up The icon stops blinking and becomes green...

Page 15: ...us Identifier Voice Icon Record Length Image Number Memory Indicator Battery Indicator Record Voice Slide modes switch to the Voice Step 1 Press once the Shutter button to start recording voice Step 2...

Page 16: ...scent Image Quality Fine Normal Basic Image Size 5 5M 2720x2040 3M 2048x1536 2M 1600x1200 1 3M 1280x960 Zoom Lever Normal 4 0x Zoom Macro Indicator Capture Mode Indicator Flash Mode OFF Auto Warning C...

Page 17: ...l show allowing you to take pictures at a closer range between 25 30cm Step 2 To take pictures follow the steps in the Shooting Photos section To take portrait and distant pictures Step 1 Push the Mac...

Page 18: ...Image Size setting menu Step 3 You can use to select 1 3M Fine quality 1280 960 pixels 2M Best quality 1600 1200 pixels 3M 2048 1536 pixels 5 5M 2720 2040 pixels firmware interpolation Step 4 Press E...

Page 19: ...er Setting Step 1 Use to select on the menu bar Step 2 Press Enter button to enter Self Timer setting menu Step 3 You can use to select ON Off Step 4 Press Enter button to confirm your selection or pr...

Page 20: ...p 3 You can use to select ON Off Step 4 Press Enter button to confirm your selection or press Menu button to cancel it NOTE y After setting date stamp on the date will display on LCD panel and stamped...

Page 21: ...icator Battery Indicator Image Playback Press to playback the previous image or the next image Press Enter button to the image zoom mode Press Up button to zoom in the image Press Down button to zoom...

Page 22: ...e file the voice icon indicator appears on screen by pressing the Enter button you can start playing the voice Press Menu button to pause play process Press Enter button to stop playing voice In voice...

Page 23: ...r all the photos stored in the Digital Video Camera Deleting a Single Photo Step 1 Make sure that the Digital Video Camera is in playback mode Example Move to the picture which is going to be deleted...

Page 24: ...top deleting operation and go back to the Playback Menu Deleting All Photos You may also choose to delete all the photos if the memory is already full and you want to free up the space to take more ph...

Page 25: ...r mind and do not want to continue deleting all the pictures press to select Cancel on the menu screen Then press the Enter button All your pictures will be retained Step 7 After all the pictures have...

Page 26: ...tton to unprotect it and then icon will disappear on right top corner of the image that you selected This means the image protection had been disabled If press Menu button the screen will return to st...

Page 27: ...tton the screen will return to step 1 Step 2 Use to move to DPOF If press Menu button the screen will return to step 1 Step 3 Press Enter button to bring up DPOF Menu Set All and Set One If press Menu...

Page 28: ...u button the screen will return to step 1 Step 3 Press Enter button to bring up DPOF Menu Set All and Set One If press Menu button the screen will return to step 3 Step 4 Press to select Set One optio...

Page 29: ...Press on the drivers to install them and the following screen will appear Step 4 Press Next to continue the setup program After the camera driver installed successfully a message will appear on the sc...

Page 30: ...ng it as a Web camera See the section Installing Software for installation instructions Using the Digital Video Camera as a Web camera it also lets you capture video directly into your computer and ed...

Page 31: ...the yellow plug output cable to the Audio in and Video in plug on your TV VCR Step 3 On your television select the channel for auxiliary Audio Video input NOTE y Locate the Audio Video ports on your...

Page 32: ...are Take Photo Impression Installation for example Step 1 Insert the software CD ROM supplied with the package into the CD ROM drive Step 2 The Auto run program will be executed and the welcome screen...

Page 33: ...ation folder and components you need Step 8 Please select the program folder you want to install Step 9 When the installation is completed the window below will appear Press Finish to end the installa...

Page 34: ...Standard 1 2m Infinity Macro 25 30cm Self timer 10 sec delay PC CAM Mode 20 30 fps 320 x 240 15 25 fps 640 x 480 Flash Mode Auto Off AV OUT NTSC PAL options PC Connection USB Ver 1 1 Movie File Record...

Reviews: