


Publication No. GEG-99018A
Genicom
Nov 00
3-12
GENICOM LN28 and microLaser 280 User Guide
PCL Menu
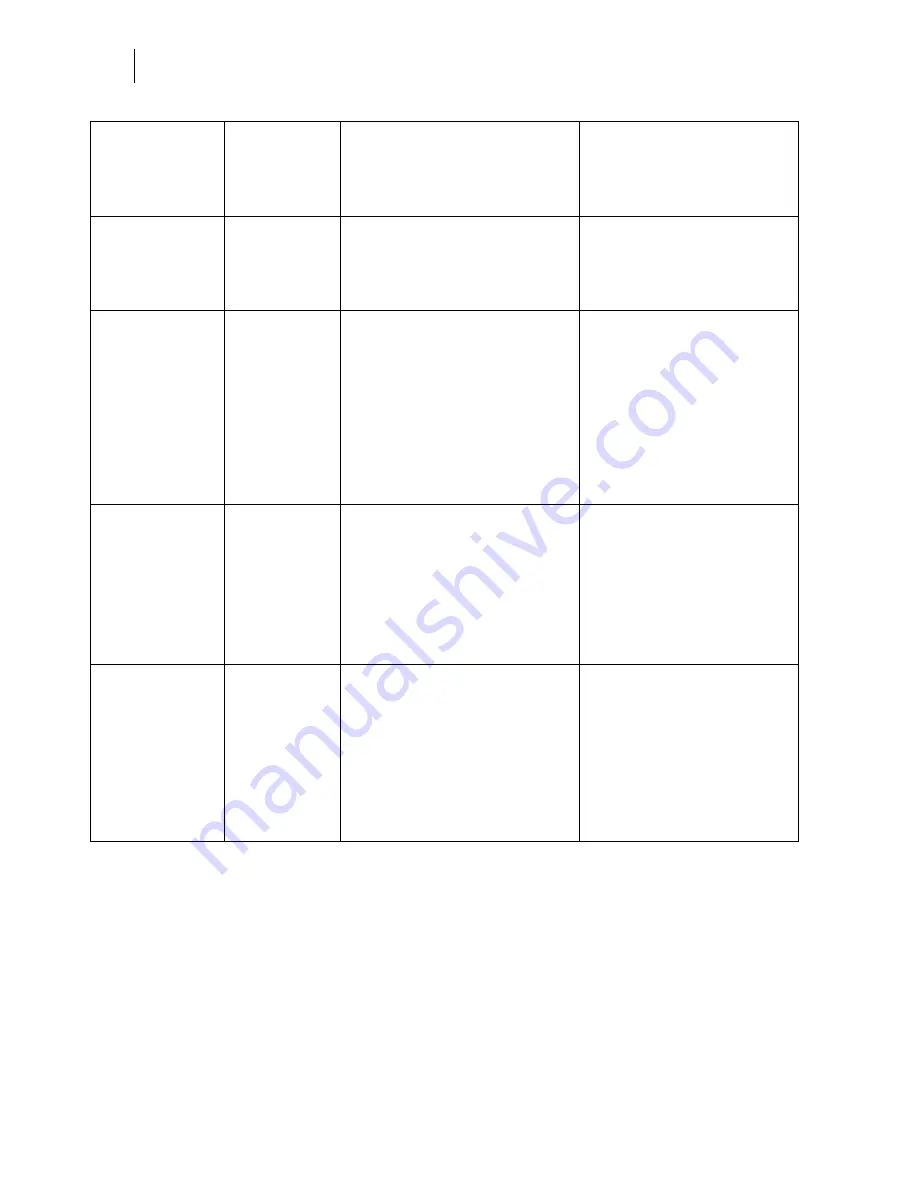
Macro Filter
This submenu allows
you to turn the
macro filter on or
off.
Off
On
Off
1. Press NEXT or PREVIOUS to
toggle between ON and OFF.
2. Press SELECT to save this
setting.
Lines Per Page
This submenu allows
you to change the
number of lines per
page.
64
5 - 128
1. Press NEXT or PREVIOUS to
increase or decrease the lines
per page.
2. Press SELECT to save this
setting.
CR Mode
This submenu allows
you top define the
action prompted by
a carriage return—a
carriage return
equals either a
cariage return alone,
or a carriage return
and a line feed
together.
CR = CR
CR = CR
CR = CR/LF
1. Press NEXT or PREVIOUS to
choose from CR=CR or
CR=CR/LF.
2. Press SELECT to save this
setting.
LF Mode
This submenu allows
you to define the
action prompted by
a line feed—a line
feed equals either a
line feed alone or a
carriage return and
a line feed together.
LF = LF
LF = LF
LF = CR/LF
1. Press NEXT or PREVIOUS to
choose from LF=LF or
LF=CR/LF.
2. Press SELECT to save this
setting.
FF Mode
This submenu allows
you to define the
action prompted by
a form feed—a form
feed equals either a
form feed alone or a
carriage return and
a form feed
together.
FF = FF
FF = FF
FF = CR/FF
1. Press NEXT or PREVIOUS to
choose from FF=FF or
FF=CR/FF.
2. Press SELECT to save this
setting.
Summary of Contents for LN28
Page 1: ...Nov 00 Genicom Publication No GEG 99018A GENICOM LN28 and microLaser 280 User Guide SIB012F...
Page 3: ...Nov 00 Genicom Publication No GEG 99018A GENICOM LN28 and microLaser 280 User Guide iii...
Page 4: ...Publication No GEG 99018A Genicom Nov 00 iv GENICOM LN28 and microLaser 280 User Guide...
Page 12: ...Publication No GEG 99018A Genicom Nov 00 xii GENICOM LN28 and microLaser 280 User Guide...


