RED TEST LEAD
BLACK TEST LEAD
If the readout is a negative value, the leads are reversed but the
absolute value represents a valid measurement of current
amplitude.
(7) Remove power from the circuit and discharge all high-voltage
capacitors.
(8) Remove the test leads and restore the circuit to its original
condition by eliminating the break you made in Step 5.
MEASURING RESISTANCE
••
Warning
••
To avoid electrical shock or damage to the meter when measuring
resistance, turn off all power to the circuit and discharge all high-
voltage capacitors.
(1) Turn the rotary switch to one of the
Ω
positions. If you are unsure
how much resistance you expect to encounter, select the
200
position.
(2) Plug the black test lead into the front-panel
COM
jack and the red
test lead into the
jack.
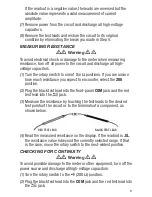
(3) Measure the resistance by touching the test leads to the desired
test points of the circuit or to the terminals of a component, as
shown below.
(4) Read the measured resistance on the display. If the readout is
.OL
,
the resistance value is beyond the currently selected range. If that
is the case, move the rotary switch to the next-widest position.
CHECKING FOR CONTINUITY
••
Warning
••
To avoid possible damage to the meter or other equipment, turn off the
power source and discharge all high-voltage capacitors.
(1) Turn the rotary switch to the
(200
Ω
) position.
(2) Plug the black test lead into the
COM
jack and the red test lead into
the
jack.
9


