background image

-2-

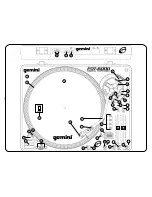
1


2

115V

230V

3

4

5

7

6

9

10

12

13

14

11

15

16

18

17

19

20

21

22

23

24

25

26

27

28

29

31

32

33

34

36

35

8

37

38

39

41

42

40

30

Summary of Contents for PDT-6000

Page 1: ...LISH PAGE 4 DEUTSCH PAGE 7 ESPA OL PAGE 10 FRANCAIS PAGE 13 OPERATORS MANUAL BEDIENUNGSHANDBUCH MANUAL DEL OPERADOR MANUEL D INSTRUCTIONS PDT 6000 DIGITAL TURNTABLE DIGITALER PLATTENSPIELER TOCADISCOS...

Page 2: ...2 1 2 115V 230V 3 4 5 7 6 9 10 12 13 14 11 15 16 18 17 19 20 21 22 23 24 25 26 27 28 29 31 32 33 34 36 35 8 37 38 39 41 42 40 30...

Page 3: ...3 Figure 2 1 2 For assistance and information in the U S A call 1 732 738 9003 Figure 1 1 2...

Page 4: ...ve their own designs please refer to your particular cartridge s instructions to insure proper installation 1 Connect the lead wires to the cartridge terminals For your convenience the terminals of mo...

Page 5: ...H CONTROL 23 and QUARTZ LOCK 25 When the QUARTZ LOCK 25 is activated the QUARTZ LOCK LED 24 lights GREEN and the speed will be exactly 33 1 3 45 or 78 rpm depending on which speed has been selected re...

Page 6: ...PHONO output by using the PHONO LINE SWITCH 41 The DIGITAL OUTPUT JACK 42 allows you to connect the PDT 6000 turntable to a mixer recorder etc that accepts a digital signal SPECIFICATIONS TURNTABLE S...

Page 7: ...ei unvorschriftsm iger Spannung betrieben wird kann dadurch der Plattenteller besch digt werden 3 Nachdem Sie berpr ft haben dass das Verpackungsmaterial vollkommen entfernt worden ist setzen Sie den...

Page 8: ...ben ihn auf die TONARMAUFLAGE 10 und befestigen ihn mit der TONARM KLEMMSCHELLE 9 10 Nun haben Sie die Option den Strom auszuschalten indem Sie den LEISTUNGSSCHALTER 16 in die OFF Position schalten od...

Page 9: ...den Abstand verringern und das Drehen gegen den Uhrzeigersinn wird ihn verl ngern BREMS UND DREHMOMENT REGELUNG Die regulierbare BRAKE TASTE 38 erm glicht Ihnen die Geschwindigkeit zu variieren bei d...

Page 10: ...cionar el tocadiscos con un arreglo incorrecto del voltaje esto puede da arlo 3 Despu s de verificar si todos los materiales de empaque han sido eliminados ponga el PLATO 2 cuidadosamente en la espiga...

Page 11: ...er al colocar el INTERRUPTOR DE PODER 16 en la posici n APAGADO o de parar el PLATO 2 apretando el PULSADOR DE MARCHA PARADA 17 y activando el freno el ctrico INTERRUPCION DE LA REPRODUCCION 1 El hech...

Page 12: ...BOTON DEL FRENO 38 ajustable le permite variar la velocidad a la cual el PLATO 2 reduce su velocidad antes de parar Se puede ajustar el tiempo de la desaccelaraci n girando el BOTON DEL FRENO 38 en e...

Page 13: ...ayez de faire marcher le tourne disque avec un r glage de tension incorrecte vous risquer d endommager le tourne disque 3 Apr s avoir v rifi que tous les emballages ont t retir s placez le PLATEAU 2 g...

Page 14: ...roduction 2 Lorsque vous poussez ce LEVIER 19 sur la position BAS le BRAS DE LECTURE 6 descendra lentement et se mettra sur le disque l o la reproduction s tait arr t e DISQUES DE 45 TOURS 1 Pour repr...

Page 15: ...la tenir dans cette position Appuyez une nouvelle fois sur la touche pour la faire sortir de nouveau pour que vous puissiez la r gler La TOUCHE DE COUPLE 39 r glable vous permet de faire varier la vit...

Page 16: ...e and does not represent a commitment on the part of the vendor Gemini Sound Products Corp shall not be liable for any loss or damage whatsoever arising from the use of information or any error contai...

Reviews: