background image


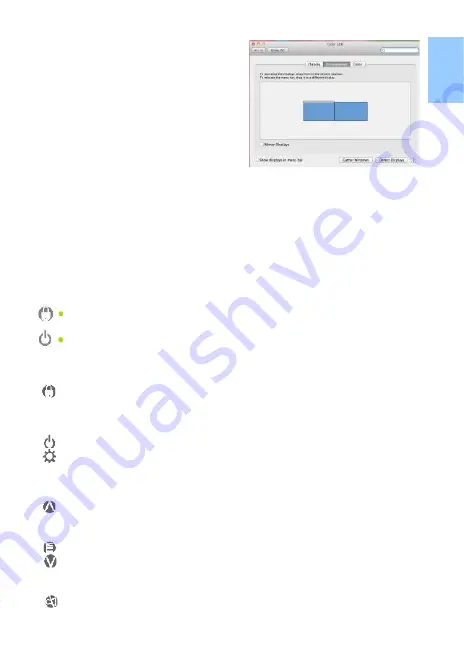
Select the arrangement mode to 
adjust the display position of the 
monitors; this is the dual monitor 

display mode (laptop’s moni-

tor)


Chapter 4 Hot Keys and OSD Instructions


Section 1 Hot Keys and LED Light Description


Caution: The buttons are capacitive  touch module. Please touch the buttons 
by the fingertip gently. Do not press the buttons with presure or continuously, 

which may cause them fail to response. “Increase/up” or “Decrease/down” 

continuously shall be done by touching the button and holding. Do not touch 

1.  LED Lights Description


The LED indicator light shows green light when turn on On-Lap Monitor and 
shows red light when stand by.  

Hot  Keys  Lock  Light:  After  press  the  Lock  Button,  all  the  buttons  are 
locked and the orange LED light is on. 
Power Light: When the On-Lap Monitor is turned on, the green LED light 
is  on.  When  the  Monitor  is  suspended,  the  Light  turns  red.  When  the 
Monitor is turned off, the LED light is off. 

2.  Hot Keys Description 

Hot Keys Lock Button

: Touch the Lock Button constantly for 3 seconds, 

and all the buttons are locked. Touch the Lock button again, and all the 
buttons are unlocked. While the On-Lap Monitor is held in the hands, the 
buttons can be locked and avoid to be touched by accident.  

Power: 

Touch the Power Button can power on/off the Monitor. 

Exit/Auto  Adjustment: 

In  the  OSD  panel,  touch  the  Exit  Button  to  exit 

and back to the previous page. When there is no OSD menu, touch this  
Button will activate automatic adjustment function (only pertains to  
analog VGA signal) 

Increase Volume/UP: 

Touch this Button to increase the volume of  

speakers.  If  the  OSD  menu  is  launched,  touch  this  button  will  move  up 

the list. Touch and hold for automatic continuous increase. 

Menu/Select: 

Touch the Menu Button to launch OSD panel. 

Decrease  Volume/Down: 

Touch  this  Button  to  decrease  the  volume  of 

speakers. If the OSD menu is launched, touch this button will move down 

the list. Touch and hold for automatic continuous decrease. 

Mute: 

Touch  the  Mute  Button  to  shut  down  the  speakers.  Touch  the 

Mute Button again can release the speakers’ output. 


Summary of Contents for On-Lap 2501 Series

Page 1: ...Manual of 2501 Series 2501 Read Me Before First Usage 2501...

Page 2: ...tion 1 Install the Protection Cover 4 Section 2 Install the Stand 4 4 Section 3 Connect Micro USB Power Cable 5 Section 4 Connect the Video Cables 5 Chapter 3 Power On and Off the On Lap Monitor 6 Sec...

Page 3: ...1 On Lap 15 On Lap 15 On Lap 16 17 17 17 17 17 2 17 17 4 18 Micro USB 18 19 3 On Lap 19 On Lap On Off 19 20 4 LED OSD 22 LED 22 OSD 23 25 5 25 25 25 26 27...

Page 4: ...1 Chapter 1 Content Description Section 1 On Lap Monitor and Accessories 1 Parts Description Fig On Lap 2501 Series input output ports Fig Front side Button Description...

Page 5: ...the image qual ity may be blurred due the low resolution images are expanded to the bigger screen This can be improved by downloading the high resolution images Videos displayed on On Lap 2501 not at...

Page 6: ...reference Section 5 Product Maintenance Do not attempt to repair the Product yourself Please send it to our professional maintenance personnel for service Should any of the following conditions occur...

Page 7: ...hen install the Cover insert the left latch of the Cover to the enclosure hole of On Lap Monitor first Then push the right latch of the Cover 5mm aside and insert the latch to the right enclosure hole...

Page 8: ...dditional HDMI A female adapter to mini HDMI male 2 Use VGA port to input The VGA Video Cable of On Lap 2501 optional accessory is required in this case Insert the small plug of VGA Video Cable to the...

Page 9: ...ndows 10 system Click on icon Click on Control Panel Appearance and Personalization Click on Display Connect to an external display Normally Display is the laptop s monitor Display is the external mon...

Page 10: ...dows desktop to this monitor and then select OK and exit Note Vertical mode cannot be directly chosen on Windows XP system the ad justment needs to be made via the video card Please refer to the user...

Page 11: ...f 2 Hot Keys Description Hot Keys Lock Button Touch the Lock Button constantly for 3 seconds and all the buttons are locked Touch the Lock button again and all the buttons are unlocked While the On La...

Page 12: ...fter Display Settings is launched can adjust Contrast Brightness and Sharpness 3 Color Setting As shown in Fig after Color Settings is launched can adjust Color Temp and Color Effect to adjust screen...

Page 13: ...etect 9 Information Display factory version Section 3 Low Power Protection Warning The maximum power consumption of the On Lap 2501 Series is 2 0 A If the volume setting is too high the power requirem...

Page 14: ...Section 2 Pin Assignment 1 HDMI Connector Pinout Pin Name Pin Name 1 TMDS Data2 11 TMDS Clock Shield 2 TMDS Data2 Shield 12 TMDS Clock 3 TMDS Data2 13 CEC 4 TMDS Data1 14 Reserved 5 TMDS Data1 Shield...

Page 15: ...s 1080P 60Hz 50Hz 1080i 30Hz 25Hz 720P 60Hz 50Hz 1080P 60Hz 50Hz 1080i 30Hz 25Hz 720P 60Hz 50Hz 576P 50Hz 576i 25Hz 480P 60Hz 480i 30Hz Speakers 1 0W Max x 2 1 0W Max x 2 Rating Voltage Current 5V 2A...

Page 16: ...adjust resolution clock horizontal position and vertical position via OSD No audio output Please check if the Mute Button was touched Touch the hot key up to increase the volume Hot Keys no response...

Page 17: ...14 GeChic Corporation 5F 3 No 138 Zhongming S Rd West Dist Taichung Taiwan R O C Customer Service service gechic com Rev 2017 1 16 w w w g e c h i c c o m...

Page 18: ...1 On Lap On Lap 1 On Lap 2501Series 15 On Lap LED...

Page 19: ...SB USB 1 AC 5V 2A 1 VGA Mini HDMI Micro HDMI 2 1m Micro HDMI 2 1m Micro USB USB 2 1m 4 1 set 1 1 On Lap 1 On Lap On Lap On Lap 1 On Lap 2 On Lap PC On Lap 3 On Lap On Lap PC On Lap 2 On Lap2501 Series...

Page 20: ...1 2 3 4 5 6 AC AC 1 2 3 4 2 1 17...

Page 21: ...2 5mm mm 5mm 1 2 4 4 On Lap 2501Series Micro USB 1 Micro USB Micro USB On Lap2501 DC PC USB 5V 2A 4 On Lap2501 Micro USB PC 5V 2A USB HDMI OSD 18...

Page 22: ...Micro HDMI Micro HDMI D On Lap2501 Micro HDMI HDMI A PC PC DVD HDMI HDMI HDMI A Micro HDMI HDMI A mini HDMI 2 VGA VGA On Lap2501 VGA D Sub PC D Sub VGA VGA 3 On Lap On Lap On Off 1 PC USB PC ON On La...

Page 23: ...Windows 7 Windows8 1 Windows 10 1 PC 2 On Lap S 2 HDMI 2 VGA R 1366x768 2501A SE 1920x1080 2501H O M OK Windows8 1 Web 2 Windows XP On Lap 1366x768 2501A SE 1920x1080 2501H Windows OK OK Windows XP 2...

Page 24: ...3 Mac OS X Mini Display Port HDMI Micro HDMI HDMI A HDMI A Mac On Lap 1366x768 2501A SE 1920x1080 2501H Mac 21...

Page 25: ...4 LED OSD LED Up Down 1 LED On Lap 2 5 5 On Lap OSD OSD OSD VGA Up OSD OSD OSD OSD Down OSD On Lap On Lap2501Series 22...

Page 26: ...OSD 1 OSD 2 3 Color Temp Color Effect Hue Saturation RGB 23...

Page 27: ...16 9 VGA Overscan HDMI Video 1080P 720P 576P 480P 5 VGA VGA H Position V Position Clock Phase 6 Audio 7 OSD OSD Menu OSD Timer OSD OSD H Pos OSD OSD V Pos OSD OSD Transparency OSD Language OSD Reset 8...

Page 28: ...2 11 TMDS Clock Shield 2 TMDS Data2 Shield 12 TMDS Clock 3 TMDS Data2 13 CEC 4 TMDS Data1 14 Reserved 5 TMDS Data1 Shield 15 SCL I C Serial Clock for DDC 6 TMDS Data1 16 SDA I C Serial Data Line for D...

Page 29: ...HD 16 9 LED 15 6 HD 16 9 LED 1920x1080 1366 x 768 U D R L 80 80 80 80 U D R L 20 45 45 45 400 1 400 1 17 5 ms 8 ms HDMI 1080P 60Hz 50Hz 1080i 30Hz 25Hz 720P 60Hz 50Hz 1080P 60Hz 50Hz 1080i 30Hz 25Hz 7...

Page 30: ...1 2 1 On Off USB 5V DC On Lap 2 HDMI VGA On Lap OSD OSD HDMI VGA On Lap VGA OSD 27...

Page 31: ...GeChic Corporation 5F 3 No 138 Zhongming S Rd West Dist Taichung Taiwan R O C Customer Service service gechic com Rev 2017 01 16 w w w g e c h i c c o m...

Page 32: ...1 http www gechic com http www tekwind co jp products GEC category php On Lap2501 No...

Reviews: