If the oil carry over of the screw compressor package
increases severely (oil recharging at unusually short
intervals), replacement may be necessary even ear-
lier.
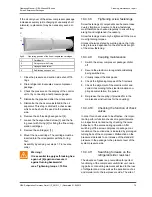
fig.48:
Operating position of the fine oil separation cartridges
1
Cartridge(s)
2
Fixing cover with O-ring
3
Hexagon-head screw
4
Self-locking hexagon nut
1. Close the pressure and suction side shut-off fit-
tings.
2. Drain refrigerant. Evacuate screw compressor
package.
3. Check the pressure on the display of the control
unit or by connecting a test pressure gauge.
4. Dismantle the pipe bend after the oil separator.
5. Dismantle the check valve installed in the oil
separator. This step is omitted if a check valve
which can be shut off is used on the pressure
side.
6. Remove the self-locking hexagon nut [4].
7. Loosen the hexagon-head screw [3] and the fix-
ing cover with O-ring [2] for fixing the fine oil sep-
aration cartridges.
8. Remove the cartridge(s) [1].
9. Mount the new cartridge. The cartridge must be
inserted into the oil separator with the O-ring
first.
Assembly by carrying out steps 1-7 in reverse
order.
Warning!
It is essential to apply self-locking hex-
agon nut [4] again and secure it
against turning backwards!
max. Tightening torque = 15 Nm
10.4.4.8
Tightening screw fastenings
Screw fastenings of components can become loose
due to vibration or movement. Screw fastenings
must therefore be checked regularly to ensure they
are tight and retightened if necessary.
Screw fastenings must only be tightened to the maxi-
mum tightening torques.
Unless otherwise stated by warning signs, the tight-
ening torque is dependent on the size and strength
of the screw fastening.
10.4.4.9
Coupling maintenance
1. Switch the screw compressor package/ chiller
off.
2. Secure the electric motor against accidentally
being switched on.
3. Visually inspect the disk packs.
4. Check the tightening torques of the fit screws.
5. Check the alignment of the electric motor and
correct it according to the steel lamination cou-
pling documentation, if required.
6. Re-grease the coupling (if provided for in the
maintenance instructions for the coupling).
10.4.4.10
Checking the function of check
valves
In order for a check valve to be effective, it is impor-
tant to perform function checks at regular intervals.
An inspection is carried out by checking the noise
behaviour of the valves during operation. After
switching off the screw compressor package, mal-
function on the suction side is indicated by prolonged
turning back of the compressor. Malfunction on the
pressure side leads to an increase of the standstill
pressure in the package to the pressure level of the
system pressure side.
10.4.4.11
Searching for leaks on the
refrigerant side / leak test
The absence of leaks is a precondition for perfect
functioning of the compressor unit/chiller unit. Leak-
ing parts or connecting elements will lead to the loss
of refrigerant and oil as well as the penetration of air
and moisture into the low pressure side. The site of
Operating Manual | GEA Grasso M-Series
Screw Compressor Packages
Cleaning, maintenance, repair
GEA Refrigeration Germany GmbH | P_261511_1 | Generated 01.04.2015
79
Summary of Contents for Grasso M-Series
Page 88: ......

