background image


GLOSSARY OF TERMS 


Abort Delay 

An option that allows a delay in reporting to the central station. 

Authority Level


The level of access an individual has when using an alarm panel. 

Central Station 

The location where alarm data is sent during an alarm report

Chime Feature 

An option that allows the keypad to sound a ding-dong whenever an entry/exit 

door is opened. 

Codes 

Can be either User Codes (relating to a person) or Function Codes (a toggle switch to 

turn specific functions on/off).  

NOTE: A system may have either four-digit codes 

or six-digit codes, but not a mixture of the two.


Duress Code 

An option that allows a special code to be sent to the central station that indicates 

the alarm system is being operated under duress. 

Forced Arming 

An option that allows the system to be turned on (ARMED) with one or more 

zones open. A system that is ready to be “force armed” will flash the entire 

message, “System Not Ready, For Help press 

º

”   

NOTE: Those zones that are not 

ready will not create an alarm.


Function Code 

A Function Code is either a four (4) or six (6) digit code that has been programmed 

by the installer to operate a device. 

Group Bypass 

An option that allows the user to bypass multiple zones with a single operation. 

Instant/Delay 

An option that allows an instant alarm condition for Entry/Exit doors, or grants a 

delay to allow someone to enter/exit the building without an alarm, or before 

entering a user code to disarm.


Master Code 

A master arm/disarm code that can program other user codes. 

Partitioned System 

A system divided into multiple areas in which its own user or users control each 

area. 

Perimeter 

The outer edge of the protected area. 

Quick Arm 

An option that allows you to turn on (ARM) the security system by double pressing 

either the 

[

AWAY

], 

[

STAY

], or 

[

NIGHT

] key on the keypad (for ARMING 

only) as programmed by the installing company. 

User Code 

A four (4) or six (6) digit entry code used to arm or disarm the system. 


NX-1248E User manual 

               Page 5 

 16/04/05


Summary of Contents for NetworX NX-1248E

Page 1: ...GE Security NetworX TM Series NX 1248E LCD keypad User manual ...

Page 2: ...CHANGING USER CODES 12 ASSIGNING USER CODE AUTHORITY LEVELS 13 OTHER KEYPAD FUNCTIONS 14 USER MENU 14 VIEW ZONE STATUS 15 SETTING THE KEYPAD TONE 15 VIEW ALARM MEMORY 15 PROGRAMMING PHONE NUMBERS OPTIONAL 15 TEST FUNCTION OPTIONAL 16 DISPLAY TEST 16 LIGHT CONTROL FOR X 10 DEVICES OPTIONAL 16 CHANGE LANGUAGES 17 DETECTOR RESET FUNCTION 17 READING THE EVENT LOG 17 ADJUSTING THE VIEW BRIGHTNESS OF TH...

Page 3: ...APPENDIX A EVENT LOG 25 APPENDIX B REFERENCE TABLES 26 NX 1248E User manual Page 3 16 04 05 ...

Page 4: ...l help you to easily operate your system Keep in mind the level of security you will obtain with this system relates specifically with two major factors 1 The quantity quality and placement of security devices attached to this system 2 The knowledge you have of the security system and how that knowledge is utilized in a weekly test of the complete system You should be aware of the following facts ...

Page 5: ...he entire message System Not Ready For Help press º NOTE Those zones that are not ready will not create an alarm Function Code A Function Code is either a four 4 or six 6 digit code that has been programmed by the installer to operate a device Group Bypass An option that allows the user to bypass multiple zones with a single operation Instant Delay An option that allows an instant alarm condition ...

Page 6: ... is armed The stay light is illuminated when all interior zones are bypassed The STAY lighted key is off when it is disarmed The STAY lighted key will flash when there has been an alarm during the previous arm cycle or NIGHT Lighted key The NIGHT lighted key is on when the system is armed The NIGHT lighted key is off when it is disarmed The NIGHT lighted key will flash when there has been an alarm...

Page 7: ...larm when pressed for two seconds If your system is connected to a monitoring center an emergency report could be sent to that center Auxiliary Emergency Key This key can activate the auxiliary alarm when pressed for two seconds If your system is connected to a monitoring center an emergency report could be sent to that center Police Panic Hold Up Key This key can sound a local audible alarm when ...

Page 8: ...ave AC power Restore power if possible If not contact the installing company System Ready Type Code to Arm System Not Ready For help press System Armed All Zones Secure Step 2 Enter your 4 or 6 digit user code to arm the system The AWAY key will illuminate steady The STAY and NIGHT keys will flash during the exit delay You may now leave the building IMPORTANT The keypad tones will accelerate durin...

Page 9: ...no longer have an entry delay If Auto Instant is enabled omit Step 4 Step 3 Press the STAY key The STAY key will illuminate indicating that all interior zones are bypassed All interior devices will bypass automatically giving the user freedom of movement within the interior area The BYPASS key will illuminate if any zone s are bypassed If any zone s have been bypassed previously by the user the li...

Page 10: ...arm Enter a valid user code The currently armed key AWAY STAY or NIGHT will go off and the tone will stop The security system is now DISARMED If a valid code is not entered before the end of the entry delay an alarm will occur NOTE If the AWAY STAY or NIGHT keys are all flashing during the entry delay the alarm system has been activated in your absence Leave the building immediately and call your ...

Page 11: ...s to exit this viewing mode Procedure 2 If you do not know the number of the zone you wish to bypass use the following steps Step 1 Press r The description for zone 1 will be displayed Step 2 Use the scroll keys to browse through the custom descriptions for the zones in this system Step 3 To bypass or unbypass a specific zone press the BYPASS key while that zone is displayed Step 4 When finished p...

Page 12: ...ccess to all or more partitions than the user being changed Step 3 Enter the 2 digit applies to NX4 6 8 or 3 digit applies to NX8E user number always enter 2 digit such as 0 3 for user 3 or 1 0 0 for user 100 The LCD keypad will display the current code for this user Stars r represent blanks Note To delete a user code press four times for a 4 digit code or six times for a 6 digit code the r key St...

Page 13: ... These are for use by a professional installer only Master code Sched arm only Arm only Reserved 0 No 1 Yes Your keypress will apply to the user code you entered in Step 3 Output 4 Output 3 Output 2 Output 1 If these messages appear on the LCD screen press the r key until you return to the prompt for the user code or until you exit this adjust mode Step 5 NOTE The LCD will now display all of the p...

Page 14: ...eady know the option ex Log Review 90 you can immediately select the wanted option by pressing the r 9 0 keys By doing this you don t have to browse through the user s menu The following list of menu selections will scroll automatically NOTE Some of the functions are not listed because they are installer level functions Each time the r key is pressed the next menu item will be displayed To exit th...

Page 15: ...se tone Lower tone 1 Alarm Memory ZONE 1 Tone mode View alarm memory Step 1 Press the r followed by the 3 key to display the zone s on the keypad that created the last alarm Step 2 The LCD Screen will display the zone description for those zones Step 3 Press to exit the alarm memory Programming phone numbers optional If private reporting voice or siren tone is enabled up to 3 phone numbers can be ...

Page 16: ...ill be sent Display test The keyboard also provides a testfuntion by the means of which the LCD display and all LED s are tested Step 1 Press r 4 5 The test will be performed and all of the LCD pixels and LED indicators will flash Step 2 Press the key to leave the display test Light control for X 10 Devices optional This menu allows you to control up to ten X 10 devices from each keypad Step 1 Pre...

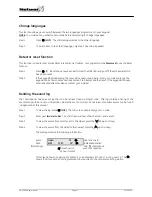
Page 17: ...t your installer Reading the event log The control panel has an event log that can be retrieved using a master code This log contains a listing of the events along with date time and partition where the event occurred An overview of possible events can be found in Appendix A of this manual Step 1 To view the log press r 9 0 The LCD screen will prompt you for a code Step 2 Enter your master code Th...

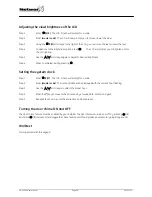
Page 18: ... Setting the system clock Step 1 Enter r 9 7 The LCD Screen will prompt for a code Step 2 Enter master code The time and date will be displayed with the current hour flashing Step 3 Use the scroll keys to select the proper hour Step 4 Enter the key to move to the minutes day of week date month and year Step 5 Repeat Steps 3 and 4 until the entire time and date are set Turning the door chime ON and...

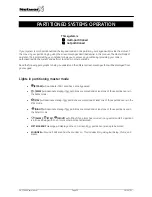
Page 19: ...n partitioning master mode BYPASS will illuminate if ANY area has a zone bypassed AWAY will illuminate steady if ALL partitions are armed and at least one of those partitions are in the AWAY mode STAY will illuminate steady if ALL partitions are armed and at least one of those partitions are in the STAY mode NIGHT will illuminate steady if ALL partitions are armed and at least one of those partiti...

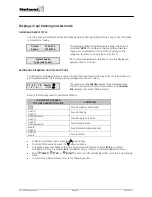
Page 20: ... to which this code has access The numbers on the bottom line represent the areas that are armed Refer to the following table for possible conditions Armed 1234 678 Ready 12345678 System Ready Type code to arm 1 2 4 5 7 8 Disarm 3 6 Arm LCD DISPLAY FOR AREA TOP LINE OVER BOTTOM LINE CONDITION Blank Blank Area Not used or Authorized Dash Dash Area Not Ready Flashing Area Dash Area Ready to Force Ar...

Page 21: ...l affect this individual partition only The lights and display represent the status of that partition only The word System will be replaced with the word Area The following is an example of this feature To exit this screen press 1 2 4 7 8 Disarm 3 5 6 Arm Area 5 Ready Type code to arm Area 5 is selected and Area 5 is ready to arm To exit the individual partition mode enter SILENCING ALARMS IN THE ...

Page 22: ...delay Beeps to indicate telephone line fault if selected Beeps during an exit delay beeps rapidly for the last 10 seconds of an exit delay if selected Pulses when one or more of the following conditions are detected Zone or Box Tamper Low Battery AC Power Fail or Expander trouble Beeps 3 times every minute indicating a low battery or missing transmitter is detected if wireless device is in system ...

Page 23: ...xpansion Aux comm fail Expansion Power trouble Expansion Low Battery A short circuit of a control s power supply has occurred Open circuit has occurred on the bell or siren circuit The Box Tamper circuit has activated The phone line connected to the control is not operating properly The control attempted to communicate a message to the Central Station but was unsuccessful A short to ground has bee...

Page 24: ...l Open circuit has occurred on the bell or siren circuit of the expander A radio receiver is being jammed Not applicable to all controls A zone is tampered Press r to identify the tampered zone A wireless device has a low battery Press r to identify the zone A wireless or multiplexed zone device is not reporting to the control Press r to identify the zone A zone is experiencing some form of troubl...

Page 25: ...ec Close Recent Close An alarm occurred within 5 minutes after the control was armed Autotest Auto Test Sending a communicator test at a specified interval Start Prog Start Programming Local programming is started End Prog End Programming Local programming is ended Start Dnld Start Download Download session is started End Dnld End Download Download session is ended Cancel Cancel System is disarmed...

Page 26: ...eep these tables in a safe place Installing Service Company ______________________________ Address ______________________________ ______________________________ Telephone number ______________________________ Name central station ______________________________ Telephone number central station ______________________________ Function codes programmed Function code Controls function action Entry exit...

Page 27: ...Zone 94 Zone 13 Zone 54 Zone 95 Zone 14 Zone 55 Zone 96 Zone 15 Zone 56 Zone 97 Zone 16 Zone 57 Zone 98 Zone 17 Zone 58 Zone 99 Zone 18 Zone 59 Zone 100 Zone 19 Zone 60 Zone 101 Zone 20 Zone 61 Zone 102 Zone 21 Zone 62 Zone 103 Zone 22 Zone 63 Zone 104 Zone 23 Zone 64 Zone 105 Zone 24 Zone 65 Zone 106 Zone 25 Zone 66 Zone 107 Zone 26 Zone 67 Zone 108 Zone 27 Zone 68 Zone 109 Zone 28 Zone 69 Zone 1...

Page 28: ...Zone 132 Zone 155 Zone 178 Zone 133 Zone 156 Zone 179 Zone 134 Zone 157 Zone 180 Zone 135 Zone 158 Zone 181 Zone 136 Zone 159 Zone 182 Zone 137 Zone 160 Zone 183 Zone 138 Zone 161 Zone 184 Zone 139 Zone 162 Zone 185 Zone 140 Zone 163 Zone 186 Zone 141 Zone 164 Zone 187 Zone 142 Zone 165 Zone 188 Zone 143 Zone 166 Zone 189 Zone 144 Zone 167 Zone 190 Zone 145 Zone 168 Zone 191 Zone 146 Zone 169 Zone...

Page 29: ...sion of GE Security EMEA bvba COPYRIGHT 2005 GE Security EMEA bvba All rights reserved GE Security EMEA bvba grants the right to reprint this manual for internal use only GE Security EMEA bvba reserves the right to change information without notice ...

Reviews: