background image

NOTE: 

The battery will not charge when outside the approved 

charging temperature range (

Specifications

, page 14

).

1

Turn off the camera.
Most power sources do not provide enough power to charge 

the camera while it is on.

2

Plug the small end of the USB cable into the USB port 

À

 on 

the camera.

3

Plug the large end of the USB cable into an AC adapter or a 

computer USB port.
When you connect the device to a power source, the top 

status LED turns solid red.

NOTE: 

The battery may charge slowly when using a 

computer USB port. Some portable computers may not 

provide enough power to charge the battery.

4

Charge the camera completely.
When the camera is fully charged, the status LED turns off.

Turning On the Camera

Hold 

POWER

.

The status LEDs flash green when the camera is on.

Turning Off the Camera

NOTICE

To prevent loss of data, always turn off the camera before 

removing the battery.

NOTE: 

You cannot turn off the camera while recording video.

1

If necessary, move the recording switch backward to stop 

recording video.

2

Hold 

POWER

.

The camera saves your data and turns off.
If you need to remove the battery, wait until the screen and 

status LEDs turn off before removing the battery.

Turning the Camera On and Off Using the Recording 

Switch

You can use the recording switch to turn the camera on and 

immediately start recording video. If you turn the camera on 

using the recording switch, it turns off automatically when you 

stop the recording using the recording switch. This feature 

allows you to start and stop recording quickly, while 

automatically turning off the camera to conserve battery power 

when you are not recording.

NOTE: 

The camera does not turn off using the recording switch 

unless you use the recording switch to turn it on.

1

With the device turned off, move the recording switch 

forward.
The device turns on and starts recording video.

2

When you are finished recording, move the recording switch 

backward.
The device stops recording and turns off.
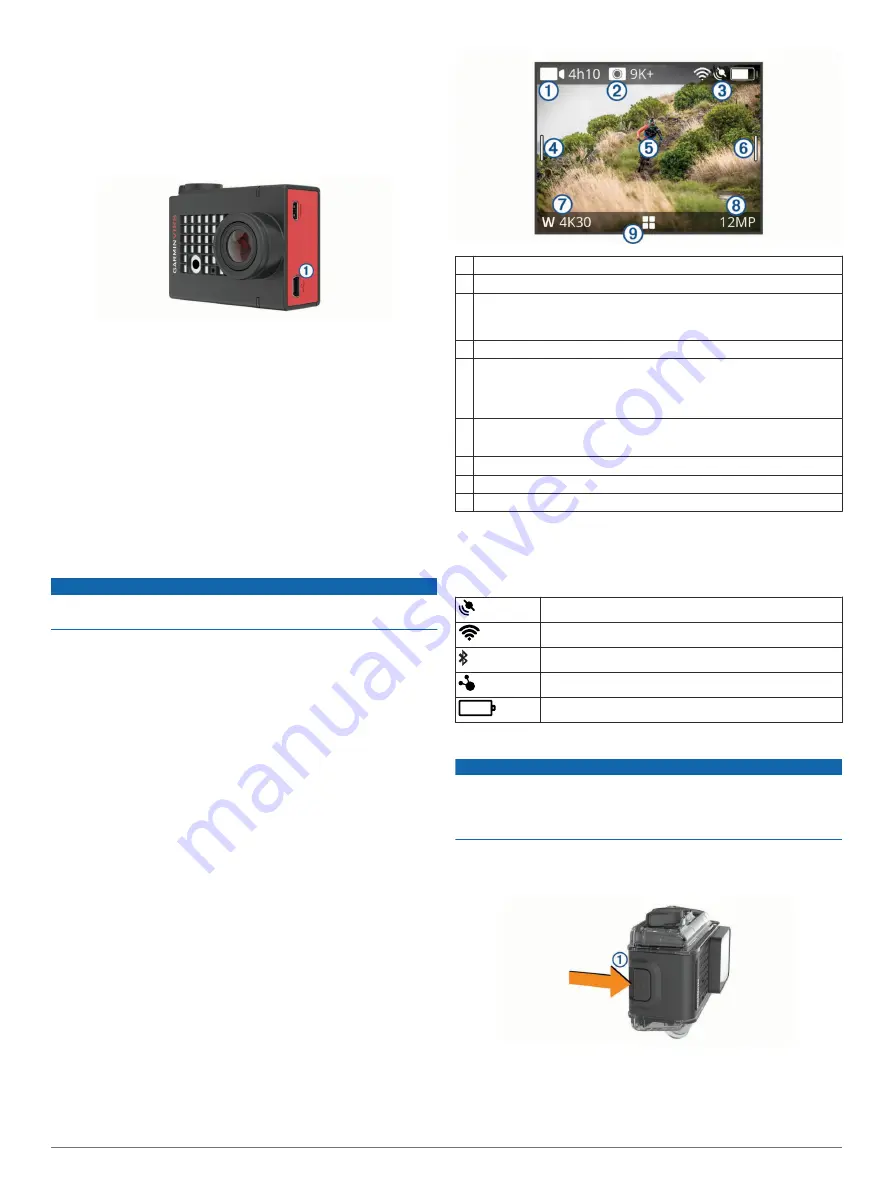
Viewfinder Overview

The viewfinder provides at-a-glance details about the remaining 

memory card space and current settings of your device.

À

Displays the remaining memory card space for video recording.

Á

Displays the remaining memory card space for photos.

Â

Displays the status for sensors, GPS, Wi

Fi, Bluetooth

®

, and battery 

capacity.
Swipe down to pair sensors and enable or disable wireless features.

Ã

Swipe right to change the photo and video modes.

Ä

While using the preview viewfinder mode, touch the background to 
zoom.
While using a G-Metrix

 viewfinder mode, touch the background to 

change the viewfinder settings.

Å

Swipe left to change the pro settings (

Pro Settings

, page 5

).

NOTE: 

This menu is available only when pro settings are enabled.

Æ

Displays the active video mode.

Ç

Displays the active photo mode.

È

Select to open the main menu.

Status Bar Icons

Status icons appear at the top of the viewfinder. A flashing icon 

means the device is searching for a signal. A solid icon means 

the signal was found or the sensor is connected.

GPS status

Wi

Fi technology status

Bluetooth technology status

ANT+

®

 sensor status

Battery level

Opening the Camera Case

NOTICE

The camera is not water resistant when it is not installed in a 

water resistant case. Not all VIRB ULTRA cases or case doors 

provide water resistance. Do not immerse or expose the camera 

or battery to water or other liquids.
You must open the camera case to remove the camera or install 

the anti-fog desiccant pack.

1

Press the latch release 

À

.

2

While pressing the release latch, pull open the front of the 

latch 

Á

.

2

Introduction

Summary of Contents for VIRB Ultra 30

Page 1: ...VIRB ULTRA 30 Owner s Manual August 2016 190 02069 00_0A...

Page 2: ...USA and other countries G Metrix is a trademark of Garmin Ltd or its subsidiaries These trademarks may not be used without the express permission of Garmin The Bluetooth word mark and logos are owned...

Page 3: ...eo on Another Device 10 External Displays 10 Connecting to an HDMI Display 10 Connecting to a Composite Video Display 10 G Metrix 10 G Metrix Data 10 Remote Operation and Garmin VIRB Mobile App 10 Ope...

Page 4: ......

Page 5: ...SB mass storage mode Off Off while not connected to external power The camera is turned off LED Color LED Action Status Off Off while connected to external power The camera is turned off and the batte...

Page 6: ...the recording switch unless you use the recording switch to turn it on 1 With the device turned off move the recording switch forward The device turns on and starts recording video 2 When you are fini...

Page 7: ...se door completely 2 Pull the camera case door away from the camera The door releases from the quick release hinge 3 Align the other camera case door with the quick release hinge and press it toward t...

Page 8: ...ds and commands in English NOTE The voice control feature is available only in English You can use this feature while the interface is set to a different language but you must speak the commands in En...

Page 9: ...tical area in a 4 3 aspect ratio For example a 2 7K video in tall expansive mode records 2028 pixels vertically instead of the standard 1524 pixels This mode is useful when wearing a chest mount or re...

Page 10: ...40 4 3 30 25 Wide Varies 1080p 1920 1080 16 9 30 25 Wide Zoom 1 5x Ultra Zoom 2x Varies 1080p Expansive 1920 1080 16 9 30 25 Wide Varies Expansive Tall 2 7K 2704 2028 4 3 30 24 25 Wide 1x 1440p 1920 1...

Page 11: ...n low light Bracket EV Step Sets the amount of variation above and below the standard exposure value for bracketed photos A larger value creates more variation in the brightness of bracketed photos Ph...

Page 12: ...Mode Time lapse 2 Select Type Extended 3 Select Start Time and select the time of day when the camera should start taking time lapse photos If you select Now the camera starts taking pictures immediat...

Page 13: ...t steps 2 and 3 for all the presets you want to copy 5 Turn off the camera and remove the memory card 6 Install the memory card in a second VIRB ULTRA camera 7 Turn on the second camera 8 On the secon...

Page 14: ...rix data onto your video using gauges graphs and more You can play and share your edited videos to show your speed acceleration heart rate and other sensor data in real time G Metrix Data Your camera...

Page 15: ...rk the network must be set up to allow connected devices to see and communicate with each other You can connect your camera to an existing 2 4 GHz Wi Fi network This could be a home network a business...

Page 16: ...ompatibility and purchasing optional sensors go to http buy garmin com Pairing ANT Sensors When you pair a compatible ANT sensor with your device the sensor data is recorded as G Metrix data 1 Put on...

Page 17: ...nabled Reset Restores the default settings You can use the Settings option to clear all user data or the Factory Reset option to restore all settings to the factory default values Format Card Erases a...

Page 18: ...ompromise the waterproof seal Support and Updates Garmin Express garmin com express provides easy access to these services for Garmin devices Product registration Product manuals Software updates Data...

Page 19: ...t read data quickly enough to play high resolution video directly from the memory card Use the VIRB Edit application to play and edit video Go to garmin com VIRBEdit to download the VIRB Edit applicat...

Page 20: ...nnecting 6 12 microSD card See memory card mounting the device 4 mounts optional 4 P photos 7 9 night 8 settings 7 9 taking 7 time lapse 7 8 Travelapse 8 viewing 9 power force 10 power key 2 presets 9...

Page 21: ......

Page 22: ...5 69 33 99 39 02 36 699699 52 001 855 792 7671 0800 427 652 0800 0233937 47 815 69 555 00800 4412 454 44 2380 662 915 35 1214 447 460 386 4 27 92 500 0861 GARMIN 427 646 27 0 11 251 9800 34 93 275 44...

Reviews: