background image

3

Unhook the back of the latch 

Â

.

4

Open the camera case door 

Ã

.

Camera Case

NOTICE

You must perform proper care and maintenance for the camera 

case (

Caring for the Removable Camera Case

, page 14

)

Failure to perform proper care and maintenance may cause 

damage to the removable camera case or gasket and allow 

water to leak into the case during use. Exposing the camera to 

water will cause permanent damage to the camera and battery, 

which may present a risk of fire, chemical burn, electrolyte leak, 

and/or injury.
The included camera case provides rugged protection for your 

camera, and it provides water protection when used with the 

watersports camera case door.
Two camera case doors are included in the package.

The watersports door 

À

 is installed on your camera case by 

default. The altimeter door 

Á

 is included in the box. You can 

quickly change the camera case door based on your activity.
While the watersports door is installed, the case is water-

resistant up to 40 m and is suitable for many water activities, 

including swimming, snorkeling, and high-speed watersports. 

The altimeter sensor does not function while the watersports 

door is installed.
While the altimeter door is installed, your device records more 

accurate elevation and grade data, and additional G-Metrix data, 

including jump height and vertical speed. The altimeter door 

provides an IEC 60529 IPX7 water rating suitable for rain and 

light splashes. The altimeter door is not suitable for watersports, 

immersion, or other exposure to water or other liquids.
Go to 

garmin.com/waterrating

 for more information about water 

ratings and suitable water activities.

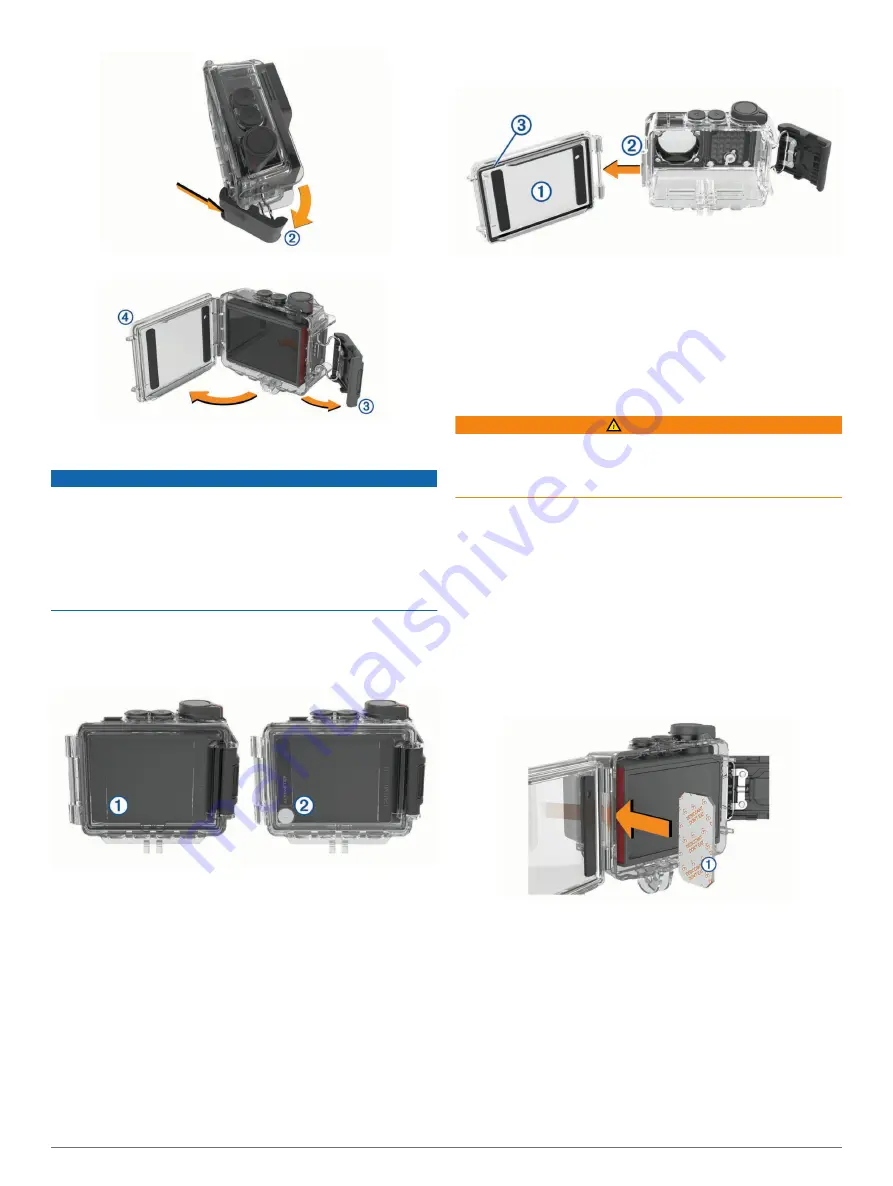
Changing the Camera Case Door

1

Open the camera case door 

À

 completely.

2

Pull the camera case door away from the camera.
The door releases from the quick-release hinge 

Á

.

3

Align the other camera case door with the quick-release 

hinge, and press it toward the camera until it snaps into 

place.

4

Verify the gasket 

Â

 is fully seated in the groove.

5

Close and latch the camera case door.

Installing an Anti-Fog Desiccant Pack

 WARNING

Do not eat desiccant packs. Desiccant packs contain silica, 

which may cause irritation in your digestive system. Desiccant 

packs are harmful if swallowed by an infant or pet and pose a 

choking hazard.
For the best clarity and image quality, you should install an anti-

fog desiccant pack to reduce fogging inside the camera case or 

on the camera lens. A desiccant pack kit is included in the 

product box. Go to 

www.garmin.com/VIRB

 to purchase 

additional desiccant packs.

NOTE: 

When using the camera case in water or in humid 

environments, it is normal for some fog to form inside the case, 

especially after the camera has been in use for an extended 

time. In very cold or humid environments, some fog may appear 

even while the desiccant pack is installed.

1

Open the camera case.

2

Insert the desiccant pack 

À

 between the camera and the 

case.

3

Close and latch the camera case.

Anti-fog Desiccant Pack Storage and Maintenance

• To preserve the effectiveness of the desiccant packs, you 

should seal them in the included foil bag when they are not in 

use. You should store the included humidity indicator card in 

the bag with the desiccant packs.

• If the dots on the humidity indicator card turn green while 

stored with the desiccant packs, the desiccant packs are 

saturated. When saturated, the desiccant packs lose their 

effectiveness, and you should dry them before using them 

again.

• If the desiccant packs become saturated, you can heat them 

at 85°C (185°F) for 60 minutes to dry them for reuse.

Introduction

3

Summary of Contents for VIRB Ultra 30

Page 1: ...VIRB ULTRA 30 Owner s Manual August 2016 190 02069 00_0A...

Page 2: ...USA and other countries G Metrix is a trademark of Garmin Ltd or its subsidiaries These trademarks may not be used without the express permission of Garmin The Bluetooth word mark and logos are owned...

Page 3: ...eo on Another Device 10 External Displays 10 Connecting to an HDMI Display 10 Connecting to a Composite Video Display 10 G Metrix 10 G Metrix Data 10 Remote Operation and Garmin VIRB Mobile App 10 Ope...

Page 4: ......

Page 5: ...SB mass storage mode Off Off while not connected to external power The camera is turned off LED Color LED Action Status Off Off while connected to external power The camera is turned off and the batte...

Page 6: ...the recording switch unless you use the recording switch to turn it on 1 With the device turned off move the recording switch forward The device turns on and starts recording video 2 When you are fini...

Page 7: ...se door completely 2 Pull the camera case door away from the camera The door releases from the quick release hinge 3 Align the other camera case door with the quick release hinge and press it toward t...

Page 8: ...ds and commands in English NOTE The voice control feature is available only in English You can use this feature while the interface is set to a different language but you must speak the commands in En...

Page 9: ...tical area in a 4 3 aspect ratio For example a 2 7K video in tall expansive mode records 2028 pixels vertically instead of the standard 1524 pixels This mode is useful when wearing a chest mount or re...

Page 10: ...40 4 3 30 25 Wide Varies 1080p 1920 1080 16 9 30 25 Wide Zoom 1 5x Ultra Zoom 2x Varies 1080p Expansive 1920 1080 16 9 30 25 Wide Varies Expansive Tall 2 7K 2704 2028 4 3 30 24 25 Wide 1x 1440p 1920 1...

Page 11: ...n low light Bracket EV Step Sets the amount of variation above and below the standard exposure value for bracketed photos A larger value creates more variation in the brightness of bracketed photos Ph...

Page 12: ...Mode Time lapse 2 Select Type Extended 3 Select Start Time and select the time of day when the camera should start taking time lapse photos If you select Now the camera starts taking pictures immediat...

Page 13: ...t steps 2 and 3 for all the presets you want to copy 5 Turn off the camera and remove the memory card 6 Install the memory card in a second VIRB ULTRA camera 7 Turn on the second camera 8 On the secon...

Page 14: ...rix data onto your video using gauges graphs and more You can play and share your edited videos to show your speed acceleration heart rate and other sensor data in real time G Metrix Data Your camera...

Page 15: ...rk the network must be set up to allow connected devices to see and communicate with each other You can connect your camera to an existing 2 4 GHz Wi Fi network This could be a home network a business...

Page 16: ...ompatibility and purchasing optional sensors go to http buy garmin com Pairing ANT Sensors When you pair a compatible ANT sensor with your device the sensor data is recorded as G Metrix data 1 Put on...

Page 17: ...nabled Reset Restores the default settings You can use the Settings option to clear all user data or the Factory Reset option to restore all settings to the factory default values Format Card Erases a...

Page 18: ...ompromise the waterproof seal Support and Updates Garmin Express garmin com express provides easy access to these services for Garmin devices Product registration Product manuals Software updates Data...

Page 19: ...t read data quickly enough to play high resolution video directly from the memory card Use the VIRB Edit application to play and edit video Go to garmin com VIRBEdit to download the VIRB Edit applicat...

Page 20: ...nnecting 6 12 microSD card See memory card mounting the device 4 mounts optional 4 P photos 7 9 night 8 settings 7 9 taking 7 time lapse 7 8 Travelapse 8 viewing 9 power force 10 power key 2 presets 9...

Page 21: ......

Page 22: ...5 69 33 99 39 02 36 699699 52 001 855 792 7671 0800 427 652 0800 0233937 47 815 69 555 00800 4412 454 44 2380 662 915 35 1214 447 460 386 4 27 92 500 0861 GARMIN 427 646 27 0 11 251 9800 34 93 275 44...

Reviews: