


most daytime time-lapse photos or videos, and for when you
want to start and stop time-lapse recording manually.
Extended
: Extended time-lapse mode takes series of photos at
a longer time interval, with an optional automatic start time
and duration. While using extended time-lapse mode, the
camera goes into low power mode between shots to extend
the battery life. This mode is useful when you want to capture
time-lapse photos over an extended time period, or when you
cannot attend the camera to start and stop time-lapse
recording manually.
NOTE:
This mode is available for photos only.
Night
: Night time-lapse mode takes a series of extended-
exposure photos at a set time interval. This mode is useful for
capturing time-lapse photos in low light conditions, or for
capturing a series of extended-exposure photos at a fixed
location.
NOTE:
This mode is available for photos only.
Travelapse
: Travelapse mode takes a series of photos or video
frames at a set distance interval, in kilometers or miles. This
mode is useful for capturing a series of photos during a long
road trip.
Recording a Time-Lapse Video
Time-lapse mode captures individual video frames at longer
intervals and creates a video that plays much faster than real
time. You can use time-lapse mode to record movements,
changes, or events that take place over a long period of time.
Time-lapse videos play at 30 frames per second. The length of
the video depends on the amount of time between video
frames. For example, if frames are recorded at a one-second
interval, each second of video covers 30 seconds of real time. If
frames are recorded at a 60-second interval, each second of
video covers 30 minutes of real time.
1
From the main menu, select
Video
>
Mode
>
Time-lapse
.
2
Select
Interval
, and select a time interval between video
frames.
3
For the best results, mount the device so it does not move
while recording.
4
Record a video.
Taking Time-Lapse Photos
1
From the main menu, select
Photo
>
Mode
>
Time-lapse
.
2
Select
Type
>
Standard
.
3
Select
Interval
, and select a time interval between photos.
4
From the viewfinder, select the photo key.
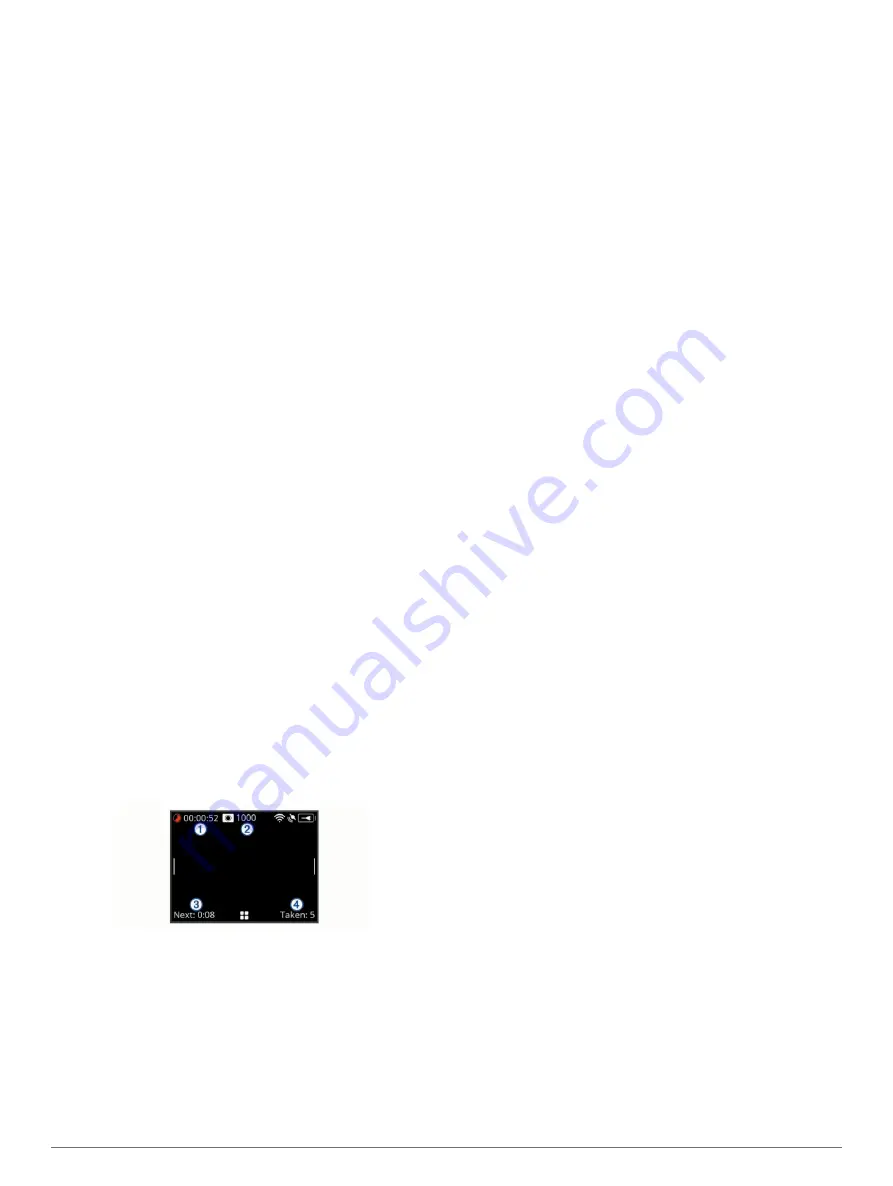
The camera takes a series of photos at the selected interval.
The screen displays the elapsed time
À
, the remaining
number of photos the camera can take
Á
, the time in
seconds until the next photo is taken
Â
, and the number of
photos the camera has taken in this time-lapse session
Ã
.
5
Select the photo key to stop taking photos.
Taking Extended Time-Lapse Photos
1
From the main menu, select
Photo
>
Mode
>
Time-lapse
.
2
Select
Type
>
Extended
.
3
Select
Start Time
, and select the time of day when the
camera should start taking time-lapse photos.
If you select Now, the camera starts taking pictures
immediately after you select the photo key.
4
Select
Interval
, and select a time interval between photos.
5
Select
Duration
, and select the amount of time for which the
camera should continue taking photos.
If you select Continuous, the camera continues taking photos
until you stop it manually.
6
Aim the camera at the subject of the time-lapse photos.
7
From the viewfinder, select the photo key.
At the start time, the device takes a series of photos at the
selected interval. The camera stops taking photos
automatically after the selected duration has elapsed.
NOTE:
The camera appears to be off while taking extended
time-lapse photos. The screen, LED, and other features are
disabled to save power, but the camera continues to take
photos.
8
To manually stop taking photos, hold
POWER
to turn on the
camera, and select the photo key.
Taking Time-Lapse Photos at Night
When taking time-lapse photos at night, you should attach the
camera to a stable mount and allow time to test your photo
settings.
1
From the main menu, select
Photo
>
Mode
>
Time-lapse
.
2
Select
Type
>
Night
.
3
Select
Interval
, and select a time interval between photos.
4
Select
Exposure Time
, and select an exposure time for each
photo.
You should select a longer exposure time for darker lighting
conditions, or if you want to capture motion blur in your
image.
5
Select
ISO Limit
, and select an option appropriate for the
lighting conditions.
6
Attach the camera to a stable mount, or set the camera on a
stable surface.
Preventing the camera from moving helps to reduce blurring
in photos with longer exposure times.
7
From the home screen, select the photo key.
The device takes a series of photos at the selected interval
and exposure time.
8
Check the first several photos to verify the photo settings are
correct for the lighting conditions (optional).
9
Select the photo key to stop taking photos.
Capturing a Road Trip Using the Travelapse
Feature
The Travelapse feature takes photos or video frames at a set
distance interval. For example, you can capture one photo or
video frame for every kilometer or mile you travel on a road trip.
This allows you to share a short video or photo series of the
places you traveled.
1
Use an appropriate mount accessory, such as the VIRB Auto
Dash Mount or the VIRB Handlebar Mount, to mount the
camera in your vehicle.
Go to
to purchase mount
accessories.
2
From the main menu, select
Photo
or
Video
.
3
Select
Mode
>
Time-lapse
.
4
Select
Type
>
Travelapse
.
8
Time-Lapse Photos and Video
Summary of Contents for VIRB Ultra 30
Page 1: ...VIRB ULTRA 30 Owner s Manual August 2016 190 02069 00_0A...
Page 4: ......
Page 21: ......


