Attaching the Device to the Mount
NOTICE
To prevent product loss or damage, do not use the adhesive
mounting base when the temperature is below -15°C (5°F).
The permanent mounting adhesive is extremely difficult to
remove after it is installed.
Before you can install the adhesive mounting base onto a
surface, the ambient temperature must be from 21° to 38°C
(from 70° to 100°F).
Your device includes an assortment of mounting bases and
arms, which can be used in many configurations. These
instructions provide an example of one possible configuration.
You can also purchase additional mounts for your device, such
as wearable mounts, vehicle mounts, or a tripod mount. Go to
1
Thoroughly clean and dry the mounting surface using water
or alcohol.
The mounting surface must be free of dirt, debris, wax, or
coatings.
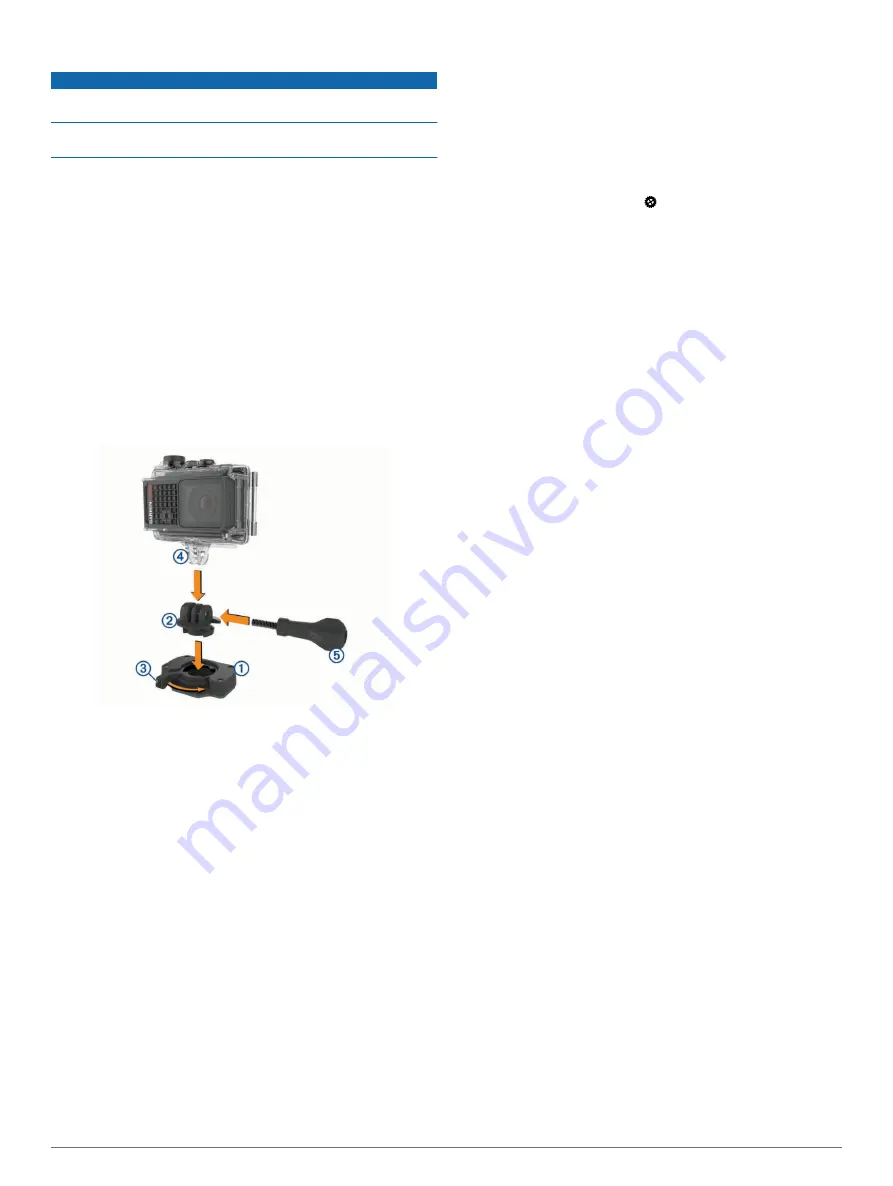
2
Remove the film from the adhesive mounting base
À
, and
press the base firmly onto the mounting surface.
You can use either the flat base or the curved base,
depending on the contour of the mounting surface.
3
Allow the base to bond to the mounting surface for at least 24
hours.
TIP:
For the best results, you can place a large book or other
heavy object on the mounting base during the 24-hour
bonding period. This applies pressure to the adhesive and
can help improve the strength of the bond.
4
Insert the adapter
Á
into the base.
The lever
Â
must be in the open position.
5
Snap the lever to the closed position to lock the adapter into
the base.
The lever must be flush with the base.
6
Insert the camera mount
Ã
into the top of the adapter.
The device should be horizontal for the proper aspect ratio
when recording video.
7
Insert a thumbscrew
Ä
into the larger opening of the joint,
and tighten the thumbscrew to lock the angle of the joint.
NOTE:
The metal fitting indicates the smaller opening of the
joint.
8
If necessary, insert the included hex wrench into the end of
the thumbscrew to adjust the tightness of the joint.
Voice Control
The voice control feature allows you to control your camera by
saying words and commands in English.
NOTE:
The voice control feature is available only in English.
You can use this feature while the interface is set to a different
language, but you must speak the commands in English.
Turning Voice Control On or Off
From the main menu, select >
Voice Control
.
Controlling the Camera Using Voice
Commands
1
Say
OK, Garmin
to activate the voice control feature.
The camera plays a tone and starts listening for a command.
2
Say a command:
• To take a photo, say
Take a Photo
or
Take a Picture
.
• To start recording video, say
Start Recording
.
• To stop recording video, say
Stop Recording
.
NOTE:
You can stop recording using a voice command
only if you started recording using a voice command.
• To place a bookmark in the video while you are recording,
say
Remember That
.
This option allows you to mark key moments in the video
as they occur so that you can find them easily while
editing the video.
The camera plays a tone when it recognizes your command.
Voice Control Tips
• Speak in a normal voice directed at the device.
• Reduce background noise to increase the accuracy of the
voice recognition.
• Before each command, say
OK, Garmin
.
• Listen for a tone to confirm that the camera successfully
recognized a command.
• Watch the status LEDs to confirm the camera recognized the
command.
The LEDs flash green twice to indicate the camera
recognized the command. The LEDs flash red twice to
indicate the command was not recognized.
Video
Recording a Video
NOTE:
If the battery power becomes very low while recording
video, the device automatically stops recording, saves the video,
and safely turns off. The status LEDs flash rapidly when the
battery charge level is low.
1
Move the recording switch forward to start recording video.
NOTE:
For the best audio quality, do not touch or cover the
microphone area, except with an approved case.
If the device is off, it turns on automatically. The device starts
recording video immediately, and the red light turns on.
2
Move the recording switch backward to stop recording video.
The video is saved on the memory card as an .mp4 file. The
G-Metrix sensor data is saved on the memory card as a .fit
file.
Video Settings
From the main menu, select
Video
.
NOTE:
Not all settings are available for all video modes.
4
Voice Control
Summary of Contents for VIRB Ultra 30
Page 1: ...VIRB ULTRA 30 Owner s Manual August 2016 190 02069 00_0A...
Page 4: ......
Page 21: ......