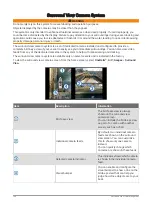


Controlling a Video Camera Using Gestures
When a networked video camera supports gesture responses, you can control pan-tilt-zoom cameras using
gestures directly on the chartplotter screen. Check your camera user manual for a list of available features.
TIP: Using gestures allows video control without displaying the video controls.
1 From a video screen, touch the screen.
2 Select an option:
• To zoom in and out with the camera, use pinch and zoom gestures.
• To pan or tilt the camera, swipe the screen in the desired direction.
Configuring the Video Appearance
NOTE: Not all options are available on all camera models and chartplotter models.
1 From the video screen, select Menu > Video Setup.
2 Select an option:
• To show the video using a stretched aspect ratio, select Aspect > Stretch. The video cannot be stretched
beyond the dimensions provided by the connected video device, and it may not fill the entire screen.
• To show the video using a standard aspect ratio, select Aspect > Standard.
• To adjust the brightness, select Brightness, and select Up, Down, or Auto.
• To adjust the color saturation, select Saturation, and select Up, Down, or Auto.
• To adjust the contrast, select Contrast, and select Up, Down, or Auto.
• To allow the chartplotter to automatically select the source format, select Standard > Auto.
Garmin VIRB
®
Action Cameras
WARNING
Do not view video or photos while operating the vessel. Failure to pay attention to the conditions on the water
can result in vessel damage, personal injury, or death.
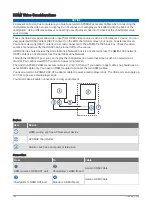
Most VIRB action cameras connect to the chartplotter from the camera menu (
).
The VIRB 360 camera connects using WPS (
Connecting a VIRB 360 Action Camera, page 144
).
In this manual, the term "VIRB action camera" refers to all models, except in the instructions on how to connect.
In that case, as listed above, the term "VIRB 360 camera" refers to only the 360 model.
Connecting a VIRB 360 Action Camera
You can connect a VIRB 360 action camera to the chartplotter using WPS. If you are connecting a VIRB camera,
connect through the camera settings (
Connecting a VIRB Action Camera, page 145
).
1 Set up the chartplotter's Wi‑Fi network (
Setting Up the Wi‑Fi Wireless Network, page 21
).
2 Bring the camera near the chartplotter.
3 On the VIRB 360 camera main menu, select Wireless > Wi-Fi.
4 If necessary, select the Wi-Fi toggle switch to enable the Wi‑Fi technology.
5 Press to select WPS, and press OK.
6 On the chartplotter, select OneHelm™, A/V, Gauges > VIRB® >
.
The camera searches for the Wi‑Fi network and connects.
You can control the camera using the chartplotter.
144
Viewing Video