background image

28

Reference

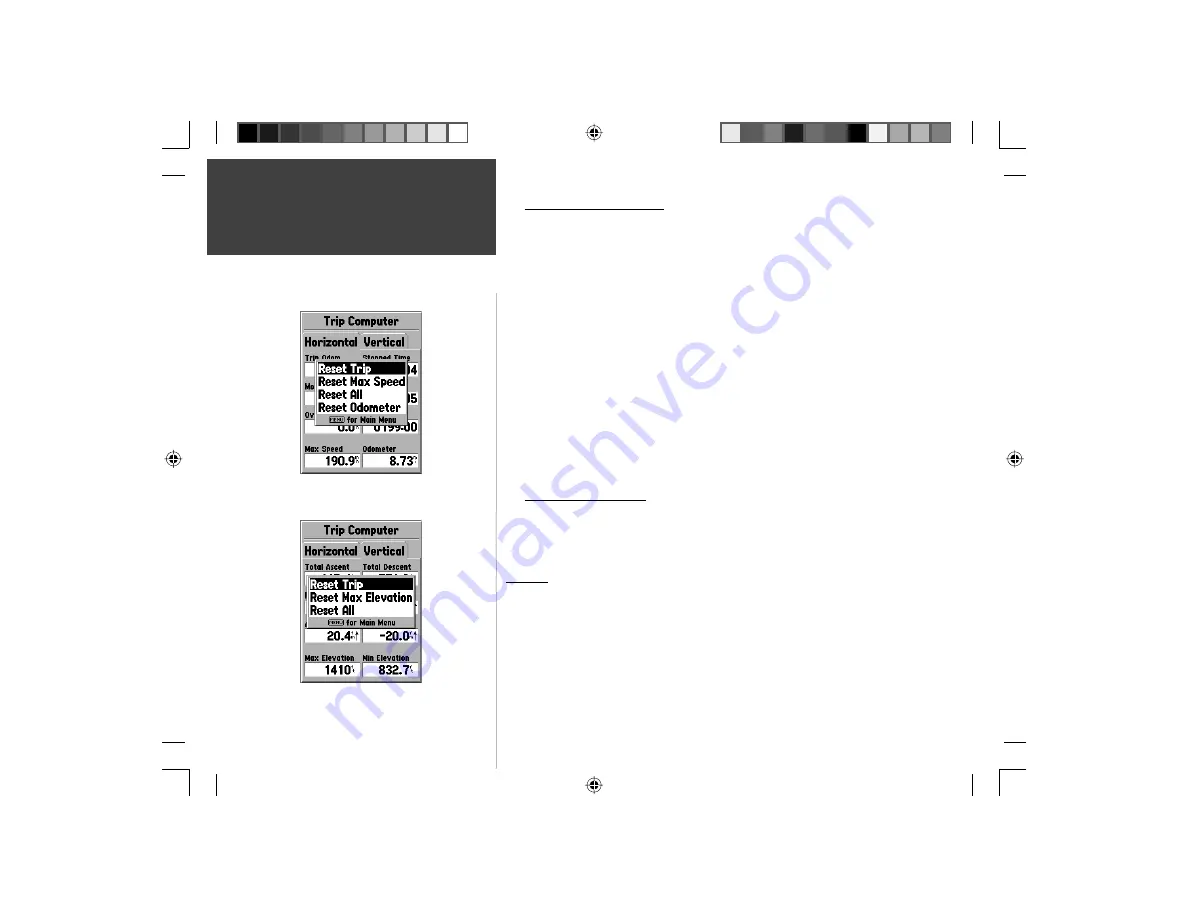
  Trip Computer Options — Tracks

Vertical Tab Data Fields

  T otal Ascent — 

The Total Ascent fi eld will show the Total Ascent of the trip in 

the units selected.  This fi eld indicates the total off all ascents.  

 Total Descent — 

The Total Descent fi eld will show the Total Descent of the 

trip in the units selected.  This fi eld indicates the total off all descents. 
As an example, if you ascend 100 ft, descend 20 ft, ascend 50 ft and descend 
30 ft, the Total Ascent would be 150 ft and Total Descent would be 70 ft.

Max Ascent — 

The Max Ascent fi eld shows the maximum rate of ascent.

Max Descent — 

The Max Descent fi eld shows the maximum rate of descent.

Avg Ascent — 

The Avg Ascent fi eld shows the average rate of ascent.

Avg Descent — 

The Avg Descent fi eld shows the average rate of descent.

 Max Elevation — 

The Max Elevation fi eld shows the Maximum Elevation for 

the trip.

 Min Elevation — 

The Min Elevation fi eld shows the Minimum Elevation for 

the trip.

 Vertical Tab Options

Reset Trip —

 This option will reset all fi elds except Max Elevation to zero.

Reset Max Elevation —

 This option will reset the Max Elevation fi eld to zero.

  Reset All —

 This option will reset all Vertical & Horizontal Tab fi elds to zero.

 Tracks

The Tracks Page displays the amount of Track Memory used, will allow you to 

‘Save’ or ‘ Clear’ the current Track Log, shows how many Saved Tracks are unused 
and displays a list of any Saved Tracks.  

Save —

 When ‘Save’ is selected, you can choose how much of the track log 

you wish to save.  Make a selection, then press 

ENTER

 to save the selection.

Clear —

 The ‘Clear’ Button will clear the Track Log.  If the Map Page is 

becoming cluttered with tracks, clearing the Track Log will clean up the map.  

Horizontal Tab Options

Vertical Tab Options

190-00249-00_0C.indd   28

5/7/2003, 9:54:46 AM

Summary of Contents for GPSMAP 76S

Page 1: ...GPSMAP 76S chartplotting receiver owner s manual and reference guide Covers Rev C indd 1 5 7 2003 9 57 21 AM...

Page 2: ...this document is subject to change without notice Garmin reserves the right to change or improve its products and to make changes in the content without obligation to notify any person or organization...

Page 3: ...ation of Product Updates Notification of New Products Lost or Stolen unit Tracking Connect to our website www garmin com and look for the Product Registra tion link on the home page Thanks for choosin...

Page 4: ...ailure by the operator of a vehicle equipped with an GPSMAP 76S to pay full attention to operating the vehicle and road conditions while the vehicle is in motion could result in an accident or collisi...

Page 5: ...erference and 2 this device must accept any interference received including interference that may cause undesired operation The GPSMAP 76S does not contain any user serviceable parts Repairs should on...

Page 6: ...and is protected under the United States of America copyright laws and international copyright treaties You further acknowledge that the structure organization and code of the Software are valuable tr...

Page 7: ...ties 36 Exits 36 37 Addresses 37 Intersections 38 Routes 38 42 Proximity 43 Celestial 44 46 MapSource Info 47 Setup Menu General Tab 47 48 Setup Menu Altimeter Tab 49 Setup Menu Compass Tab 50 Setup M...

Page 8: ...he GPSMAP 76S is waterproof to IPX 7 standards floats and is rugged enough to endure the most trying use and GARMIN s friendly user interface will allow you to be navigating with your new GPS in no ti...

Page 9: ...to say that the orbital information is no longer valid If the Almanac is cold your unit may have trouble locking on to satellite signals If the unit is unable to receive enough satellite signals to de...

Page 10: ...can be used to select your approximate location and the unit will continue to acquire satellites normally Automatic may take longer to acquire satellites Stored w o Batteries If you have stored the un...

Page 11: ...play your current position but is incapable of providing an altitude reading 3D GPS Location Indicates the receiver is currently using at least four satellite signals and is capable of providing your...

Page 12: ...s grey it means that the GPS is receiving a signal from the satellite and is in the process of storing orbital data provided in the GPS signal When the bar turns solid black the GPS is using the satel...

Page 13: ...on if you have moved the unit to another state province or country and you are having trouble locking onto satellite signals select New Location When you select New Location an options menu will be di...

Page 14: ...cale 1 Press the IN Key to decrease the Zoom Scale 2 Press the OUT Key to increase the Zoom Scale Map Page Options To access the Map Page Options with the Map Page displayed press the MENU Key To sele...

Page 15: ...desired data field then press ENTER Using the ROCKER scroll through the available selections With the data type highlighted press ENTER to accept the selection Setup Map This option contains the Map P...

Page 16: ...low is a description of each feature To change a setting highlight the appropriate field then press ENTER Make your selection then press ENTER to accept the new selection Detail Settings Most More Nor...

Page 17: ...played MapSource This option is only available if Mapsource CD data has been loaded into the unit If MapSource data is available you can choose whether or not to display the data on the map by selecti...

Page 18: ...n an Active Route will be displayed with large text on the Map Page Setup Map Point Tab The Point Tab contains the Navaids Points of Interest Geo and Exit option settings Each of the options has a Tex...

Page 19: ...ettings for Track Log Saved Tracks Course Lines and the Bearing Line To change a setting highlight the appro priate field then press ENTER Make your new selection then press ENTER to accept the select...

Page 20: ...Zoom setting To change a setting highlight the appropriate field then press ENTER Make your new selection then press ENTER to accept the selection The Contour Line settings are used to de clutter the...

Page 21: ...ng highlight the appropriate field then press ENTER Make your new selection then press ENTER to accept the selection Railroad controls the display of railways lines on the Map Page Accuracy Circle The...

Page 22: ...f you would like to save battery power it is recommended that you only turn the Electronic Compass on to take a reading then turn it back off If the Electronic Compass is turned off the unit will auto...

Page 23: ...highlighted press ENTER to accept the selection For a list of available data fields see appendix Calibrate Compass The Electronic Compass will need to be calibrated the first time batteries are instal...

Page 24: ...ation the unit will need to be held level If the unit is not level a message Hold Level will be displayed Highway Page Options To access the Highway Page Options with the Highway Page displayed press...

Page 25: ...played Track Log If Off is selected the Track Log will not be displayed Saved Tracks If Off is selected Saved Tracks will not be displayed Setup Highway Waypoint Tab The Waypoint Tab contains the On...

Page 26: ...s contained in the track tog If you clear the track log the current elevation plot will also be cleared Clearing the track log will not clear a current Pressure Plot The Plot Page has configurable dat...

Page 27: ...izontal scale of the plot to show distance Selecting Plot Over Time sets the horizontal scale of the plot to show time The plot will be able to show data stored for the last 72 hours or the last 80 mi...

Page 28: ...t available the GPS Elevation can be used for calibration If Current Elevation or Current Pressure is selected a value for the pressure or elevation will need to be entered into the Value field When f...

Page 29: ...unit was in motion since the Trip Computer was last reset Overall Avg The Overall Average Speed field will display the average speed of the unit since the Trip Computer was last reset Total Time The...

Page 30: ...ax Elevation The Max Elevation field shows the Maximum Elevation for the trip Min Elevation The Min Elevation field shows the Minimum Elevation for the trip Vertical Tab Options Reset Trip This option...

Page 31: ...or enter an interval for the Record Method Track Information Page To access information on a Saved Track highlight the desired track then press ENTER This will display the Track Information Page The...

Page 32: ...Points Page allow you to select Waypoints Points of Interest Cities Exits Addresses and Intersections using your current location or a location on the map To select a Point item highlight the desired...

Page 33: ...symbol as the selected waypoint Delete All Will delete all of the user waypoints Creating Waypoints There are three methods for creating waypoints in the GPSMAP 76S You can press the ENTER MARK key wh...

Page 34: ...can be changed the symbol name location elevation depth You can also choose to show the waypoint name on the Map Page To edit a saved waypoint Press the MENU Key twice to display the Main Menu Highlig...

Page 35: ...cked the waypoint name will be displayed on the Map Page To check uncheck the box place the highlight over that box and press ENTER New Mark and Waypoint Page Options When the New Mark or Waypoint Pag...

Page 36: ...hen Sight N Store is selected a Compass Page will be displayed Line up the sighting marks on the case of the unit with and object the press ENTER You will need to enter an estimated distance to the ob...

Page 37: ...the list by name or by showing the nearest item To view information about an item in the list highlight the item then press ENTER An Information window will be displayed showing the name address and...

Page 38: ...y on the Map Page and OK returns the display to the Cities List Exits When Exits is selected a list of exit options is displayed The included options are All Types Services Rest Area and Other To sele...

Page 39: ...e to shorten the search time If you have MapSource CD map data loaded in the unit choosing Select Map from the options menu allows you to determine which map data is used for the address search After...

Page 40: ...n Information Page From this page you can Goto the Intersection view the Intersection on the Map Page save the Intersection as a waypoint or exit the page To begin direct navigation highlight Goto the...

Page 41: ...MENU When you are creating a route you should place the points in the route in the order that you wish to navigate them Create Route Options Use Map This displays the Map Page with the Map Pointer act...

Page 42: ...n of the Map Page and Route Page You can create a route using a combination of the methods described above Starting with a blank Route Page either enter a waypoint manually or press the MENU Key and s...

Page 43: ...Line to the new location then press ENTER If the new location is a Map Feature the point will be inserted in the leg If the location is not on a Map Feature the New Waypoint Page will be displayed Pr...

Page 44: ...lighted on the Route Page Remove Waypoint Will remove the waypoint that is highlighted on the Route Page With a waypoint highlighted press MENU Highlight Yes and press ENTER to remove the waypoint Rev...

Page 45: ...ayed press MENU Add Waypoint When Add Waypoint is selected the Points Menu is displayed see page 40 for more information on the Points Menu Select a point from the menu to insert it into the Proximity...

Page 46: ...ing at midnight station time You can choose from different dates and over 3000 tide stations around the USA coastline Alaska Hawaii western Canada and several of the Caribbean Islands Main Menu Celest...

Page 47: ...The figure to the left of the line will show the current tide level in feet The Mean Lower Low Water MLLW will appear as a solid vertical line near the bottom of the chart This line will only appear i...

Page 48: ...display this information for your current location or you can use the Map or Points Menu to select a location To display the loca tion options press ENTER with Location field highlighted You can also...

Page 49: ...ore the GPSMAP 76S to the factory settings for items on the tab press MENU and with Restore Defaults highlighted press ENTER Setup Menu General Tab The General Tab contains settings for the Receiver M...

Page 50: ...ific Ocean and Atlantic Ocean You must have a clear unobstructed view of the sky for the GPSMAP 76S to be able to receive a WAAS signal even then at times it may not be possible to receive a WAAS sign...

Page 51: ...the units used for all pressure displays The unit can be set to display in Inches of Mercury or Millibars Barometer Mode The Barometer Mode can be set for Fixed or Variable elevations Select Fixed for...

Page 52: ...w XX mh kh For At Least If the Compass is On this setting determines how long the unit will wait to switch back to compass heading after the unit speed drops below the value set to use GPS Speed Settt...

Page 53: ...erature Direction Display and Speed Filter These settings are used in related fields throughout the unit Elevation Can be set to show in Feet or Meters Depth Can be set to display in Feet Fathoms and...

Page 54: ...information You can select from Auto True Magnetic Grid or User Auto provides magnetic north heading references which are automati cally determined from your current location True provides headings ba...

Page 55: ...alerts you when the boat has drifted more than the set distance The alarm can be turned On or Off Approach and Arrival The Approach and Arrival Alarms alert you when you are approaching a turn or arri...

Page 56: ...of communication in bits per second is displayed in the Baud field Text Out Allows the GPSMAP 76S to output simple text data that includes date time position and velocity information The Baud can be...

Page 57: ...eters 10 16 ft 95 typical DGPS WAAS Accuracy 3 meters 10ft 95 typical with DGPS corrections Compass Accuracy 5 degrees2 Velocity Accuracy 0 1 knot RMS steady state Dynamics 6g s Subject to accuracy de...

Page 58: ...the sentences for NMEA 0183 version 2 3 output Approved sentences GPRMC GPGGA GPGSA GPGSV GPGLL GPBOD GPRTE and GPWPL Proprietary sentences PGRME PGRMZ and PSLIB The GPSMAP 76S will accept NMEA input...

Page 59: ...o W127 5 9 W127 5 to W112 5 8 W112 5 to W097 5 7 W097 5 to W082 5 6 W082 5 to W067 5 5 W067 5 to W052 5 4 W052 5 to W037 5 3 W037 5 to W022 5 2 W022 5 to W007 5 1 W007 5 to E007 5 0 E007 5 to E022 5 1...

Page 60: ...Island New Georgia Islands Dutch Dutch Easter Isld 67 Easter Island 1967 European 1950 European 1950 Austria Belgium Denmark Finland France Germany Gibraltar Greece Italy Luxembourg Netherlands Norwa...

Page 61: ...Scotland Shetland Isl Wales Pico De Las Nv Canary Islands Potsdam Potsdam Germany Ptcairn Ast 67 Pitcairn Astro 67 Pitcairn Prov S Am 56 Prov So Amricn 56 Bolivia Chile Colombia Ecuador Guyana Peru V...

Page 62: ...time you will reach your destina tion waypoint based on current speed and track ETA at Dest The estimated time you will reach a GOTO destination or the final waypoint in a route ETA at Next The estima...

Page 63: ...rse The recommended direction to steer in order to reduce course error or stay on course Provides the most efficient heading to get back to the desired course and proceed along your route Track The di...

Page 64: ...Dragging Anchor is the message displayed when the distance set in the Anchor Alarm is exceeded Lost Satellite Reception The unit is unable to continue receiving satellite signals Memory Full Unit mem...

Page 65: ...a Track Log Full Indicates the track log is full and track recording has been turned off To be able to record more track points you will need to clear the track log and turn track recording on This wi...

Page 66: ...ed from this conversion is approximately thirty meters When the unit is placed in the LORAN TD format mode it simulates the operation of a LORAN receiver Position coordinates may be displayed as TDs a...

Page 67: ...ess the PAGE Key to return to the Main Menu If the active GRI Chain Secondary Stations or Offsets are changed all waypoints stored in the units memory will update and reference the the new settings wh...

Page 68: ...e than 45 backward or forward Carrying Case Protects the GPSMAP 76S when not in use Power Data Cable Wiring harness can be used to hardwire the unit to auxiliary power and to interface with other NMEA...

Page 69: ...r 26 Calibrate Compass 21 Cautions 2 Celestial 46 Celestial Selections 44 Changing the Zoom Scale 12 City Information Page 36 Clear the current Track Log 28 Compass Tab 50 Compass Page 20 Compass Page...

Page 70: ...ver 8 Grid Labels 15 H Heading Line 19 Highway 19 Highway Page 22 Highway Page Options 22 23 Horizontal Tab 27 Horizontal Tab Options 27 Hunt and Fish 45 I Initialization Options 8 Initializing the GP...

Page 71: ...rth Up 14 Off Course 53 Orientation 14 Overzoom 12 P Performance 55 Plan Route 42 Plot Page 24 Plot Page Options 25 Points of Interest 35 Points of Interest Options 35 Power 55 power data cable 56 Pro...

Page 72: ...Station 45 Tide Stations 17 Time 10 Time Tab 50 Time Format 50 Time Offsets 57 Time Zone 50 TracBack 30 Tracks 28 Track Information Page 29 Track Log 17 Track Page 29 Track Page Options 29 Track Up 14...

Page 73: ...FROM STATE TO STATE IN NO EVENT SHALL GARMIN BE LIABLE FOR ANY INCIDENTAL SPE CIAL INDIRECT OR CONSEQUENTIAL DAMAGES WHETHER RESULTING FROM THE USE MISUSE OR INABILITY TO USE THIS PRODUCT OR FROM DEF...

Page 74: ...Notes 190 00249 00_0C indd 72 5 7 2003 9 55 10 AM...

Page 75: ...Covers Rev C indd 3 5 7 2003 9 57 35 AM...

Page 76: ...00 2003 Garmin Ltd or its subsidiaries Garmin International Inc 1200 East 151st Street Olathe Kansas 66062 U S A Garmin Europe Ltd Unit 5 The Quadrangle Abbey Park Industrial Estate Romsey SO51 9DL U...

Reviews: