background image


24

6-5. Illustration B 

1). Hypothetical Conditions: 

More  specifically,  the  same  scenario  with

  Illustration  A 

except  selected 

switches wouldn’t be used (4 additional relays instantly remained).   

2). The result of Relay Configuration: 

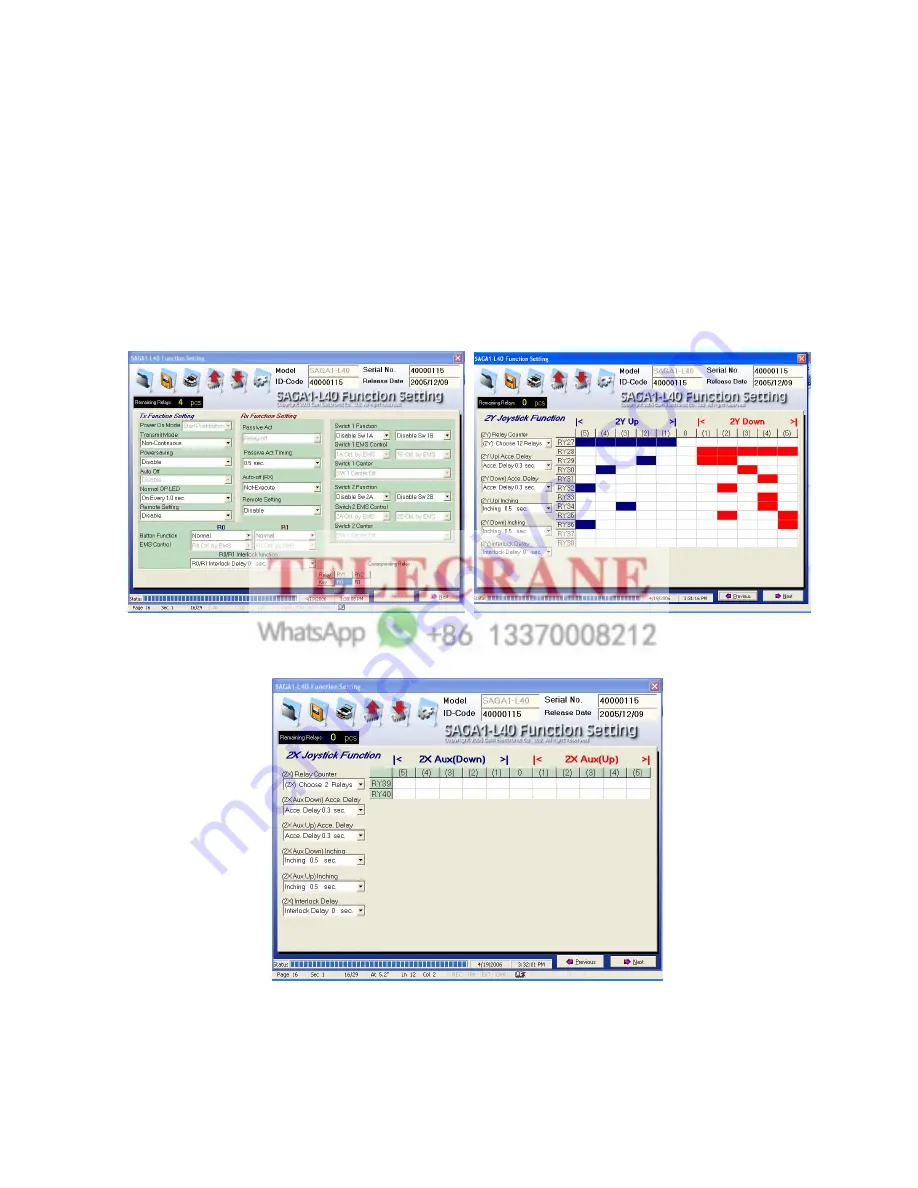
Joystick #2 Y-Axis would entitle two additional relays, Relay27


to Relay38, in 

order  to  satisfy  the  12-relay  requirement,  then  rest  of  two  remaining  relays 
would be entitled by Joystick #2 X-Axis, Relay 39 and Relay 40.   
(Please refer Fig. 6-4-6, Fig.6-4-7, and Fig.6-4-8) 


Fig. 6-4-6                                                        Fig.6-4-7   


                                                                Fig.6-4-8 

Summary of Contents for SAGA1-L40

Page 1: ...Gain Electronic Co Ltd INSTALLATION OPERATION MANUAL ...

Page 2: ...Chapter 3 Standard Accessories Chapter 4 Operation Chapter 5 PC Software Installation and Operation Guide Chapter 6 The relationship of the relays commands cable outputs APPENDIX Function Setting Defined by Customer SAGA1 L40 Passive Antenna Output of COM Relay Wiring Diagram ...

Page 3: ...eturned to a service facility designated by GAIN Buyer will pay shipping charges to GAIN while GAIN will pay return shipping charges 1 3 Excluded Items This warranty does not include consumptive parts such as batteries fuses joystick buttons and relays Also this warranty does not cover defects caused by improper installation improper or insufficient maintenance unauthorized modification improper o...

Page 4: ...ditions 9 Make sure that the batteries are in good condition and power for receiver is correct 10 Maintenance should only be done while the crane s main power is off to prevent electrical shock 11 Operating in an industrial facility is highly dangerous therefore operator must have adequate training in using SAGA1 system 12 Those who operate the machine should be healthy and have good judgment in r...

Page 5: ...4 Chapter 3 SAGA1 L40 Standard Accessories When you get a standard and full set of SAGA1 L40 system it includes the following items 3 Belts 4 Manual Wiring Diagram 1 Transmitter 2 Receiver ...

Page 6: ...5 Chapter 4 Operation 4 1 SAGA1 L40 Transmitter Joystick 1 Joystick 2 Emergency Stop button Pushbutton R1 Pushbutton R0 Start Selected Switch 1 Selected Switch 2 Rotary Key ...

Page 7: ...6 4 2 SAGA1 L40 Receiver Cable Assemble 2 Cable Assemble 1 Wiring Diagram of Control Contact ...

Page 8: ...move the batteries when the equipment is not going to be in use for a long period of time Note A Four AA size batteries are required for the transmitter There is a 3 stage power indicating function with LED display Green color Sufficient power to operate transmitter Yellow color Power is depleting Operation must be stopped immediately for example down the goods to ground to replace batteries Red c...

Page 9: ...e procedure to transfer the data from copier to TX or RX When magnetic key is off Note 1 Make sure the power of TX or RX is OFF when copying 2 The copier for SAGA1 L40 dual colors on the appearance can also be used for existing SAGA1 L4 6 8 6B 8B L10 L12 3 The copier can copy both function settings and ID Code but to pair the crystal is still essential to match both TX and RX for communicating eac...

Page 10: ...straighten both pins of the new crystal unit 4 Insert the new crystal unit vertically into the PC board 5 Press the new crystal down into the socket 1 3 4 2 5 Attention The frequency will be different when plugging the same crystal into the TX or RX For example T 311MHz Frequency for TX is 311 MHz R 321 7MHz Frequency for RX is 321 7MHz ...

Page 11: ...ons There are four input voltages available for the SAGA1 L40 as follows 48 110VAC 48 220VAC 110 220VAC 220 380VAC Please disconnect the Rx s power select the proper voltage and plug inthe connector Switch the plug to choose voltage ...

Page 12: ...will run automatically Select English Version or Chinese Version then Click Ok to proceed installing Cancel to exit Remark USB driver must be installed at first time of using USB connect cable please click the bottom line of dialogue Click here to install USB Driver to install USB driver 2 Click Next when the screen shows as below Click here to install USB Driver ...

Page 13: ...ROM The program will add a shortcut on your desktop 5 2 Software Operation and Function Setting 1 To activate the program either double click on the desktop shortcut for SAGA1 L40 software or from the start menu of your Windows Start Programs SAGA1 SAGA1 L40 Function Setting ...

Page 14: ...tion and Customer Info page of the program Pushbutton Selected Switches corresponding Relay Click here to next page Open File Save File Write Data Read Data Select Com Port About Program Print Preview Connection Diagram ...

Page 15: ...fying the function page it will meet the needs of all kind of applications and make operating remote controller easier For more details please refer Appendix 2 2 Customer Info Page This page provides the basic information of end users equipment as well The data of customer info page is useful for users on equipment management and maintenance ...

Page 16: ...er or Receiver to the computer click Read Data to retrieve the setting then click OK to see the result 2 4 Write Data Updating with new date into Transmitter or Receiver To write to another TX or RX disconnect the cable from present TX or RX and connect to target TX or RX click Write Data and then click OK Read Data Write Data ...

Page 17: ... data to computer hard disk or write it to transmitter or receiver To save the data click Save File after destination chosen and file name typed click Save Click OK 2 6 Open File To read data from saved file To click Open File after the source file L40 chosen click Open then OK Save File Open File ...

Page 18: ... Print Preview Connection Diagram Print allows users print out the current page showing on the monitor Preview Connection Diagram As a reference for technicians before starting the wiring installation To print out the wiring diagram click Print and then select preview connection diagram A wiring diagram will automatically be created in accordance with the mapping relationship between relays and co...

Page 19: ...18 Preview connection diagram Fig 2 8 1 ...

Page 20: ...nding relays are users can directly refer to corresponding Relay on function setting page For instance as Fig 6 1 shown while R0 pushbutton pressed RY1 will energizes R1 pushbutton pressed RY2 energizes Selected Switch1A SW1A RY3 energizes Selected Switch1B SW1B RY4 energizes Selected Switch2A SW1A RY5 energizes Selected Switch2B SW2B RY6 energizes Fig 6 1 Pushbutton Selected Switches correspondin...

Page 21: ...rk By modifying through software each of the axis of Joystick 1 and Joystick 2 can reach maximum 16 relay outputs Fig 6 1 2 6 2 The fixed relationship between Relays and the wire number showing on cable assemblies The number showing on cable assembles corresponds with the number of the relay contacts For example cable assembly 1 1 Cable 1 Wire 1 connected with Relay1 cable assembly 1 12 Cable 1 Wi...

Page 22: ...witches and joysticks more effectively via manipulating its function program Following concepts procedures please comprehend completely before doing the relay configuration 1 The total number of relays of SAGA1 L40 and the fixed relay figure s on Pushbuttons Selected Switches SAGA1 L40 provides totally 40 relays RY01 to RY40 Among these 40 relays an individual pushbutton can only be entitled one r...

Page 23: ...le assuming only two more relays remained Joystick 1 got a higher privilege than Joystick 2 Y Axis got a higher privilege than X Axis 4 Finally a schematic preview connection diagram As page 19 Fig 2 8 1shown will automatically be created as a wiring reference after relay configuration and function settings have been completed 6 4 Illustration A 1 Hypothetical Conditions Pushbuttons R1 R0 Start Se...

Page 24: ...23 Priority than Y Axis of Joystik 2 Please refer Fig 6 4 1 Fig 6 4 2 Fig 6 4 3 Fig 6 4 4 Fig 6 4 5 Fig 6 4 1 Fig 6 4 2 Fig 6 4 3 Fig 6 4 4 Fig 6 4 5 ...

Page 25: ...onal relays instantly remained 2 The result of Relay Configuration Joystick 2 Y Axis would entitle two additional relays Relay27 to Relay38 in order to satisfy the 12 relay requirement then rest of two remaining relays would be entitled by Joystick 2 X Axis Relay 39 and Relay 40 Please refer Fig 6 4 6 Fig 6 4 7 and Fig 6 4 8 Fig 6 4 6 Fig 6 4 7 Fig 6 4 8 ...

Page 26: ...p Acce Delay Acce Delay 0 Sec to 4 sec Select the time interval for each acceleration 4 1YNorth 1Xeast 2YUp 2XupxDown Inching Inching 0 05Sec to0 8Sec Select the time interval of each inching motion 5 1YSouth 1Xeast 2YDown 2xAuxUp Inching Inching 0 05Sec to0 8Sec Select the time interval of each inching motion 6 1Y 1X 2Y 2X Interlock Delay Interlock Delay 0 Sec to 4 0 Sec Interlock If it is danger...

Page 27: ...different functions If Center Off when select SW1 selected switch to A or B position then the related relay on when rotate SW1 selected switch to A B position then the related relay off Center On SW1 selected switch has 3 position of A A B B for selecting and different functions If Center On when select SW1 selected switch to A or B position then the related relay on when rotate SW1 rotary switch ...

Page 28: ...pushbutton and then press motion pushbutton to perform the inching motion Disable Disable R1 function 2 EMS Control 1 Ctrl by EMS 2 Bypass EMS Control by EMS means the corresponding relay of function pushbutton is controlled by EMS mushroom or emergency stop signal Bypass EMS means the corresponding relay of function pushbutton will not be controlled by EMS mushroom or emergency stop signal 3 Inch...

Page 29: ...n 3 Auto Off 4 Enable 5 Disable Enable When Transmit Mode is for continuous it will send an EMS signal to Power off the Receiver if it is set auto off in a certain time Disable Disable the function to send EMS signal to Receiver before the Transmitter is off 4 Normal OP LED 1 On 2 OnEvery0 3V 4sec 3 Off On LED indicator will lighten with green color when Transmitter is transmitting It still works ...

Page 30: ...ion of Normal and Control by EMS are going to de energize and it is essential to recommence the procedures of Power On again to continue operating 2 Passive Act Timing 0 5 4 0 sec The duration working time of Receiver between passive act is activated and the power or relay is really off 3 Auto off RX 1 None execute 2 10 mins 4 hrs Power off None execute The main relay of Receiver will remain energ...

Page 31: ...ace the RF module up side down then soldering connector 4 pins into RF module 3 Short circuit two connecting points as bottom picture shown Application To improve radio reception quality under certain severe environmental such as tower crane long range conveyor tunnel and elevator etc installing external passive or dipole antenna may be required ...

Page 32: ... connection for COM Both contacts of each 3 96 mm connector are shorted circuit Simply insert the wire into either contact of each connector will do 3 P1 P44 Terminal refer to the relay module The terminals between P1 P40 are for COM purposes Use the attached 3 different length of wires jumper to configure the COM A 4 Wiring Diagram When application requirement confirm use attached wiring diagram ...

Reviews: