background image

SuperPro Series Installation Manual 


Labeling the Wiring 

 
Documenting the installation is critical. Particularly in a large installation, the time it takes to 
document each cable run will save hours of hassle and embarrassment when trying to bring up 
all the connected systems. The SuperPro provides labeling space for every port on the panel.  
FutureSmart recommends the following labeling practices: 


• 

Label each connection on the panel documentation template (using provided labels) 

• 

Label each input cable 

• 

Label each patch cable 

• 

Label each cable at the receptacle 

Distribution Panel Installation 


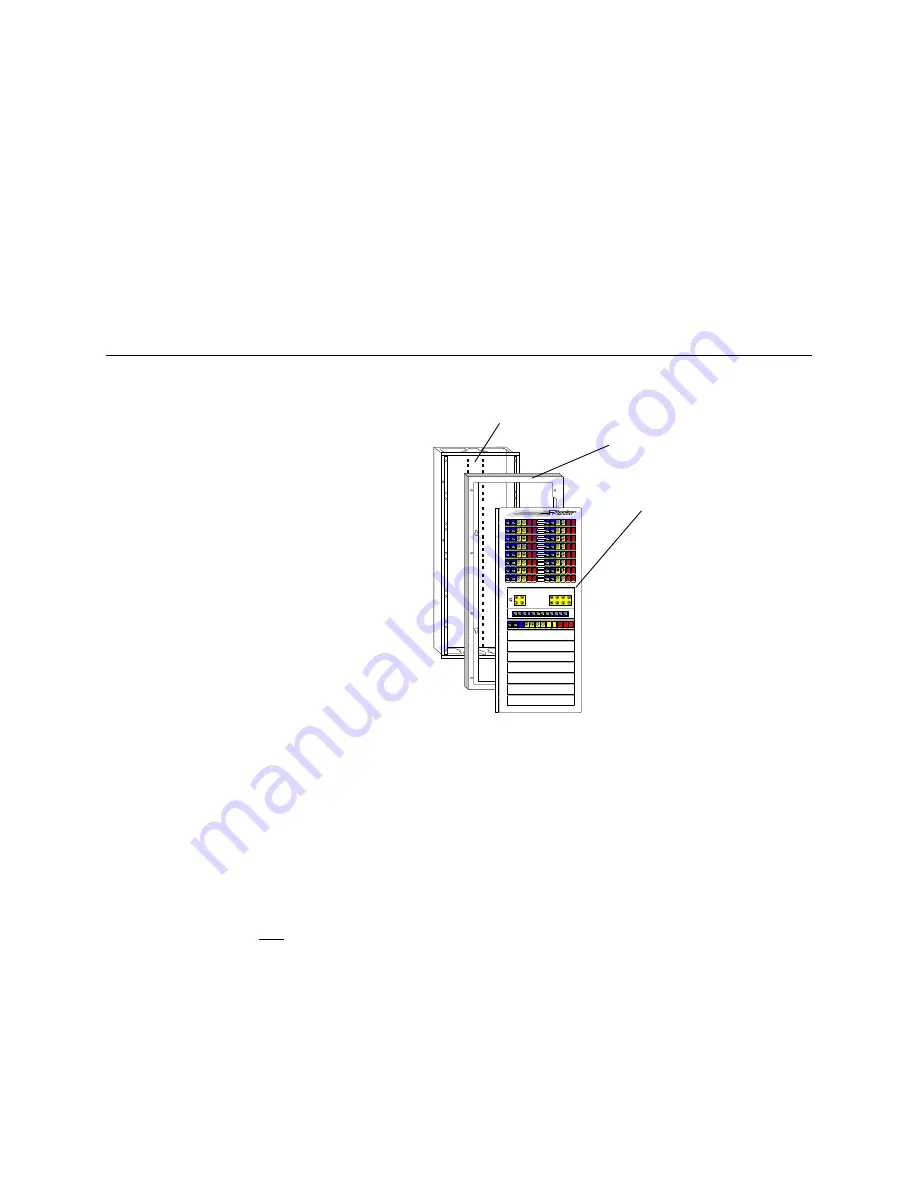
Semi-Flush Cabinet Mounting: 


Rough-in can

Mounting collar

Panel


Figure 2 

Step 1 – Installation of In-Wall Rough-In Can: 
 

1.  Place rough-in can between studs in the 16”-on-center stud space. 
2.  Be sure the lip of the can is resting against studs so that the can face protrudes ½” from the 

studs.  This will assure that sheetrock will sit flush with panel at finish time. 

3.  The top of the can should be between 5 ½’ to 6’ above the floor. 
4.  Using the holes on the sidewalls of the can, mount the can to wood studs using 1” to 2” long 

screws.  Insert shims on the sides of panel if necessary.  DO NOT OVER TIGHTEN AND 
DISTORT CAN!   

5.  Attach metal electrical box and receptacle to bottom of can. 
6.  Have the electrician run a 110-volt / 15 amp dedicated circuit to the receptacle in the bottom 

of the can and terminate the circuit in the outlet. 

7.  Pull all premise cables through the top right and left holes nearest the hinge side of the panel; 

use the side holes on the hinge side if you are installing a 12-zone panel or larger. 


Step 2 – Installation of Collar and Panel: 

1.  Install two screws several threads into the two holes on the top of the rough-in can. 
2.  Hang collar with panel on the two screws through the keyholes provided. 
3.  Insert screws in the two holes in the bottom of the can and tighten. 
4.   Tighten the two screws on the top of the can.  DO NOT OVER TIGHTEN. 

Page 8                                                                                           

     FutureSmart 

Summary of Contents for SuperPro series

Page 1: ...I N S T A L L A T I O N G U I D E S u p e r P r o Distribution Panel 12382 south gateway park place 700 draper utah 84020 1 801 617 3100 www futuresmart com...

Page 2: ...TIC TOOLKIT 6 CABLE INSTALLATION 7 LABELING THE WIRING 8 DISTRIBUTION PANEL INSTALLATION 8 SEMI FLUSH CABINET MOUNTING 8 GROUNDING THE DISTRIBUTION PANEL 9 TERMINATING THE DISTRIBUTION PANEL 9 TERMINA...

Page 3: ...SuperPro Series Installation Manual GLOSSARY 33 Page 2 FutureSmart...

Page 4: ...owner we want the ability to control where signals from satellite TV or digital cable go in our home We want to be able to move the office and easily reconnect to the Internet or the dedicated fax lin...

Page 5: ...nnected at the network interface Use caution when installing or modifying telephone lines Have the Electrician connect the AC outlet to branch circuit power The connection should be in accordance with...

Page 6: ...ps into your design process will save time minimize changes and add to customer satisfaction Determine which electronic devices your customer wants to use These may include lighting window treatments...

Page 7: ...for both the installer and the homeowner Installation Tools Having the right installation tools makes the job a lot easier and reduces maintenance calls FutureSmart offers installation tools for termi...

Page 8: ...llel to electrical or high voltage lines if possible If you must run cable near electrical or high voltage lines maintain at least 18 distance from the AC lines and keep the run as short as possible n...

Page 9: ...s This will assure that sheetrock will sit flush with panel at finish time 3 The top of the can should be between 5 to 6 above the floor 4 Using the holes on the sidewalls of the can mount the can to...

Page 10: ...f coaxial cable used in CATV systems Ground 14Awg Ground wire Ground Lug located on the Coax Module Fig 3 Terminating the Distribution Panel 1 Bring the cable bundles in through the rough in can and i...

Page 11: ...e Zone Diagram Port labels Pink RG6 coax cable Down steam to panel Black RG6 coax cable Upsteam to plate Fig 4 After you terminate every cable into the panel you can then configure the front of the pa...

Page 12: ...nate them on the appropriate connectors 7 Connect a coaxial cable jumper from the SATV outputs on the front of the input hub to the zones where the SATV receivers are located SATV signals are not comp...

Page 13: ...tion points Port labels Fig 6 Coax Hub Hookup The Coax Hub distributes modulated signals from VCRs DBS Satellite receivers DVD players security cameras and Antennae CATV High quality broadband designs...

Page 14: ...s in place for all unused outputs To have the optimal picture you need to have between 0dBmV to 10dBmV at the plate location at the room Also be aware that just like you cannot have enough dBmV signal...

Page 15: ...DISTRIBUTION HUB Lines 3 4 Lines 1 2 IES TP SURGE 1 ECC 2 94V 0 0999 IES TP SURGE 1 ECC 2 94V 0 0999 Front view Back view Right side view 1 3 2 4 1 12 RJ45 ports 2 Shorting block w surge suppression...

Page 16: ...TP hub then plug the other end of the KSU cable with the RG11 connectors into the KSU in the extension ports See Appendix A on pg 24 Telephone Distribution Hub pin out Terminating Category 5e Twisted...

Page 17: ...he yellow CAT5e cable designate as data and strip off a 1 section of its PVC jacket Untwist pairs from the end and straighten out conductors Arrange conductors following the 568A color coded layout on...

Page 18: ...insert it into the upper right port on the receptacle Fig 23 Data Module Being Inserted phone is inserted just to its right Terminating RG6 Quad Shield Coax Cable Connections should be terminated usin...

Page 19: ...etwork system is the ability to distribute a variety of signals using multiple media types Coaxial coax cable is generally used for the distribution of video transmissions throughout a residence or co...

Page 20: ...adcast capabilities of the cable so that the signal only goes where it is intended Creating Coax Cables Coax cable is fairly simple to terminate if you have the right tools The following steps illustr...

Page 21: ...tip of tool and rotate one complete turn 6 Remove the cable from the tool by pulling stripper outward and discard the stripped off insulation The cable end should now resemble Figure 5 4 Figure 5 4 Co...

Page 22: ...n Crimping the Coax Connector After the cable has been inserted into the connector properly you will use the compression coax crimp tool to compress the connection Digicon LCCT 1 Pat Pending Figure 5...

Page 23: ...ou know it works Note It is a good idea to test the cable while still on the spool to ensure that you have a good spool with no breaks in it It is much easier to test a thousand feet of cable while it...

Page 24: ...secure SpeedWrap Cable at each location Allow Sheetrock to be installed Retrieve SpeedWrap Cable Complete terminations Install faceplate A basic Multi Media Receptacle assembly is illustrated in Figur...

Page 25: ...modulation distribution 002 Integrating a DBS unit with the FIN 003 Integrating multiple DBS receivers with the FIN 30 Series Audio Video Control 001 Installing a twisted pair infrared repeater netwo...

Page 26: ...6 22 2 22 5 48 7 48 4 23 8 23 12 3 49 12 1 49 6 24 2 24 Lines 1 2 Lines 3 4 12 4 Telephone Hub Port Position EIA TIA 568 PIN 50 POSN TELCO PIN Port Position EIA TIA 568 PIN 50 POSN TELCO PIN 5 26 7 2...

Page 27: ...2 27 5 2 1 28 6 3 4 29 3 4 2 2 30 5 5 1 31 6 6 4 32 3 7 3 2 33 5 8 1 34 6 9 4 35 3 10 4 2 36 5 11 1 37 6 12 4 38 3 13 5 2 39 5 14 1 40 6 15 4 41 3 16 6 2 42 5 17 1 43 6 18 4 44 3 19 7 2 45 5 20 1 46...

Page 28: ...allation Manual FutureSmart Page 27 1 26 50 25 12 3 4 5 6 Pair 1 Pair 2 Pair 3 USOC Pinout at each port Amphenol connector on back of 8 3 Logical diagram of 8 3 connections 2 3 4 5 6 7 8 1 Note Port s...

Page 29: ...lation Manual Page 28 FutureSmart 1 26 50 25 12 3 4 7 8 Pair 1 Pair 2 Pinout at each port Line 1 2 or Line 3 4 Logical diagram of 12 4 connections 2 3 4 5 6 7 8 1 Note Port shown is female Jack 9 10 1...

Page 30: ...eries Installation Manual FutureSmart Page 29 568B Standard 1 2 3 4 5 6 7 8 T R T R T R T R Blue Orange Brown Green Pin 8 Pin 1 568A Standard 1 2 3 4 5 6 7 8 T R T R T R T R Blue Orange Brown Green Pi...

Page 31: ...EL PANASONIC 616 KSU OPTIONAL CARD FROM PANASONIC WITH 8 EXTENSION 25 PAIR TELCO CONNECTOR 8 3 INSTALLED IN HUB SPACES FIRST 8 EXTENSION LINES THAT COME STANDARD INCOMING LINES CO LINES BACK VIEW OF 8...

Page 32: ...mart Page 31 PANASONIC KX T123211D AND ALL DIGITAL PANASONIC KSU HOOK UPS TO PANEL 24 extension hook up shown PANASONIC HUBS INSTALLED IN PANEL HUB SPACES PANASONIC 1232 KSU 25 PAIR TELCO CORDS TELCO...

Page 33: ...imited to either replacing or repairing at its option any defective products that do not conform with the foregoing warranty and are returned freight prepaid to FutureSmart Equipment or parts that hav...

Page 34: ...ge of frequencies that can be transmitted with the desired signal quality Baseband A method of communication in which a signal is transmitted at its original frequency without being impressed on a hig...

Page 35: ...rs Core The central glass region of an optical fiber through which light is transmitted Crosstalk When an undesired signal interferes with the desired signal CXBus CEBus acronym for RG6 Quad Shielded...

Page 36: ...eloped jointly by Xerox Digital and Intel to interconnect computer equipment using coaxial cable and Transceivers Designed for a 10 or 100 Mbps LAN Fiber Optics Light transmission through a strand of...

Page 37: ...ntegration of voice and data Kilometer One thousand meters or 3 281 feet The kilometer is a unit of measurement for signal paths KSU Key Service Unit Commercial Telephone System LASER Light Amplificat...

Page 38: ...ss to everything on the network Our Distribution Panel provides the Node 0 or common access point to the network Node 0 The heart of a CEBus wiring system where all wires have the beginning address No...

Page 39: ...should be designed Skin Effect As the frequency used for the transmission increases the signal current and the magnetic field that surround it concentrate closer and closer to the outer edge or skin o...

Page 40: ...ergy such as optical signals radio waves etc Twisted Pair A common media used for telephone networking security HVAC and other low voltage applications UPS Uninterruptible Power Supply Upstream TV Sig...

Reviews: