background image


Stránka 

18

 z 

39


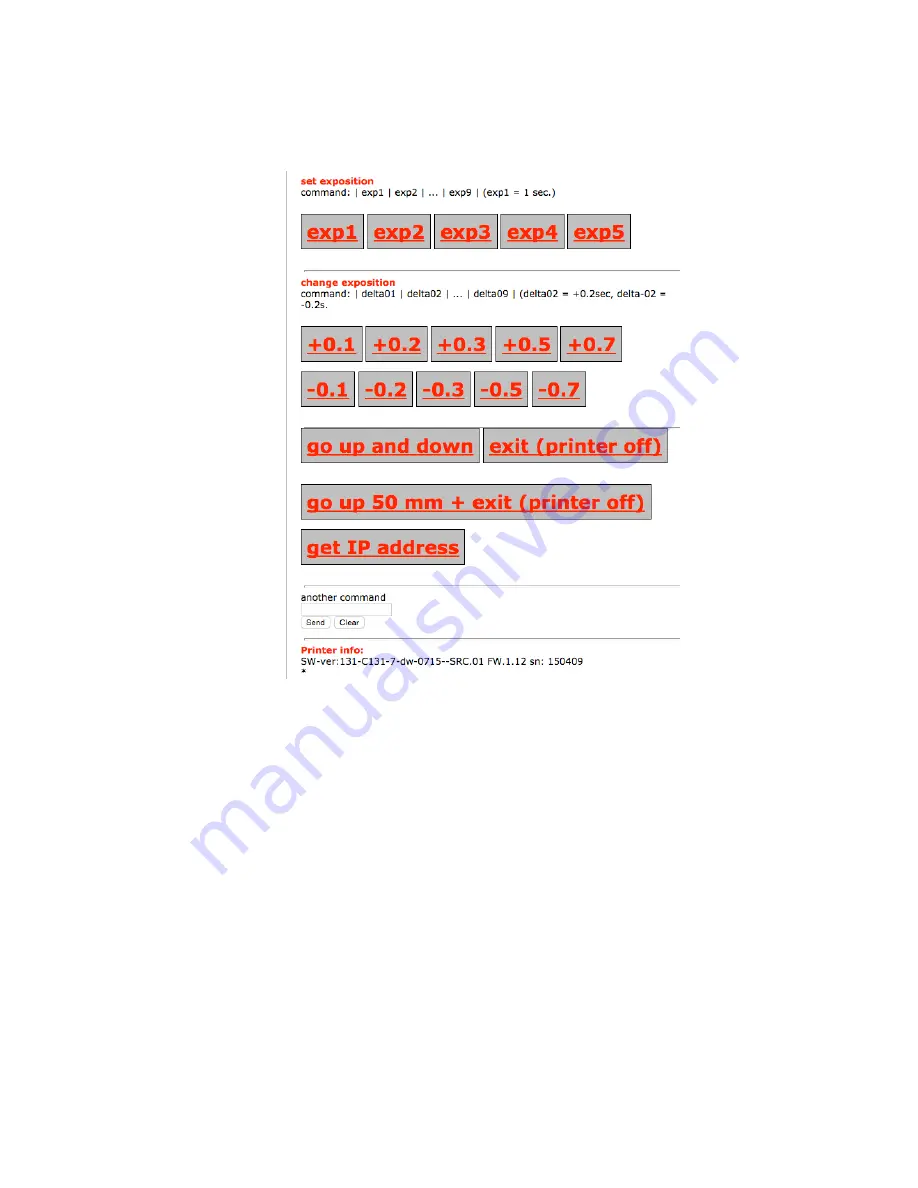
Home-­‐command   


In   this   part   of   menu,   you   can   change   the   exposition   times   of   individual   layers   during   the   

print.


exp1

   =   exposition   time   of   each   layer   =   1   s   


You   can   change   the   exposition   time   in   steps   of   one   tenth   of   a   second.   

+0,1   s   

-­‐0,1   s   


GO   UP   AND   DOWN

   –   You   can   lift   and   than   lower   the   platform   –   used   for   checking   the   

progress   during   the   print.   


EXIT

   –   turning   off   the   printer   fast


GO   UP   50   mm   +   exit

   –   Platform   is   lifted   by   50   mm   and   afterwards   the   printer   is   turned   off.   

Used   when   you   find   out   that   the   setting   was   wrong   or   there   is   another   problem   and   

therefore   you   want   to   turn   off   the   printer   and   repeat   the   print   with   different   settings.


Summary of Contents for 3Dwarf

Page 1: ...USER S MANUAL User s Manual DEVICE PRODUCT NAME 3D PRINTER TYPE DWARF SUPPLIER NAME FUTUR3D s r o ADDRESS 14800 Praha 4 Kunratice Golcova 486 14800 Praha 4 Kunratice BUSINESS ID NO 28952383 TAX ID NO...

Page 2: ...N 12 Complete following information about your device This information is necessary for spare parts order or in case of loss or theft Type number Production number Delivery purchase date Supplier deal...

Page 3: ...on electric device 11 16 User obligations 11 17 Operation of electric device 12 18 Persons without professional electrotechnical qualification ordinary persons can 12 19 Electric devices 13 20 Temper...

Page 4: ...ure 36 29 Specification of spare parts which must be used 36 30 Adjustment and maintenance operations description 36 31 Maintenance warning 37 32 Lubrication 37 33 Adjustment and maintenance safety in...

Page 5: ...ce purchase information completion to create a copy of this User s Manual and to keep original document safe for case of loss or damage While operating follow safety instructions in order to avoid inj...

Page 6: ...c glass which serves two purposes 1 Prevents sunbeams and other UV light from entering the device which protects photo reactive resin from degradation 2 Prevents UV light leakage from inside of device...

Page 7: ...aces prior starting of device Operator is obliged to check the device for damage or other peculiarity which may result in situation hazardous to health or property prior device start In case such inad...

Page 8: ...echanism and without protection measures It is prohibited to operate the device in discrepancy with requirements for work safety please see safety instructions It is prohibited to use the device in we...

Page 9: ...ar out or possible damage before he starts work Always make sure that all protection measures are mounted and that they perform flawlessly With exceedingly wore out or damaged parts this device cannot...

Page 10: ...out of reach of direct sunlight o in sufficient distance from outlets of heating ventilation and air conditioning systems 11 Risk locations location of increased risk of injury Entire indoor space 12...

Page 11: ...ce must be conductively connected to protective system of user and well conserved 16 User obligations obligations for maintaining the device according to valid regulations and standards by user Mainta...

Page 12: ...of workers the worker who observes such situation unless able to eliminate the cause of the threat by himself must take an action to eliminate or decrease the danger of injury fire or other perils Be...

Page 13: ...ce Sparking Prickling caused by electric current THE OPERATOR MUST TURN OFF THE ELECTRIC DEVICE IMMEDIATELY AND REPORT THE DEFECT TO SERVICEMAN OF THE ELECTRIC DEVICE OR A SUPERVISOR 19 Electric devic...

Page 14: ...device in case of need the instructions for professional operator training Operation and maintenance of the device can be performed only by persons provably familiar with this User s Manual and author...

Page 15: ...AN AND WIFI PRINTER CONNECTION AND CONTROL 23 1 1 Connection via LAN cable intranet Connect RS 45 cable network LAN cable on one side to socket on the back side of the printer and the other side to th...

Page 16: ...39 Start the printer and when the boot is completed the IP address assigned by the router appears In the example it is 10 0 0 46 The IP Address is also shown in this menu after the complete start up o...

Page 17: ...web browser and push Enter The intranet control system of the printer will open The printer can be controlled via intranet only after the print process was initiated You can lift the platform and tur...

Page 18: ...of a second 0 1 s 0 1 s GO UP AND DOWN You can lift and than lower the platform used for checking the progress during the print EXIT turning off the printer fast GO UP 50 mm exit Platform is lifted b...

Page 19: ...eck the print progress here What layer is being printed and whether the command you sent to the printer was executed Show config Before initiating the print process you can check the settings of confi...

Page 20: ...20 z 39 System report Informationabout current system of the printer Software Firmware Information about updates Information about the commands sent during the print Help Basic information and recomme...

Page 21: ...g VNC viewer free to download here Change the action malina in the confiq ini file on the USB Flash disk Insert the USB Flash disk in the printer and turn on Run the VNC viewer ca 1 minute after the p...

Page 22: ...2 z 39 Click on Continue The screen with SDWARF logo appears on your monitor In left hand upper corner there is a WIFI Confiq ikon Open it Click on Scan and choose your WIFI from the list of available...

Page 23: ...Str nka 23 z 39 Input SSID the name of the network and PSK the pasword of the network and click on Add...

Page 24: ...with description present on USB device and inserted into DWARF slot The printer automatically loads the model from USB at start up If everything is set correctly no further user s action is needed Pri...

Page 25: ...n this window Comment The duplicate when created appears in the same positions as original model it is necessary to dislocate them before printing 2 Object info There is basic information about model...

Page 26: ...d selected axis 7 Support generation Serves as a support for surfaces which forms an acute angle smaller than 30 with the platform It is also necessary to support models which abuts against the platfo...

Page 27: ...device in the section Configure Machine and if necessary check whether the set parameters are consistent with device parameters Set 1280 for usage of printer with standard definition Set HD for usage...

Page 28: ...red parameter especially layer thickness Complete Export Options and check the fields as in the picture Do not forget to confirm Apply Changes after every change of setting 11 Slice When the models ar...

Page 29: ...Str nka 29 z 39 Number of layers and individual slices can be reviewed in Slice View section...

Page 30: ...the folder called NAME slice in the form of PGN files It is necessary to compress the files into single zip file Create a folder with the name of printed object in the USB flash drive directory Inser...

Page 31: ...NG FOLDER NAME EXPOSITION TIME EXPOSITION TIME OF THE FIRST LAYERS LAYER HEIGHT ACCORDING TO CHART VALUE CHART FOR LAYER HEIGHT SETTING It is important to thoroughly clean the mirrors and tank bottom...

Page 32: ...main switch on the back side 5 When the printer starts ca 1min depending on the size of model information and blue button PRESS START appears Button turns red wait for command execution 6 You can use...

Page 33: ...33 z 39 PRINTING FINALIZATION 1 Wipe off liquid material from the top of platform 2 Extract the platform from the device and wipe off remaining material from the platform 3 Carefully cut off printed...

Page 34: ...nificantly influenced by cleaning and manipulation method Properly used the tank should last for more than 100 printings Major risk in tank manipulation is mechanical damage Do not use sharp scrapers...

Page 35: ...ht be damaged 24 Installation device installation requirements Device installation is performed in accordance with manufacturer s documentation 25 Protection measures instructions obligatory for user...

Page 36: ...and dust free with low air humidity Carrier is liable for damage caused during transportation 28 Obligatory accident and damage procedure if blockage can occur the procedure which must be followed fo...

Page 37: ...device repairs must hold knowledge of function and operation manual late discovery of malfunction cause and unqualified and poorly performed maintenance may cause damage Address authorized service an...

Page 38: ...hot SECURE THE WORKPLACE TO AVOID RECONNECTION OF DEVICE TO The grid 34 List of recommended spare parts in accordance with spare parts catalogue INCORRECT SPARE PART USAGE IS CONSIDERED AN INTERVENTI...

Page 39: ...atory that owner of device follows waste law while removal disposal of waste in manner of healthy life conditions preservation and environment protection It is therefore necessary that created waste i...

Reviews: