4-6
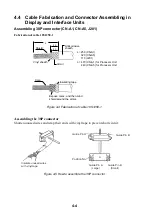
Assembling BNC connector (CN-A7, CN-A8, CN-A9, CN-A10,
CN-A11, CN-A12)
Housing
Clamp
Washer
Nut
Gasket
Center pin
15
1
2
Shield
3
3
4
5
6
1. Remove vinyl sheath of the cable by
15 mm.
2. Pass the cable through the nut, washer,
gasket and clamp.
3. Unravel the shield and fold it back
onto the clamp.
4. Shorten the insulator, leaving 3 mm.
5. Trim the shield as shown in the
drawing. Solder the center pin to the
conductor of the cable.
6. Pass the cable through the housing
and tighten the nut.
Figure 4-8 Assembling BNC connector
Summary of Contents for CSH-83
Page 1: ...COLOR SCANNING SONAR MODEL CSH 83 84 Back ...
Page 6: ...This page is intentionally left blank ...
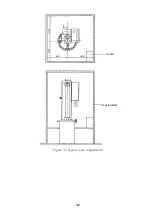
Page 11: ...3 2 Heater Heat insulator Figure 3 2 Typical sonar compartment ...
Page 68: ...A 10 ...
Page 77: ...A 19 ...
Page 78: ...A 20 ...
Page 79: ...A 21 ...
Page 80: ...A 22 ...
Page 81: ...A 23 ...
Page 82: ...A 24 ...
Page 83: ...A 25 ...
Page 84: ...A 26 ...
Page 85: ...D 1 ...
Page 86: ...D 2 ...
Page 87: ...Y Hatai D 3 ...
Page 88: ...D 4 ...
Page 89: ...Oct 31 03 D 5 ...
Page 90: ...Dec 10 02 D 6 ...
Page 91: ...D 7 ...
Page 92: ...D 8 ...
Page 93: ...D 9 ...
Page 94: ...D 10 ...
Page 95: ...D 11 ...
Page 96: ...D 12 ...
Page 97: ...D 13 ...
Page 98: ...D 14 ...
Page 99: ...D 15 ...
Page 100: ...D 16 ...
Page 101: ...D 17 ...
Page 102: ...D 18 ...
Page 103: ...D 19 ...
Page 104: ...D 20 ...

