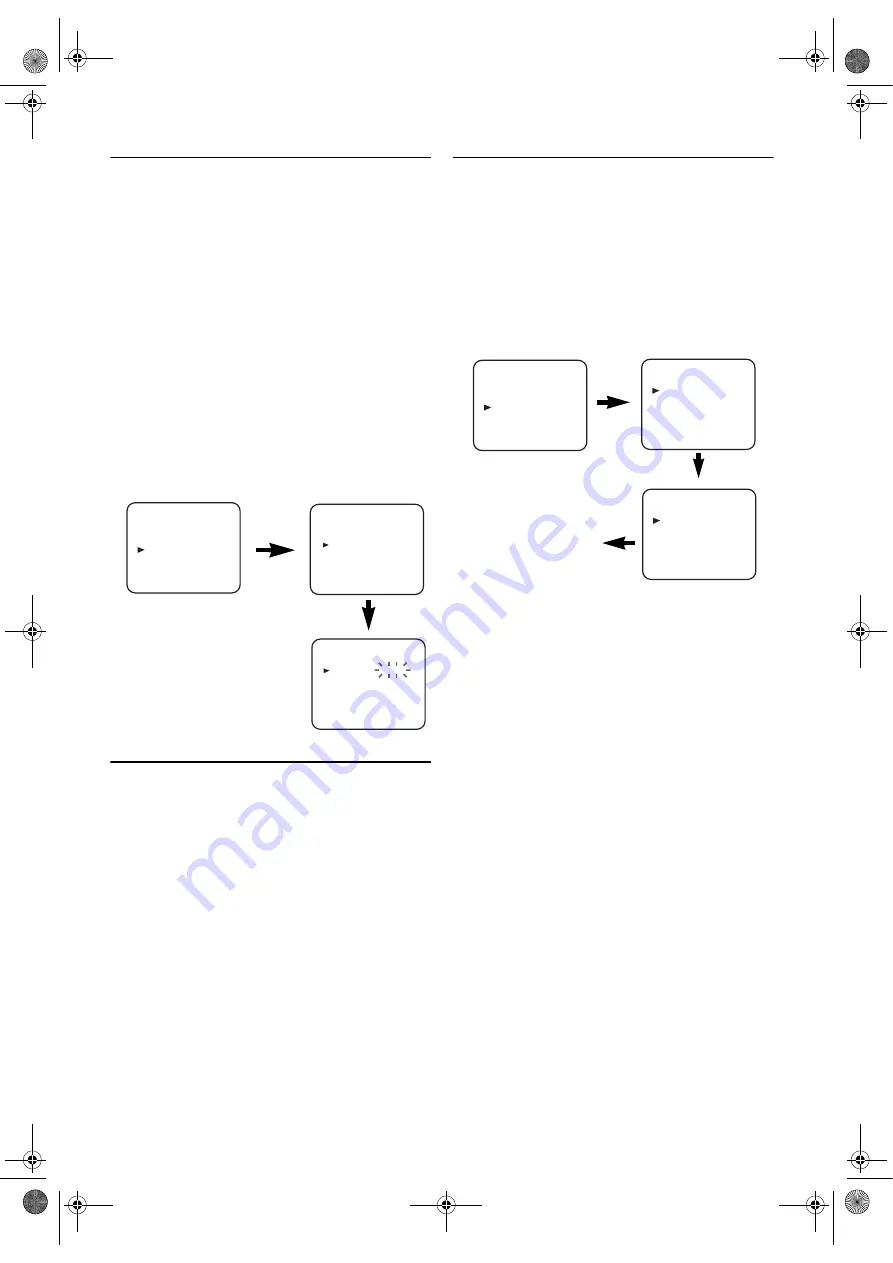
background image

10

EN

Setting the Clock

This unit incorporates a 24-hour clock. The clock must be set 
for the Timer Recording function to operate correctly.

• Use the remote control for this procedure.

1)

Press 

VCR

, then 

MENU

.

2)

Press 

K

 or 

L

 to select “INITIAL”, then press 

B

.

3)

Press 

K

 or 

L

 to select “CLOCK”, then press 

B

.

4)

Press 

K

 or 

L

 until the relevant year appears, then press 

B

5)

Press 

K

 or 

L

 until the relevant month appears, then press 

B

.

6)

Press 

K

 or 

L

 until the relevant day appears, then press 

B

7)

Press 

K

 or 

L

 until the relevant hour appears, then press 

B

.

8)

Press 

K

 or 

L

 until the relevant minute appears.

9)

Press 

MENU

 to start the clock. 

Note:

• Press 

s

 to go one step back from the current step during 

steps 

5)

 to 

8)

.

• Although seconds are not displayed, they begin counting 

from 00 when you exit by pressing 

MENU

. Use this feature 

to synchronize the clock with the correct time.

• If this unit is unplugged or if there is a power failure for 

more than 30 seconds, you may have to reset the clock.

Channel Presetting

Tuning of broadcast channels not already preset in the DVD/
VCR can be performed in two ways.

Automatic Channel Preset

• By “AUTOMATICALLY” tuning channels and placing 

them in sequential order in the DVD/VCR’s memory i.e. 
the first channel found will be memorized into the DVD/
VCR’s channel position 1, the second channel found will 
be memorized into the DVD/VCR’s channel position 2 
and so on.

• Execution of the “Automatic” channel presetting cancels all 

the preset channels. DO NOT use this feature if you intend 
to use some of the pre-tuned channels. Use the “Manual” 
channel presetting function to tune in the additional 
channels you require.

Manual Channel Preset

• Each channel is tuned manually and individually. Follow 

the steps laid out in the “Manual Channel Preset”.

Before you preset Channel...

• It is necessary to set the video channel if this unit is 

connected to the TV via the coaxial cable, and TV channel 
35 is set for broadcasting, or interference lines appear on 
the picture. Please refer to “Video Channel Setting”.

Automatic Channel Preset

You can programme the tuner to scan only the channels that 
you can receive in your area.

• Use the remote control for this procedure.

1)

Turn on the TV and select the TV channel to the video 
channel on the TV.

2)

Press 

VCR

, then 

MENU

.

3)

Press 

K

 or 

L

 to select “INITIAL”, then press 

B

.

4)

Press 

K

 or 

L

 to select “CH TUNING”, then press 

B

.

5)

Press 

K

 or 

L

 to select “AUTO”, then press 

B

.

• The tuner scans and memorizes all the active channels in 

your area. After scanning, the tuner stops on the lowest 
memorized channel.

To Select a Desired Channel

You can select a desired channel by using 

CH.

 (

K

/

L

), or 

directly pressing the 

number buttons

 on the remote control.

• Enter a channel numbers as a two-digit number for the 

quickest results. For example, to select channel 6, press 

0


and 

6

. If you only press 

6

, channel 6 will be selected after a 

brief delay.

• You can only select channels 1–99.

MENU

TIMER
SET UP
INITIAL

INITIAL

CH TUNING
CLOCK
RF OUT

CLOCK

YEAR

2 0 0 4

MONTH

0 1

DAY

0 7  WE

HOUR

_ _

MINUTE

_ _

INITIAL

CH TUNING
CLOCK
RF OUT

CH TUNING

AUTO
MANUAL
MOVE

scanning

MENU

TIMER
SET UP
INITIAL

FUN_ H97L2BD(EN).fm  Page 10  Tuesday, July 27, 2004  6:06 PM

Summary of Contents for DBVR-5500

Page 1: ...5 Auto Return 16 Quick Find 16 Index Search 16 Time Search 16 Copying a Video Tape 17 Status Display 17 DVD Operation 18 Basic Playback 18 Disc Menus 18 Title Menu 18 Calling up a Menu Screen During P...

Page 2: ...sh objects of any kind into the DVD VCR through the cabinet slots or openings as they could touch electrically live parts or short circuit parts resulting in a fire or electric shock 6 Never spill liq...

Page 3: ...BROWN LIVE Important As the colours of the wires in the mains lead of this appliance may not correspond with the coloured markings identifying the terminals in your plug proceed as follows The wire w...

Page 4: ...onal computers On the following disc the sound MAY NOT be heard Super Audio CD Note Only the sound recorded on the normal CD layer can be delivered The sound recorded on the high density Super Audio C...

Page 5: ...ng playback Press and hold this button for 1 5 seconds or more to search backward through the disc 15 CHANNEL VCR To change TV channels To adjust the tracking manually during playback 16 Remote Sensor...

Page 6: ...To search forward through the disc DVD To fast forward the tape VCR 24 PLAY To begin playback 25 DVD Press this button before using the remote control for DVD features 26 PAUSE To pause playback To a...

Page 7: ...conforms to RGB input signal the Euro AV scart connection ensures you the best picture and audio quality However if your TV does not conform to RGB input signal the S VIDEO OUT and analog AUDIO OUT co...

Page 8: ...ws you to enjoy the surround sound while producing the effecting of being in a movie theater or a concert hall If output is Dolby Digital encoded audio connect to a Dolby Digital decoder and set DOLBY...

Page 9: ...ng will be necessary if your DVD VCR is connected to the TV via the coaxial cable Use the remote control for this procedure 1 Press VCR 2 Insert a pre recorded tape into the DVD VCR The DVD VCR will s...

Page 10: ...ature if you intend to use some of the pre tuned channels Use the Manual channel presetting function to tune in the additional channels you require Manual Channel Preset Each channel is tuned manually...

Page 11: ...s VCR then MENU 2 Press K or L to select INITIAL then press B 3 Press K or L to select CH TUNING then press B 4 Press K or L to select MANUAL then press B 5 Press K or L to select POSITION then press...

Page 12: ...he DVD VCR Just press PLAY on the DVD VCR Power will automatically turn on and playback will start Direct Button Operation Using the buttons on the remote control Press FUNCTION to turn on and then pr...

Page 13: ...Function You can record in continuation from previous programme on a pre recorded tape 1 Insert a pre recorded tape Press PLAY to start playback 2 Press PAUSE at the desired point on the tape 3 Press...

Page 14: ...4 Press B until the desired mode NORMAL SOFT or SHARP is indicated on the TV screen 5 Press MENU to exit Note Once you select the Picture Select mode it stays in effect even after you turn off the DV...

Page 15: ...Programme 1 is now completed To set another timer programme repeat steps 3 to 10 11 Press MENU to exit 12 Press T SET to activate a timer recording The VCR goes into timer standby mode To Stop a Timer...

Page 16: ...ould be greater than 1 minute for SP recording and 2 minutes for LP recording Use the remote control for this procedure 1 Press VCR then SEARCH MODE 2 Press K L repeatedly until the number of programm...

Page 17: ...owners violate copyright laws and may not record clearly Status Display To check the Counter or Clock Channel number press DISPLAY Each time you press DISPLAY TV screen will change as illustrated When...

Page 18: ...ay appear on the TV screen 3 If disc menu is available on the disc audio languages subtitle options chapters for the title and other options will appear for selection 4 Press Arrow s B K L to select a...

Page 19: ...peed For DVDs and Video CDs fast forward or reverse search speed is different depending on the disc For DVDs approximate speed is 1 x2 2 x8 3 x50 and 4 x100 For Video CDs approximate speed is 1 x2 2 x...

Page 20: ...edly during playback to select one among STEREO L CH and R CH STEREO both right and left channels are active stereo L CH only left channel is active R CH only right channel is active Note If the Virtu...

Page 21: ...CH MODE repeatedly until the Marker Setup screen appears and s or B to choose the desired marker then press ENTER Note Opening the disc tray turning off the power or selecting AC at step 2 and press E...

Page 22: ...random selections press REPEAT repeatedly until TRACK appears during playback If you like to repeat the entire random selections press REPEAT repeatedly until ALL appears during playback On Screen In...

Page 23: ...Setting Choose the appropriate audio settings for your equipment It only affects during the playback of DVDs 1 Press SETUP in Stop mode 2 Press s or B to select CUSTOM then press ENTER CUSTOM mode scr...

Page 24: ...repeatedlly to select PAL or AUTO The default setting is AUTO Parental Control Parental Control limits the DVD viewing that exceeds your settings The password is required to change the PARENTAL LEVEL...

Page 25: ...yalam 5958 Maltese 5966 Maori 5955 Marathi 5964 Moldavian 5961 Mongolian 5960 Nauru 6047 Nepali 6051 Norwegian NOR 6061 O R Occitan 6149 Oriya 6164 Oromo Afan 6159 Panjabi 6247 Pashto Pushto 6265 Pers...

Page 26: ...on its surface No return to start up screen when disc is removed Reset the unit by turning it off and on again This unit does not respond to the remote control Aim the remote control directly at the s...

Page 27: ...s When a disc becomes dirty clean it with a cleaning cloth Wipe the disc from the centre out Do not wipe in a circular motion Do not use solvents such as benzine thinner commercially available cleaner...

Page 28: ...Low Voltage Directive 73 23 EEC CE Marking 93 68 EEC We declare that the following product DVD VCR Model DBVR 5500 Trade Name Funai is in compliance with following Regulations EN 55013 2001 EN55020 20...

Reviews: