background image

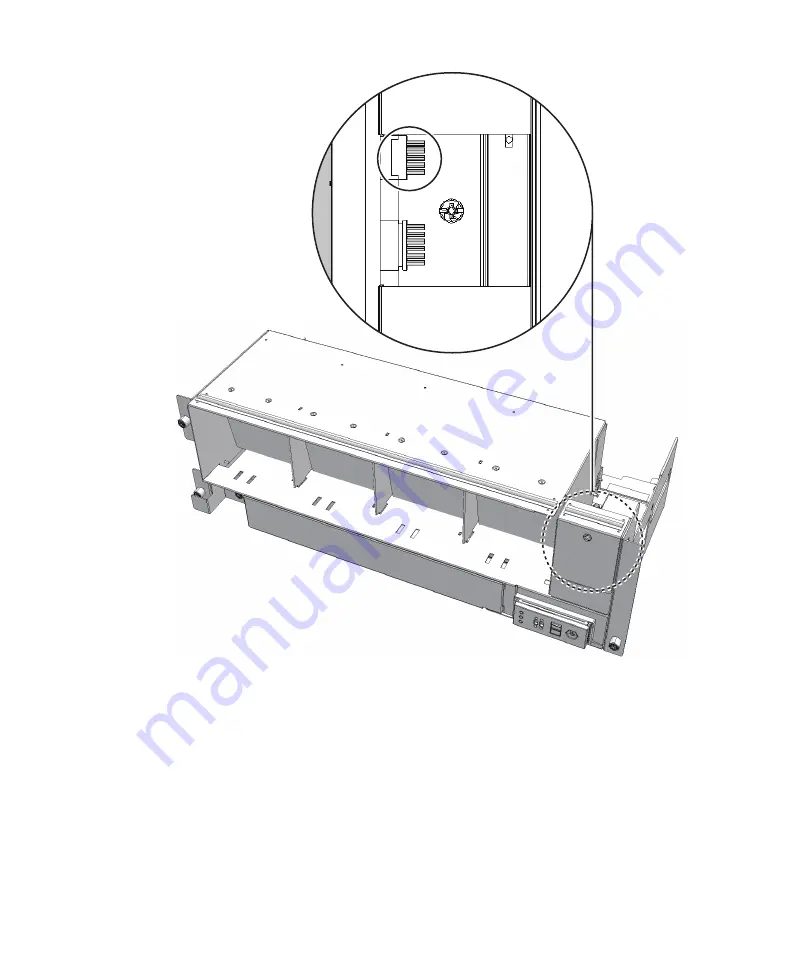
Front

Figure


23-9


Operation


panel


cable

23.5.2

Restoring


the


chassis

1.

Support


the


fan


shelf


from


below


with


one


hand


and


insert


it


into


the


chassis.


Then,


tighten


the


three


screws.

2.

Connect


the


two


cables


to


the


fan


shelf.

3.

Install


the


lower


cover


and


then


secure


it


with


the


one


screw

.

4.

Install


the


upper


cover


and


slide


the


right


and


left


stoppers


outwards.


Then,


tighten


the


two


screws


to


secure


the


upper


cover.

5.

Install


all


the


fan


units.

Fujitsu


M10-4/Fujitsu


M10-4S/SPARC


M10-4/SPARC


M10-4S


Service


Manual


February


2014

368

Summary of Contents for SPARC M10-4

Page 1: ...Fujitsu M10 4 Fujitsu M10 4S SPARC M10 4 SPARC M10 4S Service Manual Manual Code C120 E682 07EN February 2014 ...

Page 2: ... et technologies décrits dans ce document De même ces produits technologies et ce document sont protégés par des lois sur le droit d auteur des brevets et d autres lois sur la propriété intellectuelle et des traités internationaux Ce document le produit et les technologies afférents sont exclusivement distribués avec des licences qui en restreignent l utilisation la copie la distribution et la déc...

Page 3: ...g the System Components 11 2 1 Identifying the Names and Locations of Components 11 2 2 Confirming the Functions of the Operation Panel 16 2 2 1 Display function of the operation panel 19 2 2 2 Control function of the operation panel 20 2 3 Checking the LED Indications 23 2 3 1 Operation panel LEDs 23 2 3 2 LEDs on the rear panel System locator 24 2 3 3 LEDs on each component 26 2 4 Confirming the...

Page 4: ...stem Configuration 41 4 2 1 Confirming the hardware configuration 42 4 2 2 Confirming the software and firmware configurations 42 4 3 Understanding Types of Maintenance 44 Chapter 5 Understanding the Preparations for Enabling Maintenance 53 5 1 Releasing an FRU from the System with the replacefru Command 53 5 1 1 Releasing an FRU of the SPARC M10 4 M10 4S from the system 53 5 1 2 Releasing an FRU ...

Page 5: ...XSCF command 79 6 4 2 Starting the system from the operation panel 79 6 5 Restoring the Chassis 80 6 5 1 Installing the power cord 80 6 5 2 Fixing the cable support 82 6 5 3 Installing the front cover 83 Chapter 7 Maintaining the CPU Memory Units 87 7 1 Configuration of the CPU Memory Units 87 7 2 Before Maintaining a CPU Memory Unit 89 7 2 1 Types of maintenance 89 7 2 2 Maintenance flow 90 7 2 3...

Page 6: ...ntaining the Memory 169 8 1 Memory Configuration 169 8 2 Memory Configuration Rules 173 8 2 1 Memory mounting rules 174 8 2 2 Checking memory information 177 8 3 Before Maintaining Memory 178 8 3 1 Types of maintenance 178 8 3 2 Maintenance flow 179 8 3 3 Precautions for replacement 179 8 3 4 Precautions for installation 179 8 3 5 Precautions for removal 180 8 4 Enabling the Removal of Memory 180 ...

Page 7: ...em stopped maintenance 192 9 4 Removing a Crossbar Unit 193 9 4 1 Accessing a crossbar unit 193 9 4 2 Removing a crossbar unit 193 9 5 Installing a Crossbar Unit 195 9 5 1 Installing a crossbar unit 196 9 5 2 Restoring the chassis 196 9 6 Restoring the System 196 9 6 1 Inactive Cold maintenance 196 9 6 2 System stopped maintenance 198 Chapter 10 Maintaining the Power Supply Units 199 10 1 Configur...

Page 8: ...ed maintenance 209 Chapter 11 Maintaining the Fan Units 211 11 1 Configuration of the Fan Units 211 11 2 Before Maintaining a Fan Unit 212 11 2 1 Types of maintenance 213 11 2 2 Maintenance flow 213 11 2 3 Precautions for replacement 213 11 3 Enabling the Removal of a Fan Unit 214 11 3 1 Active Hot maintenance 214 11 3 2 Inactive Hot maintenance 215 11 3 3 Inactive Cold maintenance 216 11 3 4 Syst...

Page 9: ...ing the Removal of an Internal Disk 231 12 3 1 Active Hot maintenance 232 12 3 2 Active hot maintenance with DR 233 12 3 3 Inactive Hot maintenance 234 12 3 4 System stopped maintenance 234 12 4 Removing an Internal Disk 234 12 4 1 Accessing an internal disk 234 12 4 2 Removing an internal disk 235 12 5 Installing an Internal Disk 236 12 5 1 Installing an internal disk 236 12 5 2 Restoring the cha...

Page 10: ...Removing a PCI Express card cassette 255 13 5 3 Removing a PCI Express card 257 13 6 Installing a PCI Express Card 260 13 6 1 Installing a PCI Express card 260 13 6 2 Installing a PCI Express card cassette 262 13 6 3 Restoring the chassis 262 13 7 Restoring the System 262 13 7 1 Active hot maintenance with PHP 263 13 7 2 Active hot maintenance with DR 264 13 7 3 Inactive Hot maintenance 264 13 7 4...

Page 11: ...ter 15 Maintaining the Operation Panel 283 15 1 Location of the Operation Panel 283 15 2 Before Maintaining the Operation Panel 284 15 2 1 Types of maintenance 284 15 2 2 Maintenance flow 285 15 2 3 Precautions for replacement 285 15 3 Enabling the Removal of the Operation Panel 285 15 3 1 Active Cold maintenance 286 15 3 2 Inactive Cold maintenance 287 15 3 3 System stopped maintenance 287 15 4 R...

Page 12: ...SCF Unit 306 17 2 1 Types of maintenance 306 17 2 2 Maintenance flow 307 17 3 Enabling the Removal of the XSCF Unit 307 17 3 1 Active Hot maintenance 307 17 3 2 System stopped maintenance 308 17 4 Removing the XSCF Unit 309 17 5 Installing the XSCF Unit 311 17 6 Restoring the System 312 17 6 1 Active Hot maintenance 312 17 6 2 System stopped maintenance 312 Chapter 18 Maintaining the Power Supply ...

Page 13: ...nabling the Removal of a Fan Unit 325 19 3 1 Active Hot maintenance 326 19 3 2 System stopped maintenance 326 19 4 Removing a Fan Unit 327 19 4 1 Accessing a fan unit 327 19 4 2 Removing a fan unit 327 19 5 Installing a Fan Unit 328 19 5 1 Installing a fan unit 328 19 5 2 Restoring the chassis 329 19 6 Restoring the System 329 19 6 1 Active Hot maintenance 329 19 6 2 System stopped maintenance 329...

Page 14: ... of the Crossbar Box 349 22 1 Configuration of the Fan Backplane 349 22 2 Before Maintaining the Fan Backplane 350 22 2 1 Types of maintenance 351 22 2 2 Maintenance flow 351 22 3 Enabling the Removal of the Fan Backplane 351 22 4 Removing the Fan Backplane 352 22 4 1 Accessing the fan backplane 352 22 4 2 Removing the fan backplane 352 22 5 Installing the Fan Backplane 356 22 5 1 Installing the f...

Page 15: ... 2 Maintenance flow 373 24 2 3 Precautions for replacement 374 24 3 Enabling the Removal of a Crossbar Cable Electrical 374 24 3 1 Inactive Cold maintenance 374 24 3 2 System stopped maintenance 375 24 4 Removing a Crossbar Cable Electrical 376 24 5 Installing a Crossbar Cable Electrical 377 24 6 Restoring the System 378 24 6 1 Inactive Cold maintenance 378 24 6 2 System stopped maintenance 379 Ch...

Page 16: ...nce 397 26 3 3 Inactive Cold maintenance 397 26 3 4 System stopped maintenance 398 26 4 Removing an XSCF BB Control Cable 399 26 5 Installing an XSCF BB Control Cable 401 26 6 Restoring the System 402 26 6 1 Active Hot maintenance 402 26 6 2 Active Cold maintenance 403 26 6 3 Inactive Cold maintenance 403 26 6 4 System stopped maintenance 403 Chapter 27 Maintaining the XSCF DUAL Control Cables 405...

Page 17: ...es for the connection between the terminal board and fan backplane 419 28 1 3 Locations for the cable kit 420 28 2 Before Maintaining the Cable Kit 421 28 2 1 Types of maintenance 421 28 2 2 Maintenance flow 422 28 3 Enabling the Removal of the Cable Kit 422 28 4 Removing the Cable Kit 423 28 4 1 Removing the cables for the connection between the crossbar backplane unit and terminal board 423 28 4...

Page 18: ...maintenance 449 29 4 Removing the Dedicated Power Distribution Unit 450 29 5 Installing the Dedicated Power Distribution Unit 454 29 6 Restoring the System 454 29 6 1 Active Cold maintenance 455 29 6 2 System stopped maintenance 455 Appendix A Component List 457 Appendix B Component Specifications 461 B 1 CPU Memory Unit 461 B 2 Crossbar Unit 462 B 3 XSCF Unit 463 B 4 Power Supply Unit 464 B 5 Fan...

Page 19: ...ing 1M Command 480 C 6 ps 1 Command 482 C 7 prstat 1M Command 483 Appendix D External Interface Specifications 485 D 1 Serial Port 485 D 1 1 Wire connection chart for serial cable 486 D 2 USB Port 486 D 3 SAS Port 487 D 4 RESET Switch 487 Index 489 Contents xix ...

Page 20: ...Fujitsu M10 4 Fujitsu M10 4S SPARC M10 4 SPARC M10 4S Service Manual February 2014 xx ...

Page 21: ...ujitsu M10 is sold as SPARC M10 Systems by Fujitsu in Japan Fujitsu M10 and SPARC M10 Systems are identical products The preface includes the following sections Audience Related Documentation Text Conventions Notes on Safety Syntax of the Command Line Interface CLI Document Feedback Audience This document is intended for service engineers and field engineers who perform maintenance work on the sys...

Page 22: ...e Manual Fujitsu M10 SPARC M10 Systems System Operation and Administration Guide Fujitsu M10 SPARC M10 Systems Domain Configuration Guide Fujitsu M10 SPARC M10 Systems XSCF Reference Manual Fujitsu M10 SPARC M10 Systems Product Notes Fujitsu M10 SPARC M10 Systems Glossary 1 The listed manuals are subject to change without notice 2 Printed manuals are provided with the product Related Documentation...

Page 23: ... of chapters sections items buttons or menus See Chapter 2 Network Connection Text Conventions This manual uses the following fonts and symbols to express specific types of information Command syntax in the text While the XSCF commands have a section number of 8 or 1 it is omitted from the text The Oracle Solaris commands have a section number such as 1M in the text Each command has a section numb...

Page 24: ...t Feedback If you have any comments or requests regarding this document please take a moment to share it with us by indicating the manual code manual title and page and stating your points specifically through the following websites Japanese site http jp fujitsu com platform server sparc manual Global site http www fujitsu com global services computing server sparc downloads manual Fujitsu M10 4 F...

Page 25: ...ure correctly Chapter 1 Before Starting Maintenance Work This chapter describes the safety precautions that must be observed before starting any maintenance work Note the meanings of each of the following symbols and labels to ensure that the work is done correctly Warning Caution Indications Warning Labels Labels Tags Safety Precautions Notes Regarding Static Electricity Other Precautions Emergen...

Page 26: ...the crossbar box during the maintenance work The warning label on the crossbar box also describes certification standards Figure 1 1 Location of warning labels SPARC M10 4 M10 4S Figure 1 2 Location of warning labels crossbar box 1 3 Labels Tags This section explains labels and tags that are affixed on the SPARC M10 4 M10 4S and the crossbar box Fujitsu M10 4 Fujitsu M10 4S SPARC M10 4 SPARC M10 4...

Page 27: ...scribes certification standards SPARC M10 4 M10 4S Safety NRTL C Radio wave VCCI A FCC A DOC A KCC and C Tick Safety and radio wave CE BSMI and GOST R Crossbar box Safety NRTL C Radio wave VCCI A FCC A DOC A KCC and C Tick Safety and radio wave CE and CU Figure 1 3 Location of the system name plate label and standard label SPARC M10 4 M10 4S Figure 1 4 Location of the system name plate label and w...

Page 28: ...g carries an Asset ID The RFID tag of the SPARC M10 4 M10 4S is affixed on the front cover Figure 1 5 RFID tag SPARC M10 4 M10 4S Fujitsu M10 4 Fujitsu M10 4S SPARC M10 4 SPARC M10 4S Service Manual February 2014 4 ...

Page 29: ...ions warnings and instructions described on the chassis Do not insert foreign objects into the openings in the chassis Any such foreign object could come into contact with high voltage circuitry or could short circuit the components causing a fire or an electric shock Contact a service engineer to inspect the chassis Chapter 1 Before Starting Maintenance Work 5 ...

Page 30: ...odified Safety precautions on the racks The racks should be fixed on the floor ceiling or the adjacent frame The racks may be supplied with a quakeresistant options kit The use of the quakeresistant options kit prevents the racks from falling over during installation or maintenance service on the chassis Prior to installation or maintenance a safety assessment should be conducted by a service engi...

Page 31: ...ap connection destination 1 6 Other Precautions Printed boards in the chassis can be easily damaged by static electricity To prevent damage to printed boards wear a wrist strap and ground it to the chassis prior to starting maintenance When mounting any component in the chassis check the connectors on both of the chassis and component beforehand to confirm that none of the pins are bent and that a...

Page 32: ...ed on both sides of the CPU memory unit The heat sinks can be damaged by incorrect handling Do not touch the heat sinks with your hands or other objects while replacing or removing CPU memory units If a heat sink is disconnected or broken obtain a replacement CPU memory unit When storing or carrying a CPU memory unit ensure that the heat sinks are sufficiently protected When removing a cable such ...

Page 33: ...Figure 1 8 Removing the power cord SPARC M10 4 M10 4S Figure 1 9 Removing the power cord crossbar box Chapter 1 Before Starting Maintenance Work 9 ...

Page 34: ...Fujitsu M10 4 Fujitsu M10 4S SPARC M10 4 SPARC M10 4S Service Manual February 2014 10 ...

Page 35: ... Names and Locations of Components Confirming the Functions of the Operation Panel Checking the LED Indications Confirming the Types of Cable For the specifications of each component see Appendix B Component Specifications 2 1 Identifying the Names and Locations of Components This section describes the names and locations of the components mounted in the SPARC M10 4 M10 4S and the crossbar box Com...

Page 36: ...pply unit 1 Figure 2 1 Locations of components that can be accessed from the front SPARC M10 4 M10 4S Figure 2 2 Location of a component that can be accessed from the front crossbar box Fujitsu M10 4 Fujitsu M10 4S SPARC M10 4 SPARC M10 4S Service Manual February 2014 12 ...

Page 37: ...d cassette 2 Crossbar unit Only for the SPARC M10 4S The SPARC M10 4 incorporates three PCIe card cassettes Components that can be accessed from the rear Figure 2 3 Locations of components that can be accessed from the rear SPARC M10 4 M10 4S Chapter 2 Understanding the System Components 13 ...

Page 38: ...e 2 4 Locations of components that can be accessed from the rear crossbar box Internal components To access the internal components remove the CPU memory unit from the SPARC M10 4 M10 4S and the fan shelf from the crossbar box Fujitsu M10 4 Fujitsu M10 4S SPARC M10 4 SPARC M10 4S Service Manual February 2014 14 ...

Page 39: ...Component 1 CPU memory unit upper 2 CPU memory unit lower 3 Memory 4 PSU backplane unit 5 HDD backplane 6 Operation panel Figure 2 5 Locations of internal components SPARC M10 4 M10 4S Chapter 2 Understanding the System Components 15 ...

Page 40: ...re 2 6 Locations of internal components crossbar box 2 2 Confirming the Functions of the Operation Panel This section describes the functions of the operation panels of the SPARC M10 4 M10 4S and the crossbar box Fujitsu M10 4 Fujitsu M10 4S SPARC M10 4 SPARC M10 4S Service Manual February 2014 16 ...

Page 41: ... the system administrator can specify the operation mode or control the starting stopping of the system while checking the system operation status by referring to the LED indications Figure 2 7 Location of the operation panel SPARC M10 4 M10 4S Chapter 2 Understanding the System Components 17 ...

Page 42: ... 1 POWER LED 2 XSCF STANDBY LED Figure 2 8 Location of the operation panel crossbar box Figure 2 9 Appearance of operation panel SPARC M10 4 M10 4S and crossbar box Fujitsu M10 4 Fujitsu M10 4S SPARC M10 4 SPARC M10 4S Service Manual February 2014 18 ...

Page 43: ...s a BB ID number Enabled Registers a BB ID number Mode switch Enabled Mode operation of the system Disabled Power switch Enabled Start stop operation of the system Disabled Set the same mode for the SPARC M10 4S systems and crossbar boxes with the master XSCF and XCCF in the standby state If the settings are different an asterisk is displayed beside the components in the output of the showhardconf...

Page 44: ...0 4S and crossbar box 2 2 2 Control function of the operation panel The operation panel has the following switches to implement its control function BB ID switch Identifies the SPARC M10 4S and the crossbar box Mode switch slide switch Specifies the operation mode Power switch Controls start stop of the system Figure 2 11 Operation panel switches Fujitsu M10 4 Fujitsu M10 4S SPARC M10 4 SPARC M10 ...

Page 45: ...rvice mode to perform maintenance work with the system stopped Use the BB ID switch to set the BB ID number of the SPARC M10 4S or the crossbar box Set 0 to 15 for the SPARC M10 4S and 80 to 83 for the crossbar box Table 2 2 describes how to operate the BB ID switch Use the mode switch to set the operation mode for the system The Locked and Service operation modes can be switched by sliding the mo...

Page 46: ...he system startup process and then stops the system If the system stop process is in progress in Service mode Continues the system stop process If the system is stopped in Service mode Operation is ignored Even a long press does not start the system If the system is stopped in Locked mode Starts the system If a wait time for the air conditioning facilities or a warm up time is set on the XSCF the ...

Page 47: ...F is stopped Blinking System is being initialized after power on 2 3 Checking the LED Indications This section describes the statuses of the LEDs mounted on the SPARC M10 4 M10 4S and the crossbar box LEDs are mounted on the operation panel on the front of the chassis on the rear panel of the chassis and on each component that can be maintained If an error occurs the LED indication enables you to ...

Page 48: ... standby state The system is waiting for power on of the air conditioning facilities in the data center On On Off Warm up standby processing is in progress After the end of this processing the system starts up System startup processing is in progress The system is operating On On On The system is operating normally but an error has been detected Blinking On Off System stop processing is in progres...

Page 49: ...A Figure 2 12 Location of system locator SPARC M10 4 M10 4S Chapter 2 Understanding the System Components 25 ...

Page 50: ...ferred to as the locator The blink interval is 1 second 1 Hz Figure 2 13 Location of system locator crossbar box 2 3 3 LEDs on each component Each component of the SPARC M10 4 M10 4S and the crossbar box has an LED mounted These LEDs light to indicate that a component requires maintenance if that component experiences a fault Start maintenance work after checking the LED status The LEDs on each co...

Page 51: ...On Master chassis Off Slave chassis Table 2 10 LEDs on the XSCF LAN port and their statuses SPARC M10 4 M10 4S and crossbar box Name Color Status Description ACT Green On Indicates that communication is being performed Off Indicates that communication is not being performed LINK SPEED Amber On Indicates that the communication speed is 1 Gbps Green Blinking Indicates that the communication speed is...

Page 52: ... not being supplied ATTENTION Amber On Indicates that an error has occurred Blinking Indicates that the component requires maintenance This function is also referred to as the locator Off Indicates the normal state The blink interval is 1 second 1 Hz Table 2 14 LEDs on the internal disk and their statuses SPARC M10 4 M10 4S Name Color Status Description READY Green Blinking Indicates that the disk...

Page 53: ...hassis An XSCF mounted in a chassis becomes the master XSCF and monitors or controls the entire system XSCFs other than the master XSCF act as slaves and monitor or control each chassis XSCF DUAL control cable This is used to connect the master XSCF to a standby XSCF and duplicate XSCF One of the slave XSCFs functions as the standby XSCF If an abnormality occurs with the master XSCF the standby XS...

Page 54: ... 2 1 3 Figure 2 14 Locations of cable connection ports SPARC M10 4S Fujitsu M10 4 Fujitsu M10 4S SPARC M10 4 SPARC M10 4S Service Manual February 2014 30 ...

Page 55: ...n number Connection port 1 XSCF DUAL control port 2 XSCF BB control port 3 Crossbar cable connection port Figure 2 15 Locations of cable connection ports crossbar box Chapter 2 Understanding the System Components 31 ...

Page 56: ...Fujitsu M10 4 Fujitsu M10 4S SPARC M10 4 SPARC M10 4S Service Manual February 2014 32 ...

Page 57: ...ure and identify the failure location in the following cases For details on the flow for determining the cause of a failure see 3 2 Determining the Causes of Individual Failures When the CHECK LED is on When an error message is displayed on the console When an error is displayed as a result of executing a command for checking the status When an error is displayed in the error log 3 2 Determining t...

Page 58: ... engineer Confirm that an error message is displayed on the OS and XSCF consoles Execute showlogs on XSCF to display failure information Figure 3 1 Troubleshooting flow 3 3 Identifying a Failure This section explains the method for identifying a failure Use the flow described in 3 2 Determining the Causes of Individual Failures to determine the appropriate way of checking for a failure Fujitsu M10...

Page 59: ...omponent that does not have an LED execute XSCF shell commands such as the showhardconf command from the maintenance terminal For details see 3 3 3 Checking the status of a component 3 3 2 Checking error messages Display error messages to check the log information and obtain an error overview You can use either of the following two methods to check the error messages Checking error log information...

Page 60: ...65 B60X 001AA PCI 1 Name_Property ethernet Vendor ID 1077 Device ID 8000 Subsystem_Vendor ID 1077 Subsystem ID 017e Model Ommitted XSCF showstatus MBU Status Normal MEM 0A Status Faulted Table 3 1 Status of components Display Description Normal The unit is in the normal state Faulted The unit is faulty and is not operating Degraded A part of the unit has failed or degraded but the unit is running ...

Page 61: ...IBOX 2008 IOBT V_12_0V 12 069 0 000 V PCIBOX 2008 IOBT V_3_3_NO0 3 293 0 000 V PCIBOX 2008 IOBT V_3_3_NO1 3 295 0 000 V PCIBOX 2008 IOBT V_3_3_NO2 3 291 0 000 V PCIBOX 2008 IOBT V_3_3_NO3 3 300 0 000 V PCIBOX 2008 IOBT V_1_8V 1 804 0 000 V PCIBOX 2008 IOBT V_0_9V 0 900 0 000 V 3 3 4 Checking the status of a PCI expansion unit If a PCI expansion unit is connected execute the ioxadm command from the...

Page 62: ...t Lists the event log power Lists the power log env Lists the temperature history monitor Lists the monitoring message log console Lists the console message log ipl Lists the IPL message log panic Lists the panic message log 3 3 5 Checking log information Execute the showlogs command to check the error log information 1 Log in to the XSCF shell 2 Execute the showlogs command to check the log infor...

Page 63: ...RESPONSE What the system has done if anything to alleviate any subsequent problems Nov 1 16 30 20 dt88 292 IMPACT Loss of services provided by the device instances associated with this fault IMPACT Description of the assumed impact of the failure 3 3 6 Checking the messages output by the predictive self repairing tool Check the messages output from the Oracle Solaris Fault Manager predictive self ...

Page 64: ...assis requiring maintenance and determine its location The CHECK LEDs on the operation and rear panels blink An execution example in which the chassis requiring maintenance is the master chassis is shown below When specifying a different chassis such as BB 01 set setlocator b 1 blink For details on where to find and how to check the CHECK LEDs see 2 3 Checking the LED Indications 3 4 Downloading E...

Page 65: ...enance Preparing Tools Required for Maintenance Confirming the System Configuration Understanding Types of Maintenance 4 1 Preparing Tools Required for Maintenance This section explains tools required for maintenance Table 4 1 lists the tools required for maintenance on a Field Replaceable Unit FRU 4 2 Confirming the System Configuration This section explains how to check the hardware and software...

Page 66: ... confirm the hardware configuration information The following information is displayed Current configuration and status Number of mounted Field Replaceable Units FRUs Status of the unit in which a physical partition error or degradation occurred Information on the PCI expansion unit Name properties of the PCI Express PCIe card 4 2 2 Confirming the software and firmware configurations The software ...

Page 67: ...he physical system boards that are mounted showpcl Displays the configuration information for a physical partition hardware resource information showfru Displays the setting information for a device 1 Log in to the control domain console of the physical partition where the component to be maintained is mounted For information on logging in to the control domain console see 8 2 Switching to the Con...

Page 68: ...nding Types of Maintenance This section explains the types of maintenance The single chassis configuration and building block configuration denote the following system configurations There are the following five types of maintenance Active hot maintenance Maintenance work is performed while the physical partition remains turned on and the input power to the chassis in which the target Field Replac...

Page 69: ...igure 4 2 Active hot maintenance for crossbar box maintenance Active cold maintenance Maintenance work is performed while the physical partition to which the maintenance target FRU belongs remains turned on but the input power to the chassis in which the target FRU is mounted is off power cord is disconnected It is necessary to use dynamic reconfiguration DR to disconnect a chassis requiring maint...

Page 70: ...ical partition active Figure 4 3 Active cold maintenance for SPARC M10 4S maintenance Figure 4 4 Active cold maintenance for dedicated power distribution unit maintenance Inactive hot maintenance Maintenance work is performed while the physical partition to which the maintenance target FRU belongs is powered off but the input power to the chassis in which the target FRU is mounted is on power cord...

Page 71: ... partition active BB 2 Hot Physical partition active BB 5 Hot Figure 4 5 Inactive hot maintenance for SPARC M10 4S maintenance Figure 4 6 Inactive hot maintenance for crossbar box maintenance Inactive cold maintenance Maintenance work is performed while the physical partition to which the maintenance target FRU belongs is powered off and the input power to the chassis in which the target FRU is mo...

Page 72: ...tition stopped BB 2 Hot Physical partition stopped BB 5 Hot Figure 4 7 Inactive cold maintenance for SPARC M10 4S maintenance System stopped maintenance Maintenance work is performed while all the physical partitions are powered off and input power to the chassis in which the target FRU is mounted is off power cord is disconnected Figure 4 8 System stopped maintenance for SPARC M10 4S maintenance ...

Page 73: ... Types of maintenance for SPARC M10 4 Supported Maintenance can be performed Unsupported Maintenance cannot be performed FRU Active hot Active cold Inactive hot Inactive cold 1 System stopped Reference CPU memory unit Unsupported Unsupported Unsupported Supported Supported Chapter 7 Figure 4 9 System stopped maintenance for crossbar box maintenance Figure 4 10 System stopped maintenance for dedica...

Page 74: ...maintenance for internal disks are different from those of other FRUs For details see Table 12 2 3 The types of maintenance for PCIe cards are different from those of other FRUs For details see Table 13 1 Table 4 6 Types of maintenance for SPARC M10 4S Supported Maintenance can be performed Unsupported Maintenance cannot be performed FRU Active hot Active cold Inactive hot Inactive cold 1 System s...

Page 75: ... Unsupported 1 Supported 2 Chapter 17 Power supply unit Supported 4 Unsupported 1 Supported Unsupported 1 Supported 2 Chapter 18 Fan unit Supported Unsupported 1 Supported Unsupported 1 Supported 2 Chapter 19 XSCF interface unit Unsupported Unsupported 1 Unsupported Unsupported 1 Supported 2 Chapter 20 Crossbar backplane unit Unsupported Unsupported 1 Unsupported Unsupported 1 Supported 2 Chapter ...

Page 76: ...orted 3 Chapter 28 Dedicated power distribution unit Unsupported Supported Unsupported Unsupported Supported Chapter 29 1 Maintenance is possible only for the cables connecting crossbar boxes with each other Also the XSCF must be configured as a slave before maintenance is started If it is operating as the master XSCF switch it to a standby XSCF 2 If any physical partition is currently operating t...

Page 77: ...ch component described in Chapter 7 onwards Releasing an FRU from the System with the replacefru Command Releasing a Chassis from the Physical Partition Powering Off the Physical Partition Requiring Maintenance Stopping the Entire System Accessing Components 5 1 Releasing an FRU from the System with the replacefru Command This section describes the procedure for releasing an FRU requiring maintena...

Page 78: ...he SPARC M10 4 M10 4S 1 Log in to the XSCF shell 2 Execute the replacefru command to display the maintenance menu 3 Select the FRU requiring maintenance by specifying it with a numeric key In the following example since the SPARC M10 4S chassis itself is selected 1 is entered 4 Select the FRU requiring maintenance by specifying it with a numeric key In the following example since BB 0 is showing D...

Page 79: ...reaker of BB 0 and please select finish 4 2 If you want to suspend the maintenance without exchanging device please select cancel f finish c cancel 6 Select the faulty FRU by specifying it with a numeric key Since it was confirmed in step 4 that BB 0 is faulty 1 is also entered here 7 After confirming that the selected FRU is displayed enter r 8 Confirm that the CHECK LED of the FRU is on or blink...

Page 80: ...unit of the crossbar box XSCF unit of the crossbar box 1 Log in to the XSCF shell 2 Execute the replacefru command to display the maintenance menu 3 Select the FRU requiring maintenance by specifying it with a numeric key In the following example since the crossbar box chassis itself is selected 2 is entered 4 Select the FRU requiring maintenance by specifying it with a numeric key In the followin...

Page 81: ...m that the CHECK LED of the FRU is on or blinking To release a crossbar box chassis itself confirm that the system locator on the chassis is blinking For details on the locations of LEDs see 2 3 2 LEDs on the rear panel System locator and 2 3 3 LEDs on each component You can now start FRU maintenance Do not enter f until you complete the maintenance work 5 2 Releasing a Chassis from the Physical P...

Page 82: ...tion In the following example Status of PPAR ID 00 displays Running which indicates that the physical partition is operating 5 Execute the showdomainstatus command to confirm the operating condition of the logical domain In the following example Status of the logical domain displays Solaris running which indicates that Oracle Solaris is operating 6 Connect to the control domain console of the phys...

Page 83: ...CIE9 domain01 IOV PCIE10 BUS PCIE10 domain01 IOV PCIE11 BUS PCIE11 domain01 IOV BB0 CMUL NET0 PCIE PCIE0 primary OCC BB0 CMUL SASHBA PCIE PCIE0 primary OCC BB0 PCI0 PCIE PCIE1 primary EMP BB0 PCI3 PCIE PCIE2 primary EMP BB0 PCI4 PCIE PCIE2 primary EMP BB0 PCI7 PCIE PCIE3 primary EMP 9 Execute the ldm list io command to check the usage status of the I O device In the following example values displa...

Page 84: ...CIE PCIE1 primary EMP BB0 PCI3 PCIE PCIE2 primary EMP BB0 PCI4 PCIE PCIE2 primary EMP BB0 PCI7 PCIE PCIE3 primary EMP BB0 PCI8 PCIE PCIE3 primary EMP BB1 CMUL NET0 PCIE PCIE8 BB1 CMUL SASHBA PCIE PCIE8 BB1 PCI0 PCIE PCIE9 BB1 PCI3 PCIE PCIE10 BB1 PCI4 PCIE PCIE10 BB1 PCI7 PCIE PCIE11 10 Delete all the I O devices from the domain to which the I O devices of the system board to be deleted are assign...

Page 85: ...ing example Fault of PSB 01 0 displays Degraded which indicates that the system board is operating but has some faulty parts 13 Execute the deleteboard command to release the chassis requiring maintenance from the physical partition In the following example PSB 01 0 is released from the physical partition 14 Execute the showboards command to confirm that the chassis requiring maintenance has been ...

Page 86: ...master XSCF again 4 Execute the showpparstatus command to confirm the operating condition of the physical partition In the following example PPAR Status of PPAR ID 00 displays Running which indicates that the physical partition is operating 5 Execute the showdomainstatus command to confirm the operating condition of the logical domain In the following example Status of the logical domain displays ...

Page 87: ...itch the mode switches of BB ID 00 and 01 to Service mode For a building block configuration with crossbar box Switch the mode switches of BB ID 80 and 81 to Service mode 5 4 Stopping the Entire System This section describes the procedure for stopping the entire system To undertake system stopped maintenance power off all the physical partitions to stop the entire system before physically removing...

Page 88: ...dicates that Oracle Solaris is shutting down 5 4 1 Stopping the system with the XSCF command 1 Switch the mode switch on the operation panel to Service mode For details see 2 2 2 Control function of the operation panel 2 Log in to the XSCF shell 3 Execute the poweroff command In response to the confirmation message enter y In the following example the status of PPAR IDs 00 and 01 displays Powering...

Page 89: ...ce mode For details see 2 2 2 Control function of the operation panel 2 Press the power switch on the operation panel for 4 seconds or more For details see 2 2 2 Control function of the operation panel 3 Check that the POWER LED on the operation panel is off 5 5 Accessing Components This section describes the operations that must be completed prior to accessing a component requiring maintenance 5 ...

Page 90: ...0 4S or the crossbar box to perform maintenance work on a component do so only after removing the cable clamp from the power cord 1 Release the latch A in the figure of the cable clamp Pulling the cable clamp toward the rear of the chassis facilitates release of the latch Fujitsu M10 4 Fujitsu M10 4S SPARC M10 4 SPARC M10 4S Service Manual February 2014 66 ...

Page 91: ...Figure 5 3 Releasing the cable clamp crossbar box 2 Remove the power cord of the SPARC M10 4S from the PSU backplane unit or remove the power cord of the crossbar box from the power supply unit Chapter 5 Understanding the Preparations for Enabling Maintenance 67 ...

Page 92: ...cover When performing maintenance on a component from the front of a SPARC M10 4S or crossbar box chassis remove the front cover before starting the work 1 Release the right and left slide locks of the front cover and pull it towards the front Fujitsu M10 4 Fujitsu M10 4S SPARC M10 4 SPARC M10 4S Service Manual February 2014 68 ...

Page 93: ...ide locks of the front cover SPARC M10 4 M10 4S Figure 5 7 Releasing the slide locks of the front cover crossbar box 2 Lift the front cover upwards to remove it Chapter 5 Understanding the Preparations for Enabling Maintenance 69 ...

Page 94: ...Fujitsu M10 4 Fujitsu M10 4S SPARC M10 4 SPARC M10 4S Service Manual February 2014 70 ...

Page 95: ...ring the Chassis 6 1 Incorporating an FRU into the System with the replacefru Command This section describes the procedure for incorporating an FRU into the system after maintenance To do this resume the replacefru command which is running to incorporate the FRU into the system 6 1 1 Incorporating an FRU of the SPARC M10 4 M10 4S into the system If the maintenance target is the SPARC M10 4 M10 4S ...

Page 96: ...start to diagnose BB 0 s start c cancel s Diagnostic tests for BB 0 have started Initial diagnosis is about to start Continue y n y SB 00 0 power on sequence started 0 30 60 end Initial diagnosis started 1800sec 0 30 60 90 120 150 180 210 240 270 300 330 360 end Initial diagnosis has completed SB power off sequence started 1200sec 0 30 60 90 120 end SB powered off PSB Test Fault 00 0 Passed Normal...

Page 97: ...This operation may take up to 20 minute s progress scale reported in seconds 0 30 60 90 120 150 180 210 240 270 300 330 360 390 done 5 When the maintenance menu appears enter c to exit the operation 6 1 2 Incorporating an FRU of the crossbar box into the system If the maintenance target is a crossbar box the following are targeted as FRUs Chassis of the crossbar box Power supply unit of the crossb...

Page 98: ...he following screen is displayed Wait until the processing has completed 2 Confirm that the status of the replacement FRU is normal Normal and then enter f 3 When the maintenance menu appears enter c to exit the operation 6 2 Incorporating a Chassis into a Physical Partition This section describes the procedure for incorporating a chassis into a physical partition by using dynamic reconfiguration ...

Page 99: ...lacement amounts the resource assignment state cannot be restored to the original state If the resource assignment state is not restored to the original state the resources are placed in the free resource state In this case execute the ldm 1M command to assign the resources to the logical domain again XSCF showresult 0 XSCF showboards a PSB PPAR ID LSB Assignment Pwr Conn Conf Test Fault 00 0 00 0...

Page 100: ...ring maintenance has been switched to the standby state before maintenance execute the switchscf command to switch the chassis to the master XSCF 8 If you performed maintenance on a PCIe card using dynamic reconfiguration DR restore the devices that were released before the maintenance to their original configurations Reassign the devices that were released from the root domain and I O domains 1 P...

Page 101: ...sis whose XSCFs are in the standby state to Locked mode For a building block configuration without crossbar box Switch the mode switches of BB ID 00 and 01 to Locked mode For a building block configuration with crossbar box Switch the mode switches of BB ID 80 and 81 to Locked mode 2 Log in to the XSCF shell 3 Execute the showstatus command to confirm that there is no problem with the FRU after th...

Page 102: ...following example PPAR ID 0 is specified 6 4 Starting the Entire System This section describes the procedure for starting the entire system The system can be started in either of the following two ways Starting the system with an XSCF command Starting the system from the operation panel 1 Check that the XSCF STANDBY LED on the operation panel is on 2 Log in to the XSCF shell 3 Switch the mode swit...

Page 103: ...f a component 6 Start the entire system For details see 6 4 1 Starting the system with an XSCF command or 6 4 2 Starting the system from the operation panel After a short while the following processes are performed The POWER LED on the operation panel will be turned on The power on self test POST self diagnosis when powering on will be executed Then the system starts up For details see 6 1 Startin...

Page 104: ... chassis 6 5 1 Installing the power cord If the power cord of the SPARC M10 4S or the crossbar box was removed to perform the maintenance work connect the power cord and then attach the cable clamp to the power cord 1 Connect the power cord of the SPARC M10 4S to the PSU backplane unit or connect the power cord of the crossbar box to the power supply unit Figure 6 1 Installing the power cord SPARC...

Page 105: ... cord and then fix the cable clamp The cable clamp is firmly fixed by locking the latch A in the figure and then pushing the cable clamp towards the front of the chassis Figure 6 3 Locking the cable clamp SPARC M10 4 M10 4S Chapter 6 Understanding the Preparations for Restoring the System 81 ...

Page 106: ...n a component at the rear of the SPARC M10 4 M10 4S lift the cable support and fix it in place 1 Lift the cable support and lock it in place by pushing the upper and lower screw fittings towards the back direction of the arrow Fujitsu M10 4 Fujitsu M10 4S SPARC M10 4 SPARC M10 4S Service Manual February 2014 82 ...

Page 107: ... 6 5 3 Installing the front cover If the front cover of the SPARC M10 4S or the crossbar box was removed to perform maintenance install it after installing the components at the front of or inside the chassis 1 To install the front cover insert the tabs of the front cover into the notches at Chapter 6 Understanding the Preparations for Restoring the System 83 ...

Page 108: ...ront of the chassis Figure 6 6 Installing the front cover SPARC M10 4 M10 4S Figure 6 7 Installing the front cover crossbar box Fujitsu M10 4 Fujitsu M10 4S SPARC M10 4 SPARC M10 4S Service Manual February 2014 84 ...

Page 109: ...Note Check that the front cover is firmly attached and fixed Chapter 6 Understanding the Preparations for Restoring the System 85 ...

Page 110: ...Fujitsu M10 4 Fujitsu M10 4S SPARC M10 4 SPARC M10 4S Service Manual February 2014 86 ...

Page 111: ... of the CPU Memory Units Before Maintaining a CPU Memory Unit Enabling the Removal of a CPU Memory Unit Removing a CPU Memory Unit Installing a PCI Express cable Switching the microSD Card Installing a CPU Memory Unit Restoring the System 7 1 Configuration of the CPU Memory Units This section describes the configuration and locations of the CPU memory units A CPU memory unit is composed of the fol...

Page 112: ...nit There are two types of CPU memory units FRAME A and FRAME B The type of a CPU memory unit can be determined from the indication on the label A in the figure If a CPU memory unit does not have the FRAME B indication it is a FRAME A unit Fujitsu M10 4 Fujitsu M10 4S SPARC M10 4 SPARC M10 4S Service Manual February 2014 88 ...

Page 113: ...CPU memory unit 7 2 Before Maintaining a CPU Memory Unit This section describes the types and the flow of maintenance of the CPU memory units as well as some precautions 7 2 1 Types of maintenance Table 7 1 lists the types of maintenance for the CPU memory units For the definition of maintenance see 4 3 Understanding Types of Maintenance Chapter 7 Maintaining the CPU Memory Units 89 ...

Page 114: ...with the one mounted in the CPU memory unit requiring maintenance This eliminates the need to match the firmware version For details see 7 6 Switching the microSD Card 7 2 2 Maintenance flow Table 7 2 lists the sequence of the maintenance procedure for the CPU memory units To expand reduce a CPU memory unit upper it is necessary to remove the CPU memory unit from the chassis and then install it ag...

Page 115: ... not replace a CPU memory unit at the same time as the PSU backplane unit If you replace both a CPU memory unit and the PSU backplane unit at the same time the system will fail to operate normally Replace the CPU memory unit or PSU backplane unit and then confirm that the newly installed part operates normally by executing the showhardconf or showstatus command Then replace the other Field Replace...

Page 116: ...h seven or eight root complexes increases the maximum number of mounted PCIe cards However since the I O bus is reconfigured the physical partition needs to be reconfigured A root complex consists of an I O controller on a processor PCI switches and PCI devices under the I O controller For SPARC M10 4 M10 4S with two CPUs installed if a CPU memory unit upper is installed for expansion to add two C...

Page 117: ... the physical partition must also be reconfigured 7 3 Enabling the Removal of a CPU Memory Unit This section describes the preparations that must be completed prior to removing a CPU memory unit The preparation procedure differs depending on the maintenance type as follows Active Cold maintenance Inactive Cold maintenance System stopped maintenance 7 3 1 Active Cold maintenance 1 Open the rack doo...

Page 118: ...1 Releasing an FRU of the SPARC M10 4 M10 4S from the system 7 Remove all the power cords from the PSU backplane unit of the chassis requiring maintenance For details see 5 5 2 Removing the power cord 7 3 2 Inactive Cold maintenance 1 Open the rack door 2 Log in to the XSCF shell 3 Execute the showlogs command to identify the component requiring maintenance For details see 3 3 5 Checking log infor...

Page 119: ...5 5 2 Removing the power cord 7 3 3 System stopped maintenance For a single chassis configuration 1 Open the rack door 2 Log in to the XSCF shell 3 Execute the dumpconfig command to back up the XSCF setting information when replacing the CPU memory unit lower For details see 10 9 2 Saving XSCF setting information in the Fujitsu M10 SPARC M10 Systems System Operation and Administration Guide If you...

Page 120: ...uilding block configuration 1 Open the rack door 2 Log in to the XSCF shell 3 Execute the showlogs command to identify the component requiring maintenance For details see 3 3 5 Checking log information 4 Confirm the hardware and software configurations For details see 4 2 Confirming the System Configuration 5 Stop the entire system For details see 5 4 Stopping the Entire System 6 Execute the repla...

Page 121: ...bling the Removal of a CPU Memory Unit Unless otherwise specified the figures explained in this section use the SPARC M10 4S with a FRAME A CPU memory unit 7 4 1 Accessing a CPU memory unit 1 Remove the crossbar cables from the cable support Perform this procedure only when using equipment rack model 26xx or equipment rack model 16xx The procedure may vary depending on the model of the equipment r...

Page 122: ... that is fixed to the supporting column on the rear of the rack and then install the cable holder by rotating it 180 degrees Figure 7 4 Cable holder screw d Use the hook and loop fastener to fix the crossbar cables to the cable holder Fujitsu M10 4 Fujitsu M10 4S SPARC M10 4 SPARC M10 4S Service Manual February 2014 98 ...

Page 123: ...e all the crossbar cables from the crossbar unit b Remove the hook and loop fastener of the cable support A in the figure to which the crossbar cables are fixed Figure 7 6 Hook and loop fastener of the cable support c Use the hook and loop fastener to fix the crossbar cables to the cable holder installed on the supporting column on the rear of the rack Chapter 7 Maintaining the CPU Memory Units 99...

Page 124: ...of the chassis The cables to be removed are as follows Interface cable connected to the PCI Express PCIe card Crossbar cables They may have been removed in step 1 XSCF BB control cable XSCF DUAL control cable XSCF LAN cable Serial cable LAN cable SAS cable USB cable 4 Remove all the PCIe card cassettes For details see 13 5 2 Removing a PCI Express card cassette 5 If any crossbar units are mounted ...

Page 125: ...mory unit from the chassis This section describes the procedure for removing a CPU memory unit 1 Loosen the one screw securing the lever of the CPU memory unit rear left side and then lower the right and left levers of the CPU memory unit to the horizontal position Figure 7 9 Locations of the screw and the levers of the CPU memory unit Chapter 7 Maintaining the CPU Memory Units 101 ...

Page 126: ... 4 3 Removing the CPU memory unit upper Remove the CPU memory unit upper after removing the CPU memory unit from the chassis Perform reduction using the same procedure To install a CPU memory unit upper remove its filler unit 1 Unlock push the top cover of the CPU memory unit and remove the cover by sliding it in the direction of the arrow Fujitsu M10 4 Fujitsu M10 4S SPARC M10 4 SPARC M10 4S Serv...

Page 127: ...push the right side guide and remove it by sliding it in the direction of the arrow Figure 7 12 Removing right side guide 3 Unlock push the left side guide when viewed from the rear and remove it Chapter 7 Maintaining the CPU Memory Units 103 ...

Page 128: ...ory unit upper When removing the filler unit for the CPU memory unit upper you do not need to remove the PCIe cables Proceed to step 10 Figure 7 14 Removing the right side PCIe cables 5 Remove the two PCIe cables A in the figure on the left side that connect the CPU memory units upper and lower from the CPU memory unit upper Fujitsu M10 4 Fujitsu M10 4S SPARC M10 4 SPARC M10 4S Service Manual Febr...

Page 129: ... Figure 7 15 Removing the left side cables 6 Of the two PCIe cables on the left side also remove the rear one from the CPU memory unit lower as it is short Chapter 7 Maintaining the CPU Memory Units 105 ...

Page 130: ...the left side rear Perform the following work from the rear side of the chassis Figure 7 17 shows the standing position A in the figure of a field engineer Fujitsu M10 4 Fujitsu M10 4S SPARC M10 4 SPARC M10 4S Service Manual February 2014 106 ...

Page 131: ...A Figure 7 17 Standing position of a field engineer 7 Raise the levers A in the figure on the right and left sides to release the CPU memory unit upper Chapter 7 Maintaining the CPU Memory Units 107 ...

Page 132: ...the CPU memory unit upper 9 If PCIe cables are connected to the CPU memory unit lower that has a filler unit mounted move the PCIe cables A and B in the figure further apart toward the outside of the chassis Fujitsu M10 4 Fujitsu M10 4S SPARC M10 4 SPARC M10 4S Service Manual February 2014 108 ...

Page 133: ...tch on any PCIe cable Note Place the removed CPU memory unit upper on a grounded antistatic ESD mat Figure 7 19 How to move PCIe cables further apart 10 Lift the CPU memory unit upper or filler unit and then remove it carefully Chapter 7 Maintaining the CPU Memory Units 109 ...

Page 134: ...alling a CPU memory unit upper confirm that PCIe cables are connected to the CPU memory unit lower If PCIe cables have not been connected to the CPU memory unit lower remove the CPU memory unit board once and connect PCIe cables If PCIe cables are connected to the CPU memory unit lower this work is not required 1 Remove the eight screws at both ends of the XSCF cable connection port on the rear of...

Page 135: ...s for the SPARC M10 4S with a FRAME A CPU memory unit 2 Loosen the two screws holding the upper rear side of the CPU memory unit lower Then remove the rear cover A in the figure by pulling it in the direction of the arrow Chapter 7 Maintaining the CPU Memory Units 111 ...

Page 136: ...ing the XSCF board A in the figure and rear cover Tilt the right lever of the XSCF mount with your fingers about 5 mm 0 2 in to the right B in the figure Lift up the right side of the XSCF board and release the connection of the connector C in the figure Fujitsu M10 4 Fujitsu M10 4S SPARC M10 4 SPARC M10 4S Service Manual February 2014 112 ...

Page 137: ...10 4 with a FRAME A CPU memory unit For the SPARC M10 4S with a FRAME A CPU memory unit Remove the four screws fixing the XSCF board A in the figure Then lift the right side of the XSCF board to release the connector Chapter 7 Maintaining the CPU Memory Units 113 ...

Page 138: ...cted XSCF board for the SPARC M10 4S with a FRAME A CPU memory unit 4 Pull out the XSCF board diagonally to the right arrow Figure 7 25 Pulling out an XSCF board for the SPARC M10 4 with a FRAME A CPU memory unit Fujitsu M10 4 Fujitsu M10 4S SPARC M10 4 SPARC M10 4S Service Manual February 2014 114 ...

Page 139: ...SPARC M10 4S with a FRAME A CPU memory unit 5 Remove the screw fixing the XSCF mount For the SPARC M10 4 M10 4S with a FRAME A CPU memory unit Remove the one screw fixing the XSCF mount A in the figure Chapter 7 Maintaining the CPU Memory Units 115 ...

Page 140: ...A Figure 7 27 Screw for the XSCF mount for the SPARC M10 4 with a FRAME A CPU memory unit Fujitsu M10 4 Fujitsu M10 4S SPARC M10 4 SPARC M10 4S Service Manual February 2014 116 ...

Page 141: ...the XSCF mount for the SPARC M10 4S with a FRAME A CPU memory unit For the SPARC M10 4S with a FRAME B CPU memory unit Remove the two screws fixing the XSCF mount A in the figure Chapter 7 Maintaining the CPU Memory Units 117 ...

Page 142: ...S with a FRAME A CPU memory unit Raise the protruding left lever B in the figure of the XSCF mount A in the figure by about 2 mm 0 1 in with your fingers and slide it about 8 mm 0 4 in toward the front C in the figure Then remove it upward D in the figure Fujitsu M10 4 Fujitsu M10 4S SPARC M10 4 SPARC M10 4S Service Manual February 2014 118 ...

Page 143: ...A B C D D Figure 7 30 Removing the XSCF mount for the SPARC M10 4 with a FRAME A CPU memory unit Chapter 7 Maintaining the CPU Memory Units 119 ...

Page 144: ...r the SPARC M10 4S with a FRAME A CPU memory unit For the SPARC M10 4S with a FRAME B CPU memory unit Remove the XSCF mount A in the figure upward B in the figure Fujitsu M10 4 Fujitsu M10 4S SPARC M10 4 SPARC M10 4S Service Manual February 2014 120 ...

Page 145: ...screw fixing the CPU memory unit board For the SPARC M10 4 M10 4S with a FRAME A CPU memory unit Remove the one black screw A in the figure fixing the center part of the radiator on the front and the four screws fixing the CPU memory unit board B in the figure Chapter 7 Maintaining the CPU Memory Units 121 ...

Page 146: ...y unit For SPARC M10 4S with a FRAME B CPU memory unit Remove the one black screw A in the figure fixing the center part of the radiator on the front and the six screws fixing the CPU memory unit board B in the figure Fujitsu M10 4 Fujitsu M10 4S SPARC M10 4 SPARC M10 4S Service Manual February 2014 122 ...

Page 147: ...ted on the back side of the CPU memory unit board Figure 7 34 Screws on the CPU memory unit board for the SPARC M10 4S with a FRAME B CPU memory unit 8 Place your thumb on the frame located at the center of the right and left sides of the CPU memory unit board A in the figure and insert your fingers under the CPU memory unit board B in the figure from the side of the connector unit Chapter 7 Maint...

Page 148: ...gure 7 36 Finger position when releasing the connection of the connector rear surface 9 Supporting the frame with your thumb A in the figure disconnect the connection of the connector by pushing up the left and right sides at the Fujitsu M10 4 Fujitsu M10 4S SPARC M10 4 SPARC M10 4S Service Manual February 2014 124 ...

Page 149: ...re Figure 7 37 How to disconnect the connection of the connector 10 Place your thumb on the connector unit located at the center of the right and left sides of the CPU memory unit board A in the figure and hold the board by inserting your fingers under the CPU memory unit board B in the figure from the side of the connector unit Chapter 7 Maintaining the CPU Memory Units 125 ...

Page 150: ...en holding the board surface Figure 7 39 Finger position when holding the board back 11 Lift the CPU memory unit board in the horizontal position and remove it from the frame Fujitsu M10 4 Fujitsu M10 4S SPARC M10 4 SPARC M10 4S Service Manual February 2014 126 ...

Page 151: ...g the CPU memory unit board 12 Remove the sheet A in the figure You can expand the CPU memory unit upper by performing the above procedure You do not have to perform step 13 Chapter 7 Maintaining the CPU Memory Units 127 ...

Page 152: ... Figure 7 41 Removing the sheet 13 Remove the three PCIe cables The direction in which the PCIe cables are removed varies depending on the type of the CPU memory unit The connectors for the three PCIe cables facing the outside of the CPU memory unit Fujitsu M10 4 Fujitsu M10 4S SPARC M10 4 SPARC M10 4S Service Manual February 2014 128 ...

Page 153: ...ctors for the three PCIe cables facing the outside of the CPU memory unit The connector for one PCIe cable facing the outside of the CPU memory unit and the other two facing the front of the CPU memory unit Chapter 7 Maintaining the CPU Memory Units 129 ...

Page 154: ...nit 14 Connect the three PCIe cables by matching their position labels of the PCle cable with the corresponding position marks on the PCIBP board A in the figure The direction in which the PCIe cables are installed varies depending on the type of the CPU memory unit When reducing a CPU memory unit upper you do not have to perform this step because the PCIe cables are not present The connectors for...

Page 155: ...nectors for the three PCIe cables facing the outside of the CPU memory unit The connector for one PCIe cable facing the outside of the CPU memory unit and the other two facing the front of the CPU memory unit Chapter 7 Maintaining the CPU Memory Units 131 ...

Page 156: ...bles with the connector for one PCIe cable facing the outside and the two facing the front of the CPU memory unit 15 Install the sheet A in the figure Fujitsu M10 4 Fujitsu M10 4S SPARC M10 4 SPARC M10 4S Service Manual February 2014 132 ...

Page 157: ...oard against a protruding part or the frame guide Figure 7 46 Installing sheet 16 Hold the connector unit at the center of the CPU memory unit board and install it on the frame in the horizontal position For how to hold the CPU memory unit board see Figure 7 38 and Figure 7 39 Chapter 7 Maintaining the CPU Memory Units 133 ...

Page 158: ... figure can be inserted into the space between the end face of the far side of the CPU memory unit board and the radiator A in the figure a Insert the board carefully into the frame keeping it horizontal b If the threaded hole of the board and the threaded hole of the frame D in the figure do not match when you are inserting the board place the board Fujitsu M10 4 Fujitsu M10 4S SPARC M10 4 SPARC ...

Page 159: ...ame time Figure 7 49 Installing the CPU memory unit board for the SPARC M10 4 M10 4S with a FRAME A CPU memory unit For the SPARC M10 4S with a FRAME B CPU memory unit Install the CPU memory unit board with the left and right guides A and B in the figure and the left guide on the board C in the figure as a guide a Insert the board carefully into the frame keeping it horizontal b Attach the connect...

Page 160: ...ime Figure 7 50 Installing the CPU memory unit board for the SPARC M10 4S with a FRAME B CPU memory unit 17 Fix the CPU memory unit board with screws For the SPARC M10 4 M10 4S with a FRAME A CPU memory unit Fujitsu M10 4 Fujitsu M10 4S SPARC M10 4 SPARC M10 4S Service Manual February 2014 136 ...

Page 161: ...nd two points on the right of the XSCF mount with the frame guides of the CPU memory unit lower Then install the XSCF mount by sliding it to the front and fix it with one screw Figure 7 51 Installing the XSCF mount for the SPARC M10 4 M10 4S with a FRAME A CPU memory unit For the SPARC M10 4S with a FRAME B CPU memory unit Align the left protruding part A in the figure of the XSCF mount with the f...

Page 162: ...sert the XSCF board into guides at the two locations A in the figure on the mount B in the figure and push the right lever of the mount about 5 mm 0 2 in to the right C in the figure to attach E in the figure the connector unit D in the figure Then fix it with one screw F in the figure Fujitsu M10 4 Fujitsu M10 4S SPARC M10 4 SPARC M10 4S Service Manual February 2014 138 ...

Page 163: ...E A CPU memory unit For the SPARC M10 4S with FRAME A CPU memory unit Insert the XSCF board into the left guide A in the figure and press down the right connector unit B in the figure to attach the connector Then fix it with two screws Chapter 7 Maintaining the CPU Memory Units 139 ...

Page 164: ...or the SPARC M10 4S with a FRAME A CPU memory unit 20 Attach the rear cover with two screws from the upper part of the rear side of the CPU memory unit lower Fujitsu M10 4 Fujitsu M10 4S SPARC M10 4 SPARC M10 4S Service Manual February 2014 140 ...

Page 165: ... at both ends of the XSCF cable connection port on the rear of the CPU memory unit lower For the SPARC M10 4 with a FRAME A CPU memory unit and the SPARC M10 4S with a FRAME B CPU memory unit this step is not necessary Chapter 7 Maintaining the CPU Memory Units 141 ...

Page 166: ...he replacement To use the same firmware version as that used before the replacement remove the microSD card from the CPU memory unit lower being replaced and then install it in the replacement CPU memory unit lower 1 Remove the screw of the microSD card protective tape A in the figure that is fixed on the removed CPU memory unit lower and then remove the protective tape Fujitsu M10 4 Fujitsu M10 4...

Page 167: ...oving the protective tape 2 Push in the microSD card slightly with your finger and then release it The microSD card pops up slightly 3 Pull out the microSD card horizontally Chapter 7 Maintaining the CPU Memory Units 143 ...

Page 168: ... microSD card 4 Remove the microSD card from the new CPU memory unit lower Perform the same procedure as steps 1 to 3 5 Insert the microSD card that was removed in step 3 into the microSD card slot of the new CPU memory unit lower Then push it in with a finger until it locks in place Fujitsu M10 4 Fujitsu M10 4S SPARC M10 4 SPARC M10 4S Service Manual February 2014 144 ...

Page 169: ...nserting a microSD card 6 Attach the microSD card protective tape and tighten the screw 7 7 Installing a CPU Memory Unit This section describes the procedure for installing a CPU memory unit Unless otherwise specified the figures explained in this section use the SPARC M10 4S with a FRAME A CPU memory unit Chapter 7 Maintaining the CPU Memory Units 145 ...

Page 170: ...hout removing the packaging material covering the connector part of the cable Note The shortest PCIe cable is no longer necessary during maintenance Connect it to the removed CPU memory unit and return them together 7 7 1 Installing the CPU memory unit upper Install the CPU memory unit upper on the CPU memory unit lower When replacing the CPU memory unit lower install the CPU memory unit upper on ...

Page 171: ...rt 2 Install the CPU memory unit upper or filler unit on the CPU memory unit lower When installing the CPU memory unit upper Carefully install the CPU memory unit upper by setting the four guides A in the figure of the CPU memory unit upper into the grooves B in the figure of the CPU memory unit lower Chapter 7 Maintaining the CPU Memory Units 147 ...

Page 172: ...r When installing a filler unit Align the two guides A in the figure on the filler unit with the grooves B in the figure for them in the CPU memory unit lower and install the filler unit Fujitsu M10 4 Fujitsu M10 4S SPARC M10 4 SPARC M10 4S Service Manual February 2014 148 ...

Page 173: ...nit upper by holding it down from the center where the label PUSH is applied and then push it into place Firmly push the unit so that there is no space between the CPU memory unit upper and the frame of the CPU memory unit lower Chapter 7 Maintaining the CPU Memory Units 149 ...

Page 174: ...ct to the CPU memory unit upper the four right and left PCIe cables connecting the CPU memory units upper and lower While pressing the pin that locks the PCIe cable insert it vertically Fujitsu M10 4 Fujitsu M10 4S SPARC M10 4 SPARC M10 4S Service Manual February 2014 150 ...

Page 175: ...aterial of the PCIe cable connector part with any clip on the left and right side guides 5 If a filler unit for the CPU memory unit upper has been installed hold the packaging material A and B in the figure of the PCIe cable connector part over the top of the left and right side guides C and D in the figure Figure 7 64 Packaging material of the PCIe cable connector part 6 Align the four clips on e...

Page 176: ...es for the SPARC M10 4 M10 4S with a FRAME A CPU memory unit Figure 7 66 Positions of the clips on the left and right side guides for the SPARC M10 4S with a FRAME B CPU memory unit Fujitsu M10 4 Fujitsu M10 4S SPARC M10 4 SPARC M10 4S Service Manual February 2014 152 ...

Page 177: ...Figure 7 67 CPU memory unit upper and positions of the clips on the side guide for the SPARC M10 4 M10 4S with a FRAME A CPU memory unit Chapter 7 Maintaining the CPU Memory Units 153 ...

Page 178: ... 68 CPU memory unit upper and positions of the clips on the side guide for the SPARC M10 4S with a FRAME B CPU memory unit Fujitsu M10 4 Fujitsu M10 4S SPARC M10 4 SPARC M10 4S Service Manual February 2014 154 ...

Page 179: ...Figure 7 69 Filler unit of the CPU memory unit upper and positions of the clips on the side guide for the SPARC M10 4 M10 4S with a FRAME A CPU memory unit Chapter 7 Maintaining the CPU Memory Units 155 ...

Page 180: ...70 Filler unit of the CPU memory unit upper and positions of the clips on the side guide for the SPARC M10 4S with a FRAME B CPU memory unit 7 Unlock push the top cover of the CPU memory unit and install the top cover by sliding it Fujitsu M10 4 Fujitsu M10 4S SPARC M10 4 SPARC M10 4S Service Manual February 2014 156 ...

Page 181: ...elow with one hand 3 Raise the right and left levers of the CPU memory unit to secure it 7 7 3 Restoring the chassis 1 If a crossbar unit was mounted install the mounting frame and then tighten the three screws 2 If any crossbar units were mounted reinstall all of them For details see 9 5 Installing a Crossbar Unit 3 Install all the PCIe card cassettes For details see 13 6 2 Installing a PCI Expre...

Page 182: ... equipment rack model 26xx is used a Remove the hook and loop fastener of the crossbar cables from the cable holder b Remove the screw securing the cable holder and then rotate the cable holder through 180 degrees to install it on the supporting column at the rear of the rack c Connect all the crossbar cables to the crossbar unit d Use the hook and loop fastener to fix the crossbar cables to the c...

Page 183: ...ct all the power cords to the PSU backplane unit of the chassis requiring maintenance For details see 6 5 1 Installing the power cord 2 Return to the operation of the XSCF firmware replacefru command to confirm that the chassis has been incorporated into the system For details see 6 1 1 Incorporating an FRU of the SPARC M10 4 M10 4S into the system 3 Execute the diagxbu command to diagnose the cro...

Page 184: ... cord 2 Return to the operation of the XSCF firmware replacefru command to confirm that the chassis has been incorporated into the system For details see 6 1 1 Incorporating an FRU of the SPARC M10 4 M10 4S into the system 3 Execute the diagxbu command to diagnose the crossbar cables Diagnosis is performed when the system board of the chassis connected with the crossbar cables is not incorporated ...

Page 185: ...ncorporating an FRU of the SPARC M10 4 M10 4S into the system 3 Execute the diagxbu command to diagnose the crossbar cables Diagnosis is performed when the system board of the chassis connected with the crossbar cables is not incorporated into the physical partition or when the physical partition into which the chassis is incorporated is powered off The example below specifies the following 00 BB ...

Page 186: ...ut a hardware RAID 1 Connect all the power cords to the PSU backplane unit of the chassis requiring maintenance For details see 6 5 1 Installing the power cord 2 Return to the operation of the XSCF firmware replacefru command to confirm that the chassis has been incorporated into the system For details see 6 1 1 Incorporating an FRU of the SPARC M10 4 M10 4S into the system For a single chassis co...

Page 187: ...ed restoration is not necessary Proceed to step 5 a Log in to the XSCF shell b Execute the restoreconfig command to restore the XSCF setting information that has been saved with the dumpconfig command For details see 10 9 3 XSCF設定情報を復元する in the Fujitsu M10 SPARC M10 Systems System Operation and Administration Guide c Execute the version command to confirm the firmware version information If the XC...

Page 188: ...ponse to an inquiry The following example shows the diagnosis of system board 00 0 7 Execute the showstatus command to confirm that the CPU memory unit is operating normally after maintenance If there is no problem nothing is displayed 8 Execute the showhardconf command to check the hardware configuration and the status of each component Confirm that no asterisk is displayed in front of each compo...

Page 189: ...firm that the chassis has been incorporated into the system For details see 6 1 1 Incorporating an FRU of the SPARC M10 4 M10 4S into the system For a single chassis configuration you do not have to incorporate the chassis Proceed to step 4 3 Execute the diagxbu command to diagnose the crossbar cables Diagnosis is performed when the system board of the chassis connected with the crossbar cables is...

Page 190: ...ved with the dumpconfig command For details see 10 9 3 XSCF設定情報を復元する in the Fujitsu M10 SPARC M10 Systems System Operation and Administration Guide c Execute the version command to confirm the firmware version information If the XCP firmware version does not match that used before the replacement update the firmware For details see 16 1 3 Updating firmware in the Fujitsu M10 SPARC M10 Systems Syst...

Page 191: ... In the following example PPAR ID 0 is set for Auto boot 8 Execute the setpparmode command to deactivate the Autoboot function of the guest domain In the following example PPAR ID 0 is set for Auto boot 9 Start the entire system For details see 6 4 1 Starting the system with an XSCF command or 6 4 2 Starting the system from the operation panel 10 The ok prompt appears 11 Enable the RAID volume to ...

Page 192: ...eed to set the time if the NTP server is set to the XSCF Proceed to step 17 16 If the XSCF time is different from the current time execute the setdate command to set the time Specify the time in either of the following formats yyyy MM DD hh mm ss year month day hour 24 hour clock minute second MMDDhhmmyyyy ss monthdayhour 24 hour clock minuteyear second In the following example October 20 2013 16 ...

Page 193: ...mory Restoring the System 8 1 Memory Configuration This section describes the configuration and location of memory A maximum of 32 memory modules can be implemented in one CPU memory unit One chassis can contain two CPU memory units the CPU memory unit upper and lower Therefore the maximum number of memory modules that can be implemented in one chassis is 64 Figure 8 1 shows the memory locations a...

Page 194: ...Location number Component Group 1 Memory CMUL MEM 00A A 2 Memory CMUL MEM 00B B 3 Memory CMUL MEM 01A A 4 Memory CMUL MEM 01B B 5 Memory CMUL MEM 02A A 6 Memory CMUL MEM 02B B Figure 8 1 Memory locations CPU memory unit lower Fujitsu M10 4 Fujitsu M10 4S SPARC M10 4 SPARC M10 4S Service Manual February 2014 170 ...

Page 195: ...Memory CMUL MEM 07B B 17 Memory CMUL MEM 10A A 18 Memory CMUL MEM 10B B 19 Memory CMUL MEM 11A A 20 Memory CMUL MEM 11B B 21 Memory CMUL MEM 12A A 22 Memory CMUL MEM 12B B 23 Memory CMUL MEM 13A A 24 Memory CMUL MEM 13B B 25 Memory CMUL MEM 14A A 26 Memory CMUL MEM 14B B 27 Memory CMUL MEM 15A A 28 Memory CMUL MEM 15B B 29 Memory CMUL MEM 16A A 30 Memory CMUL MEM 16B B 31 Memory CMUL MEM 17A A 32 ...

Page 196: ...mber Component Group 33 Memory CMUU MEM 00A A 34 Memory CMUU MEM 00B B 35 Memory CMUU MEM 01A A 36 Memory CMUU MEM 01B B 37 Memory CMUU MEM 02A A 38 Memory CMUU MEM 02B B 39 Memory CMUU MEM 03A A Figure 8 2 Memory locations CPU memory unit upper Fujitsu M10 4 Fujitsu M10 4S SPARC M10 4 SPARC M10 4S Service Manual February 2014 172 ...

Page 197: ... Memory CMUU MEM 11A A 52 Memory CMUU MEM 11B B 53 Memory CMUU MEM 12A A 54 Memory CMUU MEM 12B B 55 Memory CMUU MEM 13A A 56 Memory CMUU MEM 13B B 57 Memory CMUU MEM 14A A 58 Memory CMUU MEM 14B B 59 Memory CMUU MEM 15A A 60 Memory CMUU MEM 15B B 61 Memory CMUU MEM 16A A 62 Memory CMUU MEM 16B B 63 Memory CMUU MEM 17A A 64 Memory CMUU MEM 17B B 8 2 Memory Configuration Rules This section describe...

Page 198: ...of all the memory modules Each eight module unit of mounted memory is indicated by letters a to f Table 8 1 Table 8 2 and Table 8 3 list the supported memory installation configurations The memory mounting locations may vary depending on the number of mounted CPU memory units Refer to this figure and table when you expand or reduce memory As for the mounting order of memory group B give priority t...

Page 199: ...EM 14A MEM 11A MEM 10A MEM 15B MEM 14B MEM 11B MEM 10B CPU 0 CPU 1 MEM 00B MEM 00A MEM 01B MEM 01A MEM 04B MEM 04A MEM 05B MEM 05A MEM 07A MEM 07B MEM 06A MEM 06B MEM 03A MEM 03B MEM 02A MEM 02B Front CMUL Front MEM 12A MEM 13A MEM 16A MEM 17A MEM 12B MEM 13B MEM 16B MEM 17B MEM 15A MEM 14A MEM 11A MEM 10A MEM 15B MEM 14B MEM 11B MEM 10B CMUU Figure 8 3 Mounting locations and units of memory Chapt...

Page 200: ...n Figure 8 3 c in Figure 8 3 d in Figure 8 3 e in Figure 8 3 f in Figure 8 3 56 a in Figure 8 3 b in Figure 8 3 c in Figure 8 3 d in Figure 8 3 e in Figure 8 3 f in Figure 8 3 g in Figure 8 3 64 a in Figure 8 3 b in Figure 8 3 c in Figure 8 3 d in Figure 8 3 e in Figure 8 3 f in Figure 8 3 g in Figure 8 3 h in Figure 8 3 When only the CPU memory unit lower is mounted When both the CPU memory unit ...

Page 201: ...in Figure 8 3 c in Figure 8 3 d in Figure 8 3 g in Figure 8 3 h in Figure 8 3 XSCF showhardconf Ommitted MBU Status Normal Ver 2086h Serial TZ1249M00C FRU Part Number CA07363 D001 A0 7060744 Power_Supply_System Memory_Size 64 GB Type A CPU 0 Status Normal Ver 4142h Serial 00325040 Freq 2 800 GHz Type 0x10 Core 16 Strand 2 MEM 00A Status Normal Code 2c800118KSF1G72PZ 1G6E1 4531 B1F92ED5 Type 04 Siz...

Page 202: ...aintenance work Also see the contents of Chapter 1 Before Starting Maintenance Work Table 8 4 Types of maintenance for memory Configuration Active hot Active cold Inactive hot Inactive cold 1 System stopped Single chassis configuration Unsupported Unsupported Unsupported Supported Supported Figure 8 4 Viewing memory information 8 3 Before Maintaining Memory This section describes the types and flo...

Page 203: ...7 4 7 4 7 4 3 Removing memory 8 5 8 5 4 Installing memory 8 6 8 6 5 Installing a CPU memory unit 7 7 7 7 7 7 6 Restoring the system 8 7 8 7 8 7 8 3 2 Maintenance flow Table 8 5 lists the sequence of the maintenance procedure for memory The procedure for expanding memory is the same as that for installing memory The procedure for reducing memory is the same as that for removing memory 8 3 3 Precaut...

Page 204: ... error 8 3 5 Precautions for removal Note the following points when removing memory Observe the memory installation rules when you remove memory For details see 8 2 1 Memory mounting rules 8 4 Enabling the Removal of Memory This section describes the preparations that must be completed prior to the removal of memory The preparation procedure differs depending on the maintenance type as follows Act...

Page 205: ...ch the memory requiring maintenance is mounted For details see 5 2 Releasing a Chassis from the Physical Partition 6 Execute the replacefru command to release the chassis requiring maintenance from the system For details see 5 1 1 Releasing an FRU of the SPARC M10 4 M10 4S from the system 7 Remove all the power cords from the PSU backplane unit of the chassis requiring maintenance For details see ...

Page 206: ...e 5 1 1 Releasing an FRU of the SPARC M10 4 M10 4S from the system 7 Remove all the power cords from the PSU backplane unit of the chassis requiring maintenance For details see 5 5 2 Removing the power cord 8 4 3 System stopped maintenance 1 Open the rack door 2 Log in to the XSCF shell 3 Execute the showlogs command to identify the component requiring maintenance For details see 3 3 5 Checking lo...

Page 207: ...you attempting to remove it For details see 8 4 Enabling the Removal of Memory 8 5 1 Accessing memory 1 Perform the preparations that must be completed prior to removing the CPU memory unit For details see 7 4 1 Accessing a CPU memory unit 2 Remove the CPU memory unit To remove the memory mounted on the CPU memory unit upper see 7 4 2 Removing a CPU memory unit from the chassis To remove the memor...

Page 208: ...he procedure for installing a memory module Perform expansion using the same procedure 8 6 1 Installing memory 1 Place the memory module by aligning the notched section with the corresponding part of the memory slot connector 2 Push the memory module into the slot evenly Fujitsu M10 4 Fujitsu M10 4S SPARC M10 4 SPARC M10 4S Service Manual February 2014 184 ...

Page 209: ...emory unit upper see 7 7 1 Installing the CPU memory unit upper If you have installed the memory of the CPU memory unit lower see 7 7 1 Installing the CPU memory unit upper and 7 7 2 Installing the CPU memory unit in the chassis 2 Restore the chassis For details see 7 7 3 Restoring the chassis 8 7 Restoring the System This section describes the procedure for restoring the system after replacement ...

Page 210: ... physical partition is powered on The example below specifies the following 00 BB ID of the chassis to start the diagnosis 02 PPAR ID of the destination where the chassis to start the diagnosis is connected You can specify only one of these 4 Execute the showlogs command to confirm that the system is operating normally For details see 3 3 5 Checking log information 5 Incorporate the chassis in whi...

Page 211: ...agnosis 01 BB ID of the destination where the chassis to start the diagnosis is connected You can specify one or more of these To specify multiple connection destination BB IDs enter a command like diagxbu y b 00 t 01 t 02 4 Execute the showlogs command to confirm that the system is operating normally For details see 3 3 5 Checking log information 5 Power on the physical partition requiring mainte...

Page 212: ...4 Close the rack door Fujitsu M10 4 Fujitsu M10 4S SPARC M10 4 SPARC M10 4S Service Manual February 2014 188 ...

Page 213: ...moving a Crossbar Unit Installing a Crossbar Unit Restoring the System 9 1 Configuration of the Crossbar Units This section describes the configuration and the locations of the crossbar units The crossbar units of the SPARC M10 4S are connected to the crossbar units of other SPARC M10 4S units or to a crossbar box for system extension Two crossbar units are mounted on a SPARC M10 4S When performin...

Page 214: ...aintenance Work Figure 9 1 Location of crossbar units 9 2 Before Maintaining a Crossbar Unit This section describes the types and flow of maintenance of the crossbar units 9 2 1 Types of maintenance Table 9 1 lists the types of maintenance for the crossbar units For the definition of maintenance see 4 3 Understanding Types of Maintenance Fujitsu M10 4 Fujitsu M10 4S SPARC M10 4 SPARC M10 4S Servic...

Page 215: ...st be removed If the power cords are not removed an electrical failure may occur 9 2 2 Maintenance flow Table 9 2 lists the sequence of the maintenance procedure for the crossbar units 9 3 Enabling the Removal of a Crossbar Unit This section describes preparation that must be completed prior to removing a crossbar unit The procedure for the preparation varies depending on the maintenance type as f...

Page 216: ...om the system For details see 5 1 1 Releasing an FRU of the SPARC M10 4 M10 4S from the system 7 Remove all the power cords from the PSU backplane unit of the chassis requiring maintenance For details see 5 5 2 Removing the power cord 9 3 2 System stopped maintenance 1 Open the rack door 2 Log in to the XSCF shell 3 Execute the showlogs command to identify the component requiring maintenance For d...

Page 217: ...em to ensure that they are reinstalled correctly For details see 5 1 1 Releasing an FRU of the SPARC M10 4 M10 4S from the system 7 Remove all the power cords from the PSU backplane unit of the chassis requiring maintenance For details see 5 5 2 Removing the power cord 9 4 Removing a Crossbar Unit This section describes the procedure for removing a crossbar unit Enable the removal of the crossbar ...

Page 218: ...ng crossbar units 2 Open the eject levers A in the figure upwards and downwards respectively and then pull the crossbar unit out of the CPU memory unit Fujitsu M10 4 Fujitsu M10 4S SPARC M10 4 SPARC M10 4S Service Manual February 2014 194 ...

Page 219: ... If a crossbar unit is mounted with a bent pin in a connector the chassis or crossbar unit may be damaged Also carefully proceed with the work to prevent any pin from being bent Figure 9 3 Opening the eject levers 3 Support the crossbar unit from below with one hand and carefully remove it from the mounting frame 9 5 Installing a Crossbar Unit This section describes the procedure for installing a ...

Page 220: ... crossbar unit 2 Lift the cable support to fix it For details see 6 5 2 Fixing the cable support 9 6 Restoring the System This section describes the procedure for restoring the system after installing the crossbar units The restoration procedure differs depending on the maintenance type as follows Inactive Cold maintenance System stopped maintenance 9 6 1 Inactive Cold maintenance 1 Connect all th...

Page 221: ...b 00 t 01 t 02 4 Execute the showlogs command to confirm that the system is operating normally For details see 3 3 5 Checking log information 5 Switch the mode switches of the master chassis and those chassis whose XSCFs are in the standby state to Locked mode For a building block configuration without crossbar box Switch the mode switches of BB ID 00 and 01 to Locked mode For a building block con...

Page 222: ...is is performed when the system board of the chassis connected with the crossbar cables is not incorporated into the physical partition or when the physical partition into which the chassis is incorporated is powered off The example below specifies the following 00 BB ID of the chassis to start the diagnosis 01 BB ID of the destination where the chassis to start the diagnosis is connected You can ...

Page 223: ...pply Unit Enabling the Removal of a Power Supply Unit Removing a Power Supply Unit Installing a Power Supply Unit Restoring the System 10 1 Configuration of the Power Supply Units This section describes the configuration and the locations of the power supply units The power supply units feed power to the individual components The components can have the 1 1 redundant configuration Active hot maint...

Page 224: ...ore Starting Maintenance Work Figure 10 1 Location of power supply unit 10 2 Before Maintaining a Power Supply Unit This section describes the types and flow of maintenance of the power supply units as well as some precautions 10 2 1 Types of maintenance Table 10 1 lists the types of maintenance for the power supply units For the Fujitsu M10 4 Fujitsu M10 4S SPARC M10 4 SPARC M10 4S Service Manual...

Page 225: ...t 10 4 3 Installing a power supply unit 10 5 4 Restoring the system 10 6 definition of maintenance see 4 3 Understanding Types of Maintenance 10 2 2 Maintenance flow Table 10 2 lists the sequence of the maintenance procedure for the power supply units 10 2 3 Precautions for replacement Note the following points when replacing a power supply unit There are two power supply units Thus the system can...

Page 226: ...al of a power supply unit The preparation procedure differs depending on the maintenance type as follows Active Hot maintenance Inactive Hot maintenance Inactive Cold maintenance System stopped maintenance 10 3 1 Active Hot maintenance 1 Open the rack door 2 Log in to the XSCF shell 3 Execute the showlogs command to identify the component requiring maintenance For details see 3 3 5 Checking log in...

Page 227: ...4 2 Confirming the System Configuration 5 Stop the entire system For details see 5 4 Stopping the Entire System 6 Execute the showpparstatus command to confirm that the physical partition requiring maintenance is powered off 7 Execute the replacefru command to release the power supply unit requiring maintenance from the system For details see 5 1 1 Releasing an FRU of the SPARC M10 4 M10 4S from t...

Page 228: ...intenance 1 Open the rack door 2 Log in to the XSCF shell 3 Execute the showlogs command to identify the component requiring maintenance For details see 3 3 5 Checking log information 4 Confirm the hardware and software configurations For details see 4 2 Confirming the System Configuration 5 Power off the physical partition requiring maintenance For details see 5 3 Powering Off the Physical Partit...

Page 229: ...ils see 4 2 Confirming the System Configuration 5 Stop the entire system For details see 5 4 Stopping the Entire System 6 Execute the replacefru command to release the chassis requiring maintenance from the system For a single chassis configuration you do not have to release the chassis Proceed to step 7 For details see 5 1 1 Releasing an FRU of the SPARC M10 4 M10 4S from the system 7 Remove all ...

Page 230: ... For details see 5 5 3 Removing the front cover 10 4 2 Removing a power supply unit 1 Remove the power cord from the power supply unit requiring maintenance 2 Loosen the screws securing the power supply unit and open the lever Figure 10 2 Screws securing power supply unit 3 Hold the lever and pull the power supply unit out of the chassis 4 Support the power supply unit from below with one hand and...

Page 231: ...hand and insert it carefully into its slot 2 Firmly push the power supply unit into its mounting position 3 Close the lever and then tighten the screws 4 Connect the power cords to the power supply unit 10 5 2 Restoring the chassis 1 Connect the power cords to the PSU backplane unit of the chassis requiring maintenance 2 Confirm that the LED green on the power supply unit is blinking 3 Install the...

Page 232: ...are configuration and the status of each component 4 Close the rack door 10 6 2 Inactive Hot maintenance For a single chassis configuration 1 Log in to the XSCF shell 2 Return to the operation of the XSCF firmware replacefru command to confirm that the power supply unit has been incorporated into the system For details see 6 1 1 Incorporating an FRU of the SPARC M10 4 M10 4S into the system 3 Star...

Page 233: ...onnect all the power cords to the PSU backplane unit of the chassis requiring maintenance For details see 6 5 1 Installing the power cord 2 Return to the operation of the XSCF firmware replacefru command to confirm that the chassis has been incorporated into the system For details see 6 1 1 Incorporating an FRU of the SPARC M10 4 M10 4S into the system 3 Power on the physical partition requiring m...

Page 234: ...3 Start the entire system For details see 6 4 Starting the Entire System 4 Close the rack door Fujitsu M10 4 Fujitsu M10 4S SPARC M10 4 SPARC M10 4S Service Manual February 2014 210 ...

Page 235: ... Installing a Fan Unit Restoring the System 11 1 Configuration of the Fan Units This section describes the configuration and the locations of the fan units Five fan units are mounted in each chassis Each fan unit has two cooling fans that cool the components in the chassis If a fault occurs with a cooling fan during system operation the XSCF detects the error However the system can continue operat...

Page 236: ...s chapter before starting the maintenance work Also see the contents of Chapter 1 Before Starting Maintenance Work Figure 11 1 Location of fan units 11 2 Before Maintaining a Fan Unit This section describes the types and the flow of maintenance of the fan units as well as some precautions Fujitsu M10 4 Fujitsu M10 4S SPARC M10 4 SPARC M10 4S Service Manual February 2014 212 ...

Page 237: ...the system 11 6 11 2 1 Types of maintenance Table 11 1 lists the types of maintenance for the fan units For the definition of maintenance see 4 3 Understanding Types of Maintenance 11 2 2 Maintenance flow Table 11 2 shows the maintenance procedure for the fan units 11 2 3 Precautions for replacement Note the following points when replacing a fan unit When replacing multiple fan units replace one u...

Page 238: ...ce type as follows Active Hot maintenance Inactive Hot maintenance Inactive Cold maintenance System stopped maintenance 11 3 1 Active Hot maintenance 1 Open the rack door 2 Log in to the XSCF shell 3 Execute the showlogs command to identify the component requiring maintenance For details see 3 3 5 Checking log information 4 Confirm the hardware and software configurations For details see 4 2 Confi...

Page 239: ...Stopping the Entire System 6 Execute the showpparstatus command to confirm that the physical partition requiring maintenance is powered off 7 Execute the replacefru command to release the fan unit requiring maintenance from the system For details see 5 1 1 Releasing an FRU of the SPARC M10 4 M10 4S from the system For a building block configuration 1 Open the rack door 2 Log in to the XSCF shell 3...

Page 240: ... the SPARC M10 4 M10 4S from the system 11 3 3 Inactive Cold maintenance 1 Open the rack door 2 Log in to the XSCF shell 3 Execute the showlogs command to identify the component requiring maintenance For details see 3 3 5 Checking log information 4 Confirm the hardware and software configurations For details see 4 2 Confirming the System Configuration 5 Power off the physical partition requiring m...

Page 241: ...e entire system For details see 5 4 Stopping the Entire System 6 Execute the replacefru command to release the chassis requiring maintenance from the system For a single chassis configuration you do not have to release the chassis Proceed to step 7 For details see 5 1 1 Releasing an FRU of the SPARC M10 4 M10 4S from the system 7 Remove all the power cords from the PSU backplane unit of the chassi...

Page 242: ...overall system may be damaged For details see 1 5 Notes Regarding Static Electricity 11 4 1 Accessing a fan unit 1 Remove the front cover For details see 5 5 3 Removing the front cover 11 4 2 Removing a fan unit 1 Pull out the fan unit while raising its lever Figure 11 2 Lever of fan unit Fujitsu M10 4 Fujitsu M10 4S SPARC M10 4 SPARC M10 4S Service Manual February 2014 218 ...

Page 243: ...s slot 11 5 Installing a Fan Unit This section describes the procedure for installing a fan unit 11 5 1 Installing a fan unit 1 Carefully insert the fan unit into its slot 2 Push the fan unit fully home 11 5 2 Restoring the chassis 1 Install the front cover For details see 6 5 3 Installing the front cover 11 6 Restoring the System This section describes the procedure for restoring the system after...

Page 244: ... 2 Inactive Hot maintenance For a single chassis configuration 1 Log in to the XSCF shell 2 Return to the operation of the XSCF firmware replacefru command to confirm that the fan unit has been incorporated into the system For details see 6 1 1 Incorporating an FRU of the SPARC M10 4 M10 4S into the system 3 Start the entire system For details see 6 4 Starting the Entire System 4 Close the rack do...

Page 245: ...ing maintenance For details see 6 5 1 Installing the power cord 2 Return to the operation of the XSCF firmware replacefru command to confirm that the chassis has been incorporated into the system For details see 6 1 1 Incorporating an FRU of the SPARC M10 4 M10 4S into the system 3 Power on the physical partition requiring maintenance For details see 6 3 Powering On the Physical Partition Requirin...

Page 246: ...4 Close the rack door Fujitsu M10 4 Fujitsu M10 4S SPARC M10 4 SPARC M10 4S Service Manual February 2014 222 ...

Page 247: ...Maintaining an Internal Disk Enabling the Removal of an Internal Disk Removing an Internal Disk Installing an Internal Disk Restoring the System 12 1 Configuration of the Internal Disks This section describes the configuration and locations of the internal disks The chassis provides eight slots for mounting internal disks The system storage can be expanded by installing extra hard disk drives HDDs...

Page 248: ...installed or removed If a disk error occurs in the system from the system console you can normally check for messages regarding a disk that is likely to fail or that has already failed This information is also recorded in the var adm messages file These error messages normally indicate the internal disk drives in which the errors have occurred by their physical or logical device names In addition ...

Page 249: ...ystem Memory_Size 256 GB CMUL Status Normal Ver 0101h Serial PP123203N0 BB 01 CMUL serial FRU Part Number CA07361 D941 C3 7060911 Memory_Size 128 GB CPU 0 Status Normal Ver 4142h Serial 00320804 Freq 3 000 GHz Type 0x10 Core 16 Strand 2 CPU 1 Status Normal Ver 4142h Serial 00321030 Freq 3 000 GHz Type 0x10 Core 16 Strand 2 MEM 00A Status Normal Code 2c800118KSF1G72PZ 1G6E1 4531 1A94229F Type 04 Si...

Page 250: ...i 0 pci 0 scsi 0 iport f disk w50000394281b517a 0 dev chassis FUJITSU BBEXP 500000e0e06d237f 01Y1_HDD01 disk 5 Specify disk enter its number XSCF showhardconf SPARC M10 4S Serial 2081238017 Operator_Panel_Switch Service System_Power Off System_Phase Cabinet Power Off Partition 0 PPAR_Status Powered Off Partition 1 PPAR_Status Powered Off BB 00 Status Normal Role Master Ver 2044h Serial 2081238017 ...

Page 251: ...rmal Code 2c800118KSF1G72PZ 1G6E1 4531 1A94229F Type 04 Size 8 GB Ommitted diskinfo D devchassis path c occupant compdev dev chassis SYS BB0 CMUL HDD0 dev chassis SYS BB0 CMUL HDD1 dev chassis SYS BB0 CMUL HDD2 dev chassis SYS BB0 CMUL HDD3 dev chassis SYS BB0 CMUL HDD4 dev chassis SYS BB0 CMUL HDD5 dev chassis SYS BB0 CMUL HDD6 dev chassis SYS BB0 CMUL HDD7 dev chassis SYS BB1 CMUL HDD0 2 Execute...

Page 252: ...BEXP 500000e0e06d237f 01Y1_HDD01 disk c2t50000394281B517Ad0 4 dev chassis FUJITSU BBEXP 500000e0e06d237f 01Y1_HDD02 dev chassis FUJITSU BBEXP 500000e0e06d237f 01Y1_HDD03 dev chassis FUJITSU BBEXP 500000e0e06d237f 01Y1_HDD04 dev chassis FUJITSU BBEXP 500000e0e06d237f 01Y1_HDD05 dev chassis FUJITSU BBEXP 500000e0e06d237f 01Y1_HDD06 dev chassis FUJITSU BBEXP 500000e0e06d237f 01Y1_HDD07 diskinfo ap En...

Page 253: ...B 8 pci c000 pci 4 pci 0 pci 0 scsi 0 iport f disk wWWN 0 LSB 9 pci c800 pci 4 pci 0 pci 0 scsi 0 iport f disk wWWN 0 LSB 10 pci d000 pci 4 pci 0 pci 0 scsi 0 iport f disk wWWN 0 LSB 11 pci d800 pci 4 pci 0 pci 0 scsi 0 iport f disk wWWN 0 LSB 12 pci e000 pci 4 pci 0 pci 0 scsi 0 iport f disk wWWN 0 LSB 13 pci e800 pci 4 pci 0 pci 0 scsi 0 iport f disk wWWN 0 LSB 14 pci f000 pci 4 pci 0 pci 0 scsi...

Page 254: ...tive hot maintenance can be performed 2 It is necessary to use dynamic reconfiguration DR to disconnect a chassis requiring maintenance from the physical partition chassis requiring maintenance is indicated by the system board PSB number 12 2 Before Maintaining an Internal Disk This section describes the types and the flow of maintenance of the internal disks as well as some precautions 12 2 1 Typ...

Page 255: ...stall the internal disk Store the removed internal disk filler unit safely such that it can be used again if you subsequently reduce the internal disk 12 2 4 Precautions for removal Note the following points when removing internal disks When you reduce the internal disk install the hard disk drive filler unit in the slot from which you have removed the internal disk 12 3 Enabling the Removal of an...

Page 256: ...d 14 2 10 Replacing a failed disk drive in the Fujitsu M10 SPARC M10 Systems System Operation and Administration Guide When the system is configured with a software RAID See your software manual When the system is configured without either a hardware RAID or software RAID To add an internal disk perform the procedure up to step 2 1 Open the rack door 2 Display the Oracle Solaris super user prompt ...

Page 257: ... you noted in advance 7 Execute the cfgadm 1M command to confirm that the internal disk requiring maintenance is disconnected The disconnected internal disk is displayed as unconfigured 12 3 2 Active hot maintenance with DR 1 Open the rack door 2 Log in to the XSCF shell 3 Execute the showlogs command to identify the component requiring maintenance For details see 3 3 5 Checking log information 4 ...

Page 258: ...wer off the physical partition requiring maintenance For details see 5 3 Powering Off the Physical Partition Requiring Maintenance 12 3 4 System stopped maintenance 1 Open the rack door 2 Confirm the hardware and software configurations For details see 4 2 Confirming the System Configuration 3 Stop the entire system For details see 5 4 Stopping the Entire System 12 4 Removing an Internal Disk This...

Page 259: ...g about 1 minute 12 4 2 Removing an internal disk 1 Push the knob on the internal disk to unlock it and then raise the lever to a 45 degree angle Figure 12 2 Knob on internal disk 2 Hold the lever and pull out the internal disk by about 3 cm 1 2 in Chapter 12 Maintaining the Internal Disks 235 ...

Page 260: ...it in the slot from which the disk was removed 12 5 Installing an Internal Disk This section describes the procedure for installing an internal disk Perform expansion using the same procedure 12 5 1 Installing an internal disk 1 When expanding an internal disk remove the internal disk filler unit from the slot in which the disk is to be installed Fujitsu M10 4 Fujitsu M10 4S SPARC M10 4 SPARC M10 ...

Page 261: ...Restoring the System This section describes the procedures for restoring the system after replacement addition and removal of internal disks The restoration procedure differs depending on the maintenance type as follows Active Hot maintenance Active hot maintenance with DR Inactive Hot maintenance System stopped maintenance 12 6 1 Active Hot maintenance The procedure may vary depending on the conf...

Page 262: ... incorporate the internal disk requiring maintenance into Oracle Solaris Enter the Ap_ID you noted in advance 3 Execute the cfgadm 1M command to confirm that the internal disk requiring maintenance has been incorporated The incorporated internal disk is displayed as configured 4 Close the rack door 12 6 2 Active hot maintenance with DR 1 Execute the testsb command to confirm that the internal disk...

Page 263: ...s executed and the result is displayed 3 Power on the physical partition requiring maintenance For details see 6 3 Powering On the Physical Partition Requiring Maintenance 4 Close the rack door 12 6 4 System stopped maintenance 1 Log in to the XSCF shell 2 Execute the testsb command to confirm that the internal disk requiring maintenance is recognized When you add the y option to the testsb comman...

Page 264: ...Fujitsu M10 4 Fujitsu M10 4S SPARC M10 4 SPARC M10 4S Service Manual February 2014 240 ...

Page 265: ...ing a PCI Express Card Checking If PCI Hot Plug PHP Can Be Used Enabling the Removal of a PCI Express Card Removing a PCI Express Card Installing a PCI Express Card Restoring the System 13 1 Configuration of the PCI Express Cards This section describes the configuration and locations of the PCIe cards Up to eight PCIe cards can be mounted in a SPARC M10 4S with a crossbar unit Up to 11 PCIe cards ...

Page 266: ... PCIe card PCI 3 5 PCIe card PCI 4 6 PCIe card PCI 5 7 PCIe card PCI 6 8 PCIe card PCI 7 9 PCIe card PCI 8 10 PCIe card PCI 9 11 PCIe card PCI 10 Can be mounted only on a SPARC M10 4 Figure 13 1 Location of the PCIe card Fujitsu M10 4 Fujitsu M10 4S SPARC M10 4 SPARC M10 4S Service Manual February 2014 242 ...

Page 267: ...requiring maintenance from the physical partition 3 For a single chassis configuration system stopped maintenance should be performed 13 2 Before Maintaining a PCI Express Card This section describes the types and the flow of the maintenance of the PCIe cards as well as some precautions 13 2 1 Types of maintenance Table 13 1 lists the types of maintenance for the PCIe cards For the definition of m...

Page 268: ...forming PCIe card expansion Set a multipath depending on the use of the PCIe card when performing active hot maintenance or active cold maintenance with PHP If you are performing PCIe card expansion remove the filler for the PCIe card from the PCIe card cassette Keep the removed filler because it will be needed if PCIe card reduction is subsequently done 13 2 5 Precautions for removal Note the fol...

Page 269: ...fy the PCIe card requiring maintenance For details see 3 3 5 Checking log information 3 Confirm the hardware and software configurations For details see 4 2 Confirming the System Configuration 4 Check whether the PCIe card requiring maintenance supports PHP The following PCIe cards do not support PHP FCoE SP1X7FAR2F SP1X7FAS2F SP1X7FBR2F and SP1X7FBS2F IB SE1X7BA12F and 7104073 7104074 If the PCIe...

Page 270: ... 11 BB0 PCI9 PCIE PCIE7 primary OCC pci 8700 pci 4 pci 0 pci 9 BB0 PCI10 PCIE PCIE7 primary OCC pci 8700 pci 4 pci 0 pci 11 Logical domain to which the PCIe card is assigned The name shown under DOMAIN of the row containing BBx PCIx under NAME for the slot of the PCIe card requiring maintenance represents the logical domain to which the PCIe card is assigned 5 to 8 in the execution example 5 BB0 P...

Page 271: ...ased on the confirmation results obtained in step 5 Suppose that both of the logical domains to which the PCIe slot and the PCIe root complex are assigned are found to be a control domain primary In this case active hot maintenance can be performed using PHP from the control domain 5 in Figure 13 2 Suppose that both of the logical domains to which the PCIe slot and the PCIe root complex are assign...

Page 272: ...ation Operation Reference Building block Use DR of the system board on the physical partition to release the target chassis from the physical partition 1 13 4 2 Active hot maintenance with DR Single chassis configuration Stop the system and then perform maintenance 13 4 4 System stopped maintenance 1 If you do not use DR the same procedure as for a single chassis configuration should be performed ...

Page 273: ...rk interface name NET DEV value that is assigned to a virtual network switch In the following example rootdom the logical domain name to which the PCIe card is assigned is specified 1 Physical network interface 2 Virtual network device and guest domain serviced by vsw0 b Log in to the logical domain to which the PCIe card is assigned Then determine the physical location of the physical network int...

Page 274: ...e virtual disk service For information on the types that can be assigned to a virtual disk backend see Virtual Disk Backend in the Oracle VM Server for SPARC Administration Guide In the following example rootdom the logical domain name to which the PCIe card is assigned is specified 1 Virtual disk backend 2 Virtual disk name and guest domain name to which the backend of vol0 is assigned b Log in t...

Page 275: ...e use of the virtual device If the virtual device duplication function is being used use the duplication function to release the target virtual device so that it is not used b Delete the virtual device and the virtual service using the ldm command from the control domain If you need to restore the original configuration after performing maintenance on the PCIe card make a note of the setting infor...

Page 276: ...ng maintenance from the logical domain Enter the Ap_ID you noted in advance 9 Execute the cfgadm c command to stop the power supply to the PCIe card requiring maintenance Enter the Ap_ID you noted in advance 10 Execute the cfgadm a command to confirm the status of the PCIe card again In the following example Receptacle and Occupant contain disconnected and unconfigured respectively which indicates...

Page 277: ...ssigned b Execute the ldm list bindings domain name command for these logical domains to confirm the name of the guest domain to which the virtual service vsw vds is provided In the following example rootdom the logical domain name to which the PCIe card is assigned is specified 1 Guest domain that uses the virtual device 2 Virtual disk backend c If the guest domain that uses the virtual device is...

Page 278: ...4 System stopped maintenance The PCIe cards can be removed installed while the input power to the chassis is on power cord is connected This section explains how to perform all types of maintenance work while the power cord of the chassis remains connected 1 Open the rack door 2 Confirm the hardware and software configurations For details see 4 2 Confirming the System Configuration 3 Stop the enti...

Page 279: ... Accessing a PCI Express card cassette 1 Lower the cable support For details see 5 5 1 Lowering the cable support 2 Remove the cables connected to the PCIe card cassette requiring maintenance 13 5 2 Removing a PCI Express card cassette There are two types of PCIe card cassettes The shapes of the latch A in the figure and lever B in the figure vary depending on the type of the PCIe card cassette bu...

Page 280: ... antistatic ESD mat latch A in the figure Figure 13 4 Lever of PCIe card cassette 2 Hold the lever and carefully pull the PCIe card cassette out of the PCI slot to remove it Fujitsu M10 4 Fujitsu M10 4S SPARC M10 4 SPARC M10 4S Service Manual February 2014 256 ...

Page 281: ... 5 3 Removing a PCI Express card 1 Remove the cover while pushing the clip A in the figure at the rear of the cover Figure 13 6 Clip at rear of cover 2 Remove the screw securing the PCIe card cassette Chapter 13 Maintaining the PCI Express Cards 257 ...

Page 282: ...Figure 13 7 Removing the screw 3 Remove the bracket A in the figure from the PCIe card Fujitsu M10 4 Fujitsu M10 4S SPARC M10 4 SPARC M10 4S Service Manual February 2014 258 ...

Page 283: ...y be damaged Note Place the removed PCIe card on a grounded antistatic ESD mat Figure 13 8 Removing the bracket 4 Remove the PCIe card from the PCIe card cassette For installation you do not have to perform this step Remove the filler for the PCIe card from the PCIe card cassette Chapter 13 Maintaining the PCI Express Cards 259 ...

Page 284: ...m expansion using the same procedure When removing a PCIe card install the filler unit instead of another PCIe card after removing the PCIe card 13 6 1 Installing a PCI Express card 1 Install the PCIe card by inserting it into the connector of the PCIe card cassette For removal of a PCIe card you do not have to perform this step Attach the filler for the PCIe card to the PCIe card cassette Fujitsu...

Page 285: ...Figure 13 10 Installing a PCIe card 2 Install the bracket for the PCIe card and secure it with the screw Figure 13 11 Installing the bracket Chapter 13 Maintaining the PCI Express Cards 261 ...

Page 286: ...Reinstall the cables of the PCIe card cassettes in their original positions by referring to notes that you made prior to the start of maintenance 3 Mount the cover on the PCIe card cassette 13 6 2 Installing a PCI Express card cassette 1 Hold the lever of the PCIe card cassette and carefully insert it into the PCIe slot 2 Raise the lever of the PCIe card cassette while pushing the latch and secure...

Page 287: ...te the PCIe card requiring maintenance into the logical domain Enter the Ap_ID you noted in advance 4 Execute the cfgadm a command to confirm that the PCIe card requiring maintenance has been incorporated into the logical domain In the following example Receptacle Occupant and Condition contain connected configured and ok respectively which indicates that the PCIe card requiring maintenance is inc...

Page 288: ...to a Physical Partition 3 Close the rack door 13 7 3 Inactive Hot maintenance 1 Log in to the XSCF shell 2 Execute the testsb command to confirm that the PCIe card requiring maintenance is recognized When you add the y option to the testsb command the system automatically answers y yes in response to an inquiry The following example shows the diagnosis of system board 00 0 3 Power on the physical ...

Page 289: ...s the diagnosis of system board 00 0 During the diagnosis processing the show devs command of OpenBoot PROM is executed and the result is displayed 3 Start the entire system For details see 6 4 Starting the Entire System 4 Close the rack door Chapter 13 Maintaining the PCI Express Cards 265 ...

Page 290: ...Fujitsu M10 4 Fujitsu M10 4S SPARC M10 4 SPARC M10 4S Service Manual February 2014 266 ...

Page 291: ... Replaceable Unit FRU Chapter 14 Maintaining the PSU Backplane Unit This chapter describes the procedure for maintaining the PSU backplane unit mounted in a SPARC M10 4 M10 4S Location of the PSU Backplane Unit Before Maintaining the PSU Backplane Unit Enabling the Removal of the PSU Backplane Unit Removing the PSU Backplane Unit Installing the PSU Backplane Unit Restoring the System 14 1 Location...

Page 292: ...ure 14 1 Location of PSU backplane unit 14 2 Before Maintaining the PSU Backplane Unit This section describes the types and the flow of maintenance of the PSU backplane unit Fujitsu M10 4 Fujitsu M10 4S SPARC M10 4 SPARC M10 4S Service Manual February 2014 268 ...

Page 293: ...to use dynamic reconfiguration DR to disconnect a chassis requiring maintenance from the physical partition Table 14 2 Maintenance flow Details of update process Replacement 1 Preparation 14 3 2 Removing the PSU backplane unit 14 4 3 Installing the PSU backplane unit 14 5 4 Restoring the system 14 6 14 2 1 Types of maintenance Table 14 1 lists the types of maintenance for the PSU backplane unit Fo...

Page 294: ...ld maintenance 1 Open the rack door 2 Log in to the XSCF shell 3 Execute the showlogs command to identify the component requiring maintenance For details see 3 3 5 Checking log information 4 Confirm the hardware and software configurations For details see 4 2 Confirming the System Configuration 5 Release the chassis in which the PSU backplane unit requiring maintenance is mounted from the physical...

Page 295: ...nd to identify the component requiring maintenance For details see 3 3 5 Checking log information 4 Confirm the hardware and software configurations For details see 4 2 Confirming the System Configuration 5 Power off the physical partition requiring maintenance For details see 5 3 Powering Off the Physical Partition Requiring Maintenance 6 Execute the replacefru command to release the chassis requ...

Page 296: ...ystem Configuration 5 Stop the entire system For details see 5 4 Stopping the Entire System 6 Execute the replacefru command to release the chassis requiring maintenance from the system For a single chassis configuration you do not have to release the chassis Proceed to step 7 For details see 5 1 1 Releasing an FRU of the SPARC M10 4 M10 4S from the system 7 Remove all the power cords from the PSU...

Page 297: ... 1 Lowering the cable support 2 Remove all the cables connected to the external interface The cables to be removed are as follows Interface cable connected to the PCI Express PCIe card Crossbar cable XSCF BB control cable XSCF DUAL control cable LAN cable 3 Remove all PCIe card cassettes For details see 13 5 2 Removing a PCI Express card cassette 4 Remove all the crossbar units For details see 9 4...

Page 298: ...right and left levers to the horizontal position Figure 14 3 Screw securing the CPU memory unit 7 Pull the CPU memory unit out by about 10 cm 3 9 in 8 Remove the front cover For details see 5 5 3 Removing the front cover 9 Remove all the power supply units For details see 10 4 Removing a Power Supply Unit 10 Remove all the fan units For details see 11 4 Removing a Fan Unit 11 Remove all the intern...

Page 299: ...ng the PSU backplane unit 1 Loosen the two screws securing the PSU backplane unit and then partially pull out the PSU backplane unit Figure 14 5 Screws securing the PSU backplane unit 2 Pull the PSU backplane unit out a little more Then remove the unit by holding its handle Chapter 14 Maintaining the PSU Backplane Unit 275 ...

Page 300: ...ocedure for installing the PSU backplane unit 14 5 1 Installing the PSU backplane unit 1 Install the operation panel on the PSU backplane unit For details see 15 5 1 Installing the operation panel 2 Insert the PSU backplane unit into the chassis by holding the handle 3 Tighten the two screws securing the PSU backplane unit Fujitsu M10 4 Fujitsu M10 4S SPARC M10 4 SPARC M10 4S Service Manual Februa...

Page 301: ...the power supply units For details see 10 5 1 Installing a power supply unit 3 Install all the fan units For details see 11 5 1 Installing a fan unit 4 Install all the internal disks or HDD filler units For details see 12 5 Installing an Internal Disk 5 Install the front cover For details see 6 5 3 Installing the front cover 6 Insert the CPU memory unit in the chassis 7 Raise the right and left le...

Page 302: ... that you made before the start of maintenance Crossbar cable XSCF BB control cable XSCF DUAL control cable LAN cable 12 Lift the cable support to fix it For details see 6 5 2 Fixing the cable support 14 6 Restoring the System This section describes the procedure for restoring the system after installing the PSU backplane unit The restoration procedure differs depending on the maintenance type as ...

Page 303: ...cifies the following 00 BB ID of the chassis to start the diagnosis 02 PPAR ID of the destination where the chassis to start the diagnosis is connected You can specify only one of these 4 Execute the showlogs command to confirm that the system is operating normally For details see 3 3 5 Checking log information 5 Incorporate the chassis in which the PSU backplane unit requiring maintenance is moun...

Page 304: ...stem is operating normally For details see 3 3 5 Checking log information 5 Power on the physical partition requiring maintenance For details see 6 3 Powering On the Physical Partition Requiring Maintenance 6 Close the rack door 14 6 3 System stopped maintenance 1 Connect all the power cords to the PSU backplane unit For details see 6 5 1 Installing the power cord 2 Return to the operation of the ...

Page 305: ...nected You can specify one or more of these To specify multiple connection destination BB IDs enter a command like diagxbu y b 00 t 01 t 02 4 Execute the showlogs command to confirm that the system is operating normally For details see 3 3 5 Checking log information 5 Start the entire system For details see 6 4 Starting the Entire System 6 Close the rack door Chapter 14 Maintaining the PSU Backpla...

Page 306: ...Fujitsu M10 4 Fujitsu M10 4S SPARC M10 4 SPARC M10 4S Service Manual February 2014 282 ...

Page 307: ...d on the SPARC M10 4 M10 4S Location of the Operation Panel Before Maintaining the Operation Panel Enabling the Removal of the Operation Panel Removing the Operation Panel Installing the Operation Panel Restoring the System 15 1 Location of the Operation Panel This section describes the location of the operation panel 283 ...

Page 308: ... of the operation panel 15 2 Before Maintaining the Operation Panel This section describes the types and flow of the maintenance of the operation panel as well as some precautions 15 2 1 Types of maintenance Table 15 1 lists the types of maintenance for the operation panel For the definition of maintenance see 4 3 Understanding Types of Maintenance Fujitsu M10 4 Fujitsu M10 4S SPARC M10 4 SPARC M1...

Page 309: ...reparation 15 3 2 Removing the operation panel 15 4 3 Installing the operation panel 15 5 4 Restoring the system 15 6 Note See the procedure for system stopped maintenance for inactive cold maintenance in a single chassis configuration 15 2 2 Maintenance flow Table 15 2 lists the sequence of the maintenance procedure for the operation panel 15 2 3 Precautions for replacement Note the following poi...

Page 310: ...Active Cold maintenance 1 Open the rack door 2 Log in to the XSCF shell 3 Execute the showlogs command to identify the component requiring maintenance For details see 3 3 5 Checking log information 4 Confirm the hardware and software configurations For details see 4 2 Confirming the System Configuration 5 Release the chassis in which the operation panel requiring maintenance is mounted from the ph...

Page 311: ...ecking log information 4 Confirm the hardware and software configurations For details see 4 2 Confirming the System Configuration 5 Power off the physical partition requiring maintenance For details see 5 3 Powering Off the Physical Partition Requiring Maintenance 6 Execute the replacefru command to release the chassis requiring maintenance from the system For details see 5 1 1 Releasing an FRU of...

Page 312: ... Execute the replacefru command to release the chassis requiring maintenance from the system For a single chassis configuration you do not have to release the chassis Proceed to step 7 For details see 5 1 1 Releasing an FRU of the SPARC M10 4 M10 4S from the system 7 Remove all the power cords from the PSU backplane unit of the chassis requiring maintenance For details see 5 5 2 Removing the power...

Page 313: ...ernal interface The cables to be removed are as follows Interface cable connected to the PCI Express PCIe card Crossbar cable XSCF BB control cable XSCF DUAL control cable LAN cable 4 Remove all PCIe card cassettes For details see 13 5 2 Removing a PCI Express card cassette 5 Remove all the crossbar units For details see 9 4 2 Removing a crossbar unit 6 Loosen the three screws securing the mountin...

Page 314: ... front cover For details see 5 5 3 Removing the front cover 10 Pull out the power supply unit by about 10 cm 3 9 in For details see 10 4 Removing a Power Supply Unit 11 Remove all the fan units For details see 11 4 Removing a Fan Unit 12 Loosen the two screws in the fan slot and then remove the fan shelf Figure 15 4 Screws in the fan slot Fujitsu M10 4 Fujitsu M10 4S SPARC M10 4 SPARC M10 4S Servi...

Page 315: ...ane unit and partially pull out the PSU backplane unit Figure 15 5 Screws securing the PSU backplane unit 2 Remove the cable from the operation panel and loosen one screw A in the figure Figure 15 6 Cables and screws of the operation panel Chapter 15 Maintaining the Operation Panel 291 ...

Page 316: ...n the mounting position and then tighten one screw 15 5 2 Restoring the chassis 1 Connect the cables to the operation panel 2 Reinstall the PSU backplane unit in its original position and then tighten the two screws 3 Reinstall the fan shelf and then tighten the two screws in the fan slot 4 Reinstall the power supply unit in its original position For details see 10 5 1 Installing a power supply un...

Page 317: ...bar units For details see 9 5 1 Installing a crossbar unit 11 Install all the PCIe card cassettes For details see 13 6 2 Installing a PCI Express card cassette 12 Connect all the cables to the external interface The cables to be connected are as follows Interface cable connected to the PCIe card Crossbar cable XSCF BB control cable XSCF DUAL control cable LAN cable 13 Lift the cable support to fix...

Page 318: ...rated into the system For details see 6 1 1 Incorporating an FRU of the SPARC M10 4 M10 4S into the system 3 Execute the diagxbu command to diagnose the crossbar cables Diagnosis is performed when the system board of the chassis connected with the crossbar cables is incorporated into the physical partition and the physical partition is powered on The example below specifies the following 00 BB ID ...

Page 319: ... of the SPARC M10 4 M10 4S into the system 3 Execute the diagxbu command to diagnose the crossbar cables Diagnosis is performed when the system board of the chassis connected with the crossbar cables is not incorporated into the physical partition or when the physical partition into which the chassis is incorporated is powered off The example below specifies the following 00 BB ID of the chassis t...

Page 320: ... command to diagnose the crossbar cables Diagnosis is performed when the system board of the chassis connected with the crossbar cables is not incorporated into the physical partition or when the physical partition into which the chassis is incorporated is powered off The example below specifies the following 00 BB ID of the chassis to start the diagnosis 01 BB ID of the destination where the chas...

Page 321: ...ounted on the crossbar box Configuration of the Crossbar Units Before Maintaining a Crossbar Unit Enabling the Removal of a Crossbar Unit Removing a Crossbar Unit Installing a Crossbar Unit Restoring the System 16 1 Configuration of the Crossbar Units This section describes the configuration and the locations of the crossbar units 297 ...

Page 322: ...Starting Maintenance Work Figure 16 1 Location of crossbar units 16 2 Before Maintaining a Crossbar Unit This section describes the types and flow of maintenance of the crossbar units 16 2 1 Types of maintenance Table 16 1 lists the types of maintenance for the crossbar units For the definition of maintenance see 4 3 Understanding Types of Maintenance Fujitsu M10 4 Fujitsu M10 4S SPARC M10 4 SPARC...

Page 323: ...wn the system all the power cords must be removed If the power cords are not removed an electrical failure may occur XSCF showlogs error 16 2 2 Maintenance flow Table 16 2 lists the sequence of the maintenance procedure for the crossbar units 16 3 Enabling the Removal of a Crossbar Unit This section describes preparation that must be completed prior to removing a crossbar unit 1 Open the rack door...

Page 324: ...onnection Open the rear door of the rack and pull up all the CB switches on the PDU The switches are off when they stay pulled up For details on the CB switches see 29 1 1 CB switches on the dedicated power distribution unit 16 4 Removing a Crossbar Unit This section describes the procedure for removing a crossbar unit Enable the removal of the crossbar box before attempting to remove it For detai...

Page 325: ...A A Figure 16 2 Positions of screws and levers 3 Hold the levers and partially pull out the crossbar unit Chapter 16 Maintaining the Crossbar Units of the Crossbar Box 301 ...

Page 326: ...rossbar unit may be damaged Also carefully proceed with the work to prevent any pin from being bent Figure 16 3 Pulling out crossbar unit 4 Support the crossbar unit from below with one hand and remove it carefully 16 5 Installing a Crossbar Unit This section describes the procedure for installing a crossbar unit 1 Carefully insert the crossbar unit into the chassis 2 Close the right and left leve...

Page 327: ...Execute the diagxbu command to diagnose the crossbar cables Diagnosis is performed when the system board of the chassis connected with the crossbar cables is not incorporated into the physical partition or when the physical partition into which the chassis is incorporated is powered off The example below specifies the following 00 BB ID of the chassis to start the diagnosis 01 BB ID of the destina...

Page 328: ...Fujitsu M10 4 Fujitsu M10 4S SPARC M10 4 SPARC M10 4S Service Manual February 2014 304 ...

Page 329: ...taining the XSCF unit mounted in the crossbar box Location of the XSCF Unit Before Maintaining the XSCF Unit Enabling the Removal of the XSCF Unit Removing the XSCF Unit Installing the XSCF Unit Restoring the System 17 1 Location of the XSCF Unit This section describes the location of the XSCF unit 305 ...

Page 330: ...e Work Figure 17 1 Location of XSCF unit 17 2 Before Maintaining the XSCF Unit This section describes the types and flow of maintenance of the XSCF unit 17 2 1 Types of maintenance Table 17 1 lists the types of maintenance for the XSCF unit For the definition of maintenance see 4 3 Understanding Types of Maintenance Fujitsu M10 4 Fujitsu M10 4S SPARC M10 4 SPARC M10 4S Service Manual February 2014...

Page 331: ...w Details of update process Replacement 1 Preparation 17 3 2 Removing an XSCF unit 17 4 3 Installing an XSCF unit 17 5 4 Restoring the system 17 6 Caution To completely shut down the system all the power cords must be removed If the power cords are not removed an electrical failure may occur 17 2 2 Maintenance flow Table 17 2 lists the sequence of the maintenance procedure for the XSCF unit 17 3 E...

Page 332: ...to release the XSCF unit requiring maintenance from the system For details see 5 1 2 Releasing an FRU of the crossbar box from the system 17 3 2 System stopped maintenance 1 Open the rack door 2 Log in to the XSCF shell 3 Execute the showlogs command to identify the component requiring maintenance For details see 3 3 5 Checking log information 4 Confirm the hardware and software configurations For...

Page 333: ...cord the positions of the cables before removing them to ensure that they are reinstalled correctly For details see 5 1 2 Releasing an FRU of the crossbar box from the system 7 Remove all the power cords from the power supply unit of the crossbar box requiring maintenance For details see 5 5 2 Removing the power cord 17 4 Removing the XSCF Unit This section describes the procedure for removing the...

Page 334: ...A Figure 17 2 Positions of screws and levers 3 Hold the levers and partially pull out the XSCF unit Fujitsu M10 4 Fujitsu M10 4S SPARC M10 4 SPARC M10 4S Service Manual February 2014 310 ...

Page 335: ...nit may be damaged Also carefully proceed with the work to prevent any pin from being bent Figure 17 3 Pulling out the XSCF unit 4 Support the XSCF unit from below with one hand and then remove it carefully 17 5 Installing the XSCF Unit This section describes the procedure for installing the XSCF unit 1 Carefully insert the XSCF unit into the chassis 2 Raise the right and left levers and then tigh...

Page 336: ...tive Hot maintenance 1 Check that the XSCF STANDBY LED on the operation panel is on For the location of LEDs see 2 3 3 LEDs on each component 2 Return to the operation of the XSCF firmware replacefru command to confirm that the XSCF unit has been incorporated into the system For details see 6 1 2 Incorporating an FRU of the crossbar box into the system 3 Execute the switchscf command to switch the...

Page 337: ...ion of the XSCF firmware replacefru command to confirm that the XSCF unit has been incorporated into the system For details see 6 1 2 Incorporating an FRU of the crossbar box into the system 3 Start all the physical partitions For details see 6 3 Powering On the Physical Partition Requiring Maintenance 4 Close the rack door Chapter 17 Maintaining the XSCF Unit of the Crossbar Box 313 ...

Page 338: ...Fujitsu M10 4 Fujitsu M10 4S SPARC M10 4 SPARC M10 4S Service Manual February 2014 314 ...

Page 339: ...its Before Maintaining a Power Supply Unit Enabling the Removal of a Power Supply Unit Removing a Power Supply Unit Installing a Power Supply Unit Restoring the System 18 1 Configuration of the Power Supply Units This section describes the configuration and the locations of the power supply units The power supply units can have the 1 1 redundant configuration Active hot maintenance can be performe...

Page 340: ... 18 1 Locations of power supply units 18 2 Before Maintaining a Power Supply Unit This section describes the types and flow of maintenance of the power supply units as well as some precautions 18 2 1 Types of maintenance Table 18 1 lists the types of maintenance for the power supply units For the definition of maintenance see 4 3 Understanding Types of Maintenance Fujitsu M10 4 Fujitsu M10 4S SPAR...

Page 341: ...tenance flow Table 18 2 lists the sequence of the maintenance procedure for the power supply units 18 2 3 Precautions for replacement Note the following points when replacing a power supply unit There are two power supply units Thus the system can continue operating even if one of the units fails Do not however operate the system for an extended period while one unit has failed When replacing mult...

Page 342: ...he component requiring maintenance For details see 3 3 5 Checking log information 4 Confirm the hardware and software configurations For details see 4 2 Confirming the System Configuration 5 Execute the replacefru command to release the power supply unit requiring maintenance from the system For details see 5 1 2 Releasing an FRU of the crossbar box from the system 6 Remove the power cord from the...

Page 343: ...For details see 5 3 Powering Off the Physical Partition Requiring Maintenance 6 Execute the replacefru command to release the power supply unit requiring maintenance from the system For details see 5 1 2 Releasing an FRU of the crossbar box from the system 7 Remove all the power cords from the power supply unit of the crossbar box requiring maintenance For details see 5 5 2 Removing the power cord...

Page 344: ...g a power supply unit 2 Support the power supply unit with one hand from below and carefully pull it out of the slot 18 5 Installing a Power Supply Unit This section describes the procedure for installing a power supply unit 1 Support the power supply unit from below with one hand and insert it carefully into its slot 2 Push the power supply unit fully home Fujitsu M10 4 Fujitsu M10 4S SPARC M10 4...

Page 345: ...green of the power supply unit is on 3 Return to the operation of the XSCF firmware replacefru command to confirm that the power supply unit has been incorporated into the system For details see 6 1 2 Incorporating an FRU of the crossbar box into the system 4 Execute the showstatus command to confirm that the power supply unit is operating normally after the maintenance 5 Execute the showhardconf ...

Page 346: ...rmware replacefru command to confirm that the power supply unit has been incorporated into the system For details see 6 1 2 Incorporating an FRU of the crossbar box into the system 3 Power on all the physical partitions For details see 6 3 Powering On the Physical Partition Requiring Maintenance 4 Close the rack door Fujitsu M10 4 Fujitsu M10 4S SPARC M10 4 SPARC M10 4S Service Manual February 201...

Page 347: ...the Removal of a Fan Unit Removing a Fan Unit Installing a Fan Unit Restoring the System 19 1 Configuration of the Fan Units This section describes the configuration and the locations of the fan units Four fan units are mounted in each chassis If one of the cooling fans fails during system operation the XSCF detects the error However the system can continue operating because the fans have a redund...

Page 348: ...before starting the maintenance work Also see the contents of Chapter 1 Before Starting Maintenance Work Figure 19 1 Location of fan units 19 2 Before Maintaining a Fan Unit This section describes the types and the flow of maintenance of the fan units as well as some precautions Fujitsu M10 4 Fujitsu M10 4S SPARC M10 4 SPARC M10 4S Service Manual February 2014 324 ...

Page 349: ...e definition of maintenance see 4 3 Understanding Types of Maintenance 19 2 2 Maintenance flow Table 19 2 lists the sequence of the maintenance procedure for the fan units 19 2 3 Precautions for replacement Note the following points when replacing a fan unit When replacing multiple fan units replace one unit at a time If a redundant configuration cannot be assured perform cold replacement The cool...

Page 350: ...ee 3 3 5 Checking log information 4 Confirm the hardware and software configurations For details see 4 2 Confirming the System Configuration 5 Execute the replacefru command to release the fan unit requiring maintenance from the system For details see 5 1 2 Releasing an FRU of the crossbar box from the system 19 3 2 System stopped maintenance 1 Open the rack door 2 Log in to the XSCF shell 3 Execu...

Page 351: ...acefru command to release the fan unit requiring maintenance from the system For details see 5 1 2 Releasing an FRU of the crossbar box from the system 7 Remove all the power cords from the power supply unit of the crossbar box requiring maintenance For details see 5 5 2 Removing the power cord 19 4 Removing a Fan Unit This section describes the procedure for removing a fan unit Enable the removal...

Page 352: ...an unit is fully inserted and secured Figure 19 2 Lever of fan unit 2 Carefully remove the fan unit from its slot 19 5 Installing a Fan Unit This section describes the procedure for installing a fan unit 19 5 1 Installing a fan unit 1 Carefully insert the fan unit into its slot 2 Push the fan unit fully home Fujitsu M10 4 Fujitsu M10 4S SPARC M10 4 SPARC M10 4S Service Manual February 2014 328 ...

Page 353: ... XSCF firmware replacefru command to confirm that the fan unit has been incorporated into the system For details see 6 1 2 Incorporating an FRU of the crossbar box into the system 2 Execute the showstatus command to confirm that the fan unit is operating normally after maintenance 3 Execute the showhardconf command to check the hardware configuration and the status of each component 4 Close the ra...

Page 354: ...F firmware replacefru command to confirm that the fan unit has been incorporated into the system For details see 6 1 2 Incorporating an FRU of the crossbar box into the system 3 Power on all the physical partitions For details see 6 3 Powering On the Physical Partition Requiring Maintenance 4 Close the rack door Fujitsu M10 4 Fujitsu M10 4S SPARC M10 4 SPARC M10 4S Service Manual February 2014 330...

Page 355: ...unted in a crossbar box Location of the XSCF Interface Unit Before Maintaining the XSCF Interface Unit Enabling the Removal of the XSCF Interface Unit Removing the XSCF Interface Unit Installing the XSCF Interface Unit Restoring the System 20 1 Location of the XSCF Interface Unit This section describes the location of the XSCF interface unit 331 ...

Page 356: ... 1 Location of XSCF interface unit 20 2 Before Maintaining the XSCF Interface Unit This section describes the types and the flow of maintenance of the XSCF interface unit 20 2 1 Types of maintenance Table 20 1 lists the types of maintenance for the XSCF interface unit For the definition of maintenance see 4 3 Understanding Types of Maintenance Fujitsu M10 4 Fujitsu M10 4S SPARC M10 4 SPARC M10 4S ...

Page 357: ...alling an XSCF interface unit 20 5 4 Restoring the system 20 6 Caution To completely shut down the system all the power cords must be removed If the power cords are not removed an electrical failure may occur XSCF showlogs error 20 2 2 Maintenance flow Table 20 2 lists the sequence of the maintenance procedure for the XSCF interface unit 20 3 Enabling the Removal of the XSCF Interface Unit This se...

Page 358: ...ounted on the rack for expanded connection Open the rear door of the rack and pull up all the CB switches on the PDU The switches are off when they stay pulled up For details on the CB switches see 29 1 1 CB switches on the dedicated power distribution unit 20 4 Removing the XSCF Interface Unit This section describes the procedure for removing an XSCF interface unit Enable the removal of the XSCF ...

Page 359: ... partially pull out the XSCF interface unit Figure 20 3 Pulling out the XSCF interface unit 4 Support the XSCF interface unit from below with one hand and then carefully remove it from the chassis Chapter 20 Maintaining the XSCF Interface Unit of the Crossbar Box 335 ...

Page 360: ...e XSCF Interface Unit This section describes the procedure for installing the XSCF interface unit 1 Support the XSCF interface unit from below with one hand and then carefully insert it into the chassis 2 Raise the right and left levers and tighten the two screws 3 Connect all the cables to the XSCF interface unit 20 6 Restoring the System This section describes the procedure for restoring the sys...

Page 361: ... crossbar box Location of the Crossbar Backplane Unit Before Maintaining the Crossbar Backplane Unit Enabling the Removal of the Crossbar Backplane Unit Removing the Crossbar Backplane Unit Installing the Crossbar Backplane Unit Restoring the System 21 1 Location of the Crossbar Backplane Unit This section describes the location of the crossbar backplane unit 337 ...

Page 362: ...tion of crossbar backplane unit 21 2 Before Maintaining the Crossbar Backplane Unit This section describes the types and the flow of maintenance of the crossbar backplane unit 21 2 1 Types of maintenance Table 21 1 lists the types of maintenance for the crossbar backplane unit For the definition of maintenance see 4 3 Understanding Types of Maintenance Fujitsu M10 4 Fujitsu M10 4S SPARC M10 4 SPAR...

Page 363: ...g the crossbar backplane unit 21 5 4 Restoring the system 21 6 Caution To completely shut down the system all the power cords must be removed If the power cords are not removed an electrical failure may occur XSCF showlogs error 21 2 2 Maintenance flow Table 21 2 lists the sequence of the maintenance procedure for the crossbar backplane unit 21 3 Enabling the Removal of the Crossbar Backplane Unit...

Page 364: ...ossbar Backplane Unit This section describes the procedure for removing the crossbar backplane unit Enable the removal of the crossbar backplane unit before attempting to remove it For details see 21 3 Enabling the Removal of the Crossbar Backplane Unit 1 Partially pull out the following components in order from top to bottom You do not have to remove the cables of these components XSCF unit For d...

Page 365: ...gure securing the lower cover and then slide the lower cover to the left to remove it Figure 21 3 Removing the lower cover 6 Disconnect the two cables from the fan shelf Arrange the removed cables in the center Chapter 21 Maintaining the Crossbar Backplane Unit of the Crossbar Box 341 ...

Page 366: ...oosen the three screws securing the fan shelf and partially pull out the fan shelf Figure 21 5 Removing the fan shelf 8 Place a hand under the fan shelf to support it and then carefully remove it from the chassis 9 Loosen the two screws and remove the bracket B in the figure fixing the guide plate A in the figure Fujitsu M10 4 Fujitsu M10 4S SPARC M10 4 SPARC M10 4S Service Manual February 2014 34...

Page 367: ...A B Figure 21 6 Removing the bracket 10 Slide the guide plate A in the figure to the front to remove it Chapter 21 Maintaining the Crossbar Backplane Unit of the Crossbar Box 343 ...

Page 368: ...iginal positions so that they do not foul the removal of the crossbar backplane unit Figure 21 7 Removing guide plate 11 Remove the cable from the clamps Fujitsu M10 4 Fujitsu M10 4S SPARC M10 4 SPARC M10 4S Service Manual February 2014 344 ...

Page 369: ...nit on a grounded antistatic ESD mat Figure 21 8 Removing the cables 12 Loosen the five screws securing the crossbar backplane unit and then pull the crossbar backplane unit straight out by holding the center handle A in the figure Chapter 21 Maintaining the Crossbar Backplane Unit of the Crossbar Box 345 ...

Page 370: ... crossbar backplane unit 1 Insert the crossbar backplane unit into the chassis and then tighten the five screws 2 Fix the cables of the crossbar backplane unit with the clamps 3 Install the guide plate by sliding it towards the rear and then tighten the two screws Fujitsu M10 4 Fujitsu M10 4S SPARC M10 4 SPARC M10 4S Service Manual February 2014 346 ...

Page 371: ...rossbar filler unit For details see 16 5 Installing a Crossbar Unit XSCF interface unit For details see 20 5 Installing the XSCF Interface Unit XSCF unit For details see 17 5 Installing the XSCF Unit 21 6 Restoring the System This section describes the procedure for restoring the system after installing a crossbar backplane unit 1 Turn on the CB switches of the dedicated power distribution unit PD...

Page 372: ... partition is powered on The example below specifies the following 00 The BB ID of the chassis to start the diagnosis 02 The PPAR ID of the destination where the chassis to start the diagnosis is connected You can specify only one of these 3 Execute the showlogs command to confirm that the system is operating normally For details see 3 3 5 Checking log information 4 Start the entire system For det...

Page 373: ...guration of the Fan Backplane Before Maintaining the Fan Backplane Enabling the Removal of the Fan Backplane Removing the Fan Backplane Installing the Fan Backplane Restoring the System 22 1 Configuration of the Fan Backplane This section describes the configuration and the location of the fan backplane The fan units are interconnected through the fan backplane 349 ...

Page 374: ...aintenance work Also see the contents of Chapter 1 Before Starting Maintenance Work Figure 22 1 Location of fan backplane 22 2 Before Maintaining the Fan Backplane This section describes the types and the flow of maintenance of the fan backplane Fujitsu M10 4 Fujitsu M10 4S SPARC M10 4 SPARC M10 4S Service Manual February 2014 350 ...

Page 375: ...oring the system 22 6 Caution To completely shut down the system all the power cords must be removed If the power cords are not removed an electrical failure may occur 22 2 1 Types of maintenance Table 22 1 lists the types of maintenance for the fan backplane For the definition of maintenance see 4 3 Understanding Types of Maintenance 22 2 2 Maintenance flow Table 22 2 lists the sequence of the ma...

Page 376: ...or of the rack and pull up all the CB switches on the PDU The switches are off when they stay pulled up For details on the CB switches see 29 1 1 CB switches on the dedicated power distribution unit 22 4 Removing the Fan Backplane This section describes the procedure for removing the fan backplane Enable the removal of the fan backplane before attempting to remove it For details see 22 3 Enabling ...

Page 377: ...e screw A in the figure securing the lower cover and then slide the lower cover to the left to remove it Figure 22 3 Removing the lower cover 3 Disconnect the two cables from the fan shelf Arrange the removed cables in the center Chapter 22 Maintaining the Fan Backplane of the Crossbar Box 353 ...

Page 378: ...4 Removing the cables 4 Loosen the three screws securing the fan shelf and partially pull out the fan shelf Figure 22 5 Removing the fan shelf 5 Place a hand under the fan shelf to support it and then carefully remove it from the chassis 6 Disconnect the two cables from the fan backplane Fujitsu M10 4 Fujitsu M10 4S SPARC M10 4 SPARC M10 4S Service Manual February 2014 354 ...

Page 379: ...Figure 22 6 Removing the cables 7 Remove the two screws securing the fan backplane to remove the bracket A in the figure Chapter 22 Maintaining the Fan Backplane of the Crossbar Box 355 ...

Page 380: ...fan backplane into the right and left hand notches in the fan shelf 2 Install the bracket of the fan backplane and secure it with two screws 3 Connect the two cables to the fan backplane 4 Support the fan shelf from below with one hand and then insert it carefully into the chassis Arranging the cables in the center makes it easier to install the fan shelf 5 Tighten the three screws securing the fa...

Page 381: ... details see 6 5 3 Installing the front cover 22 6 Restoring the System This section describes the procedure for restoring the system after installing the fan backplane 1 Turn on the CB switches of the dedicated power distribution unit PDU mounted on the rack for expanded connection Open the rear door of the rack and push in all the CB switches on the PDU Electricity is supplied when the switches ...

Page 382: ...Fujitsu M10 4 Fujitsu M10 4S SPARC M10 4 SPARC M10 4S Service Manual February 2014 358 ...

Page 383: ... panel mounted on the crossbar box Location of the Operation Panel Before Maintaining the Operation Panel Enabling the Removal of the Operation Panel Removing the Operation Panel Installing the Operation Panel Restoring the System 23 1 Location of the Operation Panel This section describes the location of the operation panel 359 ...

Page 384: ... of the operation panel 23 2 Before Maintaining the Operation Panel This section describes the types and flow of the maintenance of the operation panel as well as some precautions 23 2 1 Types of maintenance Table 23 1 lists the types of maintenance for the operation panel For the definition of maintenance see 4 3 Understanding Types of Maintenance Fujitsu M10 4 Fujitsu M10 4S SPARC M10 4 SPARC M1...

Page 385: ...storing the system 23 6 Caution To completely shut down the system all the power cords must be removed If the power cords are not removed an electrical failure may occur 23 2 2 Maintenance flow Table 23 2 lists the sequence of the maintenance procedure for the operation panel 23 2 3 Precautions for replacement Note the following point when replacing the operation panel If you replace the operation...

Page 386: ...switches on the PDU The switches are off when they stay pulled up For details on the CB switches see 29 1 1 CB switches on the dedicated power distribution unit 23 4 Removing the Operation Panel This section describes the procedure for removing the operation panel Enable the removal of the operation panel before attempting to remove it For details see 23 3 Enabling the Removal of the Operation Pan...

Page 387: ...e figure securing the lower cover and then slide the lower cover to the left to remove it Figure 23 3 Removing the lower cover 6 Disconnect the two cables from the fan shelf Arrange the removed cables in the center Chapter 23 Maintaining the Operation Panel of the Crossbar Box 363 ...

Page 388: ...istatic ESD mat Figure 23 4 Removing the cables 7 Loosen the three screws securing the fan shelf and partially pull out the fan shelf Figure 23 5 Removing the fan shelf 8 Place a hand under the fan shelf to support it and then carefully remove it from the chassis Fujitsu M10 4 Fujitsu M10 4S SPARC M10 4 SPARC M10 4S Service Manual February 2014 364 ...

Page 389: ...el 1 Remove the cable connecting the fan shelf to the operation panel Figure 23 6 Operation panel cable 2 Loosen the one screw securing the operation panel and then remove it Chapter 23 Maintaining the Operation Panel of the Crossbar Box 365 ...

Page 390: ...ed antistatic ESD mat Figure 23 7 Removing the operation panel 23 5 Installing the Operation Panel This section describes the procedure for installing the operation panel Fujitsu M10 4 Fujitsu M10 4S SPARC M10 4 SPARC M10 4S Service Manual February 2014 366 ...

Page 391: ...e prior to the start of maintenance 2 Insert the operation panel into the fan shelf and then secure it with the screw Figure 23 8 Installing the operation panel 3 Reinstall the cable between the fan shelf and the operation panel Chapter 23 Maintaining the Operation Panel of the Crossbar Box 367 ...

Page 392: ...the three screws 2 Connect the two cables to the fan shelf 3 Install the lower cover and then secure it with the one screw 4 Install the upper cover and slide the right and left stoppers outwards Then tighten the two screws to secure the upper cover 5 Install all the fan units Fujitsu M10 4 Fujitsu M10 4S SPARC M10 4 SPARC M10 4S Service Manual February 2014 368 ...

Page 393: ...nstalling the operation panel 1 Turn on the CB switches of the dedicated power distribution unit PDU mounted on the rack for expanded connection Open the rear door of the rack and push in all the CB switches on the PDU Electricity is supplied when the switches stay pushed in 2 Start the entire system For details see 6 4 Starting the Entire System 3 Close the rack door Chapter 23 Maintaining the Op...

Page 394: ...Fujitsu M10 4 Fujitsu M10 4S SPARC M10 4 SPARC M10 4S Service Manual February 2014 370 ...

Page 395: ...g a Crossbar Cable Electrical Restoring the System 24 1 Configuration of the Ports for the Crossbar Cables Electrical This section describes the configuration and the location of the ports that are used for connecting crossbar cables electrical The crossbar cables electrical are used make interconnections between SPARC M10 4S systems Each crossbar cable electrical has a number that corresponds to ...

Page 396: ...L 1R 2L 2R 0R 0L 1L 1R 2L 2R 0R 0L 1L XBU 0 XBU 1 Figure 24 1 Connection ports for crossbar cables electrical Figure 24 2 Crossbar cables electrical Fujitsu M10 4 Fujitsu M10 4S SPARC M10 4 SPARC M10 4S Service Manual February 2014 372 ...

Page 397: ...eparation 24 3 2 Removing the crossbar cables electrical 24 4 3 Installing the crossbar cables electrical 24 5 4 Restoring the system 24 6 24 2 Before Maintaining a Crossbar Cable Electrical This section describes the types and the flow of the maintenance of the crossbar cables electrical as well as precautions that must be observed 24 2 1 Types of maintenance Table 24 1 lists the types of mainten...

Page 398: ...ers depending on the maintenance type as follows Inactive Cold maintenance System stopped maintenance 24 3 1 Inactive Cold maintenance 1 Open the rack door 2 Log in to the XSCF shell 3 Execute the showlogs command to identify the component requiring maintenance For details see 3 3 5 Checking log information 4 Confirm the hardware and software configurations For details see 4 2 Confirming the Syste...

Page 399: ...topped maintenance 1 Open the rack door 2 Log in to the XSCF shell 3 Execute the showlogs command to identify the component requiring maintenance For details see 3 3 5 Checking log information 4 Confirm the hardware and software configurations For details see 4 2 Confirming the System Configuration 5 Power off all the physical partitions For details see 5 3 Powering Off the Physical Partition Requ...

Page 400: ...moval of the crossbar cables electrical before attempting to remove them For details see 24 3 Enabling the Removal of a Crossbar Cable Electrical 1 Remove the two crossbar cables electrical from the SPARC M10 4S Remove the crossbar cable electrical by holding the tab A in the figure of the cable and pulling it straight in the direction of the arrow At this time do not hold the cable part when pull...

Page 401: ...ssbar Cable Electrical This section describes the procedure for connecting the crossbar cables electrical 1 Attach the supplied connection destination label to the new replacement crossbar cable electrical For the new crossbar cable electrical use the same type of label as the one on the cable requiring maintenance and write the same port number on it 2 Connect a pair of crossbar cables electrical...

Page 402: ...intenance For details see 6 5 1 Installing the power cord 2 Return to the operation of the XSCF firmware replacefru command to confirm that the chassis has been incorporated into the system For details see 6 1 1 Incorporating an FRU of the SPARC M10 4 M10 4S into the system 3 Execute the diagxbu command to diagnose the crossbar cables Diagnosis is performed when the system board of the chassis con...

Page 403: ...e XSCF firmware replacefru command to confirm that the chassis has been incorporated into the system For details see 6 1 1 Incorporating an FRU of the SPARC M10 4 M10 4S into the system 3 Execute the diagxbu command to diagnose the crossbar cables Diagnosis is performed when the system board of the chassis connected with the crossbar cables is not incorporated into the physical partition or when t...

Page 404: ...information 5 Power on all the physical partitions For details see 6 3 Powering On the Physical Partition Requiring Maintenance 6 Close the rack door Fujitsu M10 4 Fujitsu M10 4S SPARC M10 4 SPARC M10 4S Service Manual February 2014 380 ...

Page 405: ...ptical Restoring the System 25 1 Configuration of the Ports for the Crossbar Cables Optical This section describes the configuration and the locations of the ports for connecting the crossbar cables optical The crossbar cables optical are used to connect the SPARC M10 4S to a crossbar box in a building block configuration with a crossbar box Each crossbar cable optical has a number that correspond...

Page 406: ...L2 L3 L1 L4 L6 L7 L5 L4 L6 L7 L5 R0 R2 R3 R1 R0 R2 R3 R1 R4 R6 R7 R5 R4 R6 R7 R5 L0 L2 L3 L1 L0 L2 L3 L1 L4 L6 L7 L5 L4 L6 L7 L5 R0 R2 R3 R1 R0 R2 R3 R1 R4 R6 R7 R5 R4 R6 R7 R5 Figure 25 1 Connection ports for crossbar cables optical SPARC M10 4S Figure 25 2 Connection ports for crossbar cables optical crossbar box Fujitsu M10 4 Fujitsu M10 4S SPARC M10 4 SPARC M10 4S Service Manual February 2014 ...

Page 407: ...ation number Component 1 Crossbar cables optical CBL Figure 25 3 Crossbar cables optical SPARC M10 4S Figure 25 4 Crossbar cables optical crossbar box Chapter 25 Maintaining the Crossbar Cables Optical 383 ...

Page 408: ... Before Maintaining a Crossbar Cable Optical This section describes the types and the flow of the maintenance of the crossbar cables optical as well as precautions that must be observed 25 2 1 Types of maintenance Table 25 1 lists the types of maintenance for the crossbar cables optical For the definition of maintenance see 4 3 Understanding Types of Maintenance 25 2 2 Maintenance flow Table 25 2 ...

Page 409: ...fers depending on the maintenance type as follows Inactive Cold maintenance System stopped maintenance 25 3 1 Inactive Cold maintenance 1 Open the rack door 2 Log in to the XSCF shell 3 Execute the showlogs command to identify the component requiring maintenance For details see 3 3 5 Checking log information 4 Confirm the hardware and software configurations For details see 4 2 Confirming the Syst...

Page 410: ...mponent requiring maintenance For details see 3 3 5 Checking log information 4 Confirm the hardware and software configurations For details see 4 2 Confirming the System Configuration 5 Power off all the physical partitions For details see 5 3 Powering Off the Physical Partition Requiring Maintenance 6 Execute the replacefru command to release the SPARC M10 4S requiring maintenance from the system...

Page 411: ...b A in the figure of the cable and pulling it straight in the direction of the arrow At this time do not hold the cable part when pulling the crossbar cable Pulling the cable part without the connector lock completely released may cause damage Figure 25 5 Removing the crossbar cables optical SPARC M10 4S 2 Remove the other pair of crossbar cables optical from the crossbar box Remove the crossbar c...

Page 412: ... 6 Removing the crossbar cables optical crossbar box 25 5 Installing a Crossbar Cable Optical This section describes the procedure for connecting the crossbar cables optical 1 Attach the supplied connection destination label to the new replacement crossbar cable optical For the new crossbar cable optical use the same type of label as the one on the cable requiring maintenance and write the same po...

Page 413: ...f the cable and inserting it straight into the opening Do not hold the cable part when inserting the cable 25 6 Restoring the System This section describes the procedure for restoring the system after installing the crossbar cable optical The restoration procedure differs depending on the maintenance type as follows Inactive Cold maintenance System stopped maintenance 25 6 1 Inactive Cold maintena...

Page 414: ...into which the chassis is incorporated is powered off The example below specifies the following 00 BB ID of the chassis to start the diagnosis 01 BB ID of the destination where the chassis to start the diagnosis is connected You can specify one or more of these To specify multiple connection destination BB IDs enter a command like diagxbu y b 00 t 01 t 02 4 Execute the showlogs command to confirm ...

Page 415: ...he example below specifies the following 00 BB ID of the chassis to start the diagnosis 01 BB ID of the destination where the chassis to start the diagnosis is connected You can specify one or more of these To specify multiple connection destination BB IDs enter a command like diagxbu y b 00 t 01 t 02 4 Execute the showlogs command to confirm that the system is operating normally For details see 3...

Page 416: ...Fujitsu M10 4 Fujitsu M10 4S SPARC M10 4 SPARC M10 4S Service Manual February 2014 392 ...

Page 417: ...nabling the Removal of an XSCF BB Control Cable Removing an XSCF BB Control Cable Installing an XSCF BB Control Cable Restoring the System 26 1 Configuration of the Ports for the XSCF BB Control Cables This section describes the configuration and the location of the ports to which the XSCF BB control cables are connected The XSCF BB control cables are used to connect the XSCFs mounted in the SPARC...

Page 418: ...CF BB control cables SCF_CBL Figure 26 1 Locations of XSCF BB control cables SPARC M10 4S Figure 26 2 Locations of XSCF BB control cables crossbar box Fujitsu M10 4 Fujitsu M10 4S SPARC M10 4 SPARC M10 4S Service Manual February 2014 394 ...

Page 419: ...ed as a slave before maintenance is started If it is operating as the master XSCF switch it to a standby XSCF Table 26 2 Maintenance flow Task Replacement 1 Preparation 26 3 2 Removing the XSCF BB control cables 26 4 3 Installing the XSCF BB control cables 26 5 4 Restoring the system 26 6 26 2 Before Maintaining an XSCF BB Control Cable This section describes the types and the flow of the maintena...

Page 420: ...ntenance System stopped maintenance 26 3 1 Active Hot maintenance 1 Open the rack door 2 Log in to the XSCF shell 3 Execute the showlogs command to identify the component requiring maintenance For details see 3 3 5 Checking log information 4 Confirm the hardware and software configurations For details see 4 2 Confirming the System Configuration 5 Execute the switchscf command to switch the master ...

Page 421: ...onfirming the System Configuration 5 Release the chassis connected to the XSCF BB control cable requiring maintenance from the physical partition For details see 5 2 Releasing a Chassis from the Physical Partition 6 Execute the replacefru command to release the SPARC M10 4S requiring maintenance from the system For details see 5 1 1 Releasing an FRU of the SPARC M10 4 M10 4S from the system 7 Remo...

Page 422: ...nit or power supply unit of the chassis requiring maintenance For details see 5 5 2 Removing the power cord 26 3 4 System stopped maintenance 1 Open the rack door 2 Log in to the XSCF shell 3 Execute the showlogs command to identify the component requiring maintenance For details see 3 3 5 Checking log information 4 Confirm the hardware and software configurations For details see 4 2 Confirming th...

Page 423: ...e the hook and loop fastener from the cable support For details see 5 1 1 Releasing an FRU of the SPARC M10 4 M10 4S from the system 7 Remove all the power cords from the PSU backplane unit or power supply unit of the chassis requiring maintenance For details see 5 5 2 Removing the power cord 26 4 Removing an XSCF BB Control Cable This section describes the procedure for removing the XSCF BB contr...

Page 424: ...A A Figure 26 3 Removing the XSCF BB control cables SPARC M10 4S Fujitsu M10 4 Fujitsu M10 4S SPARC M10 4 SPARC M10 4S Service Manual February 2014 400 ...

Page 425: ...F BB Control Cable This section describes the procedure for installing the XSCF BB control cables 1 Attach the supplied connection destination label to the new replacement XSCF BB control cable For the new XSCF BB control cable use the same type of label as the one on the cable requiring maintenance and write the same port number on it 2 Connect the XSCF BB control cable to SPARC M10 4S or the cro...

Page 426: ... 1 Active Hot maintenance 1 Disconnect and then connect the XSCF unit 2 Return to the replacefru command operation of the XSCF firmware to confirm that the XSCF unit of the crossbar box has been incorporated into the system For details see 6 1 2 Incorporating an FRU of the crossbar box into the system 3 Execute the showstatus command to confirm that the FRU is operating normally after the completi...

Page 427: ...XSCF BB control cable requiring maintenance into the physical partition For details see 6 2 Incorporating a Chassis into a Physical Partition 4 Close the rack door 26 6 3 Inactive Cold maintenance 1 Connect all the power cords to the PSU backplane unit or power supply unit of the chassis requiring maintenance For details see 6 5 1 Installing the power cord 2 Return to the operation of the XSCF fir...

Page 428: ...irmware replacefru command to confirm that SPARC M10 4S has been incorporated into the system For details see 6 1 1 Incorporating an FRU of the SPARC M10 4 M10 4S into the system 3 Power on all the physical partitions For details see 6 3 Powering On the Physical Partition Requiring Maintenance 4 Close the rack door Fujitsu M10 4 Fujitsu M10 4S SPARC M10 4 SPARC M10 4S Service Manual February 2014 ...

Page 429: ...g the Removal of an XSCF DUAL Control Cable Removing an XSCF DUAL Control Cable Installing an XSCF DUAL Control Cable Restoring the System 27 1 Configuration of the XSCF DUAL Control Ports This section describes configuration and location of the XSCF DUAL control ports The XSCF DUAL control cable is used to connect the master XSCF and a standby XSCF that are mounted on a SPARC M10 4S or crossbar b...

Page 430: ...F DUAL control cables SCF_DUAL Figure 27 1 Location of XSCF DUAL control port SPARC M10 4S Figure 27 2 Location of XSCF DUAL control port crossbar box Fujitsu M10 4 Fujitsu M10 4S SPARC M10 4 SPARC M10 4S Service Manual February 2014 406 ...

Page 431: ... it is operating as the master XSCF switch it to a standby XSCF Table 27 2 Maintenance flow Task Replacement 1 Preparation 27 3 2 Removing the XSCF DUAL control cables 27 4 3 Installing the XSCF DUAL control cables 27 5 4 Restoring the system 27 6 27 2 Before Maintaining an XSCF DUAL Control Cable This section describes the types and the flow of the maintenance of the XSCF DUAL control cables 27 2...

Page 432: ...aintenance System stopped maintenance 27 3 1 Active Hot maintenance 1 Open the rack door 2 Log in to the XSCF shell 3 Execute the showlogs command to identify the component requiring maintenance For details see 3 3 5 Checking log information 4 Confirm the hardware and software configurations For details see 4 2 Confirming the System Configuration 5 Execute the switchscf command to switch the maste...

Page 433: ...g the System Configuration 5 Release the chassis connected to the XSCF DUAL control cable requiring maintenance from the physical partition For details see 5 2 Releasing a Chassis from the Physical Partition 6 Execute the replacefru command to release the XSCF DUAL control cable requiring maintenance from the system For details see 5 1 1 Releasing an FRU of the SPARC M10 4 M10 4S from the system 7...

Page 434: ... power supply unit of the chassis requiring maintenance For details see 5 5 2 Removing the power cord 27 3 4 System stopped maintenance 1 Open the rack door 2 Log in to the XSCF shell 3 Execute the showlogs command to identify the component requiring maintenance For details see 3 3 5 Checking log information 4 Confirm the hardware and software configurations For details see 4 2 Confirming the Syst...

Page 435: ...the hook and loop fastener from the cable support For details see 5 1 1 Releasing an FRU of the SPARC M10 4 M10 4S from the system 7 Remove all the power cords from the PSU backplane unit or power supply unit of the chassis requiring maintenance For details see 5 5 2 Removing the power cord 27 4 Removing an XSCF DUAL Control Cable This section describes the procedure for removing an XSCF DUAL cont...

Page 436: ...SCF DUAL control cables crossbar box 2 Remove the XSCF DUAL control cables from the other chassis Pull out the XSCF DUAL control cable while pushing the lock release buttons on the both sides of the cable Fujitsu M10 4 Fujitsu M10 4S SPARC M10 4 SPARC M10 4S Service Manual February 2014 412 ...

Page 437: ...bar box 27 6 Restoring the System This section describes the procedure for restoring the system after installing the XSCF DUAL control cables The restoration procedure differs depending on the maintenance type as follows Active Hot maintenance Active Cold maintenance Inactive Cold maintenance System stopped maintenance 27 6 1 Active Hot maintenance 1 Disconnect and then connect the XSCF unit 2 Ret...

Page 438: ...ring maintenance For details see 6 5 1 Installing the power cord 2 Return to the operation of the XSCF firmware replacefru command to confirm that SPARC M10 4S has been incorporated into the system For details see 6 1 1 Incorporating an FRU of the SPARC M10 4 M10 4S into the system 3 Execute the showstatus command to confirm that the XSCF DUAL control cable is operating normally after the completi...

Page 439: ... the system 3 Power on the physical partition requiring maintenance For details see 6 3 Powering On the Physical Partition Requiring Maintenance 4 Close the rack door 27 6 4 System stopped maintenance 1 Connect all the power cords to the PSU backplane unit or power supply unit of the chassis requiring maintenance For details see 6 5 1 Installing the power cord 2 Return to the replacefru command op...

Page 440: ...Fujitsu M10 4 Fujitsu M10 4S SPARC M10 4 SPARC M10 4S Service Manual February 2014 416 ...

Page 441: ...toring the System 28 1 Configuration of the Cable Kit This section describes the configuration and location of the cable kit The cable kit is a set of cables for connections between the crossbar backplane unit and terminal board and between the terminal board and fan backplane The cable kit contains the following cables 28 1 1 Cables for the connection between the crossbar backplane unit and termi...

Page 442: ...2 Connector crossbar backplane unit side Figure 28 1 Cable SIG between the crossbar backplane unit and terminal board Cable PWR Cable for the connection between the crossbar backplane unit and terminal board PWR Figure 28 2 Cable PWR between the crossbar backplane unit and terminal board Fujitsu M10 4 Fujitsu M10 4S SPARC M10 4 SPARC M10 4S Service Manual February 2014 418 ...

Page 443: ...erminal board and fan backplane Cable PWR Cable for the connection between the terminal board and fan backplane PWR Figure 28 3 Cable PWR between the terminal board and fan backplane Cable SIG Cable for the connection of the terminal board and fan backplane SIG to the operation panel Chapter 28 Maintaining the Cable Kit of the Crossbar Box 419 ...

Page 444: ...ide 3 Connector operation panel side Figure 28 4 Cable SIG for the terminal board and fan backplane to the operation panel 28 1 3 Locations for the cable kit The locations of cable kit connections are as follows Fujitsu M10 4 Fujitsu M10 4S SPARC M10 4 SPARC M10 4S Service Manual February 2014 420 ...

Page 445: ...structions in this chapter before starting the maintenance work Also see the contents of Chapter 1 Before Starting Maintenance Work Figure 28 5 Locations for the cable kit 28 2 Before Maintaining the Cable Kit This section describes the types and the flow of maintenance of the cable kit 28 2 1 Types of maintenance Table 28 1 lists the types of maintenance for the cable kit For the definition of ma...

Page 446: ... 6 Caution To completely shut down the system all the power cords must be removed If the power cords are not removed an electrical failure may occur XSCF showlogs error 28 2 2 Maintenance flow Table 28 2 lists the sequence of the maintenance procedure for the cable kit 28 3 Enabling the Removal of the Cable Kit This section describes the preparations that must be completed prior to removing the ca...

Page 447: ...moving the Cable Kit This section describes the procedure for removing the cable kit at each cable connection destination For the cable connection destinations see 28 1 Configuration of the Cable Kit Enable the removal of the cable kit before attempting to remove it For details see 28 3 Enabling the Removal of the Cable Kit 28 4 1 Removing the cables for the connection between the crossbar backpla...

Page 448: ...ecuring the lower cover and then slide the lower cover to the left to remove it Figure 28 7 Removing the lower cover 5 Disconnect the two cables from the fan shelf Arrange the removed cables in the center Fujitsu M10 4 Fujitsu M10 4S SPARC M10 4 SPARC M10 4S Service Manual February 2014 424 ...

Page 449: ... Removing the cables 6 Loosen the three screws securing the fan shelf and partially pull out the fan shelf Figure 28 9 Removing the fan shelf 7 Place a hand under the fan shelf to support it and then carefully remove it from the chassis 8 Remove the cable connected to the crossbar backplane unit from the connector Chapter 28 Maintaining the Cable Kit of the Crossbar Box 425 ...

Page 450: ...Figure 28 10 Removing the cable cable SIG Fujitsu M10 4 Fujitsu M10 4S SPARC M10 4 SPARC M10 4S Service Manual February 2014 426 ...

Page 451: ...Figure 28 11 Removing the cable cable PWR 9 Remove the cable from the clamps Chapter 28 Maintaining the Cable Kit of the Crossbar Box 427 ...

Page 452: ...ne 1 Remove the front cover For details see 5 5 3 Removing the front cover 2 Remove all the fan units For details see 19 4 Removing a Fan Unit 3 Loosen the two screws A in the figure securing the upper cover and then slide the right and left stoppers B in the figure inwards Then remove the upper cover C in the figure Fujitsu M10 4 Fujitsu M10 4S SPARC M10 4 SPARC M10 4S Service Manual February 201...

Page 453: ... the figure securing the lower cover and then slide the lower cover to the left to remove it Figure 28 14 Removing the lower cover 5 Disconnect the two cables from the fan shelf Arrange the removed cables in the center Chapter 28 Maintaining the Cable Kit of the Crossbar Box 429 ...

Page 454: ...ng the cables 6 Loosen the three screws securing the fan shelf and partially pull out the fan shelf Figure 28 16 Removing the fan shelf 7 Place a hand under the fan shelf to support it and then carefully remove it from the chassis 8 Remove the cable connecting the fan backplane from the connector Fujitsu M10 4 Fujitsu M10 4S SPARC M10 4 SPARC M10 4S Service Manual February 2014 430 ...

Page 455: ...8 17 Removing the cable cable PWR Figure 28 18 Removing the cable cable SIG 9 Remove the cable connecting the fan shelf and operation panel from the Chapter 28 Maintaining the Cable Kit of the Crossbar Box 431 ...

Page 456: ...e cable PWR push the connector toward the back while pushing up the lower latch A in the figure with a flathead screwdriver Confirm that the lower latch A in the figure has been pushed to the back of the terminal board Push the connector toward the back while pushing down the upper latch B in the figure with a flathead screwdriver Fujitsu M10 4 Fujitsu M10 4S SPARC M10 4 SPARC M10 4S Service Manua...

Page 457: ...g the cable cable PWR For the cable SIG remove the two cable connector screws with a Phillips screwdriver bit No 1 and then remove the cable from the terminal board Chapter 28 Maintaining the Cable Kit of the Crossbar Box 433 ...

Page 458: ...Figure 28 21 Removing the cable cable SIG 11 Remove the cable from the clamps Fujitsu M10 4 Fujitsu M10 4S SPARC M10 4 SPARC M10 4S Service Manual February 2014 434 ...

Page 459: ...Figure 28 22 Removing the cable cable PWR Chapter 28 Maintaining the Cable Kit of the Crossbar Box 435 ...

Page 460: ... Install a cable that has the same shape as the removed cable 28 5 1 Installing a cable between the crossbar backplane unit and terminal board Install the cable SIG or cable PWR connecting the crossbar backplane unit and terminal board 1 Connect the cable to the connector of the crossbar backplane unit Install the cable that has the same shape as the removed cable Fujitsu M10 4 Fujitsu M10 4S SPAR...

Page 461: ...n secure the cover with the two screws 9 Install all the fan units For details see 19 5 Installing a Fan Unit 10 Install the front cover For details see 6 5 3 Installing the front cover 28 5 2 Installing a cable for the connection between the terminal board and fan backplane Install the cable SIG or cable PWR connecting the terminal board and fan backplane 1 Install the cable on the terminal board...

Page 462: ...ard Use the screw that was removed from the same location before Tighten the screw with a Phillips screwdriver bit No 1 When installing the connector orient the connector so that the dot mark A in the figure is on the left as shown in Figure 28 26 Fujitsu M10 4 Fujitsu M10 4S SPARC M10 4 SPARC M10 4S Service Manual February 2014 438 ...

Page 463: ... of the fan backplane 3 Connect the cable connecting the fan shelf and operation panel to the connector on the operation panel Perform this step only when installing the cable SIG To install the cable PWR proceed to step 4 Chapter 28 Maintaining the Cable Kit of the Crossbar Box 439 ...

Page 464: ...Front Figure 28 27 Operation panel cable 4 Secure the cable with a clamp Fujitsu M10 4 Fujitsu M10 4S SPARC M10 4 SPARC M10 4S Service Manual February 2014 440 ...

Page 465: ...Figure 28 28 Securing the cable cable PWR Chapter 28 Maintaining the Cable Kit of the Crossbar Box 441 ...

Page 466: ...ect the two cables to the fan shelf 8 Install the lower cover and then secure it with the one screw 9 Install the upper cover 10 Slide the right and left stoppers of the upper cover outwards and then secure the cover with the two screws 11 Install all the fan units For details see 19 5 Installing a Fan Unit 12 Install the front cover For details see 6 5 3 Installing the front cover Fujitsu M10 4 F...

Page 467: ...The BB ID of the chassis to start the diagnosis 01 The BB ID of the destination where the chassis to start the diagnosis is connected You can specify more than one of these To specify multiple connection destination BB IDs enter a command like diagxbu y b 00 t 01 t 02 When the system board of the chassis connected with the crossbar cables is incorporated into the physical partition and the physica...

Page 468: ...Fujitsu M10 4 Fujitsu M10 4S SPARC M10 4 SPARC M10 4S Service Manual February 2014 444 ...

Page 469: ...ion Unit Before Maintaining the Dedicated Power Distribution Unit Enabling the Removal of the Dedicated Power Distribution Unit Removing the Dedicated Power Distribution Unit Installing the Dedicated Power Distribution Unit Restoring the System 29 1 Configuration of the Dedicated Power Distribution Unit This section describes the configuration and location of the PDU The PDU is installed on the ra...

Page 470: ...distribution unit PDU 1 3 Dedicated power distribution unit PDU 2 4 Dedicated power distribution unit PDU 3 This is mounted when the two expanded connection racks have been installed Figure 29 1 Location of the PDU Fujitsu M10 4 Fujitsu M10 4S SPARC M10 4 SPARC M10 4S Service Manual February 2014 446 ...

Page 471: ...ectricity supplied A in Figure 29 2 shows the locations of CB switches for single phase power feed B in the same figure shows the locations of CB switches for three phase power feed There are 12 CB switches per PDU and 24 CB switches per rack Figure 29 2 Locations of CB switches on a PDU Chapter 29 Maintaining the Dedicated Power Distribution Unit Mounted on the Rack for Expanded Connection 447 ...

Page 472: ...ution Unit This section describes the types and flow of maintenance of the PDU as well as some precautions 29 2 1 Types of maintenance Table 29 1 lists the types of maintenance for the PDU For the definition of maintenance see 4 3 Understanding Types of Maintenance 29 2 2 Maintenance flow Table 29 2 lists the sequence of the maintenance procedure for the PDU 29 2 3 Precautions for replacement Note...

Page 473: ...he Dedicated Power Distribution Unit This section describes the preparations that must be completed prior to removing a PDU The preparation procedure differs depending on the maintenance type as follows Active Cold maintenance System stopped maintenance 29 3 1 Active Cold maintenance 1 Open the rack door 2 Disconnect all the power cords of the SPARC M10 4S and crossbar boxes from the PDU requiring...

Page 474: ...If you perform this work alone you may injure yourself or cause damage to the PDU because the PDU is heavy 29 4 Removing the Dedicated Power Distribution Unit This section describes the procedure for removing the dedicated power distribution unit Enable the removal of the dedicated power distribution unit before attempting to remove it For details see 29 3 Enabling the Removal of the Dedicated Pow...

Page 475: ...Figure 29 3 PDU screws 2 Grasp the top and bottom of the PDU and then pull it out Chapter 29 Maintaining the Dedicated Power Distribution Unit Mounted on the Rack for Expanded Connection 451 ...

Page 476: ...he power cables and then pull them straight out Figure 29 4 Pulling out the PDU 3 Disconnect all the power cables from the rear of the PDU Fujitsu M10 4 Fujitsu M10 4S SPARC M10 4 SPARC M10 4S Service Manual February 2014 452 ...

Page 477: ...r cables are connected to the PDU To pull them out push the upper and lower latches A in the figure Figure 29 6 Power cable connector for single phase power feed For a three phase power feed Three power cables are connected to the PDU To pull them out turn the ring Chapter 29 Maintaining the Dedicated Power Distribution Unit Mounted on the Rack for Expanded Connection 453 ...

Page 478: ...a single phase power feed Connect four power cables to the PDU For a three phase power feed Connect three power cables to the PDU Install each power cable by holding its plug and then secure it by turning the ring clockwise 2 Install the PDU into the rack for expanded connection 3 Install the four PDU screws 29 6 Restoring the System This section describes the procedure for restoring the system af...

Page 479: ...1 Active Cold maintenance 1 Connect all the power cords of the SPARC M10 4S and crossbar boxes to the PDU requiring maintenance 2 Close the rack door 29 6 2 System stopped maintenance 1 Connect all the power cords of the SPARC M10 4S and crossbar boxes to the PDU requiring maintenance 2 Start the entire system For details see 6 4 Starting the Entire System 3 Close the rack door Chapter 29 Maintain...

Page 480: ...Fujitsu M10 4 Fujitsu M10 4S SPARC M10 4 SPARC M10 4S Service Manual February 2014 456 ...

Page 481: ...0 5 12 11 2 15 Appendix A Component List This appendix describes components that constitute the SPARC M10 4 M10 4S the crossbar box and the expanded connection rack Figure A 1 Locations of components of SPARC M10 4 M10 4S 457 ...

Page 482: ... unit 7 Front cover 8 Internal disk 9 Power supply unit 10 Operation panel 11 PCI Express card cassette 12 PCI Express card 13 Crossbar unit mounting frame 14 Crossbar unit 15 CPU memory unit lower Not mounted on SPARC M10 4 Fujitsu M10 4 Fujitsu M10 4S SPARC M10 4 SPARC M10 4S Service Manual February 2014 458 ...

Page 483: ...Crossbar backplane unit 3 Fan backplane 4 Fan shelf 5 Fan unit 6 Upper cover 7 Lower cover 8 Front cover 9 Guide plate fixing bracket 10 Guide plate 11 Operation panel 12 Power supply unit 13 Crossbar unit Figure A 2 Locations of components of crossbar box Appendix A Component List 459 ...

Page 484: ...ocation number Component 1 Dedicated power distribution unit 2 Expanded connection rack 3 Crossbar box Figure A 3 Locations of components of expanded connection rack Fujitsu M10 4 Fujitsu M10 4S SPARC M10 4 SPARC M10 4S Service Manual February 2014 460 ...

Page 485: ...at constitute the SPARC M10 4 M10 4S CPU Memory Unit Crossbar Unit Power Supply Unit Fan Unit Internal Disk Drive PCI Express Card Backplanes Operation Panel Components that constitute the crossbar box Crossbar Unit XSCF Unit XSCF Interface Unit Power Supply Unit Fan Unit Backplanes Operation Panel B 1 CPU Memory Unit The CPU memory unit of the SPARC M10 4 M10 4S consists of two units the upper 46...

Page 486: ...eplace the CPU and XSCF individually Each CPU memory unit upper and CPU memory unit lower is available in eight different types based on the combination of CPU type and the number of memory slots Table B 1 lists the specifications of the CPU memory unit For the maintenance procedure see Chapter 7 Maintaining the CPU Memory Units B 2 Crossbar Unit The crossbar units of the SPARC M10 4S and the cros...

Page 487: ... procedures SPARC M10 4S Chapter 9 Maintaining the Crossbar Units Crossbar box Chapter 16 Maintaining the Crossbar Units of the Crossbar Box B 3 XSCF Unit The XSCF unit of the crossbar box is a control unit that is central to the system The functions of an XSCF are as follows Controlling each unit Console function for each physical partition that uses the TTY communication protocol Communication w...

Page 488: ... procedure see Chapter 17 Maintaining the XSCF Unit of the Crossbar Box B 4 Power Supply Unit The power supply units of the SPARC M10 4 M10 4S and the crossbar box take power from the input power and supply it to the system The redundant configuration of the power supply units allows the system to continue operating even if one of the units fails during operation Table B 5 and Table B 6 list the s...

Page 489: ...e SAS Location Front of chassis B 5 Fan Unit Five fan units are mounted on the SPARC M10 4 M10 4S and four on the crossbar box They provide a flow of air to cool the inside of the chassis Each fan unit has two cooling fans Table B 7 and Table B 8 list the specifications of the fan units of the SPARC M10 4 M10 4S and the crossbar box respectively See the following chapters for details of the mainte...

Page 490: ... Item Description Number of XSCF interface units 1 For the maintenance procedure see Chapter 12 Maintaining the Internal Disks B 7 PCI Express Card Up to eight PCIe cards can be mounted in a SPARC M10 4S with a crossbar unit mounted For a SPARC M10 4 with no crossbar unit mounted up to 11 PCIe cards can be mounted Table B 10 lists the specifications of the PCIe card For the maintenance procedure s...

Page 491: ...CF Interface Unit of the Crossbar Box B 9 Backplanes The backplanes of the SPARC M10 4 M10 4S and the crossbar box have connectors for connecting replaceable units in the chassis The PSU backplane unit of SPARC M10 4 M10 4S mounts the memory that stores the identification information and the user setting information The backplane of the SPARC M10 4 M10 4S is shown below PSU backplane unit A in the...

Page 492: ...ategory Replacement Figure B 1 Location of backplane of SPARC M10 4 M10 4S Table B 12 lists the specifications of the PSU backplane unit For the maintenance procedure see Chapter 14 Maintaining the PSU Backplane Unit The backplanes of the crossbar box are shown below Crossbar backplane unit A in the figure Fan backplane B in the figure Fujitsu M10 4 Fujitsu M10 4S SPARC M10 4 SPARC M10 4S Service ...

Page 493: ...ntenance System stopped Maintenance category Replacement Table B 14 Specifications of fan backplane crossbar box Item Description Number of fan backplanes 1 Figure B 2 Locations of backplanes of crossbar box Table B 13 and Table B 14 list the specifications of the crossbar backplane and the fan backplane units respectively Appendix B Component Specifications 469 ...

Page 494: ...f the maintenance procedures Crossbar backplane unit of crossbar box Chapter 21 Maintaining the Crossbar Backplane Unit of the Crossbar Box Fan backplane of crossbar box Chapter 22 Maintaining the Fan Backplane of the Crossbar Box B 10 Operation Panel The operation panels of the PARC M10 4 M10 4S and the crossbar box are installed in the front of the chassis This panel displays the system status a...

Page 495: ...le Solaris commands to display fault diagnosis information and to take countermeasures The commands listed here are useful for determining whether there are problems in the system the network or some other system connected through the network iostat 1M Command prtdiag 1M Command prtconf 1M Command netstat 1M Command ping 1M Command ps 1 Command prstat 1M Command C 1 iostat 1M Command The iostat 1M...

Page 496: ...duct MBF2300RC Revision 3706 Serial No EB25PC201AL6 Size 300 00GB 300000000000 bytes Media Error 0 Device Not Ready 0 No Device 0 Recoverable 0 Illegal Request 0 Predictive Failure Analysis 0 c3t50000393D851FDAAd0 Soft Errors 0 Hard Errors 0 Transport Errors 0 Vendor TOSHIBA Product MBF2300RC Revision 3706 Serial No EB25PC201AMS Size 300 00GB 300000000000 bytes Media Error 0 Device Not Ready 0 No ...

Page 497: ... X on line 3 3000 MHz SPARC64 X on line 4 3000 MHz SPARC64 X on line 5 3000 MHz SPARC64 X on line 6 3000 MHz SPARC64 X on line 7 3000 MHz SPARC64 X on line 8 3000 MHz SPARC64 X on line 9 3000 MHz SPARC64 X on line 10 3000 MHz SPARC64 X on line C 2 prtdiag 1M Command The prtdiag 1M command displays information on system settings and diagnosis Diagnosis information displays FRUs in the system that e...

Page 498: ...es Slot Bus Name Model Speed Status Type Path BB0 CMUL SASHBA PCIE scsi pciex1000 87 LSI 2308_2 5 0GTx8 pci 8000 pci 4 pci 0 pci 0 scsi 0 BB0 CMUL NET0 PCIE network pciex14e4 1656 2 5GTx1 pci 8000 pci 4 pci 0 pci 9 network 0 BB0 CMUL NET1 PCIE network pciex14e4 1656 2 5GTx1 pci 8000 pci 4 pci 0 pci 9 network 0 1 BB0 CMUL NET2 PCIE network pciex14e4 1656 2 5GTx1 pci 8000 pci 4 pci 0 pci a network 0...

Page 499: ...network pciex108e abcd SUNW pcie qgc2 5GTx8 pci 8100 pci 4 pci 0 pci 0 pci 0 pci 0 pci 0 pci 1 pci 0 pci 11 pci 0 pci 0 network 0 1 BB0 PCI0 PCIE network pciex108e abcd SUNW pcie qgc2 5GTx8 pci 8100 pci 4 pci 0 pci 0 pci 0 pci 0 pci 0 pci 1 pci 0 pci 11 pci 0 pci 0 network 0 2 BB0 PCI0 PCIE network pciex108e abcd SUNW pcie qgc2 5GTx8 pci 8100 pci 4 pci 0 pci 0 pci 0 pci 0 pci 0 pci 1 pci 0 pci 11 ...

Page 500: ...System Configuration Oracle Corporation sun4v Memory size 131304 Megabytes System Peripherals Software Nodes ORCL SPARC64 X scsi_vhci instance 0 packages driver not attached SUNW builtin drivers driver not attached SUNW probe error handler driver not attached deblocker driver not attached disk label driver not attached terminal emulator driver not attached dropins driver not attached SUNW asr driv...

Page 501: ... concentrator instance 0 virtual network switch instance 0 virtual disk server instance 0 virtual channel client instance 1 virtual channel client instance 2 pciv communication instance 0 virtual domain service instance 0 cpu driver not attached cpu driver not attached cpu driver not attached cpu driver not attached cpu driver not attached Ommitted cpu driver not attached cpu driver not attached c...

Page 502: ...tance 25 pci instance 26 scsi instance 1 iport instance 6 smp instance 1 disk instance 6 enclosure instance 1 iport instance 9 pci instance 27 pci instance 29 usb instance 1 usb instance 1 hub instance 2 pci instance 28 network instance 4 network instance 5 pci instance 30 network instance 6 network instance 7 Ommitted pci instance 22 pci instance 101 pci instance 102 pci instance 103 pci instance...

Page 503: ...e 16 pci performance counters instance 20 pci performance counters instance 17 pci performance counters instance 21 pci performance counters instance 18 pci performance counters instance 22 pci performance counters instance 19 pci performance counters instance 23 ramdisk root driver not attached os io driver not attached fcoe instance 0 iscsi instance 0 pseudo instance 0 C 4 netstat 1M Command The...

Page 504: ...e into an IP address and then displays it Allows you to check the IP address instead of the host name netstat p Net to Media Table IPv4 Device IP Address Mask Flags Phys Addr net0 4S 111 D0 255 255 255 255 SPLA b0 99 28 98 30 36 net0 10 24 187 1 255 255 255 255 00 0a b8 50 cd 42 net0 224 0 0 22 255 255 255 255 S 01 00 5e 00 00 16 Net to Media Table IPv6 If Physical Address Type State Destination M...

Page 505: ...ighttime network events at one time by piping the ping output to a file svR Displays the routes that probe packets have passed through at intervals of 1 second Displays the routes and hop counts of probe packets allowing you to compare multiple routes to identify any bottleneck ping s 10 24 187 50 PING 10 24 187 50 56 data bytes 64 bytes from 10 24 187 50 icmp_seq 0 time 0 555 ms 64 bytes from 10 ...

Page 506: ...74 sort 0 0 673 ps 0 0 637 bash 0 0 636 login 0 0 634 usr sbin in telnetd 0 0 629 bash 0 0 613 usr bin login 0 0 602 usr lib devchassis devchassisd 0 0 600 opt SUNWldm bin ldmd 0 0 581 usr lib inet in ndpd 0 0 580 sbin dhcpagent 0 0 577 usr lib rmvolmgr 0 0 548 usr sbin auditd 0 0 519 usr sbin syslogd 0 0 508 usr lib ssh sshd 0 0 497 usr lib fm fmd fmd 0 0 487 usr lib hal hald addon cpufreq 0 0 47...

Page 507: ...12 usr lib pfexecd 0 0 98 lib inet in mpathd 0 0 74 lib crypto kcfd 0 0 73 lib inet ipmgmtd 0 0 59 usr sbin dlmgmtd 0 0 38 lib inet netcfgd 0 0 13 lib svc bin svc configd 0 0 11 lib svc bin svc startd 0 0 8 vmtasks 0 0 7 intrd 0 0 6 kmem_task 0 0 5 zpool rpool 0 0 3 fsflush 0 0 2 pageout 0 0 1 usr sbin init 0 0 0 sched C 7 prstat 1M Command The prstat 1M command repeatedly tests all the active pro...

Page 508: ...those processes that are consuming excessive amounts of resources s key Sorts the list by key parameter The list can be sorted by cpu default time and size v Displays the information in detailed mode Allows you to view other parameters prstat n 5 s size PID USERNAME SIZE RSS STATE PRI NICE TIME CPU PROCESS NLWP 497 root 55M 49M sleep 59 0 0 01 12 0 0 fmd 37 600 root 41M 36M sleep 59 0 0 09 13 0 0 ...

Page 509: ...l interface connectors provided on the SPARC M10 4 M10 4S are as follows Serial Port USB Port SAS Port The external interface connectors provided on the crossbar box are as follows Serial Port USB Port The switch for the XSCF that is provided on the SPARC M10 4 M10 4S will be as follows RESET Switch D 1 Serial Port Table D 1 lists the specifications of the serial ports of the SPARC M10 4 M10 4S an...

Page 510: ...nd 5 GND Ground 6 RXD Input Received data 7 DSR Input Data set ready 8 CTS Input Transmission possible D 1 1 Wire connection chart for serial cable Figure D 1 Wire connection chart of serial cable D 2 USB Port Table D 2 lists the specifications of the USB port of the SPARC M10 4 M10 4S and the crossbar box Fujitsu M10 4 Fujitsu M10 4S SPARC M10 4 SPARC M10 4S Service Manual February 2014 486 ...

Page 511: ...for more information about compatible devices D 4 RESET Switch The RESET switch of the SPARC M10 4 M10 4S is an emergency switch to restart the XSCF For how to use the RESET switch see 17 2 Precautions concerning Using the RESET Switch in the Fujitsu M10 SPARC M10 Systems System Operation and Administration Guide Figure D 2 indicates the RESET switch location of the SPARC M10 4 while Figure D 3 in...

Page 512: ...A A Figure D 2 RESET switch location SPARC M10 4 Figure D 3 RESET switch location SPARC M10 4S Fujitsu M10 4 Fujitsu M10 4S SPARC M10 4 SPARC M10 4S Service Manual February 2014 488 ...

Page 513: ... power off 8 entire system starting 78 entire system stopping 63 external interface 485 F failure identifying 34 fan backplane 349 fan unit 211 323 I internal disk 223 L labels 2 LED indications 23 M maintenance preparing for 41 maintenance types of 44 memory 169 O operation panel 283 359 Oracle Solaris 471 P PCI Express card 241 physical partition powering off 61 physical partition powering on 77...

Page 514: ...X XSCF BB control cable 393 XSCF DUAL control cable 405 XSCF interface unit 331 XSCF unit 305 Fujitsu M10 4 Fujitsu M10 4S SPARC M10 4 SPARC M10 4S Service Manual February 2014 490 ...

Reviews: