background image


4

 ケーブルの接続  

33

J

3

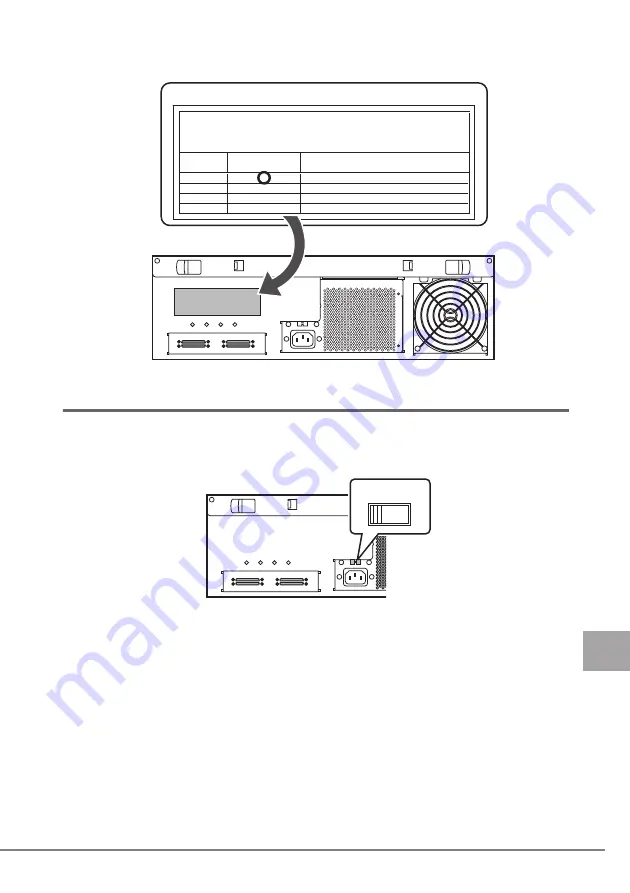
接続先ラベルに必要事項を記入し、本製品背面に貼ります。

コネクタに接続しているドライブ番号に、○印を付けてください。

4.2

電源ケーブルの接続

1

電圧スイッチが

115V

に設定されていることを確認します。

電源が入ると、前面の

Power LED

が点灯します。

䠷䝷䝧䝹䛾㈞௜఩⨨䠹

᥋⥆ඛ䝷䝧䝹

䠷䝷䝧䝹䛾グධ౛䠹

㻝㻘㻞

㻟㻘㻠

䝁䝛䜽䝍䛻᥋⥆䛧䛶䛔䜛䝗䝷䜲䝤␒ྕ䜢䕿䛷䝬䞊䜻䞁䜾䛧䛶ୗ䛥䛔䚹᥋⥆䝗䝷䜲䝤ኚ᭦
䛾ሙྜ䛿䚸㽢䛷ᾘ䛧䛶䚸ഛ⪃䛻᪂᥋⥆䝗䝷䜲䝤␒ྕ䜢グ㏙䛧䛶䛟䛰䛥䛔䚹
㻹㼍㼞㼗㼋㼠㼔㼑㼋㼏㼛㼚㼚㼑㼏㼠㼛㼞㼋㼎㼥㻌䇾䕿䇿㼋㼠㼔㼑㼋㼏㼛㼚㼚㼑㼏㼠㼑㼐㼋㼐㼞㼕㼢㼑㼋㼚㼡㼙㼎㼑㼞㻚㼋㻵㼒㼋㼏㼔㼍㼚㼓㼑㼋㼏㼛㼚㼚㼑㼏㼠㼕㼛㼚㻘
㼐㼑㼟㼏㼞㼕㼎㼑㼋㼚㼑㼣㼋㼏㼛㼚㼚㼑㼏㼠㼑㼐㼋㼐㼞㼕㼢㼑㼋㼚㼡㼙㼎㼑㼞㼋㼕㼚㼋㻺㼛㼠㼑㻚


䝁䝛䜽䝍ྡ
㼏㼛㼚㼚㼑㼏㼠㼛㼞

᥋⥆䝗䝷䜲䝤␒ྕ

㼐㼞㼕㼢㼑㼋㻺㼛㻚

䚷ഛ⪃䠄ಟṇ䝗䝷䜲䝤␒ྕ䠅
䚷㻺㼛㼠㼑㻔㻹㼛㼐㼕㼒㼕㼑㼐㼋㼐㼞㼕㼢㼑㼋㻺㼛㻚㻕

㔚࿶䉴䉟䉾䉼

䌛⢛㕙஥䌝

11

5

Summary of Contents for PRIMERGY SX10 S2

Page 1: ...J E B7FY 2431 01 SX10 S2 バックアップキャビネット取扱説明書 SX10 S2 User s Guide PG R2BC1 ...

Page 2: ...本製品は 一般事務用 パーソナル用 家庭用 通常の産業用等の一般的用途を想定して設計 製造されて いるものであり 原子力施設における核反応制御 航空機自動飛行制御 航空交通管制 大量輸送システム における運行制御 生命維持のための医療器具 兵器システムにおけるミサイル発射制御など 極めて高度 な安全性が要求され 仮に当該安全性が確保されない場合 直接生命 身体に対する重大な危険性を伴う用 途 以下 ハイセイフティ用途 という に使用されるよう設計 製造されたものではございません お客 様は 当該ハイセイフティ用途に要する安全性を確保する措置を施すことなく 本製品を使用しないでくだ さい ハイセイフティ用途に使用される場合は 弊社の担当営業までご相談ください 当社のドキュメントには 外国為替および外国貿易管理法 に基づく特定技術が含まれていることがありま す 特定技術が含まれている場合は 当...

Page 3: ...取り扱いをすると 人が死亡する可能性 または重傷を負う可能性があることを示しています 注意 この表示を無視して 誤った取り扱いをすると 人が損害を負う可能 性があること および物的損害が発生する可能性があることを示して います で示した記号は 警告 注意を促す内容であることを告げるもので す 記号の中やその脇には 具体的な警告内容が示されています で示した記号は してはいけない行為 禁止行為 であることを告 げるものです 記号の中やその脇には 具体的な禁止内容が示されて います で示した記号は 必ず従っていただく内容であることを告げるもの です 記号の中やその脇には 具体的な指示内容が示されています 記号 意味 お使いになるときの注意点や してはいけないことを記述していま す 必ずお読みください ハードウェアやソフトウェアを正しく動作させるために必要なことが 書いてあります 必ずお読みくだ...

Page 4: ...にお子様のいるご家庭 ではご注意ください 異物 水 金属片 液体など が本製品の内部に入った場合は すぐにサーバ 本体の電源スイッチを切り 電源プラグをコンセントから取り外してください その後 修理相談窓口にご連絡ください そのまま使用すると 感電 火災の原因となります 特にお子様のいるご家庭 ではご注意ください 本製品を勝手に改造しないでください 火災 感電の原因となります 本製品のカバーは オプション装置の取り付けなど 必要な場合を除いて取り 外さないでください 内部の点検 修理は修理相談窓口に連絡してください 内部には電圧の高い部 分があり 感電の原因となります 開口部 通風孔など から内部に金属類や燃えやすい物などの異物を差し込ん だり 落としたりしないでください 故障 火災 感電の原因となります 本製品の上または近くに 花びん 植木鉢 コップ などの水が入った容器 金属物を置かな...

Page 5: ...電の原因となりま す 電源プラグの電極 およびコンセントの差し込み口にほこりが付着している場 合は 乾いた布でよく拭いてください そのまま使用すると 火災の原因とな ります 取り外したカバー キャップ ネジなどは 小さなお子様が誤って飲むことが ないように 小さなお子様の手の届かないところに置いてください 万一 飲 み込んだ場合は すぐに医師と相談してください 本製品の開口部 通風孔など をふさがないでください 通風孔をふさぐと内 部に熱がこもり 火災の原因となります 本製品の上に重い物を置かないでください また 衝撃を与えないでください バランスが崩れて倒れたり 落下したりしてけがの原因となります 振動の激しい場所や傾いた場所など 不安定な場所に置かないでください 落 ちたり 倒れたりしてけがの原因となります 電源プラグを抜くときは電源ケーブルを引っ張らず 必ず電源プラグを持って 抜いて...

Page 6: ... 取扱説明書 本書 取り付け金具 一式 各製品名は 各社の商標または登録商標です 各製品は 各社の著作物です Copyright FUJITSU LIMITED 2008 本製品を移動する場合は 必ず電源プラグをコンセントから抜いてください また 電源ケーブルなども外してください 作業は足元に十分注意して行って ください 電源ケーブルが傷付き 火災 感電の原因となったり 本製品が落 ちたり倒れたりしてけがの原因となります 長時間装置を使用しないときは 安全のため必ず電源プラグをコンセントから 抜いてください 火災 感電の原因となります オプション装置の取り付けや取り外しを行う場合は 本製品および接続されて いる装置の電源スイッチを切り 電源プラグをコンセントから抜いた後に行っ てください 故障 火災 感電の原因となります 弊社推奨品以外の装置は接続しないでください 故障 火災 感電の原因と...

Page 7: ...ケーブルキットの取り付け 17 2 3 1 使用できる SCSI ケーブルキット 17 2 3 2 SCSI ケーブルキットの取り付け位置 17 2 3 3 SCSI ケーブルキットの取り付け手順 18 2 4 バックアップユニットの取り付け 23 2 4 1 使用できるバックアップユニット 23 2 4 2 バックアップユニットの取り付け手順 23 3 ラックへの搭載 27 3 1 設置場所の条件 27 3 2 本製品のラックへの搭載方法 28 4 ケーブルの接続 32 4 1 サーバ本体用 SCSI ケーブルの接続 32 4 2 電源ケーブルの接続 33 5 トラブルシューティング 35 5 1 Error LED 表示によるトラブルシューティング 35 5 2 Power LED 表示によるトラブルシューティング 36 5 3 修理相談窓口に相談するときは 42 6 仕様 43 ...

Page 8: ...製品前面 1 フロントパネル バックアップユニットを取り付け 取り外しするときに外します 2 グロメット フロントパネルを開閉するときに使用します 3 LED パネル 本製品の状態を表示します 詳細については 1 1 1 LED パネル P 9 を参照してください 4 ドライブベイ 1 4 バックアップユニットを 4 台まで取り付けできます 1 㩷䊐䊨䊮䊃䊌䊈䊦 2 㩷䉫䊨䊜䉾䊃 3 LEDࡄࡀ 4 㩷䊄䊤䉟䊑䊔䉟1 4 㩷䊄䊤䉟䊑䊔䉟2 4 㩷䊄䊤䉟䊑䊔䉟3 4 㩷䊄䊤䉟䊑䊔䉟4 ...

Page 9: ...切 を示します 2 Error LED 本製品内部に異常があるかを示します LED の状態 説明 点灯 緑 ドライブの電源が入っている状態です 消灯 ドライブの電源が切れている状態です LED の状態 説明 消灯 正常です 点灯 オレンジ 温度値に異常があります 点滅 オレンジ 速 1 秒間隔 電源ファンに異常があります 点滅 オレンジ 遅 2 秒間隔 システムファンに異常があります 1 Drive Power LED 2 Error LED 3 Power LED 4 㩷㔚Ḯ䉴䉟䉾䉼 R 1 2 3 4 Drive Power ...

Page 10: ...ます 4 電源スイッチ 本製品は サーバ本体の電源が入ると 自動で電源が入ります 通常 電源ス イッチは R に設定しておいてください LED の状態 説明 消灯 本製品の電源が切れている状態です 点灯 オレンジ 待機モードです 点灯 緑 本製品の電源が入っている状態です 点滅 緑 サーバ連動設定の待機中です 電源スイッチの状態 説明 常時 本製品の電源が入っています R サーバ本体と連動してドライブの電源を入 切します 標準設定 常時 本製品は待機モードです ...

Page 11: ... スライドします 2 SCSI INPUT コネクタ SCSI ケーブルを使ってサーバ本体と接続します 3 電圧スイッチ 115V 230V 国内 国外での使用によって 設定電圧が異なります 国内使用時 AC100V は 115V に設定されています 4 電源コネクタ 電源ケーブルを接続します 5 リリースタイ 電源ケーブルが抜け落ちることを防止するためにリリースタイで固定します 1 㩷䊨䉾䉪䊧䊋䊷 2 SCSI INPUTࠦࡀࠢ 3 㩷㔚 䉴䉟䉾䉼 4 㩷㔚Ḯ䉮䊈䉪䉺 5 㩷䊥䊥䊷䉴䉺䉟 ...

Page 12: ...SCSI ケーブルキットどうしが交わらないように向きを固定します ドライブベイ番号に応じて 使用する穴が異なります 3 システムファン 本製品内部の温度が上がりすぎないように熱を排出し 部品を冷却するための送風装 置です 4 電源ユニット 本製品に電源を供給します 5 ケーブルクランプ ケーブル類が混線しないように束ねて固定します 6 リブ SCSI ケーブルキットが煩雑にならないように置く台です 3 䉲䉴䊁䊛䊐䉜䊮 2 䉬䊷䊑䊦䊖䊦䉻䊷 1 䊄䊤䉟䊑䊔䉟 䌛೨㕙 䌝 6 䊥䊑 4 㔚Ḯ䊡䊆䉾䊃 5 䉬䊷䊑䊦䉪䊤䊮䊒 ...

Page 13: ...て説明します 2 1 トップカバーの取り付け 取り外し I O モジュールや SCSI ケーブルキットを取り付けるときは トップカバーを取り外して行 います トップカバーの取り外し 取り付け方法は次のとおりです トップカバーの取り外し 1 本製品と 本製品に接続されている すべてのサーバ本体の電源を切り コンセントから電源ケーブルを抜きます 2 背面のロックレバーを左右にスライドしながら トップカバーを背面方向 にスライドして持ち上げ 本製品から取り外します 䠷 㠃ഃ䠹 䝻䝑䜽䝺䝞䞊 䝖䝑䝥䜹䝞䞊 䠷 㠃ഃ䠹 ...

Page 14: ...14 トップカバーの取り付け トップカバーの取り付けは はめ込み位置を合わせてから取り付けてください 取り付け後 トップカバーはロックされます 䊃䉾䊒䉦䊋䊷 䌛 㕙 䌝 䉕ว䉒䈞䉎 ...

Page 15: ...使用できる I O モジュール 2 2 2 I O モジュールの取り付け手順 1 本製品の電源を切り 電源ケーブルを抜いてからトップカバーを取り外し ます 2 1 トップカバーの取り付け 取り外し P 13 2 本製品の金属部分に触れて 人体の静電気を放電します 3 取り付け位置の切り起こし箇所に I O モジュールを取り付けます 4 I O モジュールのつまみネジを締めて固定します 品名 型名 備考 I O モジュール PG IMS01 PGBIMS01 SCSI 専用 䠷 㠃ഃ䠹 ษ䜚 䛣䛧 I O䊝䉳䊠䊷䊦 ߟ ߺࡀࠫ 䌛 㕙 䌝 ...

Page 16: ...5 電源ケーブル P1 P8 P9 ファンケーブル LTG LED ケーブルを接 続します ファンケーブルはケーブルクランプから外さずに接続してください 万一 ケーブルクランプから外れた場合は ファンケーブルをはめ込んでから接続 してください 㟁 䜿䞊䝤䝹䠄P9䠅 䝣䜯䞁䜿䞊䝤䝹 LTG LED䜿䞊䝤䝹 㟁 䜿䞊䝤䝹䠄P8䠅 㟁 䜿䞊䝤䝹䠄P1䠅 䠷I O䝰䝆䝳䞊䝹䠹 䉬䊷䊑䊦䉪䊤䊮䊒 䋨ౝ 䈮䈅䉍䉁䈜䋩 ...

Page 17: ... 3 1 使用できる SCSI ケーブルキット 2 3 2 SCSI ケーブルキットの取り付け位置 SCSI ケーブルキットはケーブルホルダーに取り付けます ケーブルホルダーには ドライ ブベイ番号が刻印されています バックアップユニットを取り付けるドライブベイ 1 から 順に SCSI ケーブルキットを取り付けてください 品名 型名 備考 SCSI ケーブルキット PG CBLS032 PGBCBLS032 1 対 1 接続用 添付品 ネジ ケーブルホルダー取付用 タグラベル 㹙 㠃ഃ㹛 1 2 3 4 䝗䝷䜲䝤䝧䜲1 䝗䝷䜲䝤䝧䜲2 䜿䞊䝤䝹䝩䝹䝎䞊 䠄䝗䝷䜲䝤䝧䜲1䚸2 䠅 1 2 3 4 䝗䝷䜲䝤䝧䜲3 䝗䝷䜲䝤䝧䜲4 䜿䞊䝤䝹䝩䝹䝎䞊 䠄䝗䝷䜲䝤䝧䜲3䚸4 䠅 ...

Page 18: ...3 SCSI ケーブルキットの取り付け手順 ここでは ドライブベイ 1 に接続する場合を例に説明します 1 本製品の電源を切り 電源ケーブルを抜いてからトップカバーを取り外し ます 2 1 トップカバーの取り付け 取り外し P 13 2 本製品の金属部分に触れて 人体の静電気を放電します 3 ケーブルホルダーのつまみネジをゆるめて 本製品からケーブルホルダー を取り外します 䉬䊷䊑䊦䊖䊦䉻䊷 䈧䉁䉂䊈䉳 㨇 㕙 㨉 ...

Page 19: ...グラベルを貼ります タグラベルは SCSI ケーブルキットに添付されています 使用するドライブベイ番号のタグラベルを貼ってください SCSI ケーブルへの貼り付け方 SCSI ケーブルの I O モジュール接続側の位置に ドライブ名が見えるように巻きつ けてください 電源ケーブルのコネクタへの貼り付け方 1 3 4 SCSI䜿䞊䝤䝹䜻䝑䝖 䜿䞊䝤䝹䝩䝹䝎䞊 㒊䛸 䜢ྜ䜟䛫䜛 䛾 䛸ྜ䜟䛫䜛 䠷I O䝰䝆䝳䞊䝹᥋ ഃ䠹 䠷䝗䝷䜲䝤䝧䜲᥋ ഃ䠹 DRIVE 1 䠷I O䝰䝆䝳䞊䝹᥋ ഃ䠹 SCSI䜿䞊䝤䝹 䝍䜾䝷䝧䝹 1 2 䝁䝛䜽䝍 DRIVE 1 䝷䝧䝹䛾ᕥ 䜢䝁䝛䜽䝍䛾 㒊䛻ྜ䜟䛫䜛 DRIVE 1 ...

Page 20: ...SCSI ケーブルキットに添付のネジを使用してください 7 SCSI ケーブルキットを本製品のリブに置きます ドライブベイ 1 3 はリブの下段に ドライブベイ 2 4 はリブの上段に置いてくだ さい 8 ドライブベイ側のケーブルをドライブベイに入れ込みます 1 2 3 4 䜿䞊䝤䝹䝩䝹䝎䞊 SCSI䜿䞊䝤䝹䜻䝑䝖 䝛䝆 䝛䝆Ṇ䜑䛾ୖഃ䛻 䝗䝷䜲䝤䝧䜲 ྕ䛾 䛜䛒䜚䜎䛩䚹 䠷䝗䝷䜲䝤䝧䜲1䛻᥋ 䛩䜛ሙྜ䠹 䊥䊑 SCSI䉬䊷䊑䊦䉨䉾䊃 䊄䊤䉟䊑䊔䉟䈮 䉏ㄟ䉃 㪈 㪉 㪊 㪋 ...

Page 21: ...の取り付け 21 J 9 ケーブルホルダーのツメを本製品の取り付け場所のエンボス部に挿入しま す 10 つまみネジを締めてケーブルホルダーを固定します 11 ケーブル類を接続します ࣥ ࢫ ࢶ 㻝 㻞 㻟 㻠 䜿䞊䝤䝹䝩䝹䝎䞊 䛴䜎䜏䝛䝆 䌛I O䊝䉳䊠䊷䊦䌝 SCSI䉮䊈䉪䉺 Drive 1 Drive 3 Drive 2 Drive 4 㔚Ḯ䉮䊈䉪䉺 Drive 1 Drive 2 Drive 3 Drive 4 ...

Page 22: ...22 12 ケーブルクランプを使用してケーブル類を束ねます 䉬䊷䊑䊦䉪䊤䊮䊒 ...

Page 23: ...ユニットの取り付け方法は次のとおりです ここでは ドライブベイ 1 に取 り付ける手順を説明します 1 本製品の電源を切り 電源ケーブルを抜いてからトップカバーを取り外し ます 2 1 トップカバーの取り付け 取り外し P 13 2 フロントパネルのグロメット 2 箇所 を図の方向に回します フロントパネルのロックが解除されます 品名 型名 占有ベイ 内蔵 LTO3 HH ユニット PG LT302 PGBLT302 1 ベイ 内蔵 LTO2 HH ユニット PG LT201 PGBLT201 内蔵 LTO1 HH ユニット PG LT102 PGBLT102 内蔵 DAT72 ユニット PG DT501 PGBDT501 䠷๓㠃ഃ䠹 䝗䝷䜲䝤䝧䜲2 䝗䝷䜲䝤䝧䜲1 䝗䝷䜲䝤䝧䜲3 䝗䝷䜲䝤䝧䜲4 㛤 ...

Page 24: ...に引き 持ち上げて外します 4 ダミーユニットを取り外します ドライブベイ固定レール 2 箇所 の両側のツメを内側に押しながら ゆっくり手 前に引いて取り外します 取り出したダミーユニットは大切に保管しておいてください 5 取り外したダミーユニットから固定レールを取り外します 12 本のネジを取り外して ドライブベイ固定レールを取り外します 前面側のネジ 左右合わせて 4 本 を手順 6 の取り付けで使用します 䝒䝯 ᅛᐃ䝺䞊䝹 ...

Page 25: ...ットにネジが添付されている場合は 添付されているネ ジを使います ネジが添付されていない場合は 手順 5 で取り外したネジのうち 4 本を使用して取り付けます 7 ドライブベイから SCSI ケーブルキットを引き出し SCSI ケーブル 電 源ケーブルをバックアップユニットに接続します 8 カップリングツールは ドライブベイ固定レールのネジ穴の位置に合わせ て取り付けます 䠷䝗䝷䜲䝤䝧䜲ᅛᐃ䝺䞊䝹䠹 SCSI䜿䞊䝤䝹 㟁 䜿䞊䝤䝹 䠷䝞䝑䜽䜰䝑䝥䝴䝙䝑䝖䠹 SCSI䜿䞊䝤䝹䜻䝑䝖 䜹䝑䝥䝸䞁䜾䝒䞊䝹 ࢵࣉࣜࣥࢢࢶ ࣝ ࢆᅛᐃࣞ ࣝࡢࢿࢪ ྜࢃࡏࡿ ...

Page 26: ...ライブベイ 1 2 は バックアップユニットの左側 ドライブベイ 3 4 は バックアップユニットの右側 9 ドライブベイにバックアップユニットを取り付けます カチッ と音がするまで押し込みます 10 フロントパネルを取り付けます フロントパネルのフックを 切り欠きに引っ掛けて取り付けます 11 グロメット 2 箇所 のつまみ部を図のように縦に回してから押し込みま す グロメットは硬いことがあります パチン と音がなるまで押し込んでください 12 トップカバーを取り付けます トップカバーの取り付け P 14 䝣䝑䜽 ษ䜚Ḟ䛝 㛢 ...

Page 27: ...法について説明します 3 1 設置場所の条件 本製品は 次の場所を避けて設置してください 湿気やほこり 油煙の多い場所 通気性の悪い場所 火気のある場所 周囲温度が 10 35 をはずれる場所 湿度が 20 80 をはずれる場所 電源ケーブルなどのケーブルが足に引っ掛かる場所 テレビやスピーカーの近くなど 強い磁気が発生する場所 水のかかる場所 直射日光の当たる場所や 暖房器具の近くなど 高温になる場所 腐食性ガスが発生する場所 塩害地域 振動の激しい場所や傾いた状態など 不安定な場所 ...

Page 28: ...柱 に取り付けます 3 スライドレールの左右を確認します スライドレールには 右用と左用があります ラック支柱前面に向かって右側には RIGHT 左側には LEFT の表示があります ラックは必ず固定し 転倒防止用スタビライザを取り付けてください ラックの設 置に関する詳細は ラックに添付のマニュアルを参照してください 本製品の運搬を行う場合は 必ず 2 人以上で本体の左右側面 および底面を持って ください ᮏ〇ရᗏ㠃䛾 䠷䝷䝑䜽ᨭᰕ๓㠃䠹 䠷䝷䝑䜽ᨭᰕ 㠃䠹 䝢䞁 䜢ྜ䜟䛫䜛 1䚸 3ಶ 䠷ᕥഃ䠹 䠷ྑഃ䠹 3U 䠄 䝃䜲䝈䠅 3U 䠄 䝃䜲䝈䠅 8ಶ 䠄M5䝷䝑䜽䝘䝑䝖䠅 3ಶ 䠄M5䝃䝷䝛䝆䠅 䝛䝆 䜢ྜ䜟䛫䜛 ...

Page 29: ...ます 6 スライドレールとラックナットをラックに取り付けます 1 スライドレール背面側のピンをラックにはめ込みます 2 スライドレール前面側のネジ位置をラックに合わせ ワッシャーとともに取り 付けます 3 ラックナットは ラック支柱前面の内側からツメを上下に引っ掛けて取り付け ます 䌛ฝ 䊧䊷䊦䈱ౝ 䌝 䉟䊮䊅䊷䊧䊷䊦 䉴䊤䉟䊄䊧䊷䊦 䌛 ኻ 䌝 䊨䉾䉪䉕 䈕䈩 㒰 㶎Ꮐ 䊧䊷䊦䈲䇮䊨䉾䉪䉕ਅ䈕䈩 㒰 䠷ᮏ〇ရྑഃ㠃䠹 䝛䝆 䛻䛿䜑 䜐 䛣䛾㒊ศ䛷ᅛᐃ䛥䜜䜛 ᚋ᪉䛻䝇䝷䜲䝗 M5 ࠢ 䊪䉾䉲䊞䊷 M5ࠨ ࡀࠫ 䊈䉳 䉕 ว䉒䈞䉎 䉴䊤䉟䊄䊧䊷䊦䈱 䊏䊮䉕䈲䉄ㄟ䉃 䌛೨㕙 䌝 䌛 㕙 䌝 䇸㪩㪠㪞㪟㪫䇹䇮䇸㪣㪜㪝㪫䇹 䈱 䉕 䋣 ...

Page 30: ...後方にスライドさせてラックに搭載します 3 本製品をラックから数回出し入れして スライドの動作に問題がないことを確 認します 注意 インナーレールを取り付けるとき リテナーに正しく取り付いていること を確認してください スライドレールにインナーレールを無理に押し込まないでください イン ナーレールの金具が変形し レールが正常に動作しなくなるおそれがあり ます 本製品をスライドさせる場合や元に戻す場合は 十分注意してくださ い 指や衣服が挟まれて けがをするおそれがあります 䝻䝑䜽䜢ୖ䛢䛶ゎ㝖 䠷ྑഃ䝺䞊䝹䛾ሙྜ䠹 䈜ᕥഃ䝺䞊䝹䛿䚸䝻䝑䜽䜢ୗ䛢䛶ゎ㝖 ᮏ〇ရ䜢ᦚ 䛩䜛䛸䛝䚸䝸䝔䝘䞊䛜 䝺䞊䝹䛾ඛ 㒊䛻䛒䜛䛣䛸䜢 ㄆ 䝸䝔䝘䞊 ...

Page 31: ...3 ラックへの搭載 31 J 8 本製品とラックを固定します 本製品や周辺装置が搭載されていない場所には ラックに添付のブランク パネルを取り付けてください 䛴䜎䜏䝛䝆 ...

Page 32: ...続 1 サーバ本体の電源を切ります 2 バックアップユニットを取り付けたドライブベイ番号に対応する SCSI INPUT コネクタを確認し SCSI ケーブルを接続します コネクタ名 connector 接続ドライブ番号 drive No A 1 B 2 C 3 D 4 䌛 㕙 䌝 䌛೨㕙 䌝 䊄䊤䉟䊑䊔䉟1 䊄䊤䉟䊑䊔䉟2 䊄䊤䉟䊑䊔䉟3 䊄䊤䉟䊑䊔䉟4 䋩䊋䉾䉪䉝䉾䊒䊡䊆䉾䊃䈏䊄䊤䉟䊑䊔䉟1䈮ข䉍ઃ䈔䉌䉏䈩䈇䉎႐ว䈲䇮 䇭䇭SCSI INPUT䉮䊈䉪䉺䇸A䇹䈮ធ 䈚䉁䈜䇯 㪘 㪙 㪚 㪛 SCSI INPUT䉮䊈䉪䉺 ...

Page 33: ...D が点灯します 䠷䝷䝧䝹䛾 䠹 ᥋ ඛ䝷䝧䝹 䠷䝷䝧䝹䛾グධ 䠹 㻰 㻝 㻝㻘㻞 㻟 㻟㻘㻠 䝁䝛䜽䝍䛻᥋ 䛧䛶䛔䜛䝗䝷䜲䝤 ྕ䜢䕿䛷䝬䞊䜻䞁䜾䛧䛶ୗ䛥䛔䚹᥋ 䝗䝷䜲䝤ኚ 䛾ሙྜ䛿䚸㽢䛷ᾘ䛧䛶䚸ഛ 䛻᪂᥋ 䝗䝷䜲䝤 ྕ䜢グ 䛧䛶䛟䛰䛥䛔䚹 㻹㼍㼞㼗㼋㼠㼔㼑㼋㼏㼛㼚㼚㼑㼏㼠㼛㼞㼋㼎㼥㻌䇾䕿䇿㼋㼠㼔㼑㼋㼏㼛㼚㼚㼑㼏㼠㼑㼐㼋㼐㼞㼕㼢㼑㼋㼚㼡㼙㼎㼑㼞㻚㼋㻵㼒㼋㼏㼔㼍㼚㼓㼑㼋㼏㼛㼚㼚㼑㼏㼠㼕㼛㼚㻘 㼐㼑㼟㼏㼞㼕㼎㼑㼋㼚㼑㼣㼋㼏㼛㼚㼚㼑㼏㼠㼑㼐㼋㼐㼞㼕㼢㼑㼋㼚㼡㼙㼎㼑㼞㼋㼕㼚㼋㻺㼛㼠㼑㻚 㻭 㻮 㻯 䝁䝛䜽䝍ྡ 㼏㼛㼚㼚㼑㼏㼠㼛㼞 ᥋ 䝗䝷䜲䝤 ྕ 㼐㼞㼕㼢㼑㼋㻺㼛㻚 䚷ഛ 䠄ಟṇ䝗䝷䜲䝤 ྕ䠅 䚷㻺㼛㼠㼑㻔㻹㼛㼐㼕㼒㼕㼑㼐㼋㼐㼞㼕㼢㼑㼋㻺㼛㻚㻕 㔚 䉴䉟䉾䉼 䌛 㕙 䌝 115 ...

Page 34: ...を防止するた め リリースタイで固定してください 周辺装置を接続したあと ラックに添付のケーブルホルダーに ケーブルをまと めてリリースタイで固定します このフォーミング処理により ラックに複数のサーバが搭載されている場合で も ケーブルが見分けやすくなります 㔚Ḯ䉬䊷䊑䊦 䊥䊥䊷䉴䉺䉟 వ 䉕ㅢ䈚䇮䈵䈦䈴䈦䈩 ቯ䈜䉎 ᧄ ຠ䈮㔚Ḯ䉬䊷䊑䊦䉕ធ 䈚䈢ᓟ䇮 ਅ 䉕ෳ 䈮䈚䈩䇮䊥䊥䊷䉴䉺䉟䈪㔚Ḯ 䉬䊷䊑䊦䉕 ቯ䈚䈩䈒䈣䈘䈇䇯 䈭䈍䇮ᧄ ຠ䈱㔚Ḯ䉬䊷䊑䊦䉕ᛮ䈒䈫䈐 䈲䇮ᔅ䈝ᧄ ຠ 䈱㔚Ḯ䉮䊈䉪䉺䉕ᛮ䈒 䉋䈉䈮䈚䈩䈒䈣䈘䈇䇯 䊥䊥䊷䉴䉺䉟 䉬䊷䊑䊦 䉬䊷䊑䊦䊖䊦䉻䊷 䌛䊤䉾䉪 㕙 䌝 ...

Page 35: ...5 1 Error LED 表示によるトラブルシューティング LED 表示 状態 対処方法 点灯 オレンジ 温度の異常値を検出 本製品設置場所の環境温度が適切 10 35 であるか確認してください 適切である場合 装置の故障が考えられま す 修理相談窓口に連絡してください 点滅 オレンジ 速 1 秒間隔 電圧スイッチの設定違 い またはファンエラー を検出 電圧スイッチの設定を確認してください 電圧スイッチの設定が違っている場合は 電源ケーブルを外してから 電圧スイッチ を正しく設定してください 4 2 電源ケーブルの接続 P 33 その後も LED が点滅する場合は 装置の 故障が考えられます 修理相談窓口に連絡 してください 点滅 オレンジ 遅 2 秒間隔 ...

Page 36: ...䝤䝹㢮䛜ṇ䛧䛟᥋ 䛥䜜䛶䛔䜎䛩䛛䠛 㟁 䝇䜲䝑䝏䛜䛂䡘䛃䛻タᐃ䛥䜜䛶 䛔䜎䛩䛛䠛 ᾘⅉ Power LED䛿䛹䛾䜘䛖䛺 ែ䛷䛩䛛䠛 No No ౪ 䛧䛶䛟䛰䛥䛔䚹 No No No No No No No No ṇ䛧䛟᥋ 䛧䛶䛟䛰䛥䛔䚹 䛂4 2 㟁 䜿䞊䝤䝹䛾᥋ 䛃䠄P 33䠅 䛂䡘䛃䛻タᐃ䛧䛶䛟䛰䛥䛔䚹 䛂1 1 1 LED䝟䝛䝹䛃䠄P 9䠅 䛜ᨾ㞀䛧䛶䛔䜛ྍ ᛶ䛜䛒䜚䜎䛩䚹 ಟ ㄯ ཱྀ䛻㐃 䛧䛶䛟䛰䛥䛔䚹 ṇ䛧䛟᥋ 䛧䛶䛟䛰䛥䛔䚹 䛂2 ෆⶶ䜸䝥䝅䝵䞁䛾ྲྀ䜚 䛡䛃䠄P 13䠅 䜸䝺䞁䝆Ⅼⅉ 䜎䛯䛿 Ⅼ 㟁 䜿䞊䝤䝹䛜ṇ䛧䛟᥋ 䛥䜜䛶 䛔䜎䛩䛛䠛 㟁 䜿䞊䝤䝹䛜 䛧䛶䛔䜎䛩䛛䠛 ಟ ㄯ ཱྀ䛻㐃 䛧䛶䛟䛰䛥䛔䚹 ...

Page 37: ...されているのに電源が切れない Power LED がオレンジ点灯にならない ෆ䛾䜿䞊䝤䝹㢮䛜ṇ䛧䛟᥋ 䛥䜜䛶䛔䜎䛩䛛䠛 ᾘⅉ Power LED䛿䛹䛾䜘䛖䛺 ែ䛷䛩䛛䠛 No No No No ṇ䛧䛟タᐃ䛧䛶䛟䛰䛥䛔䚹 䛂1 1 1 LED䝟䝛䝹䛃䠄P 9䠅 ṇ䛧䛟᥋ 䛧䛶䛟䛰䛥䛔䚹 䛂2 ෆⶶ䜸䝥䝅䝵䞁䛾ྲྀ䜚 䛡䛃䠄P 13䠅 䛜ᨾ㞀䛧䛶䛔䜛ྍ ᛶ䛜䛒䜚䜎䛩䚹 ಟ ㄯ ཱྀ䛻㐃 䛧䛶䛟䛰䛥䛔䚹 㟁 䝇䜲䝑䝏䛜䛂䚷㻌䛃䛻タᐃ䛥䜜䛶 䛔䜎䛩䛛䠛 Ⅼⅉ 䜎䛯䛿 Ⅼ ...

Page 38: ...䝃䞊䝞ᮏయ᥋ 䠅䛜ṇ䛧䛟᥋ 䛥䜜䛶䛔䜎䛩䛛䠛 No No ṇ䛧䛟᥋ 䛧䛶䛟䛰䛥䛔䚹 䛂4 1 䝃䞊䝞ᮏయ SCSI䜿䞊䝤䝹 䛾᥋ 䛃䠄P 32䠅 1 䝃䞊䝞ᮏయ䛾SCSI䜹䞊䝗䛜ṇ䛧䛟 ㄆ 䛥䜜䛶䛔䜎䛩䛛䠛 2䠅 Term Powerタᐃ䛜ṇᖖ䛷䛩䛛䠛 䜸䝺䞁䝆Ⅼⅉ 䜎䛯䛿 Ⅼ 㟁 䜿䞊䝤䝹䛜ṇ䛧䛟᥋ 䛥䜜䛶 䛔䜎䛩䛛䠛 㟁 䜿䞊䝤䝹䛜 䛧䛶䛔䜎䛩䛛䠛 ಟ ㄯ ཱྀ䛻㐃 䛧䛶䛟䛰䛥䛔䚹 ಟ ㄯ ཱྀ䛻㐃 䛧䛶䛟䛰䛥䛔䚹 ḟ䝨䞊䝆䜈 䛟 ṇ䛧䛟᥋ 䛧䛶䛟䛰䛥䛔䚹 䚷 䛂4 2 㟁 䜿䞊䝤䝹䛾᥋ 䛃䠄P 33䠅 䛂䕔㟁 䝇䜲䝑䝏䛜䛂䡘䛃䛻タᐃ䛥䜜䛶 䛔䜛䛾䛻㟁 䛜ධ䜙䛺䛔䛃䠄P 36䠅䜢 ཧ 䛧䚸ᑐฎ䛧䛶䛟䛰䛥䛔䚹 1䠅䝃䞊䝞ᮏయ䜎䛯䛿SCSI䜹䞊䝗䛾 䚷㻌䝬䝙䝳䜰䝹䛾䛄䝖䝷䝤䝹䝅䝳䞊䝔䜱䞁 䚷㻌䜾䛅䜢ཧ 䛧䛶䛟䛰䛥䛔䚹 2䠅ྛ䝞䝑䜽䜰䝑䝥䝴䝙䝑䝖䛾䝬䝙䝳䜰䝹 䚷 䜢ཧ 䛧䛶䚸Term Power...

Page 39: ... ṇ䛧䛟᥋ 䛧䛶䛟䛰䛥䛔䚹 䛂2 ෆⶶ䜸䝥䝅䝵䞁䛾ྲྀ䜚 䛡䛃䠄P 13䠅 㟁 䝇䜲䝑䝏䛜䛂R䛃䛻タᐃ䛥䜜䛶 䛔䜎䛩䛛䠛 㟁 䝇䜲䝑䝏䜢䛂R䛃䛻タᐃ䛧䛶䛟䛰䛥䛔䚹 ᥋ 䛧䛶䜛䛩䜉䛶䛾䝃䞊䝞䛾㟁 䛜ษ䜜䛶䛔䜎䛩䛛䠛 ᦚ 䛧䛶䛔䜛䝗䝷䜲䝤䛾 Term Power OFF䛻䛺䛳䛶 䛔䜎䛩䛛䠛 No No No No ᥋ 䛧䛶䛔䜛䛩䜉䛶䛾䝃䞊䝞䛾 㟁 䜢ษ䛳䛶䛟䛰䛥䛔䚹 No No 䛂䕔㟁 䝇䜲䝑䝏䛜䛂㻌㻌㻌䛃䛻タᐃ䛥䜜䛶 䛔䜛䛾䛻㟁 䛜ษ䜜䛺䛔䛃䠄P 37䠅䜢 ཧ 䛧䚸ᑐฎ䛧䛶䛟䛰䛥䛔䚹 タᐃ䛜 䛜ᨾ㞀䛧䛶䛔䜛ྍ ᛶ䛜䛒䜚䜎䛩䚹 ಟ ㄯ ཱྀ䛻㐃 䛧䛶䛟䛰䛥䛔䚹 タᐃ᪉ἲ䛻䛴䛔䛶䛿䚸ྛ䝞䝑䜽䜰䝑䝥 䝴䝙䝑䝖䛾䝬䝙䝳䜰䝹䜢ཧ 䛧䛶䚸 Term Powerタᐃ䜢OFF䛻䛧䛶䛟䛰 䛥䛔䚹 㟁 䝇䜲䝑䝏䜢䛂䚷 䛃䛻タᐃ䛩䜛䛸 㟁 䛜ษ䜜䜎䛩䛛䠛 ...

Page 40: ...䚹 ᾘⅉ 䜸䝺䞁䝆Ⅼⅉ Ⅼ ෆ䛾I O䝰䝆䝳䞊䝹䛸䝗䝷䜲䝤䛾 㛫䛾㟁 䜿䞊䝤䝹䛜ṇ䛧䛟᥋ 䛥䜜 䛶䛔䜎䛩䛛䠛 ಟ ㄯ ཱྀ 㐃 ࡋ ࡃࡔࡉ ࠋ ෆ䛾I O䝰䝆䝳䞊䝹䛸䝗䝷䜲䝤䛾 㛫䛾㟁 䜿䞊䝤䝹䛜 䛧䛶䛔䜎 䛩䛛䠛 ṇ䛧䛟᥋ 䛧䛶䛟䛰䛥䛔䚹 䛂2 3 3 SCSI䜿䞊䝤䝹䜻䝑䝖䛾ྲྀ䜚 䛡 ᡭ㡰䛃䠄P 18䠅 䛂2 4 2 䝞䝑䜽䜰䝑䝥䝴䝙䝑䝖䛾ྲྀ䜚 䛡 ᡭ㡰䛃䠄P 23䠅 㟁 䝇䜲䝑䝏䛾タᐃ䛻ᛂ䛨䛶䚸௨ୗ䜢 ཧ 䛧䛶䛟䛰䛥䛔䚹 䞉䛂䕔㟁 䝇䜲䝑䝏䛜䛂䡘䛃䛻タᐃ䛥䜜䛶 䚷䛔䜛䛾䛻㟁 䛜ධ䜙䛺䛔䛃䠄P 36䠅 䞉䛂䕔㟁 䝇䜲䝑䝏䛜䛂R䛃タᐃ 䛷㟁 䚷䛜ධ䜙䛺䛔䛃䠄P 38䠅 䛂䕔㟁 䝇䜲䝑䝏䛜䛂R䛃タᐃ 䛷㟁 䛜ධ䜙䛺䛔䛃䠄P 38䠅䛾 Ⅼⅉ Power LED䛿䛹䛾䜘䛖䛺 ែ䛷䛩䛛䠛 㟁 䝇䜲䝑䝏䛾タᐃ䛻ᛂ䛨䛶䚸௨ୗ䜢 ཧ 䛧䛶䛟䛰䛥䛔䚹 䞉䛂䕔㟁 䝇䜲䝑䝏䛜䛂䚷㻌䛃䛻タᐃ䛥䜜䛶 䚷䛔䜛䛾䛻㟁...

Page 41: ...䛶䛔䜎䛩䛛䠛 SCSI䜿䞊䝤䝹䠄䝃䞊䝞ᮏయ᥋ 䠅䛜ṇ䛧䛟᥋ 䛥䜜䛶䛔䜎䛩䛛䠛 䛜ᨾ㞀䛧䛶䛔䜛ྍ ᛶ䛜䛒䜚䜎䛩䚹 ಟ ㄯ ཱྀ䛻㐃 䛧䛶䛟䛰䛥䛔䚹 ྛ䝞䝑䜽䜰䝑䝥䝴䝙䝑䝖䛾䝬䝙䝳䜰䝹䜢ཧ 䛧䛶䚸ṇ䛧䛟タᐃ䛧䛶䛟䛰䛥䛔䚹 1 䝃䞊䝞ᮏయ䛾SCSI䜹䞊䝗䛜ṇ䛧䛟 ㄆ 䛥䜜䛶䛔䜎䛩䛛䠛 2䠅 Term Powerタᐃ䛜ṇᖖ䛷䛩䛛䠛 ṇ䛧䛟᥋ 䛧䛶䛟䛰䛥䛔䚹 䛂2 ෆⶶ䜸䝥䝅䝵䞁䛾ྲྀ䜚 䛡䛃䠄 No No ᾘⅉ 䜸䝺䞁䝆Ⅼⅉ Ⅼ ಟ ㄯ ཱྀ䛻㐃 䛧䛶䛟䛰䛥䛔䚹 ಟ ㄯ ཱྀ䛻㐃 䛧䛶䛟䛰䛥䛔䚹 㟁 䝇䜲䝑䝏䛾タᐃ䛻ᛂ䛨䛶䚸௨ୗ䜢 ཧ 䛧䛶䛟䛰䛥䛔䚹 䞉䛂䕔㟁 䝇䜲䝑䝏䛜䛂䡘䛃䛻タᐃ䛥䜜䛶 䚷䛔䜛䛾䛻㟁 䛜ධ䜙䛺䛔䛃䠄P 36䠅 䞉䛂䕔㟁 䝇䜲䝑䝏䛜䛂R䛃タᐃ 䛷㟁 䚷䛜ධ䜙䛺䛔䛃䠄P 38䠅 䛂䕔䝞䝑䜽䜰䝑䝥䝴䝙䝑䝖䛾㟁 䛜ධ䜙䛺䛔䛃 䠄P 40䠅䜢ཧ 䛧䛶ᑐฎ䛧䛶䛟䛰䛥䛔䚹 䛾᥋ 䛃䠄P 32䠅 䠄P...

Page 42: ...42 5 3 修理相談窓口に相談するときは 修理相談窓口にご連絡いただく前に 事前に次の内容について確認しておいてください 修理相談窓口の連絡先などは 保証書に記載されています ST A SERIAL MODEL PG ဳฬ ㅧ ภ ...

Page 43: ... 品名 PRIMERGY SX10 S2 バックアップキャビネット 型名 PG R2BC1 5 インチベイ 4 ベイ 電源ユニット 標準 1 台 電源制御モード サーバ連動 AC 給電のうち どちらか 1 つを選択 SCSI インターフェース SE LVD SCSI 最大 160MB s 外形寸法 mm 483 W 754 D 131 4 H 占有ユニット数 3U 質量 23 5Kg 最大 入力電圧 周波数 AC100V 50 60Hz コンセント 二極接地型 標準 1 個 消費電力 250W 保守サポート期間 5 年 ...

Page 44: ...44 ...

Page 45: ...duct is designed developed and manufactured as contemplated or general use including without limitation general office use personal use household use and ordinary industrial use but is not designed developed and manufactured as contemplated for use accompanying fatal risks or dangers that unless extremely high safety is secured could lead directly to death personal injury severe physical damage or...

Page 46: ...potentially lethal CAUTION Ignoring this symbol may lead to injury and or damage this product The triangle mark emphasizes the urgency of the WARNING and CAUTION Details are described next to the triangle A barred circle warns against certain actions Do Not Details are described next to the circle A black circle indicates actions that must be taken Details are described next to the black circle Sy...

Page 47: ...he server s power and unplug it from the power source Contact an office listed in Appendix B Contact Information p 90 Not doing so may cause electric shock and fire Extreme care should be taken in households with young children Do not remodel this product Doing so may cause electric shock or fire Do not remove this products cover except when necessary such as when installing optional equipment Req...

Page 48: ... or fire Keep removed covers caps screws and other small objects young children might swallow out of their reach If swallowed contact a doctor immediately Do not cover the openings air holes etc on this product Doing so can cause overheating and fire Do not place anything heavy on top of this product Also do not severely jar this product Doing so may cause this product to fall and result in injury...

Page 49: ...ct Power cable x 1 User s Guide this document Mounting hardware x 1 set Product names used are trademarks or registered trademarks of their respective manufacturers All products are copyrights of their respective manufacturers Copyright FUJITSU LIMITED 2008 Turn off this product and the connected devices and unplug them from the power source before installing or uninstalling optional devices Not d...

Page 50: ...Kit 61 2 4 Installing a Backup Unit 66 2 4 1 Usable Backup Units 66 2 4 2 How to Install a Backup Unit 66 3 Installing in a Rack 70 3 1 Condition of Installation Location 70 3 2 How to Install this Product in a Rack 71 4 Connecting Cables 75 4 1 Connecting the SCSI Cable for the Server 75 4 2 Connecting the Power Cable 76 5 Troubleshooting 78 5 1 Troubleshooting on Error LED Display 78 5 2 Trouble...

Page 51: ...Remove this front panel to install or uninstall the backup unit 2 Grommet These grommets are used to open or close the front panel 3 LED panel Displays this product s status For details refer to 1 1 1 LED Panel p 52 4 Drive bay 1 to 4 Up to four backup units can be installed 1 Front panel 2 Grommets 3 LED panel 4 Drive bay 1 4 Drive bay 2 4 Drive bay 3 4 Drive bay 4 ...

Page 52: ...atus Description Blinking green The drive power is turned on Off The drive power is turned off LED status Description Off Normal status On amber The temperature value is abnormal Blinking amber fast one second interval The power fan is abnormal Blinking amber slow two seconds interval The system fan is abnormal 1 Drive Power LEDs 2 Error LED 3 Power LED 4 Power switch R 1 2 3 4 Drive Power ...

Page 53: ...set the power switch to R LED status Description Off This product is turned off On amber Standby mode On green This product is turned on Blinking green Standby for the power interlock setting with the server Power switch status Description Turns on this product all the time R Turns the drive s power on off in conjunction with the server power default Usually this product is in standby mode ...

Page 54: ...standard The voltage is set to 230V in default 4 Power connector A power cable is plugged in 5 Release tie Use this release tie to secure the power cable to prevent it from falling The power supply of this server is 100 240 VAC Use a power cable that meets your country s standard For details refer to the Appendix A Power Cable Selection p 87 1 Lock levers 2 SCSI INPUT connector 3 Voltage switch 4 ...

Page 55: ... This is a ventilation device to remove heat so that the temperature in this product does not rise too much and to cool the components 4 Power supply unit Supplies power to this product 5 Cable clamp This cable clamp is used to bind and secure the cables so that they do not get tangled 6 Rib This rib is used to store the SCSI cable kits so that they do not get tangled 3 System fan 2 Cable holders ...

Page 56: ...his product s top cover The procedure for attaching removing the top cover is as follows Removing the top cover 1 Turn off this product and all servers that are connected to this product and unplug the power cable 2 Slide the top cover backward and lift up while sliding the lock levers at the rear right and left to remove the cover from this product Rear Lock levers Top cover Rear ...

Page 57: ...Internal Options 57 E Attaching the top cover To attach the top cover align the top cover with the insertion position before attaching it After attaching the top cover it is locked Top cover Rear Align the position ...

Page 58: ...er cable and then remove the top cover 2 1 Attaching Removing the Top Cover p 56 2 Touch a metal part of this product to discharge static electricity 3 Insert the I O module into the holes at the installation location 4 Tighten the thumbscrew of the I O module to secure it Product name Product ID Remark I O Module PG IMS01 PGBIMS01 for SCSI Rear Holes I O module Thumbscrew Rear ...

Page 59: ... LTG LED cable Connect the fan cable so that it does not come out of the cable clamps If the fan cable comes out of the cable clamps insert it in the cable clamps before connecting Power cable P9 Fan cable LTG LED cable Power cable P8 Power cable P1 I O module Cable clamps They are inside ...

Page 60: ...tall the SCSI cable kit in the cable holder The drive bay number is printed on the cable holder Install the SCSI cable kit in ascending order of drive bay number from Drive bay 1 where the backup unit is installed Product name Product ID Remark SCSI cable kit PG CBLS032 PGBCBLS032 For one to one connection Appended goods Screws to attach a cable holder Tag label Rear 1 2 3 4 For Drive bay 1 For Dr...

Page 61: ...the SCSI cable kit in Drive bay 1 1 Turn off this product unplug the power cable and then remove the top cover 2 1 Attaching Removing the Top Cover p 56 2 Touch a metal part of this product to discharge static electricity 3 Loosen the thumbscrew of the cable holder and remove the cable holder from this product Cable holder Thumbscrew Rear ...

Page 62: ...to be used How to attach to the SCSI cable Twist the label around the cable on the I O module connection side so that the drive name can be seen How to attach to the connector of the power cable Z 1 3 4 SCSI cable kit Cable holder Align the protrusions with the holes Align with the holes I O module connection side Drive bay connection side DRIVE 1 I O module connection side SCSI cable Tag label 1 ...

Page 63: ...the ribs of this product Put Drive bays 1 and 3 on the lower stand Drive bays 2 and 4 on the upper stand of the rib 8 Insert the cable on the drive bay side into the drive bay 1 2 3 4 Cable holder SCSI cable kit Screw The drive bay number is printed on the upper side of the screw clamp When connecting to Drive bay 1 Rib SCSI cable kit Insert into the drive bay 㪈 㪉 㪊 㪋 ...

Page 64: ...stallation locaton of this product 10 Tighten the thumbscrew to secure the cable holder 11 Connect the cables Sleaves Tabs 1 2 3 4 Cable holder Thumbscrew I O module SCSI connectors Drive 1 Drive 3 Drive 2 Drive 4 Power connectors Drive 1 Drive 2 Drive 3 Drive 4 ...

Page 65: ...2 Installing Internal Options 65 E 12 Bind the cables using the cable clamp Cable clamps ...

Page 66: ... Turn off this product unplug the power cable and then remove the top cover 2 1 Attaching Removing the Top Cover p 56 2 Turn the grommets on the front panel two locations in the direction shown in the figure below The front panel lock is released Product name Product ID Exclusive bay Tape Drv LTO3 Ultrium3 Ultrium2 400GB PG LT302 PGBLT302 1 bay Tape Drv LTO2 Ultrium2 200GB PG LT201 PGBLT201 Tape D...

Page 67: ...e drive bay fixed rail two locations inward and pull the dummy unit out slowly to remove it Keep the removed dummy units in a safe place 5 Remove the fixed rails from the removed dummy unit Remove 12 screws and remove the drive bay fixed rails The front side screws four in total for right and left are used to attach the fixed rails in Step 6 Tabs Fixed rails ...

Page 68: ... removed in Step 5 to attach the fixed rails 7 Pull out the SCSI cable kit from the drive bay and connect the SCSI cable and power cable to the backup unit 8 Attach the coupling tool aligning it with the screw hole position of the drive bay fixed rail Drive bay fixed rail SCSI cable Power cable Backup unit SCSI cable kit Coupling tool Coupling tool Align the hole with the screw hole of the fixed r...

Page 69: ...Drive bays 3 and 4 Right side of backup unit 9 Install the backup unit in the drive bay Insert it until it clicks 10 Attach the front panel Hook the front panel on the notches to attach the front panel 11 Turn the grommet tabs two locations lengthwise as shown in the figure below and push them The grommet may be tough Push it until it clicks 12 Attach the top cover Attaching the top cover p 57 Hoo...

Page 70: ...e to fire or other sources of heat Area with a temperature of below 10 C or above 35 C Area with humidity of less than 20 or more than 80 Area where cables become trip hazards Area where strong magnetic fields are generated such as near TVs and speakers Area close to water Areas close to direct sunlight or near heating appliances Areas where corrosive gas is generated Salty areas Areas where the d...

Page 71: ... is displayed on the right side toward the rack pillar front and LEFT is displayed on the left side Be sure to secure the rack with stabilizers to prevent this product from tipping over For details on installing the rack refer to the rack manual provided with the rack When carrying this product have a right and left side and the bottom of the body by two or more people The base line of this produc...

Page 72: ...ails with the rack and attach the slide rails to the rack along with the washers 3 Insert the rack nut tabs from inside of the rack pillar and hook them at the top and bottom sides to attach the rack nuts Inside of right rail Inner rail Slide rail Outside Press the lock up to release For the left side rail press down to release Right side of this product Insert into the screw location It is secure...

Page 73: ...hat the slide rails move smoothly without any problems CAUTION When inserting the inner rails check that they are attached to the retainers properly Do not push the inner rails into the slide rails by force Fittings of the inner rails may be trans formed and the rails do not move normally Injury Be careful not to pinch your fingers or catch any clothing when sliding this product into the cabinet T...

Page 74: ...74 8 Secure this product to the rack Install the attached blank panel to the rack where this product or peripheral devices are not installed Thumbscrews ...

Page 75: ...er 2 Check the SCSI INPUT connector corresponding to the drive bay number which the backup unit is installed in and connect the SCSI cable Connector name Drive No A 1 B 2 C 3 D 4 Rear Front Drive bay 1 Drive bay 2 Drive bay 3 Drive bay 4 Example When the backup unit is installed in Drive bay 1 connect the cable to SCSI INPUT connector A A B C D SCSI INPUT connector ...

Page 76: ...er supply of this server is 100 240 VAC Use a power cable that meets your country s standard For details refer to the Appendix A Power Cable Selection p 87 Label location Label of the connection target Label example 㪛 㪈 㪈㪃㪉 㪊 㪊㪃㪋 䉮䊈䉪䉺䈮ធ 䈚䈩䈇䉎䊄䊤䉟䊑 ภ䉕䂾䈪䊙䊷䉨䊮䉫䈚䈩ਅ䈘䈇䇯ធ 䊄䊤䉟䊑ᄌᦝ 䈱႐ว䈲䇮㬍䈪ᶖ䈚䈩䇮 䈮ᣂធ 䊄䊤䉟䊑 ภ䉕 ㅀ䈚䈩䈒䈣䈘䈇䇯 Mark_ the_ connector_ by 㵰䂾㵱_ the_ connected_ drive_ number _ If_ change_ connectio㫅㪃 describe_ n...

Page 77: ...ith the release tie to the cable holder provided with the rack This forming process makes the cables easily recognizable even when multiple servers are installed in the rack Power cable Release tie Make the circle by passing tie ahead in the box Afterwards tighten by pulling it After connecting the power cable to this product refer to the figure below and secure the power cable with the release ti...

Page 78: ...perature around this product s installation location is correct 10 C to 35 C If it is correct this product may fail Contact an office listed in Appendix B Contact Information p 90 Blinking amber fast one second interval The voltage switch setting is wrong or a fan error was detected Check the voltage switch setting If the voltage switch setting is wrong remove the power cable and correct the setti...

Page 79: ...connected correctly The power switch is set to Off What is the status of the Power LED No No Supply it No No No No No No No No Connect it properly Set it to 1 1 1 LED Panel p 52 This product may fail Connect them correctly 2 Installing Internal Options p 56 Lit up amber or Blinking green The power cable is connected properly The power cable is damaged Contact maintenance support 4 2 Connecting the...

Page 80: ... cables in this product are connected correctly Off What is the status of the Power LED No No No No Set it correctly 1 1 1 LED Panel p 52 Connect them correctly 2 Installing Internal Options p 56 This product may fail Contact maintenance support The power switch is set to Lit up green or Blinking green ...

Page 81: ...er switch to POWER LED lights green The SCSI cable for server connection is come down No No No No The SCSI cable for server connection is connected correctly No No Connect it properly 4 1 Connecting the SCSI Cable for the Server p 75 1 The server SCSI card is recognized correctly 2 The Term Power setting is correct 1 Refer to Troubleshooting in the server or SCSI card s manual 2 Refer to each back...

Page 82: ... power switch is set to R Set the power switch to R All the connected servers power are turned off The Term Power settings of the drive that is installed is set to OFF No No No No Turn off all the connected servers power No No Deal with this problem referring to Even when the power switch is set to the power cannot be turned off p 80 This product may fail Contact maintenance support Refer to each ...

Page 83: ... set to R the power cannot be turned on This product may fail Contact maintenance support No No This product may fail Contact maintenance support Off Lit up amber Blinking green The power cable between the I O module and drive in this product is connected correctly Contact maintenance support The power cable between the I O module in this product and drive is come down Connect it properly 2 3 3 Ho...

Page 84: ...I O module and drive bay is connected correctly The termination resistor is connected correctly No No The SCSI cable between the I O module and drive bay is come down The SCSI cable for server connection is come down The SCSI cable for server connection is connected correctly This product may fail Contact maintenance support Refer to each backup unit s manual for the setting and set it correctly 1...

Page 85: ...ting 85 E 5 3 Contacting Maintenance Support Before contacting maintenance support check the following For contact information refer to Appendix B Contact Information p 90 ST A SERIAL MODEL PG Model name Product ID ...

Page 86: ...age bay 4 bays Power supply unit Standard 1 Power control mode Power interlock with the server AC power feeding Select one of them SCSI interface SE LVD SCSI Max 160MB s Dimension mm 483 W 754 D 131 4 H Number of exclusive units 3U Weight Max 23 5Kg Input voltage frequency 200VAC 50 60Hz Power outlet Bipolar ground type standard 1 Power consumption 250W ...

Page 87: ...unit has been packed separately and has been selected according to the country of destination It must be used to prevent electric shock Use the following guidelines if it is necessary to replace the original cable set The female receptacle of the cable set must meet CEE 22 requirements see Figure ...

Page 88: ...nd Canada For units set at 230 V outside of the United States and Canada Use a cable set consisting of a minimum AWG according to the table above and a grounding type attachment plug rated 15 A 250 V The cable set should have the appropriate safety approvals for the country in which the equipment will be installed and should be marked HAR Cable Type Size of Conductors in Cable Maximum Current Rati...

Page 89: ...Live As the colors of the wires in the mains lead of this appliance may not correspond with the colored markings identifying the terminals in your plug proceed as follows The wire which is colored Green and Yellow must be connected to the terminal in the plug which is marked with the letter E or by the earth symbol or colored Green or Green and Yellow The wire which is colored Blue must be connect...

Page 90: ... Indonesia PT Fujitsu Systems Indonesia Offices Headquarters Tel 62 21 570 9330 Hunting Fax 62 21 573 5150 Address Wisma Kyoei Prince 10th Floor Jl Jend Sudirman Kav 3 4 Jakarta Indonesia 10220 Korea Fujitsu Korea Ltd Tel 82 2 3787 6000 Fax 82 2 3787 6066 Address Susong Tower Building 83 1 Susong Dong Jongno Gu Seoul Republic of Korea 110 140 Malaysia Fujitsu Malaysia Sdn Bhd Tel 60 3 8318 3700 Fa...

Page 91: ...d Tel 66 2 500 1500 Fax 66 2 500 1555 Address 12th Floor Olympia Thai Tower 444 Rachadapisek Road Samsennok Huaykwang Bangkok Thailand 10310 Vietnam Fujitsu Vietnam Limited Tel 84 4 831 3895 Fax 84 4 831 3898 Address Unit 802 8th floor Fortuna Tower Hanoi 6B Lang ha Street Ba dinh District Hanoi Socialist Republic of Vietnam United States Fujitsu Computer Systems Corporation Tel 1 800 831 3183 Fax...

Page 92: ...92 ...

Page 93: ...hts or other rights arising from the use of any information in this manual No part of this manual may be reproduced in any form without the prior written permission of Fujitsu Any manual which has missing pages or which is incorrectly collated will be replaced PRIMERGY SX10 S2 バックアップキャビネット PG R2BC1 取扱説明書 SX10 S2 PG R2BC1 User s Guide B7FY 2431 01 00 発 行 日 発行責任 2008 年 12 月 富士通株式会社 Issued on Issued ...

Page 94: ......

Reviews: