


32
Memory Upgrade
Module
Your Fujitsu LifeBook P Series notebook
comes with a minimum of 256 MB of high
speed Double Data Rate Synchronous
Dynamic RAM 2 (DDR2 SDRAM), 400 MHz
factory installed. To increase your system’s
memory capacity, you may install a memory
upgrade module. The memory upgrade must
be a dual-in-line (DIMM) SDRAM module. To
ensure 100% compatibility, purchase the
SDRAM module only from Fujitsu.
INSTALLING MEMORY
UPGRADE MODULES
1. Turn off power to your LifeBook note-
book and remove any power adapter.
2. Make sure that all the connector covers
are closed.
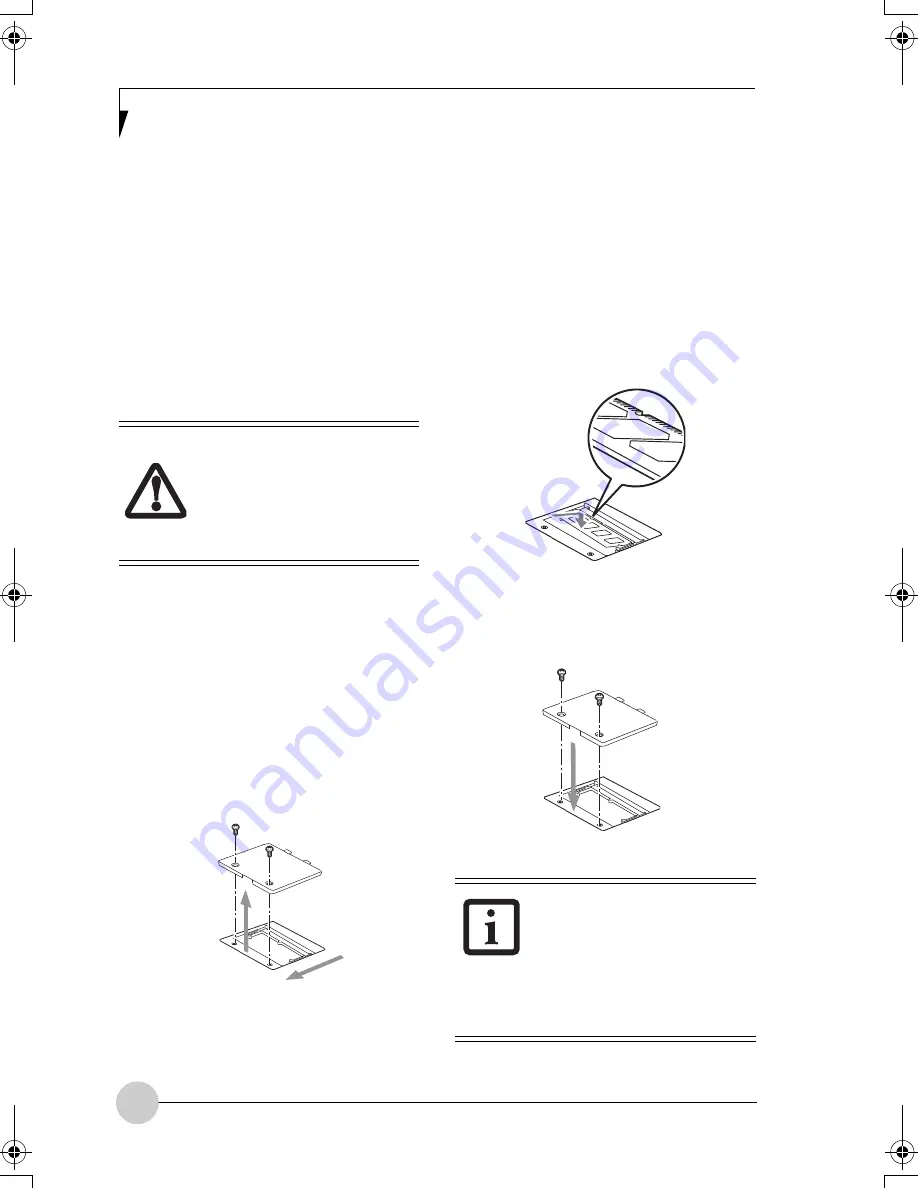
3. Turn the notebook bottom side up, and
remove the screws of the memory
upgrade module compartment.
(Figure 4-2)
4. Remove the cover.
Figure 4-2. Opening the Memory Upgrade
Compartment
5. Remove the memory upgrade module
from the static guarded sleeve.
6. Align the memory upgrade module with
the component side up. Align the
connector edge of the memory upgrade
module with the connector slot in the
compartment.
(Figure 4-3)
7. Insert the memory upgrade module at a
45° angle. Press the connector edge of
the module firmly down and into the
connector until it lodges under the
retaining clip. You will hear a click when
it is properly in place.
Figure 4-3. Installing a Memory Module
8. Replace the cover.
(Figure 4-4)
9. Replace the screws.
Figure 4-4. Replacing the Memory
Compartment Cover
Do not remove any screws
from the memory upgrade
module compartment except
those specifically shown in the
directions for installing and
removing the module.
The memory upgrade module
is not something you routinely
remove from your notebook.
Once it is installed, you should
leave it in place unless you
want to change system
memory capacity.
P Series.book Page 32 Thursday, August 4, 2005 11:02 AM
Summary of Contents for Lifebook P1510
Page 8: ...viii ...
Page 11: ...1 1 Preface ...
Page 12: ...2 ...
Page 14: ...4 ...
Page 15: ...5 2 Getting to Know Your Lifebook ...
Page 16: ...6 ...
Page 32: ...22 ...
Page 33: ...23 3 Using Your LifeBook ...
Page 34: ...24 ...
Page 36: ...26 ...
Page 37: ...27 4 User Installable Features ...
Page 38: ...28 ...
Page 49: ...39 5 Using fingerprint authentication ...
Page 50: ...40 ...
Page 63: ...53 6 Troubleshooting ...
Page 64: ...54 ...
Page 83: ...1 1 序言 ...
Page 84: ...2 ...
Page 86: ...4 ...
Page 87: ...5 2 了解您的 LifeBook 笔记 本电脑 ...
Page 88: ...6 ...
Page 90: ...8 表 2 1 系统图示 显示屏旋转 此图示表示转换为 Tablet 模式时 显示屏应该旋转的方向 连接 笔记本电 脑图标 用途 ...
Page 104: ...22 ...
Page 105: ...23 3 使用 LifeBook ...
Page 106: ...24 ...
Page 108: ...26 ...
Page 109: ...27 4 使用者自行安装 功能 ...
Page 110: ...28 ...
Page 120: ...38 ...
Page 121: ...39 5 使用指纹验证 ...
Page 122: ...40 ...
Page 137: ...55 6 故障排除 ...
Page 138: ...56 ...
Page 154: ...1 1 序言 ...
Page 155: ...2 ...
Page 157: ...4 ...
Page 158: ...5 2 了解您的 LifeBook 筆記型 電腦 ...
Page 159: ...6 ...
Page 161: ...8 表 2 1 系統圖示 顯示幕旋轉 此圖示表示轉換為 Tablet 模式時 顯示幕應該旋轉的方向 連接 筆記型電 腦 圖標 用途 ...
Page 175: ...22 ...
Page 176: ...23 3 使用 LifeBook ...
Page 177: ...24 ...
Page 179: ...26 ...
Page 180: ...27 4 使用者自行安裝 功能 ...
Page 181: ...28 ...
Page 191: ...38 ...
Page 192: ...39 5 使用指紋驗証 ...
Page 193: ...40 ...
Page 208: ...55 6 故障排除 ...
Page 209: ...56 ...


