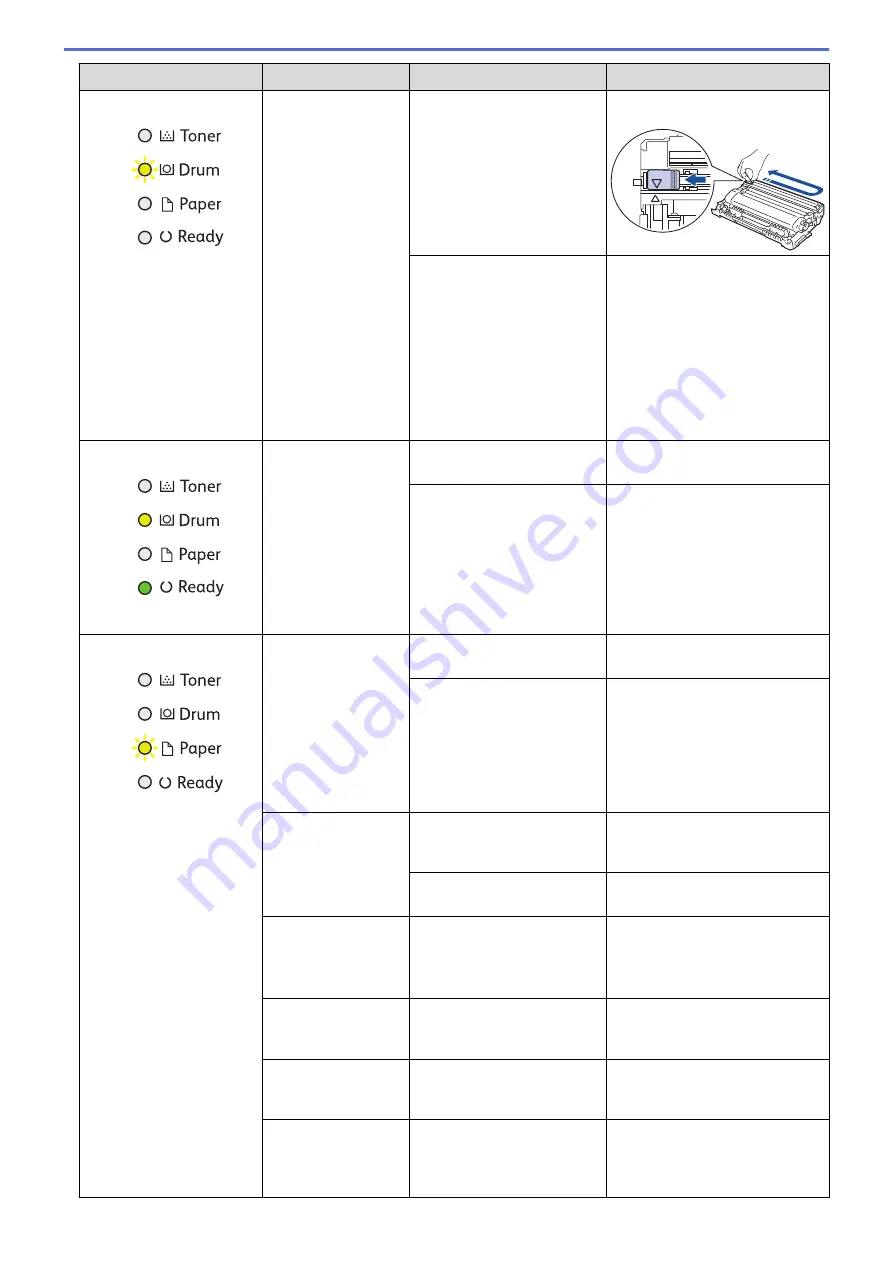
LED Indication
Status Monitor
Cause
Action
Drum !
The corona wire on the drum
unit must be cleaned.
Clean the corona wire on the
drum unit.
The drum unit or the toner
cartridge and drum unit
assembly is not installed
correctly.
Remove the toner cartridge and
drum unit assembly, remove the
toner cartridge from the drum
unit, and reinstall the toner
cartridge back into the drum unit.
Reinstall the toner cartridge and
drum unit assembly into the
machine.
If the problem continues, replace
the drum unit with a new one.
Replace Drum
It is time to replace the drum
unit.
Replace the drum unit with a new
one.
The drum unit counter was
not reset when the previous
drum was removed.
Reset the drum unit counter.
Cover is Open
The front cover is not
completely closed.
Open and then firmly close the
front cover of the machine.
The fusing unit cover is not
completely closed or paper
was jammed in the back of
the machine when you turned
on the power.
•
Close the fusing unit cover
located inside the back cover
of the machine.
•
Make sure paper is not
jammed inside the back cover
of the machine, and then
close the fusing unit cover.
2-sided Disabled
(For automatic 2-
sided printing
models)
The back cover of the
machine is not closed
completely.
Close the back cover of the
machine until it locks in the
closed position.
The 2-sided tray is not
installed completely.
Install the 2-sided tray firmly in
the machine.
Jam 2-sided
(For automatic 2-
sided printing
models)
The paper is jammed
underneath the 2-sided tray
or the fusing unit.
Clear the Jam in the 2-sided tray
or the fusing unit.
Jam Inside
The paper is jammed inside
the machine.
Open the front cover, remove the
drum and toner, and clear the
paper jam.
Jam Rear
The paper is jammed in the
back of the machine.
Open the fusing unit cover and
remove all jammed paper. Close
the fusing unit cover.
Jam Tray
The paper is jammed in the
paper tray.
Pull the paper tray out
completely, open the front cover
and fusing unit cover to remove
all jammed paper.
156
Summary of Contents for DocuPrint P235 d
Page 1: ...DocuPrint P235 db DocuPrint P235 d DocuPrint P275 dw Online User s Guide ...
Page 26: ...Related Information Load and Print Paper in the Manual Feed Slot 22 ...
Page 37: ...Related Information Print from Your Computer Windows Print Settings Windows 33 ...
Page 53: ... Printing Problems 49 ...
Page 88: ...Home Security Security Lock the Machine Settings Network Security Features 84 ...
Page 156: ...Home iPrint Scan for Mac iPrint Scan for Mac iPrint Scan Overview 152 ...
Page 162: ... Clean the Corona Wire 158 ...
Page 166: ... Replace Supplies Replace the Drum Unit Clean the Corona Wire 162 ...
Page 172: ...6 Close the front cover Related Information Paper Jams 168 ...


