background image

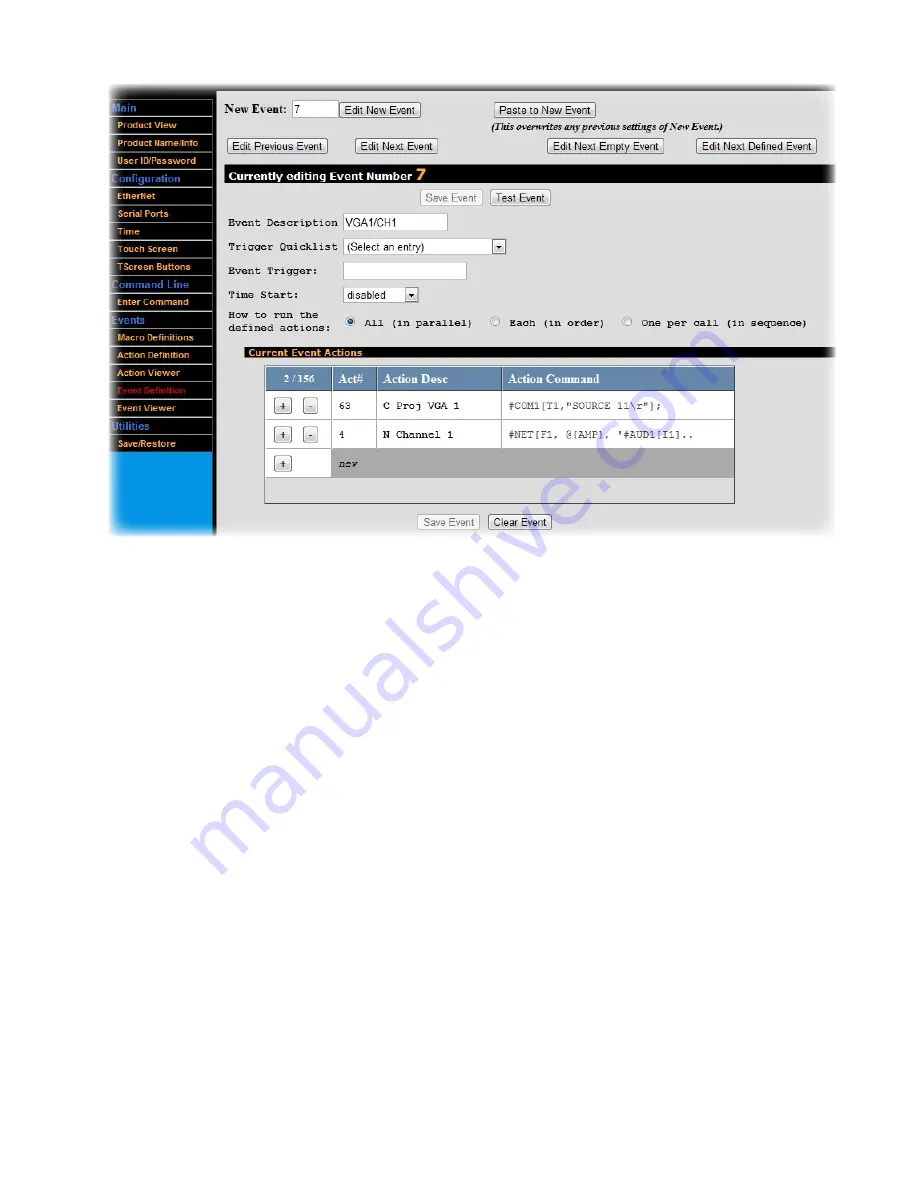
To create or edit an Event:

• 

Select 

Event Definitions

. (Note that it may be more convenient to navigate to previously defined Events via the 

Event Viewer

.)

• 

You can move through various Events using the buttons at the top of this screen. (

CAUTION: Save your work 

on the current Event before navigating away or your changes will be lost!

)

• 

Edit New Event

: Lets you modify the Event definitions for a saved Action. 

• 

Paste to New Event

: Useful for cloning the current Event (displayed in the black strip labeled “Currently 

editing Event Number xx.”) to another Event. Change the New Event field to the number of the target 
Event and click the Paste to New Event button. The current Event data will be copied to the target Event. 
(

CAUTION: This will overwrite the target Event!

)

• 

Edit Previous Event

: Moves to the previous Event record

• 

Edit Next Event

: Moves to the next Event record.

• 

Edit Next Empty Event

: Moves to a new undefined Event record.

• 

Edit Next Defined Event

: Moves to the next defined Event (skipping over any undefined records)

• 

Give the Event a useful description (e.g., “Mute”)

• 

If you want to have the Event initiated by a button press, you will eventually assign a button to this Event in the 

TScreen Buttons

 interface (see Appendix B.2)

• 

If you want to have the Event initiated by a general purpose input signal, make a selection in the 

Trigger 

Quicklist

 and define the specific Trigger in the 

Event Trigger

 field. The CB6000 constantly scans all inputs, 

searching for an event that matches any Triggers you have defined. When a matching event is recognized, the 
corresponding output actions are executed in rapid succession.

• 

If you want to have the Event initiated according to a schedule, select the schedule you’d like using the 

Time 

Start

 menu

21

Summary of Contents for CB6000

Page 1: ...CB6000 Installer Guide ...

Page 2: ...lled Before You Begin and from there proceed to Steps 1 through 6 If you follow the steps set out in this Installer Guide and organize everything you need beforehand you ll find setting up your FrontRow CB6000 touch control panel to be quite simple Of course if you run into any obstacles you can always find contact information for our technical support representatives at www gofrontrow com contact...

Page 3: ...s Step 4 13 Physical Installation Prep Step 5 14 Plan Your installation Step 6 15 16 Install Your CB6000 Appendix A 17 23 Control Logic Programming Appendix B 24 26 Creating Your Own User Interface Appendix C 27 31 Setting Preferences Appendix D 32 34 ICR 01 Smart Receiver Juno Connect Commands Appendix E 35 CM3000 Commands Appendix F 36 CA1000 Commands Appendix G 37 Setting Up An Alert Button App...

Page 4: ...ng like this Step 1 Before you begin 1 The CB6000 can also be paired with FrontRow Teacher Edition for iOS to control the classroom from an iPad or iPhone Available on the App Store Teacher Edition instantly supports all the actions and buttons you program into the CB6000 making it easy to configure and easy for teachers to learn and use Download the Teacher Edition for iOS Setup Guide from the Fr...

Page 5: ...tion about this unit Run diagnostics Reset IP address and web login password Clear priority message Calibrate screen Password required Use either installer password 1538 or touch panel password default is 1357 see Appendix C 7 Password required Use installer password 1538 Network jack Auxiliary jack standalone power and other user functions Main Screen Menu Screen Back of CB6000 2 ...

Page 6: ...or on and off switch inputs handle the transport controls for a DVD player and control audio volume from the teacher s com puter an MP3 player and two FrontRow wireless microphones If FrontRow Conductor is being used in the school the CB6000 could also initiate intercom calls and trigger alerts Network Switch 5V 18V ICR 01 Audio VGA HDMI Audio Extractor LAN Audio HDMI CAT5 CAT5 CAT5 CAT5 COAX 5V A...

Page 7: ...rojectors that are otherwise not online Below are the basic connections for controlling a projector and amplifier serially and a DVD player via infrared remote Serial Controlled Amplifier Screen or interactive white board CB6000 Control Panel TB14 Projector Power LAN Cat 5 cable Serial cable Control power RS232 Speaker Speaker AUX Speaker cable RS232 NOTE This is a schematic illustration intended ...

Page 8: ...h Set aside IP addresses for each CB6000 ICR 01 Smart Receiver or CM3000 and any other FrontRow components or servers To help organize this important information we have an ezRoom Installer Planning Template available for you to download at www gofrontrow com ezroom under the Downloads section Of course you can also create your own It should look something like this ...

Page 9: ...ifferent base files that are tailored to each configuration There are several ways to create your configuration files Go to gofrontrow com base files and find the Base Configuration File library Each Base Configuration File stored here includes both the user interface and control logic programming needed for the most common applications If your configuration is uncommon enough that it s outside th...

Page 10: ...sing the TB14 as a power source see 2 b below A computer with RJ45 connection and a web browser installed A completed ezRoom Installer Planning Template or other detailed information about the school s available IP addresses for your CB6000s ICR 01 Smart Receivers or CM3000s and other components see Step 1 Your Base Configuration File s see Step 2 Masking tape or labels and a marker 2 Connect your...

Page 11: ...n on specific devices AUX POWER IN AUX NETWORK NETWORK Crossover cable b With CM3000 as power source WARNING CONNECT THE CM3000 TO THE CB6000 S NETWORK ONLY JACK YOU CAN DAMAGE YOUR DEVICES IF YOU CONNECT TO THE AUX JACK CM3000 Amplifier Switch or Soundpost CB6000 Control Panel Computer Power Control cable Signal control ezRoom mounting plate Cat 5 cable Other cable NOTE This is a schematic illust...

Page 12: ...ections Category view Select Network and Internet Connections and then Network Connections 3 Double click on your active LAN or Internet connection 4 Click Properties This opens the Local Area Connections Properties window Proceed to 3c b Windows 7 8 and 10 1 Open Windows Start menu Type network and sharing into the Search box in the Start Menu and select Network and Sharing Center when it comes u...

Page 13: ...d select the Manually option 7 Enter IP address 192 168 1 100 Subnet mask 255 255 255 0 Router Leave blank NOTE We recommend 192 168 1 100 as the standard IP address however you may need to use a different address if you are using a local switch already using this address 8 Click Apply Now 10 6 In the General tab click Use the following IP address and enter IP address 192 168 1 100 Subnet mask 255...

Page 14: ...M3000 amplifier switch as is common in an ezRoom system or other IP addressable device click Macro Definitions Your Base Configuration File contains variables that reference the IP addresses and ports of the devices you ll be sending commands to Rather than repeating the addresses throughout the script and having to update all of these as we configure each new room we use a Macro Name variable in ...

Page 15: ...ormat if not checked the time will be displayed in a 12 hour format 11 Click Save Settings 15 Disconnect the CB6000 from the Cat 5 cable replace it in its anti static bag and apply a label with the room number written on it so you are sure to install it in the right place on the job site 16 Connect your next CB6000 and repeat Step 3 4 Load the Configuration until all of your units are programmed N...

Page 16: ...s staples 2 Recommended tools Drill or hammer drill for concrete walls Drill bits or masonry bits for concrete walls Slotted screwdriver Level or ruler tape measure Crimp pliers or scissors Tin snips optional Ladder Staple gun Safety goggles Step 4 Physical Installation Prep General safety precautions Do not install or use the CB6000 near water or heat sources Clean only with a dry cloth Protect a...

Page 17: ...ou decide we ll use the following layout of a typical classroom as an example 1 Decide where to put the CB6000 We recommend locating the CB6000 where the instructor is likely to spend most of her or his time In the example below we ve placed the CB6000 conveniently near both the whiteboard and the teacher s desk A good place for the CB6000 You ll install the CB6000 at teacher eye level where he or...

Page 18: ...utput from device to RX1 IMPORTANT Be sure to keep wiring and Action commands consistent to avoid problems For example serial Actions sent to COM1 should use the TX1 RX1 pins See Appendix A ICR 01 Smart Receiver If you are controlling a device via infrared e g a DVD player connect an IR emitter cable not included part number 520 3001 001 to the ICR 01 Smart Receiver s IR blaster port Secure the em...

Page 19: ...TX2 OUT White output from device to Pin 4 RX2 IN IMPORTANT Be sure to keep wiring and Action commands consistent to avoid prob lems For example serial Actions sent to COM1 should use the TX1 RX1 pins actions sent to COM2 should use the TX2 RX2 pins See Appendix A If you are controlling a device via infrared e g a DVD player connect an IR emitter cable not included part number 520 3001 001 to the T...

Page 20: ... Step 3 for guidance 8 Define Macros Defining Macros makes mass deployment of CB6000s easier by letting you define Actions using variables to repre sent the IP addresses of the devices you ll control This means that your configuration file can be written as a tem plate with IP addresses explicitly defined in only one place the Macro Definitions rather than repeated throughout your Actions This sav...

Page 21: ...vious Action Moves to the previous Action record Edit Next Action Moves to the next Action record Edit Next Empty Action Moves to a new undefined Action record Edit Next Defined Action Moves to the next defined Action skipping over any undefined records Give the Action a brief useful description e g Net Mute Define the Action using Action Command Select a template for the Action from the drop down...

Page 22: ...ommands see manufacturer s instructions A string expression that contains the command Example increments the audio input channel of a ICR 01 by one over TCP IP protocol using an ASCII string NET F1 ICR 01 AIN1 I1 L Intercom HTP Commands Syntax HTP http Server calypso conductor call Device Name Required Optional Data Type Format Description Server Required Variant If using Macros recommended MacroN...

Page 23: ...A704D403A104FB03A704D903 Alarm Commands Syntax ALM Command DTime Name Required Optional Data Type Format Description Command Required Variant Use ON to start the alarm Use OFF to stop the alarm Starts stops the beep Time Required Variant Integer representing multiples of 4ms duration Sets the duration Example turns on the beep with a 200ms duration ALM ON D50 For complete programming guidance refe...

Page 24: ...evious Event Moves to the previous Event record Edit Next Event Moves to the next Event record Edit Next Empty Event Moves to a new undefined Event record Edit Next Defined Event Moves to the next defined Event skipping over any undefined records Give the Event a useful description e g Mute If you want to have the Event initiated by a button press you will eventually assign a button to this Event ...

Page 25: ...e controlling devices that lack serial control ports the recommended method for controlling non networked devices but have an infrared remote control you can place your CB6000 into an IR learning mode Choose Enter Command Select one of the Learn Universal IR options from the drop down list Click Send CMD Hold the device s IR remote control within 15cm 6in of the CB6000 LCD screen then press the bu...

Page 26: ...cuting command strings You can use this to verify the correctness of a command before you enter it into an Action For serial commands it can also be used to see any data returned from the remote device Choose Enter Command Select a test command from the drop down menu the test command will appear in the Send Command window For Serial Serial Transmit COMxx TX Serial Receive COMxx RX For Infrared IR...

Page 27: ...ty You can certainly deviate from this workflow but you will probably waste some time flipping back and forth between programming screens unnecessarily 1 Connect to the CB6000 through A Web Browser On a computer connected to the LAN type in the IP address of your CB6000 the default is 192 168 1 104 If you have not already reassigned it see Step 3 for guidance 2 Creating and Assigning Actions to Pa...

Page 28: ...he graphic in the button detail section and choose an appropriate descriptor ideally five characters or less Choose To have the button trigger an Event using the EVT drop down Ideally you will have already defined these Events in Appendix A 4 however you can define the Event details later as long as you note the Event num ber you re assigning here And or select the number of the page to which the ...

Page 29: ...ave Buttons before working on a different page or your changes will be lost Test your changes on the CB6000 user interface to be sure the results are as expected When you are satisfied that you have completely finished programming your Base Configuration File see Save Restore in Appendix C 8 ...

Page 30: ... one or more Actions 4 Create Pages covered in Appendix B 2 Logical groupings of buttons e g DVD transport controls 5 Create Buttons covered in Appendix B 2 Buttons that represent specific Events e g mute 6 Set Preferences covered in Appendix C Set other parameters e g timeout security You can certainly deviate from this workflow but you will probably waste some time flipping back and forth betwee...

Page 31: ...s 192 168 1 1 Secondary NameServer IP Address Click Save Settings in the top section The device port configuration and System MAC Address sections consist of defaults generally not required for mod ification The Web Server Port set at 80 is also static and is visible here for informational purposes only Next the Remote Management Port is a Controller Network Action Protocol CNAP registered port se...

Page 32: ...ton to retrieve the com puter s current time date To enable or disable the Day Light Saving DST mode click the box to Honor the Daylight Saving Transition Table A message below the check box indicates whether DST is currently OFF or ON A three column table at the bottom of the view displays the current defined year and the next three years No actual DST data can be changed with this interface Cont...

Page 33: ...me button On Either the screen will change either upon pressing the page 1 Home button or upon a defined period of inactivity Select the screen that the CB6000 will fall back to between screen touches Fallback Screen Current when Panel Lock is enabled below transitions to the unlock keypad screen otherwise no transition occurs Clock Screen a large clock Info Screen the text screen descriptor page ...

Page 34: ...n File for this CB6000 Check the check box if you want the IP address contained in the loaded configuration file to overwrite the IP address on your connected CB6000 unit Click Load Note that other operations such as IP address definition are often required See Step 4 To save your current configuration file to use as a template for other CB6000s Select Save Restore Click Save To save your configur...

Page 35: ... an integer from 1 to 100 or The or may be followed by a single digit 1 9 indicating the change in volume steps to be made If no digit is entered the volume will increment by one Sets the audio volume to the percentage of maximum volume corresponding to the integer used an increase in volume by n steps n or a decrease in volume by n steps n Examples Unmute and increase volume AUD1 M0 V Unmute and ...

Page 36: ...um volume corresponding to the integer used an increase in volume by n steps n or a decrease in volume by n steps n Examples Set volume of Aux 1 to 15 50 of maximum AIN1 I1 L50 Increase volume of microphone channel A AIN1 I5 L Reduce the volume of microphone channel B AIN1 I6 L ICR 01 Smart Receiver Juno Connect Option Commands Syntax OPTn Parameter Setting Name Required Optional Data Type Format ...

Page 37: ...s X X X X Conductor Admin CM3000 IP Address X X X X Conductor Admin CMP500 IP Address X X X X Room Component IP Addresses Room FrontRow CB6000 Room X X X X Room X X X X Room X X X X Room X X X X Room X X X X Room X X X X Room X X X X Room X X X X Room X X X X Room X X X X Room X X X X Room X X X X Room X X X X Room X X X X Room X X X X La Cresta High School 34 ...

Page 38: ... Volume Optional Variant VCommand where Command is an integer from 1 to 100 or The or may be followed by a single digit 1 9 indicating the change in volume steps to be made Sets the audio volume to the percentage of maximum volume corresponding to the integer used an increase in volume by n steps n or a decrease in volume by n steps n Examples Unmute and increase volume AUD1 M0 V Unmute and decrea...

Page 39: ... and increases volume by n steps If you leave the argument n blank a default of 1 is assumed BVDn where n is an integer from 1 to 2 Unmutes and decreases volume by n steps If you leave the argument n blank a default of 1 is assumed AVMn where n is blank 0 or 1 Audio mute on 0 off 1 or toggle blank AVAn where n is an integer from 1 to 32 Sets absolute volume to level indicated by n BVAn where n is ...

Page 40: ...the Event to a button on the CB6000 see Appendix A and Appendix B Alerts can also be sent directly from the CB6000 if used in a hallway or other location that does not have an ezRoom installed However the header of the message displayed in the Conductor Notifer will not contain any information identifying a location other than the IP address of the sending device In this case in order to have the ...

Page 41: ...presses with less than 0 5 sec between them Single button press lasting more than 3 sec This must be done while pairing is active to avoid a reboot A long press while pairing is not active Hold until initial feedback is heard Short very low audio tones as the CMBT BLUETOOTH AUDIO RECEIVER enters Pairing mode and the LED will flash rapidly and continuously throughout the 60 second period of active ...

Page 42: ...r CM800Si and Smart Receiver using Relay 2 Short press GPO2 CLOSE D20 Long press GPO2 CLOSE D900 Commands for CM3000 Short press XRO1 F2 38001000001FFF0000 Long press XRO1 F2 3801F0000008002732073207320732070027 CB 6000 Example Let s look at an example where a CB6000 is programmed to allow remote control of a CMBT Bluetooth audio receiver attached to a CM800Si via relay 1 We could simply create tw...

Page 43: ...e device with the newly defined buttons At this point assuming the devices can reach each other on the network the CB6000 can be used to control the CMBT Bluetooth audio receiver remotely Pressing the Pairing button will put it in pairing mode and pressing that same but ton twice while in pairing mode will exit that mode Now pressing the Reset button should cycle power on the CMBT Bluetooth audio ...

Page 44: ...s Note that this action also resets the web access password to calypso see Appendix C 3 I can t remember what web access password I set for the CB6000 and now I can t log onto it Reset the CB6000 to its default web access password calypso On the screen see step 1 2 go to Menu Reset enter code 1538 and follow the instructions Note that this action also resets the CB6000 s IP address see Appendix C ...

Page 45: ...5 3927 7900 fax 707 769 9624 tel 905 461 5300 www gofrontrow com www gofrontrow com www gofrontrow com www gofrontrow com The FrontRow alert notification feature is not intended to nor can it prevent emergencies FrontRow Calypso LLC its agents employees subsidiaries affili ates and parent companies are not responsible for individual applications of the alert notification feature or related equipme...

Reviews: