173
EN
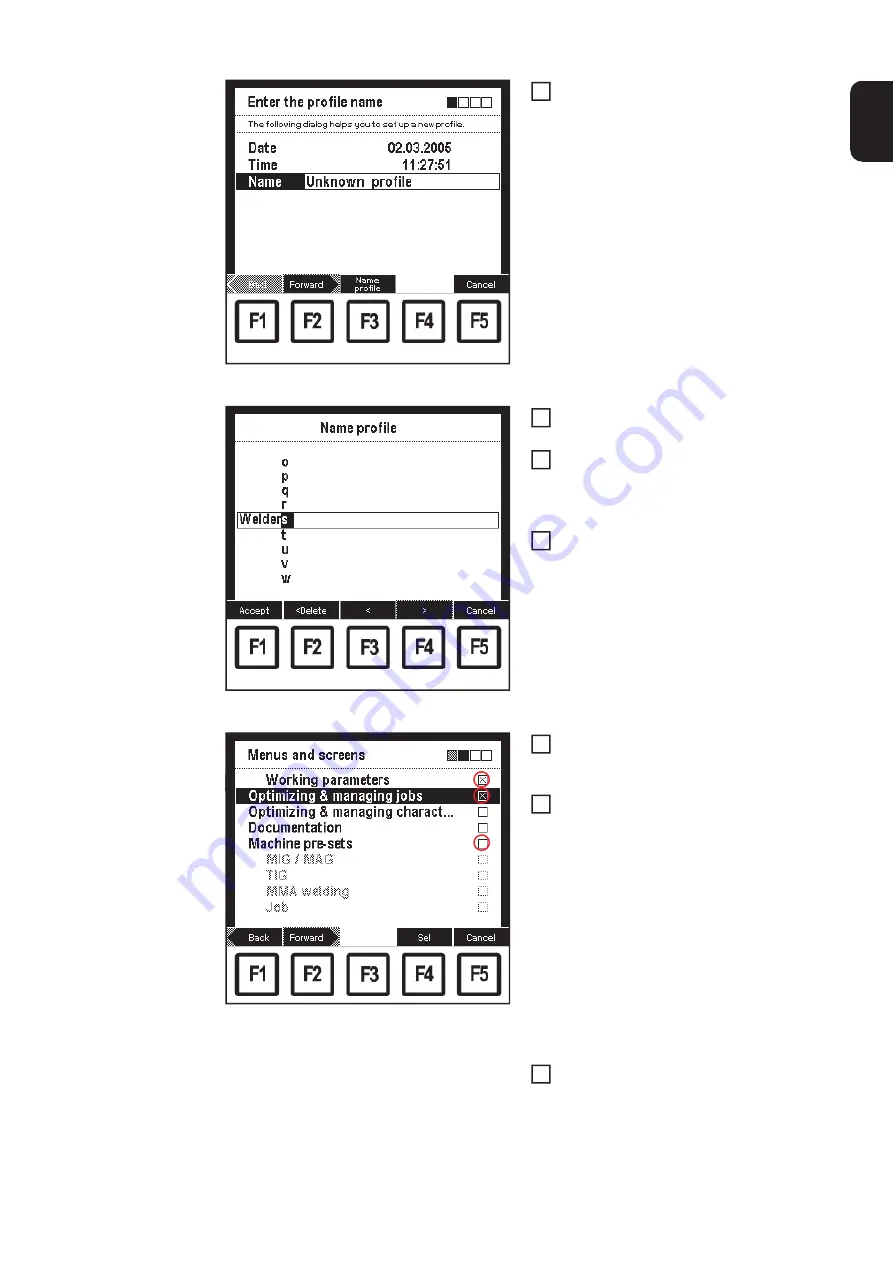
"Enter the profile name" screen
Press F3 "Name profile"
–
"Name profile" screen appears
"Name profile" screen
Select corresponding characters using
the adjusting dial (18)
Press F4 ">" to enter the next charac-
ter
–
Corrections can be carried out
using F3 "<" or F2 "< Delete"
Press F1 "Accept" when finished:
–
The new name is accepted, the
2nd screen in the wizard appears
("Menus and screens")
"Menus and screens" screen:
"Working parameters" screen and "Optimizing & ma-
naging jobs" menu item activated;
"Optimizing & managing characteristics", "Documen-
tation" and "Machine pre-sets" menu items not activa-
ted;
"Machine pre-sets" menu item with greyed out screens
Select menu items and screens permit-
ted for the profile in question using the
adjusting dial (18)
Press F4 "Select" to activate a menu
item or screen
–
An activated menu item or screen
is denoted by an X in the check
box.
–
In the case of menu items that
have not been activated, their
screens are greyed out.
Press F2 "Forward"
–
The 3rd screen in the wizard ap-
pears ("More settings")
6
7
8
9
IMPORTANT!
The higher-level menu item
must also be activated in order to activate
screens.
10
11
12
Summary of Contents for RCU 5000i
Page 2: ...2 ...
Page 4: ...4 ...
Page 200: ...200 Backup screen All data from the remote control unit are sa ved onto the memory card ...
Page 202: ...202 Restore screen The last Data screen called up appears ...
Page 207: ...207 EN Machine pre sets MIG MAG screen MIG MAG screen appears ...
Page 210: ...210 Machine pre sets e g MIG MAG screen The last Data screen called up appears ...
Page 242: ...242 ...
Page 243: ...Appendix ...
Page 244: ...244 Spare parts list RCU 5000i ...
Page 245: ...245 ...
Page 246: ...246 ...
Page 247: ...247 ...


