background image

23

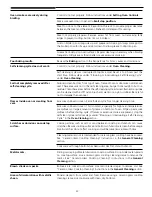
Oven smokes excessively during
broiling.

Poor baking results.

Self-cleaning cycle does not work.

Soil not completely removed after
self-cleaning cycle.

Flames inside oven or smoking from
vent.

Scratches or abrasions on cooktop
surface.

Metal marks.

Brown streaks or specks.

Areas of discoloration with metallic
sheen.

Control(s) not set properly. Follow instructions under 

Setting Oven Controls

.

Make sure oven door is opened to 

broil stop position.

Meat too close to the element. Reposition the rack to provide proper clearance
between the meat and the element. Preheat broil element for searing.

Meat not properly prepared. Remove excess fat from meat. Cut remaining fatty
edges to prevent curling, but do not cut into lean.

Grid on broiler pan wrong side up and grease not draining. Always place grid on
the broiler pan with ribs up and slots down to allow grease to drip into pan.

Grease has built up on oven surfaces. Regular cleaning is necessary when broiling
frequently. Old grease or food spatters cause excessive smoking.

Review the 

Baking

 section in the Recipe Book for hints, causes and corrections.

Control(s) not set properly. Follow instructions under 

Oven Cleaning.

Self-cleaning cycle was interrupted. Stop time must be set 2 to 4 hours past the
start time. Follow steps under "Stopping or Interrupting a Self-Cleaning Cycle"
under 

Oven Cleaning

.

Failure to clean bottom, front top of oven, frame of oven or door area outside oven
seal. These areas are not in the self-cleaning area, but get hot enough to burn on
residue. Clean these areas before the self-cleaning cycle is started. Burned-on residue
can be cleaned with a stiff nylon brush and water or a nylon scrubber. Be careful
not to damage the oven seal.

Excessive spillovers in oven. Set self-clean cycle for a longer cleaning time.

Excessive spillovers in oven. This is normal, especially for high oven temperatures,
pie spillovers or large amounts of grease on bottom of oven. Wipe up excessive
spillovers before starting cycle. If flames or excessive smoke are present, stop the
self-clean cycle and follow steps under "Stopping or Interrupting a Self-Cleaning
Cycle" in the 

Oven Cleaning

 section.

Coarse particles such as salt or sand between cooktop and utensils can cause
scratches. Be sure cooktop surface and bottoms of utensils are clean before usage.
Small scratches do not affect cooking and will become less visible with time.

Cleaning materials not recommended for ceramic-glass cooktop have been used.
See "Ceramic-Glass Cooktop Cleaning" Instructions in the 

General Cleaning

section.

Cookware with rough bottom has been used. Use flat, smooth utensils.

Sliding or scraping of metal utensils on cooktop surface. Do not slide metal utensils
on cooktop surface. Use a ceramic-glass cooktop cleaning creme to remove the
marks. See "Ceramic-Glass Cooktop Cleaning" Instructions in the 

General

Cleaning

 section.

Boilovers are cooked onto surface. Use razor blade scraper to remove soil. See
"Ceramic-Glass Cooktop Cleaning" Instructions in the 

General Cleaning

 section.

Mineral deposits from water and food. Remove using a ceramic-glass cooktop
cleaning creme. Use cookware with clean, dry bottoms.

Summary of Contents for Gallery Professional Series

Page 1: ...y Instructions 3 4 Control Pad Functions 5 Setting the Clock and Minute Timer 6 SurfaceCooking 7 IndicatorLight s 7 Setting Surface Controls 8 Before Setting Oven Controls and WarmerDrawerControls 9 SettingWarmerDrawerControls 10 Setting Warm Zone Controls 11 Setting Oven Controls 12 15 OvenCleaning 16 17 GeneralCleaning 18 20 ChangingCooktopand Oven Lights 21 AdjustingOvenTemperature 21 Avoid Ser...

Page 2: ...ame in the storage compartment Model Number Serial Number Date of Purchase Register Your Product The self addressed PRODUCT REGISTRATION CARD should be filled in completely signed and returned to the Frigidaire Canada 1997 White Consolidated Industries Inc All rights reserved This Owner s Guide contains general operating instructions for your range and feature information for several models Your r...

Page 3: ...ituations that may cause bodily injury or property damage Do not store items of interest to children in the cabinets above or on the backguard of a range Children climbing on the range to reach items could be seriously injured Do not leave children alone Children should not be left alone or unattended in the area where an appliance is in use They should never be allowed to sit or stand on any part...

Page 4: ...TIONS FOR USING YOUR OVEN Use Care When Opening Oven Door or Warmer Drawer if equipped Stand to the side of the range when opening the door of a hot oven warmer drawer Let hot air or steam escape before you remove or replace food in the oven warmer drawer Keep Oven Vent Ducts Unobstructed The oven is vented between the cooktop and the backguard Touching the surfaces in this area when the oven is o...

Page 5: ...ously entered except the timeofdayandminute timer Push the CANCEL button to stop cooking BAKE TIME BUTTON Used to enter the length of the baking time STOP TIME BUTTON Used with the BAKE TIME BAKE CONV BAKE ROAST and CLEAN buttons to program a delayed automatic baking or cleaning cycle stop time CLOCK BUTTON Used to set the time of day The oven can be programmed to Bake normally Convection bake roa...

Page 6: ...utes to 10 minutes 10 minutes to 1 hour 1 hour to 9 hours and 55 minutes To Set the Clock When the range is first plugged in or when the power supply to the range has been interrupted the display will flash 1 Push the CLOCK button The word TIME will appear in the display 2 Push and hold the UP or DOWN ARROW button until the correct time of day appears in the display The word TIME will disappear af...

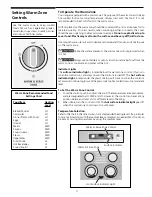
Page 7: ...lected setting the unit will cycle on and off The surface heating unit retains enough heat to provide a uniform and consistent heat during the off cycle The ceramic fixture thermally insulates the heating unit concentrating heat in the heating zone For efficient cooking turn off the unit several minutes before cooking is complete This will allow residual heat to complete the cooking The amount of ...

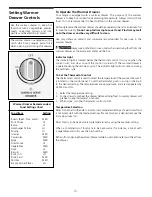
Page 8: ...e the marks as a guide and adjust the control knob as needed To Operate the Dual Radiant Unit Control Left Front Right Front Set the rocker switch to the desired coil size indicates coil only indicates both inner and outer coils operate You may switch from either coil setting at any time during the cooking process Push in and turn the dual surface unit control knob in either direction to the desir...

Page 9: ...ware for example rolls or pastries and dinner plates Before Setting Oven and Warmer Drawer Controls REMOVING REPLACING OVEN RACKS To remove pull the rack forward until it stops Lift up front of rack and slide out To replace fit the rack onto the guides on the oven walls Tilt the front of the rack upward and slide the rack back into place ARRANGING OVEN RACKS WITH 5 RACK POSITIONS To bake on 1 rack...

Page 10: ...turn the knob to the desired setting The temperatures are approximate and are designated by HI MED and LO 1 Select the temperature setting 2 For best results preheat the drawer before adding food An empty drawer will preheat in approximately 15 minutes 3 When done turn the thermostat control to OFF Temperature Selection Refer to the chart in the side column for recommended settings If a particular...

Page 11: ... light located under the glass cooktop will come on when the control is set and will continue to glow until the glass cooktop has cooled down to a moderate level To Set the Warm Zone Control 1 Tosetthecontrol pushinandturntheknob Thetemperaturesareapproximate and are designated by HI MED and LO However the control can be set at any position between HI and LO for different levels of heating 2 When ...

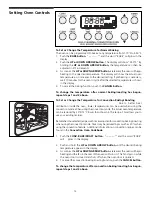
Page 12: ... to better heat distribution inside the oven lower temperatures can be used when using the convection mode When using the convection mode the actual oven temperature can be reduced by 25 F 12 C lower than shown in the recipe This allows you to use your existing recipes Remembertousetestedrecipeswithtimesadjustedforconvectionbaking roasting when using the convection mode Times may be reduced by as ...

Page 13: ...e Arranging Oven Racks in this Owner s Guide 2 Place the grid in the broiler pan The roasting rack fits on the grid allowing the heated air to circulate under the food for even cooking and helps to increase browning on the underside Make sure the roasting rack is securely seated on the grid in the broiler pan DO NOT use the broiler pan without the grid or cover the grid with aluminum foil 3 Positi...

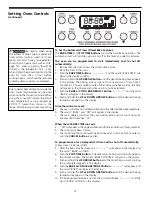
Page 14: ... 3 times c The control will then continue to beep once every 10 seconds for 5 minutes or until the CANCEL button is pushed To program oven for a delayed start time and to shut off automatically Follow steps 1 4 above THEN 5 After the bake time has been set will appear in the display and the word BAKE will flash 6 Push the STOP TIME button The time when baking will stop will appear in the display w...

Page 15: ...ell done foods such as chicken and lobster 2 Push the VARI BROIL button and the word BROIL will appear in the display 3 Push and hold the UP or DOWN ARROW button until the desired broil setting level appears in the display Variable Setting Doneness LO LOW Well done 2 Medium Low Medium well 3 Medium Medium 4 5 Medium HI Medium rare HI High Rare 4 Place the grid on the broiler pan then place the foo...

Page 16: ...ss spillovers in the oven cavity before starting the self cleaning cycle Toclean usehot soapywaterandacloth Largespilloverscancauseheavy smoke or fire when subjected to high temperatures DO NOT allow food spills withahighsugaroracidcontent suchasmilk tomatoes sauerkraut fruitjuices or pie filling to remain on the surface as they may cause a dull spot even after cleaning 5 Clean any soil from the o...

Page 17: ...e Controls for the Self Cleaning Cycle To Start at a Delayed Time and Shut off Automatically Follow steps 1 3 above THEN 4 Push the STOP TIME button The time of day that the self cleaning cycle ends will appear in the display The words CLN STOP TIME will glow in the display 5 Push and hold the UP or DOWN ARROW button until the time of day that you want the cleaning to be completed appears in the d...

Page 18: ...l with a metal razor blade scraper Hold razor blade scraper at a 30 angle to the cooktop 3 Remove loosened soil with a clean paper towel 4 Apply cooktop cleaning cream as described for normal soil 5 Ifanysoilremains repeatthestepslistedabove Afterallsoilhasbeenremoved polish the entire surface with the cooktop cleaning cream For sugary spillovers Sugary spills can cause pitting of your cooktop sur...

Page 19: ...ers as bluish stains may occur during heating and cannot be removed To replace knobs after cleaning line up the flat sides of both the knob and the shaft then push the knob into place Gentlescouringwithasoapyscouringpadwillremovemostspots Rinsewitha1 1solution of clear water and ammonia If necessary cover difficult spots with an ammonia soaked paper towel for 30 to 40 minutes Rinse with clean wate...

Page 20: ...ith an ammonia soaked paper towel for 30 to 40 minutes Cleaners made especially for stainless steel chrome or copper are also recommended 2 Rinse with clean water and a cloth 3 Rinse off all cleaners and wipe dry before operating the range Bluish stains may result due to heat combining with the cleaning material these stains cannot be removed To Reinstall the Spice Rack 1 Place the spice rack on t...

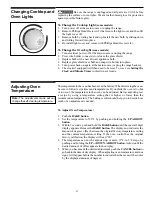
Page 21: ...button to gobacktothetimeofdaydisplay Whenadjustingoventemperature aminus sign will appear before the number to indicate that the oven will be cooler by the displayed amount of degrees Changing Cooktop and Oven Lights Adjusting Oven Temperature Be sure the range is unplugged and all parts are COOL before replacing the surface or oven lights Wear a leather faced glove for protection against possibl...

Page 22: ...o power to the appliance Check steps under Entire Appliance Does Not Operate in this Avoid Service Checklist Incorrect control setting Make sure the correct control is on for the surface unit to be used Replace or tighten bulb See Changing Cooktop and Oven Lights in this Owner s Guide for instructions Make sure cord plug is plugged tightly into outlet Service wiring is not complete Contact your de...

Page 23: ...eaning area but get hot enough to burn on residue Clean these areas before the self cleaning cycle is started Burned on residue can be cleaned with a stiff nylon brush and water or a nylon scrubber Be careful not to damage the oven seal Excessive spillovers in oven Set self clean cycle for a longer cleaning time Excessive spillovers in oven This is normal especially for high oven temperatures pie ...

Page 24: ...ly for the remainder of the original warranty WARRANTY DOES NOT APPLY TO a Transportation damage b Supply and replacement of porcelain glass and light bulbs c Parts and service supplied or obtained from other than FRIGIDAIRE PARTS AND SERVICE or FRIGIDAIRE PARTS AND SERVICE authorized depots d Damage or failure as the result of abuse improper or commercial use CONSUMER OWNER RESPONSIBILITY a To pr...

Page 25: ...tionsdupanneaudecommande 5 Réglagedel horlogeetdelaminuterie 6 Surfacedecuisson 7 Témoinslumineux 7 Réglagedescommandesdesurface 8 Avantderéglerlescommandes dufouretdutiroir réchaud 9 Réglagedescommandes dutiroir réchaud 1 0 Réglagedescommandes delazoneréchaud 1 1 Réglagedescommandesdufour 12 15 Nettoyagedufour 16 17 Nettoyagegénéral 18 20 Remplacementdel ampoulede surfaceetdufour 2 1 Ajustementde...

Page 26: ...e appareil La CARTE D ENREGISTREMENT préalablement adressée doit être remplie en entier signée et retournée à Frigidaire Canada Enregistrement de l appareil Le présent Guide de l utilisateur décrit le mode d emploi général de cette cuisinière ainsiquelescaractéristiquesdediversautres modèles Certaines des caractéristiques décrites peuvent donc ne pas s appliquer à votre cuisinière Remarque Lesdire...

Page 27: ...atériaux inflammables ceci comprend les papiers plastiques tissus livres de cuisine objets en plastique et torchons ainsi que les liquides inflammables Ne rangez pas sur ou près de la cuisinière des produits comme les bombes aérosol qui pourraient exploser et entraîner un incendie ou des dégâts matériels Ne rangez pas dans les armoires au dessus d une cuisinière ou sur son dosseret des articles po...

Page 28: ...mager ou le déplacer N utilisez pas de produits de nettoyage pour four Aucun produit de nettoyage commercial ni aucun revêtement protecteur ne doivent être utilisés dans le four ou sur l une de ses pièces INSTRUCTIONS IMPORTANTES POUR L UTILISATION DE LA TABLE DE CUISSON Sachez quel bouton commande chacun des éléments chauffants de surface Choisissez des ustensiles de bonne dimension Cette cuisini...

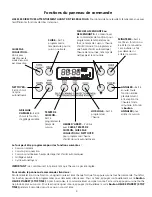
Page 29: ...inuellement sur le bouton HEURE D ARRÊT STOP TIME pendant 5 secondes jusqu à ce qu un son soit émis CUIRE PAR CONVECTION Utilisé pour sélectionner le mode de cuisson par convection MINUTERIE Sert à mettre en fonction ou à arrêter la minuterie La minuterie ne fait pas démarrer ni arrêter la cuisson CUIRE Sert à programmer la température pour la cuisson normale FLÈCHES ASCENDANTE ou DESCENDANTE S ut...

Page 30: ... ce signal toutes les 10 secondes pendant 5 minutes ou jusqu à ce que le bouton MINUTERIE TIMER ON OFF soit enfoncé Le temps est affiché et augmente en tranches de 5 secondes 10 secondes 1 minute 5 minutes Lorsque la minuterie est programmée pour 5 secondes à 2 minutes 2 minutes à 10 minutes 10 minutes à 1 heure 1 heure à 9 heures 55 minutes Remarque La minuterie ne fait pas démarrer ni arrêter la...

Page 31: ...ursoulourdssurlaplaquedecuissonpeutlacraquer Les casseroles avec des fonds rugueux peuvent égratigner la plaque de cuisson Il est recommandé de ne pas déposer d aliments directement sur la plaque de cuisson vitrifiée sans les mettre dans des ustensiles de cuisine car leur cuisson sera inégale et le nettoyage plus difficile Votre cuisinière peut inclure n importe quelle combinaison des éléments de ...

Page 32: ...ce Pour faire fonctionner l élément radiant à surface variable Réglez l interrupteur à bascule à la grosseur d élément voulu Indique que seul l élémentintérieurfonctionne Signalequel élémentintérieur aussibienquel élément extérieur sont en fonctionnement Vous pouvez passer d un élément à l autre à n importequelmomentdelacuisson Appuyezsurleboutondecommandedel élément radiant à surface variable et ...

Page 33: ...ins modèles placer les grilles dans les positions 2 et 4 POUR RETIRER ET REPLACER LES GRILLES DU FOUR Pour retirer une grille du four tirer la grille jusqu à ce qu elle s immobilise Soulever le devant de la grille et la sortir englissant Pourremettreunegrilleen place ajusterlagrillesurlesguidessitués le long des murs Soulever le devant de la grille puis glisser la grille en place Disposition de la...

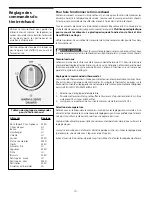
Page 34: ...ré Lestempératuressontapproximativesetdésignées par HAUT HI MOYEN MED et BAS LO 1 Sélectionnez le réglage de température 2 Pourdemeilleursrésultats préchauffezletiroiravantd ajouterlesaliments Untiroir vide prend 15 minutes à réchauffer 3 Lorsque vous aurez terminé tournez la commande de thermostat à OFF Sélection de température Référez vous au tableau dans la colonne ci contre pour les réglages r...

Page 35: ...outondecommandeserarégléetcontinuera de briller tant que la vitre ne se sera pas refroidie à un niveau acceptable Réglage de la zone réchaud 1 Pour régler le thermostat enfoncez le bouton et tournez le au réglage désiré Les températuressontapproximativesetdésignéesparHAUT HI MOYEN MED etBAS LO Toutefois le bouton peut être positionné à tout endroit entre les repères HAUT HI et BAS LO pour des nive...

Page 36: ...mpérature de cuisson par convection Grâce à une meilleure répartition de chaleur à l intérieur du four durant la cuisson par convection des températures plus basses peuvent être utilisées Pour le mode cuisson parconvection vouspouvezdiminuerlatempératuredufourde25 F 12 Cmoindreque celle sur la recette Ceci vous permet d utiliser vos recettes existantes N oubliez pas d utiliser des recettes éprouvé...

Page 37: ... four dans le présent Guide de l utilisateur 2 Placez la grille dans la lèchefrite La grille de rôtissage s imbrique dans la grille de la lèchefrite pour que l air chaud circule sous l aliment afin de procurer une cuisson uniforme et d accroître le brunissement de la partie inférieure Assurez vous que la grille de rôtissage est bien imbriquée dans celle de la lèchefrite Ne vous servez pas de la lè...

Page 38: ...des pendant 5 minutes ou jusqu à ce que vous appuyez sur le bouton ANNULER CANCEL Pour programmer le four pour une mise en marche différée et un arrêt automatique Répétez les étapes 1 à 4 indiquées plus haut et terminez l opération comme suit 5 Dès que le temps de cuisson est sélectionné s affiche à l écran et le mot CUISSON BAKE clignote 6 Appuyez sur le bouton HEURE D ARRÊT STOP TIME L heure à l...

Page 39: ...s la recouvrir de papier d aluminium La matière grasse en surface pourrait s enflammer 5 Placez la lèchefrite sur la grille du four Laissez la porte ouverte à la position d arrêt gril pendant la cuisson sur gril La porte restera dans cette position sans se fermer 6 Faites griller l aliment d un côté jusqu à ce qu il brunisse tournez le et faites le cuire de l autre côté Assaisonnez et servez Nota ...

Page 40: ...nettoyant Utilisezdel eauchaudesavonneuseetunchiffon Lesrenversements de nourriture peuvent produire beaucoup de fumée ou s enflammer à des températuresélevées NEPASlaisserlesrenversementsdenourritureàteneurélevée en sucre ou en acide comme le lait les tomates la choucroute les jus de fruits ou les garnitures à tarte sur la surface car ils peuvent laisser des dépôts mats même après le nettoyage 5 ...

Page 41: ...e la température du four est élevée s assurer que le mot LOCKED BARRÉ n est plus affiché et que le four a refroidi pendant au moins UNE HEURE avant de tenter d ouvrir la porte du four Réglage des commandes pour que le cycle autonettoyant démarre plus tard et s arrête automatiquement Suivez les étapes 1 à 3 ci dessus puis 4 Appuyez sur le bouton HEURE D ARRÊT STOP TIME L heure à laquelle le cycle a...

Page 42: ...r la saleté normale 5 Si la saleté persiste répétez les étapes ci dessus Après la disparition de la saleté polissez toute la surface avec la crème nettoyante pour plaque de cuisson Pour les renversements de sucre Les renversements à teneur élevée en sucre peuvent causer des piqûres sur votre plaque de cuisson Vous devez donc commencer à nettoyer ces renversements pendant que la plaque est encore c...

Page 43: ...r inoxydable sont recommandés Rincez tout résidu de nettoyeur sans quoi des taches bleutées permanentes pourraient se former sous l effet de la chaleur Pour remettre les boutons en place après le nettoyage alignez les côtés plats des boutons et des axes puis poussez les boutons en place L utilisation délicate d un tampon à récurer savonneux permet d enlever la plupart des taches Rincezàl aided une...

Page 44: ...nt pour l acier inoxydable le chrome et le cuivre sont également recommandés 2 Rincez avec de l eau claire et un chiffon 3 Rincez tout résidu de nettoyeur et séchez avant d utiliser la cuisinière Sinon la chaleur produite par la cuisinière pourrait réagir avec les résidus de nettoyeur et former des taches bleutées permanentes Remontage de l étagère à épices certains modèles 1 Déposezl armoireàépic...

Page 45: ...lors d un premier usage de suivre les temps et températures de la recette Si vous estimez que le four est trop chaud ou trop froid la température peut être ajustée Avant de procéder à un tel ajustement faites un essai avec la recette en réglant la température à un degré légèrement supérieur ou inférieur à la température recommandée pour la recette Les résultats de la cuisson devraient vous aider à...

Page 46: ...ière est suffisant Les armoires ne sont pas d équerre ou sont trop justes Communiquez avec le constructeur ou l installateur afin de rendre l appareil accessible Le tapis nuit à la cuisinière Laissez suffisamment d espace pour permettre de soulever la cuisinière au dessus du tapis Le contrôleur électronique a décelé une défectuosité Appuyez sur le bouton ANNULER CANCEL pour annuler l affichage et ...

Page 47: ...dans le four Ceci est normal particulièrement pour des températures de fours très élevées des garnitures de tartes renversées ou s il y a beaucoup de graisse au fond du four Si des flammes ou de la fumée excessive sont présentes arrêtez le cycle d autonettoyage et suivez les étapes décrites dans la section Arrêt ou interruption du cycle d autonettoyage dans la section Nettoyage du four Des particu...

Page 48: ...tenue dans toute législation applicable Les conditions de cette garantie ne sont pas destinées à exclure ou à limiter vos droits en vertu de ces lois Le garant se réserve toutefois le droit de facturer les frais de transport et de déplacement lorsque la distance est supérieure à 48 kilomètres 30 milles du dépositaire de Service autorisé par FRIGIDAIRE PIÈCES ET SERVICE le plus proche Cette garanti...

Reviews: