background image

07

06

Use only a pressure-regulated compressed
air source to limit the air pressure supplied to
the tool.

The regulated pressure must not

exceed 110psi. If the regulator fails, the pressure
delivered to the tool must not exceed 200psi.
Over pressurizing the tool is able to result in
bursting, abnormal operation, breakage of the
tool or serious injury to persons. Use only clean,
dry, regulated compressed air at the rated
pressure or within the rated pressure range as
marked on the tool. Always verify prior to using
the tool that the air source has been adjusted to
the rated air pressure or within the rated air-
pressure range.

Before unloading or making adjustments.

When maintaining the tool.

When clearing a jam.

When touching the safety yoke.

When tool is not in use.

When moving to a different work area.

Such precautionary measures reduce the risk of
injury to persons.

Always disconnect air source:

LOADING TOOL

Do not load the tool with fasteners when any
one of the operating controls is activated.
Never place a hand or any part of body in
fastener discharge area of tool.
Never point tool at anyone.
Do not pull the trigger or depress the
workpiece contact as accidental actuation
may occur, possibly causing injury.

The warnings and precautions discussed
above cannot cover all possible
conditions and situations that may occur.
It must be understood by the user that
common sense and caution are factors
which cannot be built into this product,
but must be supplied by the user.

WARNING:

!

UNPACKING

This tool has been shipped completely
assembled.
Carefully remove the tool and any
accessories from the box.
Inspect the tool carefully to make sure no
breakage or damage occurred during
shipping.
Do not discard the packing material until you
have carefully inspected and satisfactorily
operated the tool.
If any parts are damaged or missing, please
call

.

1-888-669-5672

If any parts are missing do not operate
this tool until the missing parts are
replaced. Failure to do so could result in
possible serious personal injury.

WARNING:

!

Do not attempt to modify this tool or
create accessories not recommended for
use with this tool. Any such alteration or
modification is misuse and could result
in hazardous condition leading to
possible serious personal injury.

WARNING:

!

OPERATION

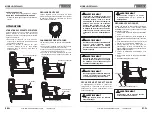
USING THE BELT HOOK

Loosen and remove the hook screw and nut(A).
Save the screw and nut for future use.
Position the hook in your preferred position.
Using the longer screw packed with hook, fasten
hook to tool.

The tool is packed with a separate hook system.
Assemble the hook on the tool before using the
hook. The hook can be positioned on both left and
right sides.

Hook nut (A)

FEATURES

360 ADJUSTABLE EXHAUST

OIL-FREE DESIGN

COMFORT-GRIP HANDLE

ERGONOMICALLY ENGINEERED BODY

°

Allows user to direct air away from

.

For less maintenance.

For long lasting durability.

For increased comfort and control.

f

face

Rugged and Comfortable resulting in a light-
weight tool great for extended use.

Keeps interior components debris free, extending
tool life.

Depth is easily adjustable for various
applications.

Allows for easy access clearing in the event of a
jam.

Eliminates damage to working surface.

ANODIZED ALUMINUM CYLINDER AND
MAGAZINE

AIR FILTER

ADJUSTABLE DEPTH

QUICK-JAM RELEASE

NON-MARRING SAFETY CONTACT

FEATURES

SPECIFICATIONS

REQUIRES:

AIR INLET:
MAGAZINE CAPACITY:

WEIGHT:
MAXIMUM PRESSURE:
PRESSURE RANGE:

5.87 SCFM with 100

fasteners per minute @ 90 psi

1/4 inch NPT

100 fasteners, 18 gauge

2.79 lbs

110 psi

60 psi 110 psi

PIN SIZE RANGE:

1/2 inch to 1 5/8 inch

-

-

Compatible with

All Generic 18 Gauge 1/4"

Crown Staples from 1/2" to 1-5/8".

MODEL: PST9040Q

MODEL: PST9040Q

HTTP://WWW FREEMANTOOLS COM

1-888-669-5672

.

.

HTTP://WWW FREEMANTOOLS COM

1-888-669-5672

.

.

13mm

1/2”
5/8”

16mm

3/4”

19mm

1”

25mm

1-1/4”

32mm

1/4”(5.7mm)

1-1/2”

38mm

1-5/8”

40mm

Hook

Summary of Contents for PST9040Q

Page 1: ...8 GA 1 5 8 STAPLER MODEL PST9040Q WARNING KEEP YOUR DATED PROOF OF PURCHASE FOR WARRANTY PURPOSES IMF500900AV 06 14 SAVE THIS MANUAL FOR FUTURE REFERENCE Failure to follow warnings could result in DEA...

Page 2: ...it someone or cause the tool to react and result in a risk of injury to persons A dust mask non skid safety shoes and a hard hat must be used for the applicable conditions Wear a full face shield if y...

Page 3: ...a fastener to be directed toward anything other than the workpiece Never use gasoline or other flammable liquids to clean the tool Do not remove tamper with or otherwise cause the trigger lock or trig...

Page 4: ...e tool If any parts are damaged or missing please call 1 888 669 5672 If any parts are missing do not operate this tool until the missing parts are replaced Failure to do so could result in possible s...

Page 5: ...ith consistent results It may be possible to achieve the desired depth with air pressure adjustments alone NON MARRING PAD The non marring pad attached the nose of the tool helps prevent marring and d...

Page 6: ...ly lubrication But lubrication is required for best performance after long periods of use Oil for pneumatic fastening tools is added through the air line connection and will lubricate internal parts D...

Page 7: ...ers Other than the postage and insurance requirement no charge will be made for repairs covered by this warranty These warranties do not apply to defects in materials or workmanship or damages resulti...

Page 8: ...IEZAS DESGASTADAS OPERACI N CARACTER STICAS Las advertencias y precauciones mencionadas en este manual no abarcan todas las condiciones y situaciones posibles Es perfectamente comprensible que no pode...

Page 9: ...t s haciendo y utiliza el sentido com n Para evitar disparos accidentales mantenga los dedos alejados del gatillo cuando no accione los sujetadores especialmente cuando conecte la herramienta al sumin...

Page 10: ...ctores da ados o desgastados de lo contrario el rendimiento o la durabilidad de la herramienta podr an verse reducidos Y Y MODELO PST9040Q MODELO PST9040Q HTTP WWW FREEMANTOOLS COM 1 888 669 5672 ENTR...

Page 11: ...todas las marcas gen ricas de grapas de calibre 18 de 13mm 40mm MODELO PST9040Q MODELO PST9040Q HTTP WWW FREEMANTOOLS COM 1 888 669 5672 13mm 1 2 5 8 16mm 3 4 19mm 1 25mm 1 1 4 32mm 1 4 5 7mm 1 1 2 3...

Page 12: ...profundidad de disparo primero ajuste la presi n de aire y dispare un sujetador de prueba Nunca supere los 8 27 bar PRECAUCI N La herramienta est dise ada especialmente para el modo secuencial simple...

Page 13: ...os y amortiguadores de la herramienta lo que resultar en el mal funcionamiento de la misma y elevar la frecuencia del mantenimiento LUBRICACI N 7 8 Lubrica la herramienta nicamente con los lubricantes...

Page 14: ...que la pistola de clavos Freeman no presenta defectos en los materiales ni en la mano de obra lo que est sujeto a las excepciones y limitaciones mencionadas en la presente Esta garant a de las hojas p...

Page 15: ...stados no permiten la exclusi n o limitaci n de los da os accidentales o resultantes de modo que la exclusi n o limitaci n anterior puede no aplicarse en su caso Si alg n t rmino o limitaci n contenid...

Page 16: ...e ou des copeaux de bois vitez de porter des v tements amples ou des bijoux Attachez les cheveux longs Gardez les cheveux les v tements et les gants l cart des pi ces mobiles Les v tements amples bijo...

Page 17: ...Maintenir l outil avec votre main ou contre votre corps est instable et risque de causer la perte de contr le de l outil Utilisez toujours un chiffon propre pour le nettoyage N utilisez pas de liquid...

Page 18: ...zone de travail afin d viter une activation accidentelle pouvant causer des blessures CHARGEMENT DE L OUTIL Ne chargez pas d attaches dans l outil lorsque l une des commandes est activ e Ne placez ja...

Page 19: ...isez des pinces ou un tournevis pour d gager l attache coinc e Fermez le m canisme de d blocage et le verrou Reconnectez l outil la source d alimentation en air Remettez les attaches dans l outil Tire...

Page 20: ...contact doit se d placer librement sans se coincer Le ressort de l l ment de contact doit le ramener sa position allong e N utilisez pas l outil si le m canisme de d clenchement de l l ment de contact...

Page 21: ...toyez le magasin 4 Remplacez le ressort 5 V rifiez le raccord le tuyau ou le compresseur 6 Remplacez et lubrifiez les joints toriques 7 Remplacez les joints toriques 8 Resserrez les vis et les raccord...

Page 22: ...u en r duire la port e ni offrir toute autre garantie au nom de PGP Inc Ces garanties limit es expresses contiennent AUCUNE GARANTIE AUTRE QUE LA GARANTIE CI DESSUS QU ELLE SOIT VERBALE OU CRITE EXPRE...

Reviews:

Related manuals for PST9040Q