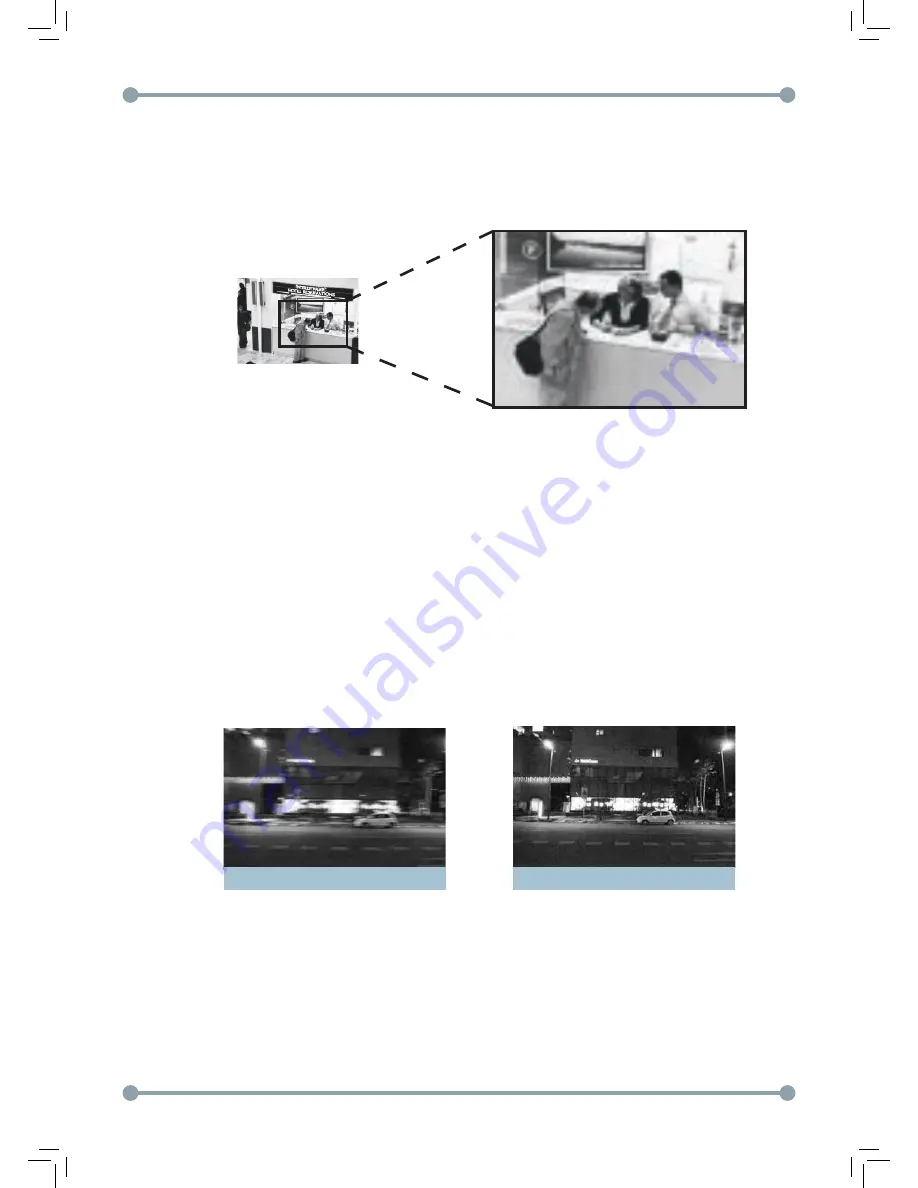
background image

- 27 -


»

SMART DZOOM:

 Smart DZoom automatically digitally zooms the 

camera when there is motion detected in a certain area. Press 

Left/

Right

 to select 

ON

 to enable Smart DZoom or 

OFF

 to disable. Then 

press 

Set Up

 to configure the following parameters:

DIS OFF

DIS ON


»

Range:

 Press 

Left/Right

 to apply 2x~5x digital zoom to the image. 


»

Position:

 Press 

Set Up

 and then press 

Left/Right/Up/Down

 to 

adjust the zoom area. Press 

Set Up

 to confirm the area.


»

Sensitivity:

 Press 

Left/Right

 to adjust the sensitivity of motion 

detection for Smart DZoom.


»

Time:

 Press 

Left/Right

 to adjust the time the camera will maintain the 

zoom before zooming out.


»

DIS (Digital Image Stabilizer):

 DIS compensates for unclear images 

caused by windy conditions or vibrations in the installation area. Press 

Left/Right

 to select 

ON

 to enable DIS or 

OFF

 to disable. 


»

Neg. Image:

 Press 

Left/Right

 to select 

ON

 to invert the colors in the 

image (makes the image look like a photo negative). Or select 

OFF

 for a 

normal image.

Summary of Contents for DPB74TLUX

Page 1: ...mpany Instruction Manual English Version 2 0 D3200 D3300 Series Digital Video Surveillance Recorder 4 8 16 32 960H Real time View Record CMS Mobile Apps HDMI www flir com security formerly DPB74TLUX 9...

Page 2: ...2...

Page 3: ...3...

Page 4: ...ions 6 Package Contents 7 Installation 8 Connection 10 How to Set Up the Camera Menu 11 Menu Tree 12 Menu Tree Continued 13 Menu Tree 14 Default Settings 15 Lens 17 Exposure 17 White Balance 20 Day Ni...

Page 5: ...m Auto Iris D N Varifocal Lens True Day Night with ICR mechanism TDN IP67 Weatherproof rated Advanced 3D Digital Noise Reduction 3D DNR ArcticPro technology for harsh climates minimum operating temper...

Page 6: ...hocks Only use the camera in environments between 40 C and 50 C This is one of the most important parts of the camera Be careful not to leave fingerprints on the lens cover If it gets wet wipe dry imm...

Page 7: ...emble the camera Use an appropriate low voltage power cable to prevent fire or electrical shock Please ensure that your installation area can support the weight of the camera Do not use a strong or ab...

Page 8: ...ping Screw 4x25 x4 Hexagon Screw Plate 5x10 x4 Test Video Cable x1 Zoom Focus Adjustment Tool x1 Allen Key x1 Instruction Manual x1 Camera x1 Accessories MNTB74J Junction box mount ACCUTC1 UTC Control...

Page 9: ...a stand to tilt the camera 180 c Loosen the screw underneath the camera stand to rotate the camera around the stand 360 1 Use the mounting plate to drill holes for the cable and mounting screws 2 Plac...

Page 10: ...Level screw left to decrease the output or right to increase the output It is recommended to fine tune the IR level during low light conditions to determine the best setting NOTE By default the IR LED...

Page 11: ...Video Connect the camera to the video cable You can also control the camera OSD over the video cable using a UTC controller Pelco C protocol OR c UTP Video Connect the camera to a video balun using o...

Page 12: ...nu Press Up Down to move the menu cursor up and down and select menu items Press Left Right to move the menu cursor left and right and adjust the selected menu item Press the Set Up button to open sub...

Page 13: ...12 Menu Tree...

Page 14: ...13 Menu Tree Continued...

Page 15: ...14 Menu Tree...

Page 16: ...tdoor Low Level 0 Exposure Outdoor High Level 0 White Bal ATW White Bal Manual Blue 28 White Bal Manual Red 16 Day Night EXT Day Night EXT Start Delay 5 Day Night EXT End Delay 2 Day Night B W Burst O...

Page 17: ...10 Special Privacy Transpar 3 Special Defect Sensup X32 Special Defect Diff 2 Special Defect Threshold 1 Special Defog Off Special Defog Manual Level 10 Special Defog Manual Color Gain 3 Special Defog...

Page 18: ...IGHTNESS MODE RETURN 50 INDOOR RET IIIIIIIIII IIIIIIIIII 2 Press Up Down to select BRIGHTNESS and then Left Right to adjust the brightness between 1 100 3 Press Up Down to select MODE and then Left Ri...

Page 19: ...D WDR RETURN AUTO MID AUTO OFF OFF RET AGC Auto Gain Control Press Left Right to adjust AGC Increasing the AGC level may increase the amount of noise in the image Off AGC disabled Low 28dB gain appli...

Page 20: ...area where BLC will be applied Press Set Up and press Left Right Up Down to adjust the position of the area Press Set Up to confirm the area and then press Left Right Up Down to adjust the size of th...

Page 21: ...s Left Right to select ALL DAY for HSBLC to be enabled in both day and night mode or NIGHT ONLY for HSBLC to be enabled during night mode only Default Press Set Up to return to default HSBLC settings...

Page 22: ...our installation When there is a very high color temperature in the image above 10 500K for example clear sky or sunset It is very dark If the camera is pointed directly at fluorescent lighting or if...

Page 23: ...eft Right to select Off to eliminate the burst signal or On to allow the burst signal IR Smart Press Left Right to select On to enable Smart IR compensation or Off to disable Smart IR will prevent the...

Page 24: ...e delay time before the camera will switch between day and night modes D N AGC Select the brightness value when the camera changes from day mode to night mode N D AGC Select the brightness value when...

Page 25: ...disable If you select ON press Set Up to set the compensation level for 3D DNR between 0 200 3DNR LEVEL RETURN 200 RET IIIIIIIIII IIIIIIIIII NOTE As the level is increased the effectiveness of the noi...

Page 26: ...lay and press Set Up to configure the camera title To configure the camera title do the following a Press Up Down Left Right to control the menu cursor b Press Set Up to enter the selected character c...

Page 27: ...freeze the image Mirror Press Left Right to flip the image in one of the following directions D ZOOM RANGE PAN TILT RETURN x2 0 0 0 RET IIIIIIIIII IIIIIIIIII IIIIIIIIII IIIIIIIIII OFF MIRROR V FLIP RO...

Page 28: ...adjust the zoom area Press Set Up to confirm the area Sensitivity Press Left Right to adjust the sensitivity of motion detection for Smart DZoom Time Press Left Right to adjust the time the camera wil...

Page 29: ...n press Set Up to confirm c Press Left Right Up Down to configure the size of the motion area and then press Set Up to confirm d Press Set Up again to save changes Value Sensitivity Press Left Right t...

Page 30: ...the privacy area and then press Set Up d Press Set Up again to save the privacy area Color Press Left Right to select color 0 15 Transparency Press Left Right to set the transparency of the motion ar...

Page 31: ...ype of monitor you have LCD Recommended if you are using an LCD monitor Press Set Up to configure the Gamma Level Blue Gain and Red Gain CRT Recommended if you are using a CRT monitor Press Set Up to...

Page 32: ...AL ADJUST RESET EXIT DC ATW COLOR ON Use the Reset function to reset the camera to factory default settings This is recommended if you end up with an unclear or unsatisfactory picture due to setting c...

Page 33: ...LED on Video Output 1 0Vp p Composite 75 Ohms S N Ratio 52db AGC off Lens 3 5mm 16mm F1 2 Varifocal DC Auto Iris Power Source AC 24V 10 Power Consumption 11W without heater 24W with heater Minimum Pow...

Page 34: ...on the monitor DVR If there is an intermediate device ensure it is set to 75 Hi z The image is overexposed at night Turn the LED Level screw to the left to reduce the power output to the IR LEDs It i...

Page 35: ...receive product updates and information North America 1 866 816 5919 Technical support for technical installation issues Mon Fri 8 00 am to 8 00pm EST By Phone Product support is available 24 7 inclu...

Reviews: