background image

Upgrading Keyboard Firmware

8

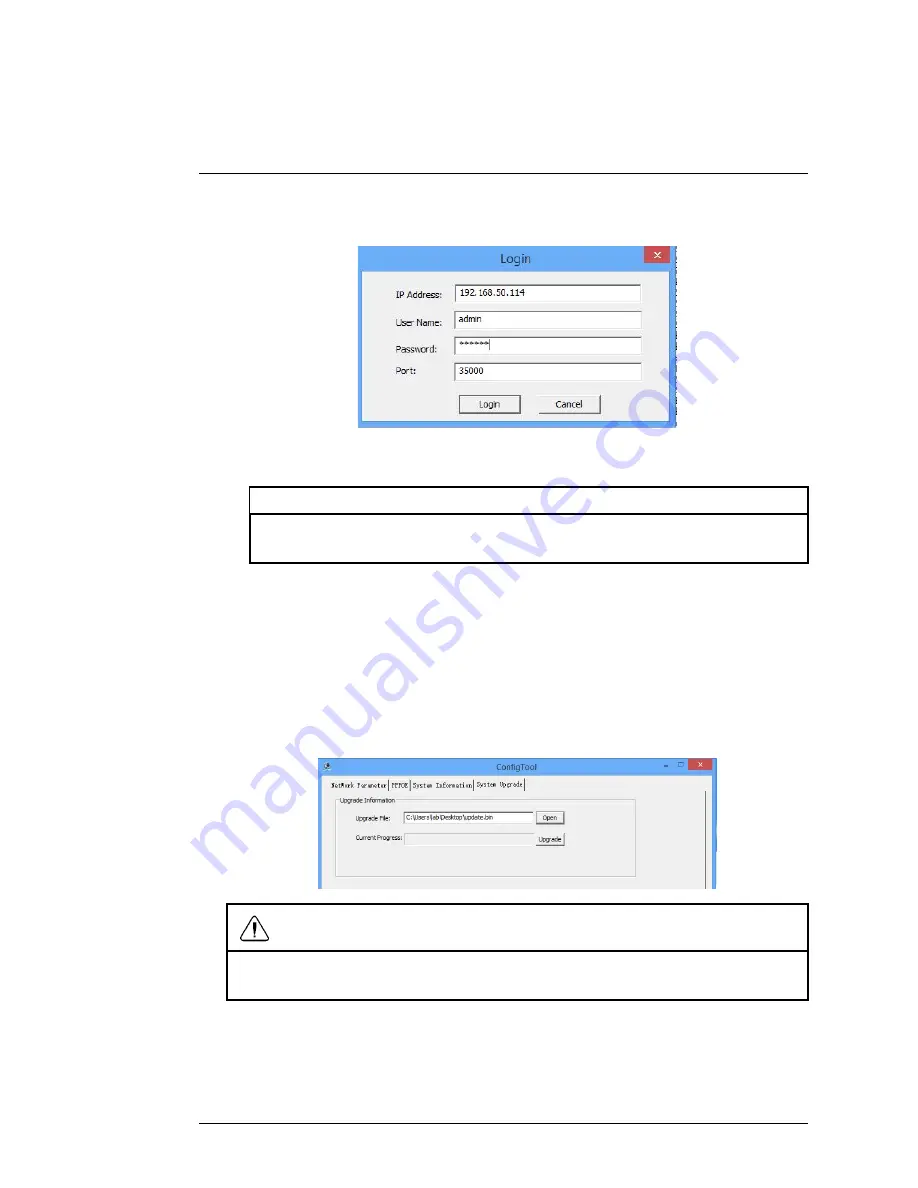
7. Configure the following:

IP Address

: Enter the IP address of the keyboard.

NOTE

To find the IP address on the keyboard, go to

Menu Settings>System>Network

then select

DHCP

and press

ENTER

.

User Name

: Enter

admin

.

Password

: Enter the password for the keyboard admin account (de-

fault:

000000

).

Port

: Enter the keyboard’s Client port (default

35000

).

8. Click

Login

. Select the

System Upgrade

tab.

9. Click

Open

and select the firmware upgrade file (.bin). Click

Upgrade

to

start the firmware upgrade. Wait for the firmware upgrade to complete.

CAUTION

DO NOT

unplug the power or network cable from the keyboard during the firmware up-

grade process.

#; r. 1.0/21073/21073; en-US

33

Summary of Contents for ACCKBD320

Page 1: ...Instruction Manual ACCKBD320 Network PTZ Keyboard...

Page 2: ......

Page 3: ...Instruction Manual ACCKBD320 Network PTZ Keyboard r 1 0 21073 21073 en US iii...

Page 4: ...ING TO QUALIFIED SERVICE PERSONNEL The lightning flash with arrowhead symbol within an equilateral triangle is intended to alert the user to the presence of uninsulated dangerous voltage within the pr...

Page 5: ...g PTZ Cameras using RS485 13 5 2 3 Adding a DVR or NVR Using RS232 14 5 2 4 Finding RS232 Information on FLIR DVRs or NVRs 16 6 Controlling Devices Using the Keyboard 17 6 1 Selecting Devices 17 6 2 C...

Page 6: ...4 2 Add User 28 7 4 3 Delete User 28 7 4 4 Modify Rights 29 7 5 Config Resetting to Factory Defaults 29 7 6 Info 30 7 7 Model 30 7 8 Menu Tree Overview 31 8 Upgrading Keyboard Firmware 32 9 ACCKBD320...

Page 7: ...ended to connect the product to a surge protector to protect from damage caused by electrical surges It is also recommended to connect the product to an uninterruptible power supply UPS which has an i...

Page 8: ...rloading Do not overload wall outlets or extension cords as this can result in the risk of fire or electric shock Overloaded AC outlets extension cords frayed power cords damaged or cracked wire insul...

Page 9: ...lation is provided and the product manufacturer s instructions have been followed 11 Attachments Do not use attachments unless recommended by the product manufacturer as they may cause a hazard 12 Wat...

Page 10: ...osed to rain or water If the product has been dropped or the cabinet has been damaged If the product does not operate normally by following the operating in structions Adjust only those controls that...

Page 11: ...nto this prod uct through openings as they may touch dangerous voltage points or short out parts that could result in a fire or electric shock Never spill liquid of any kind on the product 4 Lightning...

Page 12: ...MPX DVRs Access multiple devices using the same keyboard Connect to devices over LAN with RJ45 RS485 and RS232 supported Pelco D and Pelco P supported NOTE Please visit www flirsecurity com pro for i...

Page 13: ...ACCKBD320 Getting Started 3 The system comes with the following components Network Video Recorder 12V Power adapter RS485 Block Ethernet cable r 1 0 21073 21073 en US 7...

Page 14: ...4 2 Keyboard Ports 1 USB Service only not supported 2 RS422 Not supported 3 RS485 Used for RS485 connections 4 Ethernet Connect an Ethernet cable from the keyboard to your router to control devices o...

Page 15: ...ess SHIFT to switch be tween numbers and letters 2 DVR control panel ID ID shortcut Return to zone ID selection CAM Device channel number Press channel number CAM to select channel MULT Split button C...

Page 16: ...ight On when keyboard is con nected to power TR TX Network data receive and send indicator light Flashes when keyboard sends or receives informa tion over the network NET Network indicator light On wh...

Page 17: ...ard saves each device as a zone See the sections below for instructions on how to add a zone depending on the connection method 5 2 1 Adding Devices over the Local Area Network LAN You can add devices...

Page 18: ...VR NVR or SD PTZ camera standalone IPAddr Enter the IP address of the device you would like to add Client Port Enter the Client Port of the device you would like to add The default client port for FLI...

Page 19: ...ion To add a PTZ camera using RS485 1 Connect the RS485 Rx cables from the PTZ camera to the keyboard NOTE Connect Rx positive from the camera to the A1 connector on the keyboard Con nect Rx negative...

Page 20: ...t the device baud rate DataBit Select the device data bit setting Parity Select the device parity setting StopBit Select the device stop bit setting 7 Press ENTER to save the device 8 Press ESC to go...

Page 21: ...d press ENTER 6 Configure the following ID Enter an ID number to save this device under Each device you con nect to must have a unique ID number Name Enter a name for the device of your choice Link Se...

Page 22: ...232 address is determined by the Device No in the DVR NVR settings On DNR400 Series for example you can find the Device No by right clicking and then clicking Main Menu General General See the example...

Page 23: ...the type of device you are connecting to DVR NVR or PTZ camera 6 2 Controlling DVRs or NVRs Once you have added your FLIR MPX DVR or NVR to the keyboard you can control connected PTZ cameras control...

Page 24: ...r details on controlling PTZ cameras Press ENTER to open the system info screen Press ENTER twice to open the DVR NVR menus In menus In menus press the joystick LEFTand RIGHT to move the cursor Press...

Page 25: ...ess the joystick UP and DOWN to select menu items Press the joystick LEFTand RIGHT to change menu parameters Press ENTER to open submenus Press ESC to exit the OSD menu 6 3 3 Controlling Presets You c...

Page 26: ...e TOUR button to open the tour menu 2 Under TourNo enter the number of the tour you would like to set up 3 Press the joystick DOWN to select Set and press ENTER 4 Under Preset No enter the number of t...

Page 27: ...manually stopped 4 To stop the tour select Stop from the tour menu and press ENTER 6 3 5 Controlling Scans The scan function sets the camera to go back and forth between a left and a right position To...

Page 28: ...Set and then press ENTER 9 Select Set Right and press ENTER to save the current position as the right position To run a scan 1 Press the SCAN button to open the scan menu 2 Under ScanNo enter the numb...

Page 29: ...TERN to open the pattern menu 2 Under PatNo enter the number of the pattern you want to save 3 Press DOWN on the joystick to select SETand then press ENTER 4 Select Start and press ENTER to begin reco...

Page 30: ...pattern 1 Press the PATTERN button to open the pattern menu 2 Under PatNo enter the number of the pattern you want to run 3 Select Start and press ENTER to run the pattern 4 To stop the pattern selec...

Page 31: ...Press ESC to exit or go back 7 2 System The System menus allow you to configure keyboard settings System menus are under Menu Settings System 7 2 1 Time The Time menu lets you set the system time Set...

Page 32: ...d press ENTER to save 7 2 3 Address The Address menu allows you to configure the receiver address for the PTZ keyboard for RS232 RS485 Set the address between 0 and 255 default is 0 When there is a ca...

Page 33: ...5 2 Adding Zones Devices page 11 for details 7 4 Account The Account menus allow you to add delete or modify user accounts and passwords on the keyboard NOTE You must be logged into the keyboard with...

Page 34: ...a six digit password 3 Highlight OK and confirm the password 4 Press down to highlight Right and press ENTER to configure user ac count rights Press LEFT RIGHT to enable disable rights Rights are en a...

Page 35: ...to configure user ac count rights Press left right to enable disable rights Rights are enabled when the icon is filled and disabled when the icon is empty Press ENTER to confirm the rights and save th...

Page 36: ...the keyboard to factory defaults 1 Select Default and press ENTER 2 Press ENTER again to confirm or ESC to cancel 7 6 Info The Version menu shows the current version of the keyboard firmware 7 7 Mode...

Page 37: ...Using the Keyboard Menu 7 7 8 Menu Tree Overview r 1 0 21073 21073 en US 31...

Page 38: ...PC before performing the steps below To upgrade keyboard firmware 1 Download the firmware file from www flirsecurity com pro 2 Extract the firmware file bin from the zip file 3 Download the Firmware...

Page 39: ...assword Enter the password for the keyboard admin account de fault 000000 Port Enter the keyboard s Client port default 35000 8 Click Login Select the System Upgrade tab 9 Click Open and select the fi...

Page 40: ...evices 1024 Keyboard Communica tion Direct Mode Network Mode PTZ Protocols MPX CVI Pelco D Pelco P Pelco D1 Pelco P1 Display LCD 75 2mm x 33 85mm Max User Accounts 1 Admin 10 User User Account Type Ad...

Page 41: ...s As our products are subject to continuous improvement FLIR Systems Inc and its subsidiaries reserve the right to modify product design specifications and prices without notice and without incurring...

Page 42: ...hout notice from time to time 10 1 FCC Class A Notice This equipment has been tested and found to comply with the limits for a Class A digital device pursuant to Part 15 of the FCC Rules These limits...

Page 43: ......

Page 44: ...tered trademarks or trademarks of FLIR Systems and or its subsidiaries All other trademarks trade names or company names referenced herein are used for identification only and are the property of thei...

Reviews: