17
While welding the current can be decreased
from l2 to lf by lightly pressing the torch
button (for less than 0.7 seconds).
To restore the pre-set current value, press
the button again lightly.
Prolonged pressure on the torch button will
terminate this process, as described in the
paragraph regarding 4T mode.
The microprocessor will regulate the
increases and decreases in current and gas
flow in order to ensure optimum results.
6.3.4 Welding Process Selection (Normal
or Pulsed)
To switch between normal or pulsed
welding, press button 24 (Fig.1) until either
LED22 (normal) or LED23 (pulsed) lights up.
Normal Welding:
Once the welding current set at l2 using
knob 25 (Fig.1) is reached the
microprocessor will maintain that value for
the duration of the welding process.
Pulsed Welding:
In this case the welding current will not
remain constant at the l2 value set using
knob 25 (Fig.1). It will continue to alternate
between the l2 value and a much lower ls
value (so-called “background current”).
The alternation frequency between the two
values is adjustable (the factory-set
frequency is 30Hz but that can be adjusted
following the instructions).
The length of time the welding current
remains al l2 value versus the duration of
the complete duty cycle can also be
adjusted. The factory-set ratio is 50%.
Welding can now begin.
6.3.5 TIG Welding
Follow these instructions in TIG Lift-Arc
mode:
1.
Set the welding current turning knob 25,
Figure 1. (The setting will be displayed on
panel 13, Fig.1)
2.
Connect the earth clamp to the workpiece.
3.
Regulate the gas flow using the regulator
on the cylinder (app. 6 litres/min) while
pressing the torch button.
4.
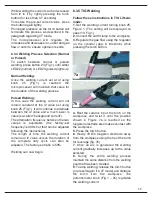
Rest the ceramic tip of the torch on the
workpiece and twist it until the position
shown in Figure 7a is reached so the
tungsten electrode also makes contact with
the workpiece.
5.
Press the torch button.
6.
Slowly lift the tungsten electrode away
from the workpiece using the tip of the torch
for leverage (fig. 7b)
7.
Once an arc is generated the welding
current gradually increases up to the value
selected.
8.
During the entire welding process
maintain the same distance from the welding
pool that has been created.
9.
To stop welding, release the torch button
(or press it again if in 4T mode) and distance
the torch from the workpiece. The
potentiometer knob (Fig.1 – 25) regulates
the welding current.
7a
7b
Summary of Contents for TT165 AC/DC
Page 1: ...InstructionManual TT165 AC DC TT205 AC DC TT165 AC DC TT205 AC DC ...
Page 4: ......
Page 5: ...TT165 AC DC TT205 AC DC ...
Page 10: ...X ...
Page 12: ......
Page 30: ...20 NOTE ...
Page 32: ...Cod 910 100 333GB REV00 ...

