16
The microprocessor will
regulate the increases and
decreases in current and gas flow in order
to ensure optimum results.
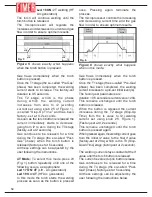
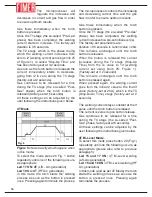
Gas flows immediately when the torch
button is pressed.
Once the T1 stage (the so-called “Pre-Gas”
phase) has been completed, the welding
current starts to increase. The factory-set
duration is 0.5 seconds.
The T2 stage, which is the phase during
which the welding current increases from
zero to l2 (welding current set using knob 25
of Figure 1), is called “Slop-Up Time” and
has been factory-set at 0,2 seconds.
As soon as the torch button is released the
current immediately starts to decrease,
going from l2 to zero during the T3 stage
(factory-set at 2 seconds).
Gas continues to be released for a time
during the T4 stage (the so-called “Post-
Gas” phase) when the torch button is
released (factory-set at 5 seconds).
All these settings can be adjusted by the
user following the instructions given below.
4T Mode
To select this mode press 20 Fig. 1 button
repeatedly until one of the following occurs,
as appropriate
Led 17 ON: 4T
(Lift - Arc generation)
Led 19 On: 4T
(HF Arc generation)
in this mode the torch starts the welding
process as soon as the button is pressed
once. Pressing again terminate the process.
The microprocessor controls the increasing
and decreasing current time and the gas
flow in order to ensure optimum results.
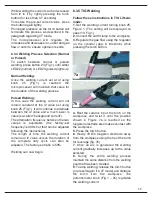
Gas flows immediately when the torch
button is pressed.
Once the T1 stage (the so-called “Pre-Gas”
phase) has been completed, the welding
current increases to a pre-set initial level (ls).
The factory-set parameters are :
duration = 0.5 seconds, ls current value = 20A.
This remains unchanged until the torch
button is released.
When the button is released the current
increases during the T2 stage (Slop-Up
Time) from the ls value to 12 (welding
current set using knob 25, Figure 1).
(Factory-set at 0,2 seconds)
This remains unchanged until the torch
button is pressed again.
When pressed again, the welding current
goes from the initial l2 value to the final lf
value (factory-set at 20A), which is the T3
(Slop-Down Time) stage (factory-set at 2
seconds).
The welding current stays constant at the lf
value until the torch button is released.
The current is zeroed upon button release.
Gas continues to be released for a time
during the T4 stage (the so-called “Post-
Gas” phase, factory-set at 5 seconds).
All these settings can be adjusted by the
user following the instructions given below.
4T Bi-Level Mode.
To select this mode press button 20 (Fig.1)
repeatedly until one the following occurs, as
appropriate (please also refer to previous
paragraph):
Led 15 and 17 ON:
4T Bi-Level welding
(Lift-Arc generation)
Led 15 and 19 ON:
4T Bi-Level welding (HF
Arc generation)
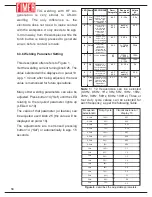
In this mode (and as per 4T Mode) the torch
starts the welding process as soon as the
button is pressed once. Pressing again
terminates the process.
Fig. 6
Button
Pushed
Button
Pushed
Figure 6
shows exactly what happens when
in this mode.
Summary of Contents for TT165 AC/DC
Page 1: ...InstructionManual TT165 AC DC TT205 AC DC TT165 AC DC TT205 AC DC ...
Page 4: ......
Page 5: ...TT165 AC DC TT205 AC DC ...
Page 10: ...X ...
Page 12: ......
Page 30: ...20 NOTE ...
Page 32: ...Cod 910 100 333GB REV00 ...


