background image

FENIX IMVICO 

TK-41 OPERATION MANUAL

7/88


HEAD CLEANING PROCEDURE AND PRECAUTIONS

.

    Do not  clean the thermal head  immediately after printing because  thermal
    head and its periphery are hot during and after printing.
    Do not use sandpaper, cutter knives etc. when cleaning. They will damage the
    heat elements.

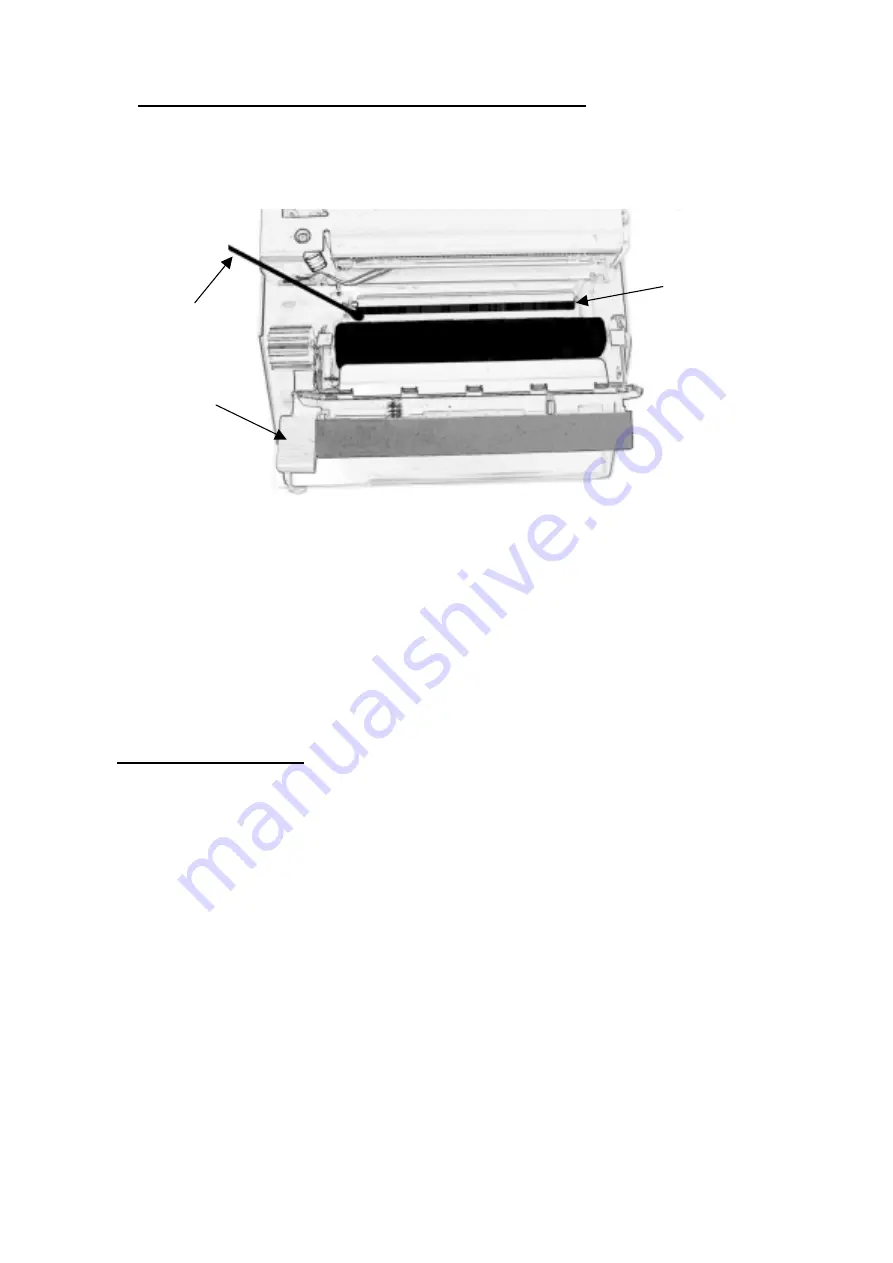
                                         Fig a. Head cleaning procedure

Turn off the printer. Turn the release lever in the direction of the arrow. Clean
the heat elements using alcohol (ethanol, methanol, or IPA) and a cotton swab.
Wait until the alcohol dries and close the platen block. Fenix recommends
cleaning the thermal head periodically (generally every 3 months) to maintain
receipt print quality.

RECOMMENDATIONS


Before connecting any input interface, verify the correct operation of the

      TK-41 printer with self test feature.


Place the TK41 in such a way that connection wires are not crushed or
twisted

.

Thermal head

Cotton swab

Head-up
lever

Summary of Contents for TK41

Page 1: ...TK41 THERMAL PRINTER Operation Manual Version 2 0 February 2003...

Page 2: ...nge Fig 3 6 1 Optical Mark Characteristics Fig 3 6 Optical Mark Characteristics 68 addition ITF bar code 73 change Fig C 1 TK4160T TK4180B external dimensions Fig C 1 TK4160T TK4180T external dimensio...

Page 3: ...3 2 2 Serial interface connection example 22 2 3 3 CENTRONICS PARALLEL CONNECTOR 23 2 3 3 1 Specifications 23 2 3 3 2 Parallel interface connection example 25 3 BASIC OPERATIONS 28 3 1 LOADING PAPER...

Page 4: ...54 4 3 CONTROL COMMANDS DESCRIPTION 55 APPENDIX A CHARACTERS x LINE 74 APPENDIX B RECOVERY FROM AUTOCUTTER ERROR 75 APPENDIX C EXTERNAL APPEARANCE 76 APPENDIX D SPECIFICATIONS 78 APPENDIX E HOW TO OR...

Page 5: ...rial port error detection flow chart 49 Fig 3 13 Parallel port error detection flow chart 50 Fig 3 14 Optical Mark Characteristics 51 Fig 3 15 Optical Mark recommended use sequence 53 Fig 4 1 Code128...

Page 6: ...failure DO NOT blow the TK41 NEVER modify the TK41 DO NOT try to repair the TK41 by yourself If some failure is detected contact with your usual dealer technical service Since the printer contains pe...

Page 7: ...Turn the release lever in the direction of the arrow Clean the heat elements using alcohol ethanol methanol or IPA and a cotton swab Wait until the alcohol dries and close the platen block Fenix reco...

Page 8: ...rinting up to 150mm s Line printing method Printing is performed every time a text line is filled High reliability 15 million lines Single 24V DC power supply 150W No paper and paper near end sensors...

Page 9: ...model 80mm 640 dot positions 3 Dot density 203 dpi x 203 dpi dpi dots per inch 25 4mm 8 dots mm 4 Printing speed High speed mode 150mm s 5 9 s max Normal mode 100mm s 3 9 s Low speed mode 80mm s 3 1 s...

Page 10: ...E JUJO THERMAL Original paper No PD160R OJI Original paper No TF11KS ET NIPPON PAPER INDUSTRIES CO LTD A different paper type may give a different print quality The paper thickness must be 56 180 m 1...

Page 11: ...L 11 88 1 6 ENVIRONMENTAL CONDITIONS 1 Operating Temperature 0 to 55 C 32 to 131 F Reliable printing 5 to 50 C 41 to 122 F 2 Operating humidity 10 to 80 34 C 93 2 F at 80 non condensing Fig 1 1 Operat...

Page 12: ...o the chassis by screwing putting four metric screws M4 L10 mm through the holes marked with A in fig 2 1 Fixing the TK41T Place all the four screws in the same direction from up to down Use two metri...

Page 13: ...lace all the four screws in the same direction from down to up Use two metric nuts M4 to secure the screws marked with B in the same figure It is hardly recommended that the fixing holes of your chass...

Page 14: ...s that a correct installation must follow are Smooth exit of the ticket Prevent problems with static electricity due to the nature of the used materials Avoid the final user s access to the printer ou...

Page 15: ...Detects paper near end when remaining paper is about 7m long B Detects paper near end when remaining paper is about 30m long Fig 2 5 Paper near end sensor positions REAR VIEW FRONT VIEW Printer cutte...

Page 16: ...wo points must be assured to make this system work right The construction of the receptacle must avoid the user to reach any internal parts of the machine The way of the ticket from the printer outlet...

Page 17: ...er is placed very near the user s chassis some system must be implemented in order to move the printer when accessing the printing head i e giving the fixing holes of the chassis an oval shape to allo...

Page 18: ...laced in the back side of the printer User can find the next connectors Power supply connector Serial RS 232 communications connector Parallel CENTRONICS communications connector Fig 2 9 TK41connector...

Page 19: ...5V to control the electronics The power supply must satisfy the following conditions VCC 24v DC 2 4v Example of current consumption for the 79 5mm wide mechanism Print head current consumption at a pr...

Page 20: ...dots energizing pulses elements paper feed amount two steps including non printing area Average energizing pulse width is defined as 107 of 160 dots per dot line that are continuously energized WARNIN...

Page 21: ...E Refer to point 3 4 2 The stop bit for the printer side is fixed to 1 The data word length is fixed to 8 bits Pin Signal name Signal direction from the printer side Function 2 RXD Input Receive data...

Page 22: ...eives and checks serial data according to the transmission baud rate programmed If the input data is not printed correctly the transmission conditions between the host device and the TK41 do not proba...

Page 23: ...ter side Function 1 STB Input Strobe signal 2 Data0 LSB Input 3 Data1 Input 4 Data2 Input 5 Data3 Input 6 Data4 Input 7 Data5 Input 8 Data6 Input 9 Data7 MSB Input Data Bus 10 ACK Output Acknowledge s...

Page 24: ...et the characteristics described below In addition both rise time and fall time of each signal shall be 0 5 s or less 4 Data transmissions shall not ignore the ACK or BUSY signals An attempt to transm...

Page 25: ...ata3 Data3 5 6 Data4 Data4 6 7 Data5 Data5 7 8 Data6 Data6 8 9 Data7 MSB Data7 MSB 9 10 ACK ACK 10 11 BUSY BUSY 11 12 PE PE 12 13 Select Select 13 14 NC AutoFeed 14 15 ERR ERR 15 16 NC INIT 16 17 NC S...

Page 26: ...LSB Data0 LSB 2 3 Data1 Data1 3 4 Data2 Data2 4 5 Data3 Data3 5 6 Data4 Data4 6 7 Data5 Data5 7 8 Data6 Data6 8 9 Data7 MSB Data7 MSB 9 10 ACK ACK 10 11 BUSY BUSY 11 12 PE PE 12 13 Select Select 13 14...

Page 27: ...signal Busy BUSY output pin SUB D25 11 The BUSY signal indicates that the printer is ready to receive data When the BUSY signal is LOW data can be input This signal remains HIGH from the transition o...

Page 28: ...ce please make sure the paper roll has been placed in the right way 1 Place the paper roll in the subjection cylinder 2 Place the paper roll in the right direction 3 Place the fixing button to assure...

Page 29: ...any 7 Make sure that the printing head is closed 8 Make sure the paper end is cut in a straight way as shown in the figure Fig 3 3 1 Automatic paper load 9 Put the paper end in the TK41 inlet 10 Push...

Page 30: ...printing head open 3 Place the paper roll in the right direction 4 Make sure the paper end is cut in a straight way as shown in the figure Fig 3 5 1 Manual paper load 5 Put the paper end in the TK41 i...

Page 31: ...FENIX IMVICO TK 41 OPERATION MANUAL 31 88 3 2 CHARACTER CODE TABLE The TK41 uses next table PC437 USA Standard Europe International Character Set USA Table 3 1 1 PC437 character code table...

Page 32: ...FENIX IMVICO TK 41 OPERATION MANUAL 32 88 Continued 80H to FFH Table 3 2 2 PC437 character code table...

Page 33: ...re placed in the back side of the printer When using the TK41B model the Buttons Leds are placed in the top side of the printer There are three leds and two buttons which are identified as follows Fig...

Page 34: ...while pressing the PFEED button When the OM sensor is enabled the printer will feed paper by mark paper unit Paper feeding using the paper FEED button cannot be performed under the following conditio...

Page 35: ...l head closed normal condition NOTE When this LED is ON indicates one of this three situations There is no paper at the printer inlet The thermal head is open Both previous situations Any of these sit...

Page 36: ...s Printing speed Print density Selected font Character scale Character spacing Line Spacing Status of the Black Mark sensor Status of the CR command function See point 4 CONTROL COMMANDS Starting the...

Page 37: ...FENIX IMVICO TK 41 OPERATION MANUAL 37 88 Next figure shows an example of SELF TEST MODE Fig 3 9 SELF TEST MODE sample...

Page 38: ...de To start the programming mode on a paper roll turn off the printer and hold down the PROG button then turn on the printer Then the printer asks for the configurable parameters These are the configu...

Page 39: ...FENIX IMVICO TK 41 OPERATION MANUAL 39 88 Next figure shows how the printer asks for the configurable parameters Fig 3 10 PROGRAMMING MODE sample...

Page 40: ...easily detected using this mode for the user can compare what he is supposedly sending to the printer and what the printer is actually receiving Starting the hexadecimal dump To start the hexadecimal...

Page 41: ...eans that an error has occurred The TK41 can send the STATUS BYTES by the serial port to communicate some of these errors PARALLEL PORT When an error occurs it is indicated in the port pins Pins named...

Page 42: ...cause the action to recover from these errors is actually the same This error is quite significant so when it arises the motor stops and no printing is allowed ERROR ORIGIN There is no paper in the pr...

Page 43: ...r must send to the printer the Real time status transmission command DEL EOT n and then the printer answers with the corresponding STATUS BYTE which identifies the type of error See point 4 CONTROL CO...

Page 44: ...over 70 C LEDS INDICATION The ERR led turns ON SERIAL PORT INDICATION When the user detects an error DTR signal HIGH for more than 4 seconds he must send to the printer the Real time status transmiss...

Page 45: ...user detects an error DTR signal HIGH for more than 4 seconds he must send to the printer the Real time status transmission command DEL EOT n and then the printer answers with the corresponding STATU...

Page 46: ...and then the printer answers with the corresponding STATUS BYTE which identifies the type of error See point 4 CONTROL COMMANDS for details PARALLEL PORT INDICATION When the user detects an error ERR...

Page 47: ...Real time status transmission command DEL EOT n and then the printer answers with the corresponding STATUS BYTE which identifies the type of error See point 4 CONTROL COMMANDS for details PARALLEL POR...

Page 48: ...The ERR led turns ON SERIAL PORT INDICATION When the user detects an error DTR signal HIGH for more than 4 seconds he must send to the printer the Real time status transmission command DEL EOT n and t...

Page 49: ...ial port error detection flow chart END START TIMER SEND 1 BYTE SEND Real time status COMMAND WITHOUT CHECKING RTS SIGNAL READ STATUS FROM PRINTER AND IDENTIFY ERROR BEGIN NO DTR 0 YES RTS 0 NO YES EN...

Page 50: ...PORT ERROR DETECTION FLOW CHART Fig 3 13 Serial port error detection flow chart BEGIN END WRITE BYTE IN DATA BUS STB PULSE ACK 0 YES NO END OF TRANSMISSION YES NO READ PINS ST1 ST2 IDENTIFY ERROR ERR...

Page 51: ...Optical Mark sensor After detecting the Optical Mark it is not detected for approximately 2cm The reflecting rate of the Optical Mark must be 10 or less and the reflecting rate of the white must be 7...

Page 52: ...ng position Other considerations Paper can only be fed backward by using these previous commands The total amount that paper can be backward fed is 118 steps approx 14 75mm Pressing the PFEED button w...

Page 53: ...CKET 1 at its cutting position CP and cut it Move paper backwards until finding the printing position PP of TICKET 2 Now TICKET 2 is ready to start printing Fig 3 15 Optical Mark recommended use seque...

Page 54: ...ve buffer The receive buffer is a buffer that stores as it is the data received from the host the reception data The receive data is stored in the receive buffer temporarily and is then processed sequ...

Page 55: ...tput paper end signals X 61 ESC c 4 Select paper near end sensor to stop printing X 62 ESC d Print and feed n lines X 62 GS FF Feed marked paper to print starting position X 62 GS Select character siz...

Page 56: ...Real time status transmission Format ASCII DEL EOT n Hex 10 04 n Range 01 H n 04 H Description Transmits the selected printer status specified by n in real time according to the following parameters...

Page 57: ...FF 00 Hardware OK 3 ON 08 Hardware error occurred 4 ON 10 Not used Fixed to ON 5 X Not used Undefined value OFF 00 No error 6 ON 40 Error occurred 7 OFF 00 Not used Fixed to OFF n 03 H Error status Bi...

Page 58: ...60 Paper roll end detected by paper roll sensor 7 OFF 00 Not used Fixed to OFF ESC SP n Name Set right side character spacing Format ASCII ESC SP n Hex 1B 20 n Range 00 H n FF H Description Sets the...

Page 59: ...uple size characters are printed When some characters in a line are double or more height all the characters in the line are aligned at the baseline ESC M can also select character font type However t...

Page 60: ...gs to the settings that were in effect when the power was turned on Notes The data in the receive buffer is not cleared ESC J n Name Print and feed paper Format ASCII ESC J n Hex 1B 4 n Range 00 H n F...

Page 61: ...CII ESC c 3 n Hex 1B 63 33 n Range 00 H n 01 H Description Selects the paper sensor s to output paper end signal using n as follows Bit OFF ON Hex Function 0 OFF 00 Undefined OFF 00 Paper roll near en...

Page 62: ...e print starting position to the beginning of the line This command does not affect the line spacing set by ESC 2 or ESC 3 The maximum paper feed amount is 1016 mm 40 If the paper feed amount n x line...

Page 63: ...ter Height Selection Hex Width Hex Height 00 1 normal 00 1 normal 10 2 double width 01 2 double height 20 3 02 3 30 4 03 4 40 5 04 5 50 6 05 6 60 7 06 7 70 8 07 8 Notes This command is effective for a...

Page 64: ...e positions to start the printing 02 H Setting value for the positions to start the cutting m specifies the direction of the adjustment m Function 00 H Specifies a forward paper feeding direction 01 H...

Page 65: ...D 28 4B 02 00 01 m Range F6 H m FF H and 00 H m 0A H corresponds to the print density 50 to 150 Description m specifies the print density If F6 H m FF H the print density set to be lighter F6 is the l...

Page 66: ...gized being divided into two the maximum printing speed in speed level 1 becomes 100mm s When the print speed is set to 150mm s the energizing mode is automatically set to non divided print head energ...

Page 67: ...and bar code printing Default nL 00 H nH 00 H Reference APPENDIX A GS T n Name Set print position to the beginning of print line Format ASCII GS T n Hex 1D 54 n Range n 00 H or n 01 H Description Set...

Page 68: ...mand is effective only when processed at the beginning of a line After cutting the ticket the printer always feeds the paper back to the printing position Notes for 1 The printer cuts paper at the cur...

Page 69: ...table n Font 00 H Font A 12x24 01 H Font B 8x16 Notes HRI indicates Human Readable Interpretation HRI characters are printed at the position specified by GS H HRI characters are always printed at X S...

Page 70: ...and processes the following data as normal data If the horizontal size exceeds printing area the printer only feeds the paper This command feeds as much paper as is required to print the bar code reg...

Page 71: ...ode data is not the code set selection character the printer stops command processing and processes the following data as normal data 4 If the combination of and the following character does not apply...

Page 72: ...203 2 dpi 101 6 dpi 02 H Double height 101 6 dpi 203 2 dpi 03 H Quadruple 101 6 dpi 101 6 dpi dpi dots per 25 4 mm 1 xL xH select the number of data bytes xL xH x 256 in the horizontal direction for...

Page 73: ...77 n Range 02 H n 06 H Description Sets the horizontal size of the bar code n specifies the bar code width as follows n Module Width mm for Multi level Bar Code 02 H 0 250 03 H 0 375 04 H 0 500 05 H 0...

Page 74: ...number of printable characters in one line is determined by the next formula The parameters of the formula are Mechanism 640 dots for M T542 576 dots for M T532 448 dots for M T522 LeftMargin 0 to 65...

Page 75: ...operation automatically If the problem is not serious the autocutter returns to its normal position without any intervention by the user If the autocutter does not return to its normal position by it...

Page 76: ...EXTERNAL APPEARANCE ____________________________________________________________________ Fig D 1 TK41T60 TK41T80 external dimensions Fig C 1 TK4160T TK4180T external dimensions Fig C 1 TK4160T TK4180T...

Page 77: ...77 88 Fig C 2 TK4160B TK4180B external dimensions A B C TK41B60 110mm 60mm 62mm TK41B80 130mm 80mm 70mm Table C 2 TK41B60 TK41B80 different dimensions 262 7 207 7 55 9 128 8 168 8 150 45 4x4 A C B 26...

Page 78: ...2 3 1 Power supply connector High speed mode Mean Approx 9 A Peak Approx 14 A Two part energizing mode Mean Approx 7 A Peak Approx 11 5 A Standby Mean Approx 0 1 A Dimensions WxDxH mm including a 150m...

Page 79: ...r 60 T80X150X25 Standard 150 mm diameter paper roll for 80 T60X130X25 Standard 130 mm diameter paper roll for 60 T80X130X25 Standard 130 mm diameter paper roll for 80 MTG 01 Metal outlet ticket guide...

Page 80: ...s giving the specified values Remove any foreign objects from the paper inlet If using the serial port check the port configuration The paper comes out but no characters are printed Make sure you are...

Page 81: ...ASCII characters 00H to 5FH Code set B ASCII characters 20H to 7FH Code set C 2 digit numeral characters using one character 100 numerals from 00 to 99 The following special characters are also avail...

Page 82: ...Z 5A 90 VT 0B 11 3 33 51 5B 91 FF 0C 12 4 34 52 5C 92 CR 0D 13 5 35 53 5D 93 SO 0E 14 6 36 54 5E 94 SI 0F 15 7 37 55 5F 95 DLE 10 16 8 38 56 FNC1 7B 31 123 49 DC1 11 17 9 39 57 FNC2 7B 32 123 50 DC2...

Page 83: ...52 82 Z 7A 122 2B 43 S 53 83 7B 7B 123 123 2C 44 T 54 84 7C 124 2D 45 U 55 85 7D 125 2E 46 V 56 86 7E 126 2F 47 W 57 87 DEL 7F 127 0 30 48 X 58 88 FNC1 7B 31 123 49 1 31 49 Y 59 89 FNC2 7B 32 123 50 2...

Page 84: ...90 5A 90 11 0B 11 51 33 51 91 5B 91 12 0C 12 52 34 52 92 5C 92 13 0D 13 53 35 53 93 5D 93 14 0E 14 54 36 54 94 5E 94 15 0F 15 55 37 55 95 5F 95 16 10 16 56 38 56 96 60 96 17 11 17 57 39 57 97 61 97 18...

Page 85: ...gram This program is an easy way to explore the TK41 s main features To install the program run the SETUP EXE file and follow the instructions on the screen The program is intended for three purposes...

Page 86: ...n some errors there may be a little time delay from the moment when the error is produced until the printer notifies it When enabling the printer status the program tests the printer s sensors and not...

Page 87: ...elected parameters Press the Save settings button to save these parameters Press the Autotest button to check the parameters have been saved NOTE The Left Margin and the Number of lines parameters are...

Page 88: ...FENIX IMVICO TK 41 OPERATION MANUAL 88 88 SPAIN Avda Meridiana 507 509 08016 BARCELONA Phone Num 34 93 353 92 22 Fax Num 34 93 353 97 21 e mail fenixim retemail es http www feniximvico com...

Reviews: