background image

ENGLISH

GB-8

OPERATION OF PRODUCT

Touch Controls

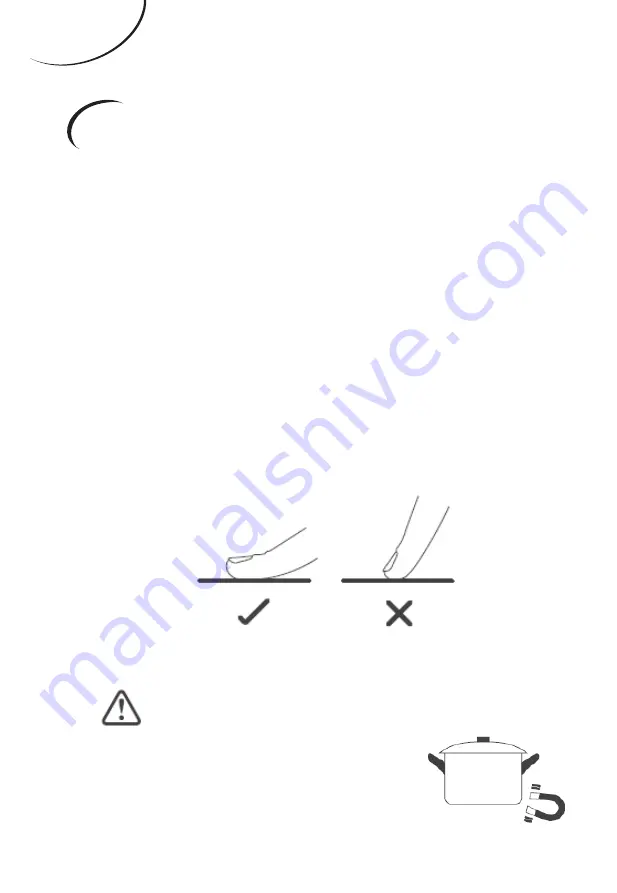
•  The controls respond to touch, so you don’t 

need to apply any pressure.

•  Use the ball of your finger, not its tip.

•  You will hear a beep each time a touch is 

registered.

•  Make sure the controls are always clean, 

dry, and that there is no object (e.g. a utensil 

or a cloth) covering them. Even a thin film 

of water may make the controls difficult to 

operate.

Choosing the right Cookware

•  Only use cookware with a base suitable 

for induction cooking. 

•  Look for the induction symbol 

on the packaging or on the 

bottom of the pan.

Summary of Contents for TI60 INF 444

Page 1: ...TI60 INF 444...

Page 2: ......

Page 3: ...de lire attentivement ce manuel d instructions et de le conserver pour toute r f rence ult rieure TABLE DES MATI RES MANUEL D UTILISATION INSTRUCTIONS DE S CURIT FR 2 DESCRIPTION DU PRODUIT FR 6 UTILI...

Page 4: ...soient sous une surveillance continue Cet appareil peut tre utilis par des enfants partir de 8 ans et par des personnes ayant des capacit s physiques sensorielles ou mentales r duites ou un manque d...

Page 5: ...ons d taill es sur la mani re de nettoyer les surfaces en contact avec les aliments r f rez vous au paragraphe ci apr s de la notice Un moyen de d connexion du r seau d alimentation ayant une distance...

Page 6: ...aliments sans surveillance sur une table de cuisson en utilisant des mati res grasses ou de l huile peut tre dangereux et d clencher un incendie NE JAMAIS essayer d teindre un incendie avec de l eau...

Page 7: ...n syst me de commande distance s par Il est recommand de ne pas d poser d objets m talliques tels que couteaux fourchettes cuill res et couvercles sur le plan de cuisson car ils peuvent devenir chauds...

Page 8: ...er 1500 1800 W max 4 Foyer 1500 1800 W max 5 Foyer 3000 3600 W max 6 Plaque en verre 7 Bandeau de commandes Bandeau de commandes 7 6 5 4 3 2 1 1 Boutons de s lection des foyers 2 Fonction sp ciale 3 B...

Page 9: ...ffant la surface de verre Le verre devient chaud uniquement parce que l ustensile de cuisson finit par le chauffer Ustensile de cuisson ferreux Circuit magn tique Courants induits Bobine d induction P...

Page 10: ...ologie de chauffe Foyers et zone de cuisson induction Diam tre des foyers Avant gauche 16 0 cm Arri re gauche 21 0 cm Longueur et largeur de la zone utile droite L 38 0 cm l 19 0 cm Consommation nerg...

Page 11: ...ez un bip chaque fois que la pression sur un bouton est d tect e par l appareil Veillez ce que les boutons de contr le soient toujours propres et secs et ce qu aucun objet par exemple un ustensile ou...

Page 12: ...l ustensile de cuisson convient l induction Si vous n avez pas d aimant 1 Mettez un peu d eau dans l ustensile de cuisson que vous voulez tester 2 Si ne clignote pas sur l afficheur et que l eau chau...

Page 13: ...n l g rement plus large permet de maximiser l efficacit nerg tique Si vous utilisez un ustensile de cuisson plus petit l efficacit nerg tique sera moindre qu attendu Les ustensiles de cuisson de moins...

Page 14: ...ses afficheurs affichent ou ce qui indique que la table de cuisson induction est entr e dans le mode d attente Placez un ustensile de cuisson appropri sur le foyer que vous voulez utiliser Veillez ce...

Page 15: ...ge de la puissance de chauffe tout moment pendant la cuisson Si et la puissance de chauffe clignotent alternativement sur l afficheur Cela signifie que Vous n avez pas plac d ustensile de cuisson sur...

Page 16: ...ensile de cuisson appropri n est plac sur le foyer Terminer la cuisson Touchez le bouton de s lection du foyer que vous voulez teindre teignez le foyer en touchant le curseur tactile sur V rifiez que...

Page 17: ...ture s re Il peut galement servir de fonction d conomie d nergie si vous voulez chauffer d autres ustensiles de cuisson en utilisant la chaleur r siduelle des foyers Utiliser la fonction Booster Activ...

Page 18: ...e fonction est disponible avec tous les foyers Le foyer retourne dans son r glage d origine apr s 5 minutes Si le r glage d origine de la puissance est 0 il retourne 9 apr s 5 minutes Si le r glage d...

Page 19: ...ent Comme une grande zone Pour utiliser la zone modulable comme une grande zone unique touchez simplement le bouton d di R glez la puissance de chauffe en touchant le curseur tactile Pour l utilisatio...

Page 20: ...chauffe de l appareil Comme deux zones ind pendantes Pour utiliser la zone modulable comme deux foyers diff rents deux choix de chauffe sont possibles a a Placez un ustensile de cuisson sur la partie...

Page 21: ...ns sp ciales La fonction Frire et la fonction Maintien au chaud Fonction Frire Fonction Maintien au chaud a Fonction Frire Cette fonction vous permet de frire des aliments Cette fonction n est disponi...

Page 22: ...st disponible avec tous les foyers Touchez le bouton de s lection du foyer avec lequel vous voulez utiliser la fonction Maintien au chaud Touchez le bouton de la fonction Maintien au chaud l afficheur...

Page 23: ...tous les boutons de contr le sont d sactiv s l exception du bouton marche arr t vous pouvez toujours teindre la table de cuisson en cas d urgence en actionnant le bouton marche arr t mais vous devez d...

Page 24: ...de cuisson est sous tension Remarque Vous pouvez utiliser l alerte sonore m me si vous ne s lectionnez aucun foyer Touchez le bouton du minuteur 10 s affiche sur l afficheur du minuteur et le 0 cligno...

Page 25: ...e L afficheur affiche la dur e restante La sonnerie bipe pendant 30 secondes et l afficheur du minuteur affiche quand la dur e r gl e est coul e B R gler le minuteur pour teindre un ou plusieurs foyer...

Page 26: ...seur tactile par exemple 9 le minuteur est maintenant r gl sur 95 minutes Une fois la dur e r gl e elle commence imm diatement tre d compt e L afficheur affiche la dur e restante REMARQUE Le point rou...

Page 27: ...yers simultan ment les points des foyers concern s sont affich s L afficheur du minuteur affiche la dur e en minutes le point du foyer correspondant clignote L affichage est le suivant r gl sur 15 min...

Page 28: ...outon du minuteur l afficheur clignote Touchez le curseur tactile pour r gler le minuteur sur 00 le minuteur est annul Dur es de fonctionnement par d faut Votre table de cuisson induction int gre une...

Page 29: ...sson Quand les aliments commencent bouillir baissez le r glage de temp rature Utilisez un couvercle pour r duire la dur e de GUIDE DE CUISSON Puissance 1 2 3 4 5 6 7 8 9 Dur e de fonctionnement par d...

Page 30: ...lles commencent juste remonter occasionnellement la surface du liquide de cuisson Le mijotage est essentiel pour cuisiner de d licieuses soupes et des rago ts tendres car les saveurs se d veloppent sa...

Page 31: ...ak une seule fois pendant la cuisson La dur e de cuisson exacte d pend de l paisseur du steak et du degr de cuisson d sir Les dur es peuvent varier entre 2 et 8 minutes par c t Appuyez sur le steak po...

Page 32: ...baissez le r glage de puissance du foyer remettez la viande dans la po le et ajoutez votre sauce 6 Remuez doucement les ingr dients pour qu ils soient bien cuits 7 Servez imm diatement D tection des p...

Page 33: ...le de cuisson et la quantit d ingr dients cuire Faites des tests avec la table de cuisson induction pour trouver les r glages les plus appropri s R glage de la puissance Appropri 1 2 Chauffer d licate...

Page 34: ...FR 32 FRAN AIS R glage de la puissance Appropri 7 8 Saut Cuire des p tes 9 P Saut asiatique Griller Porter une soupe bullition Bouillir de l eau...

Page 35: ...touching the controls Make sure the touch control area is dry and use the ball of your finger when touching the controls The glass is being scratched Rough edged cookware Unsuitable abrasive scourer...

Page 36: ...vers une zone froide de la table de cuisson 3 Nettoyez les salis sures ou d bordements projections avec un torchon ou du papier essuie tout 4 Effectuez les tapes 2 4 de la proc dure de nettoyage des S...

Page 37: ...per et s teindre et les boutons tactiles peuvent ne pas fonctionner s il y a du liquide sur eux Veillez essuyer la zone des boutons tactiles pour la s cher avant de remettre la table de cuisson sous t...

Page 38: ...es soit s che et touchez les avec la pulpe du doigt Le verre est ray Des ustensiles de cuisson non lisses ont t utilis s Des produits de nettoyage ou des tampons r cu rer abrasifs non appropri s ont t...

Page 39: ...e Il y a un bruit de ventilateur pro venant de la table de cuisson Le ventilateur de refroidissement int gr dans votre table de cuisson induction s est mis en marche pour viter que les composants lect...

Page 40: ...s de cuisson adapt s la cuis son induction Voir le chapitre S lectionner des ustensiles de cuisson appropri s Centrez l ustensile de cuis son et v rifiez que la taille de son fond correspond celle du...

Page 41: ...Coded erreur Probl me Solution Autodiagnostic E1 La tension de l alimentation lectrique est sup rieure la tension nominale V rifier que l alimentation lectrique est normale Une fois que l alimentatio...

Page 42: ...ur fonctionne normalement Si ce n est pas le cas le changer Pas d autodiagnostic F3 F6 Court circuit Panne du capteur de temp rature de la plaque c ramique F3 pour N 1 F6 pour N 2 Contr ler la connexi...

Page 43: ...s Panne Probl me Solution A Solution B La LED ne s al lume pas quand l appareil est bran ch Pas d alimen tation V rifier que la fiche est solidement branch e dans la prise lectrique et que la prise le...

Page 44: ...de de cuisson s allume mais l appareil ne chauffe pas La temp ra ture de la table de cuisson est lev e La temp rature ambiante est peut tre trop lev e Les entr es d air ou les sorties d air sont peut...

Page 45: ...li mentation Le diam tre de l ustensile de cuisson L appareil a surchauff L appareil a sur chauff Attendre que sa temp rature redevienne nor male Appuyer sur le bouton marche arr t pour red marrer l a...

Page 46: ...bruit anormal Le moteur du ventilateur est endommag Changer le venti lateur Les indications fournies ci dessus correspondent l valuation et l inspection des pannes communes Ne d montez pas l appareil...

Page 47: ...m S lectionnez un plan de travail dont le mat riau est isol et r sistant la chaleur le bois et les mati res similaires hygroscopiques ou fibreuses ne doivent pas tre utilis s comme mat riau de plan de...

Page 48: ...n soit bien a r e et ce que ses entr es et sorties d air ne soient pas bouch es V rifiez que la table de cuisson induction est en bon tat de fonctionnement Voir ci dessous Remarque La distance de s cu...

Page 49: ...ation il faut placer un insert en bois fix par des vis une distance minimale de 50 mm du dessous de la table de cuisson Respectez les exigences suivantes L ext rieur de la table de cuisson comporte de...

Page 50: ...tant la chaleur Si la table de cuisson est install e au dessus d un four le four doit comporter un ventilateur de refroidissement int gr L installation doit tre conforme toutes les exigences d espacem...

Page 51: ...haleur par exemple des carreaux de c ramique pour les surfaces murales entourant la table de cuisson Apr s l installation de la table de cuisson proc dez aux v rifications suivantes Le c ble d aliment...

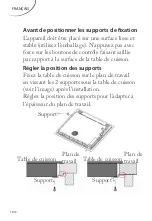
Page 52: ...aisant saillie par rapport la surface de la table de cuisson R gler la position des supports Fixez la table de cuisson sur le plan de travail en vissant les 2 supports sous la table de cuisson voir l...

Page 53: ...ectement au dessus d un lave vaisselle r frig rateur cong lateur machine laver ou s che linge car l humidit peut endommager les composants lectroniques de la table de cuisson 3 La table de cuisson ind...

Page 54: ...d alimentation correspond celle sp cifi e sur la plaque signal tique 3 Les sections du c ble d alimentation peuvent soutenir la charge sp cifi e sur la plaque signal tique Pour brancher la table de c...

Page 55: ...ils sp cialis s pour viter un accident Si l appareil est branch directement sur l alimentation secteur un disjoncteur omnipolaire doit tre install et comporter une ouverture minimale de 3 mm entre ses...

Page 56: ...able de cuisson ne sont pas accessibles apr s l installation En application de la directive DEEE 2012 19 UE concernant l environnement il est interdit d liminer les appareils lectriques ou lectronique...

Page 57: ...s appareils usag s doivent tre collect s s par ment afin d optimiser le taux de r cup ration et le recyclage des mat riaux qui les composent et r duire l impact sur la sant humaine et l environnement...

Page 58: ......

Page 59: ...regulation For a better use of your new device we recommend you to read carefully this user manual and keep it for record SAFETY INSTRUCTIONS GB 2 PRODUCT INDUCTION GB 5 OPERATION OF PRODUCT GB 8 COOK...

Page 60: ...children aged 8 years and above and persons with reduced physical sensory or mental abilities or lack of experience or knowledge on the condition that they have been supervised or have received instr...

Page 61: ...es which must be provided in the fixed wiring in accordance with installation regulations This appliance is designed to be used for domestic and similar purposes such as kitchens used by employees in...

Page 62: ...e any objects on the cooking surfaces WARNING If the surface is cracked disconnect the appliance from the power supply to prevent the risk of electric shock This appliance is not designed to be used i...

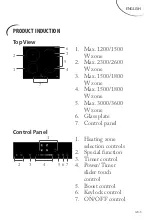
Page 63: ...0 W zone 3 Max 1500 1800 W zone 4 Max 1500 1800 W zone 5 Max 3000 3600 W zone 6 Glass plate 7 Control panel Control Panel 7 6 5 4 3 2 1 1 Heating zone selection controls 2 Special function 3 Timer con...

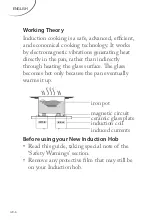
Page 64: ...he pan rather than indirectly through heating the glass surface The glass becomes hot only because the pan eventually warms it up iron pot magnetic circuit induced currents induction coil ceramic glas...

Page 65: ...a Heating technology Induction cooking zone and cooking area Diameter of cooking zone Left front 16 0 cm Left rear 21 0 cm Length and width of useful surface area right L 38 0 cm W 19 0 cm Energy cons...

Page 66: ...p each time a touch is registered Make sure the controls are always clean dry and that there is no object e g a utensil or a cloth covering them Even a thin film of water may make the controls difficu...

Page 67: ...ng materials is not suitable pure stainless steel aluminium or copper without a magnetic base glass wood porcelain ceramic and earthenware Do not use cookware with jagged edges or a curved base Make s...

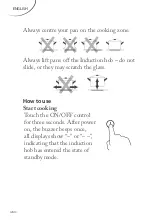
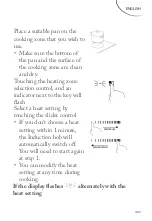
Page 68: ...pans off the Induction hob do not slide or they may scratch the glass How to use Start cooking Touch the ON OFF control for three seconds After power on the buzzer beeps once all displays show or ind...

Page 69: ...ting zone selection control and an indicator next to the key will flash Select a heat setting by touching the slider control If you don t choose a heat setting within 1 minute the Induction hob will a...

Page 70: ...ooking zone No heating takes place unless there is a suitable pan on the cooking zone The display will automatically turn off after 2 minutes if no suitable pan is placed on it Finish cooking Touching...

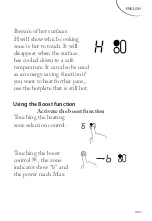
Page 71: ...ooled down to a safe temperature It can also be used as an energy saving function if you want to heat further pans use the hotplate that is still hot Using the Boost function Activate the boost functi...

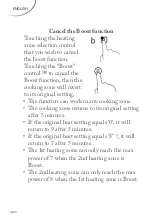
Page 72: ...ng The function can work in any cooking zone The cooking zone returns to its original setting after 5 minutes If the original heat setting equals 0 it will return to 9 after 5 minutes If the original...

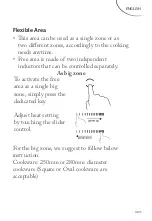
Page 73: ...made of two independent inductors that can be controlled separately As big zone To activate the free area as a single big zone simply press the dedicated key Adjust heat setting by touching the slide...

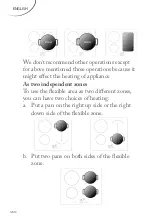
Page 74: ...ions because it might effect the heating of appliance As two independent zones To use the flexible area as two different zones you can have two choices of heating a Put a pan on the right up side or t...

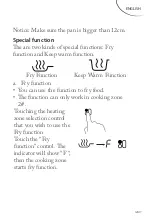
Page 75: ...d Keep warm function Fry Function Keep Warm Function a Fry function You can use the function to fry food The function can only work in cooking zone 2 Touching the heating zone selection control that y...

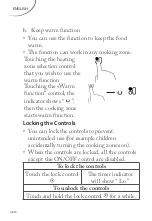
Page 76: ...ontrol the indicator shows then the cooking zone starts warm function Locking the Controls You can lock the controls to prevent unintended use for example children accidentally turning the cooking zon...

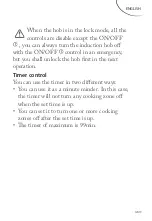
Page 77: ...ol in an emergency but you shall unlock the hob first in the next operation Timer control You can use the timer in two different ways You can use it as a minute minder In this case the timer will not...

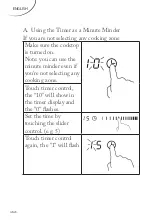
Page 78: ...one Make sure the cooktop is turned on Note you can use the minute minder even if you re not selecting any cooking zone Touch timer control the 10 will show in the timer display and the 0 flashes Set...

Page 79: ...The display will show the remaining time Buzzer will beep for 30 seconds and the timer indicator shows when the setting time finished B Setting the timer to turn one or more cooking zones off Set one...

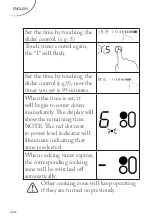
Page 80: ...is 95 minutes When the time is set it will begin to count down immediately The display will show the remaining time NOTE The red dot next to power level indicator will illuminate indicating that zone...

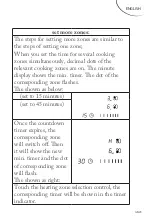
Page 81: ...e on The minute display shows the min timer The dot of the corresponding zone flashes The shown as below set to 15 minutes set to 45 minutes Once the countdown timer expires the corresponding zone wil...

Page 82: ...r control to set the timer to 00 the timer is cancelled Default working times Auto shut down is a safety protection function for your induction hob It shut down automatically if ever you forget to tur...

Page 83: ...particularly if you re using PowerBoost At extremely high temperatures oil and fat will ignite spontaneously and this presents a serious fire risk Cooking Tips When food comes to the boil reduce the t...

Page 84: ...ption method may require a setting higher than the lowest setting to ensure the food is cooked properly in the time recommended Searing steak To cook juicy flavorsome steaks 1 Stand the meat at room t...

Page 85: ...compatible flat based wok or a large frying pan 2 Have all the ingredients and equipment ready Stir frying should be quick If cooking large quantities cook the food in several smaller batches 3 Prehe...

Page 86: ...ill keep cooking down the induction hob for a further 1 minute HEAT SETTINGS The settings below are guidelines only The exact setting will depend on several factors including your cookware and the amo...

Page 87: ...ENGLISH GB 29 Heat setting Suitability 3 4 reheating rapid simmering cooking rice 5 6 pancakes 7 8 saut ing cooking pasta 9 P stir frying searing bringing soup to the boil boiling water...

Page 88: ...nd wipe dry with a clean cloth or paper towel 4 Switch the power to the cooktop back on When the power to the cooktop is switched off there will be no hot surface indication but the cooking zone may s...

Page 89: ...le and scrape the soiling or spill to a cool area of the cooktop 3 Clean the soiling or spill up with a dish cloth or paper towel 4 Follow steps 2 to 4 for Everyday soiling on glass above Remove stain...

Page 90: ...p and turn itself off and the touch controls may not function while there is liquid on them Make sure you wipe the touch control area dry before turning the cooktop back on HINTS AND TIPS Problem Poss...

Page 91: ...touching the controls Make sure the touch control area is dry and use the ball of your finger when touching the controls The glass is being scratched Rough edged cookware Unsuitable abrasive scourer...

Page 92: ...should quieten down or disappear completely when you decrease the heat setting Fan noise coming from the induction hob A cooling fan built into your induction hob has come on to prevent the electronic...

Page 93: ...se cookware suitable for induction cooking See section Choosing the right cookware Centre the pan and make sure that its base matches the size of the cooking zone The induction hob or a cooking zone h...

Page 94: ...mer using Solution Failure code Problem Solution Auto Recovery E1 Supply voltage is above the rated voltage Please inspect whether power supply is normal Power on after the power supply is normal E2 S...

Page 95: ...e short circuit F3 for 1 F6 for2 Check the connection or replace the ceramic plate temperature sensor F4 F7 Ceramic plate temperature sensor failure open circuit F4 for 1 F7 for2 F5 F8 Ceramic plate t...

Page 96: ...d tightly in outlet and that outlet is working The accessorial power board and the display board connected failure Check the connection The accessorial power board is damaged Replace the accessorial p...

Page 97: ...fan Check whether the fan runs smoothly if not replace the fan The power board is damaged Replace the power board Heating stops suddenly during operation and the display flashes u Pan Type is wrong U...

Page 98: ...failure Check the connection The display board of communicate part is damaged Replace the display board The Main board is damaged Replace the power board Fan motor sounds abnormal The fan motor is da...

Page 99: ...ness of the work surface is at least 30mm Please select heat resistant and insulated work surface material Wood and similar fibrous or hygroscopic material shall not be used as work surface material u...

Page 100: ...e the Induction cooker hob is well ventilated and the air inlet and outlet are not blocked Ensure the induction cooker hob is in good work state As shown below Note The safety distance between the hot...

Page 101: ...n insert fixed by screws at a minimum distance of 50mm from the bottom of the hob Follow the requirements below There are ventilation holes around outside of the hob YOU MUST ensure these holes are no...

Page 102: ...plicable standards and regulations A suitable isolating switch providing full disconnection from the mains power supply is incorporated in the permanent wiring mounted and positioned to comply with th...

Page 103: ...he hob If the hob is installed above a drawer or cupboard space a thermal protection barrier is installed below the base of the hob The isolating switch is easily accessible by the customer Before loc...

Page 104: ...see picture Cautions 1 The induction hotplate must be installed by qualified personnel or technicians We have professionals at your service Please never conduct the operation by yourself 2 The hob wil...

Page 105: ...heat 6 A steam cleaner is not to be used Connecting the hob to the mains power supply This hob must be connected to the mains power supply only by a suitably qualified person Before connecting the ho...

Page 106: ...ether the domestic wiring system is suitable without alterations Any alterations must only be made by a qualified electrician If the cable is damaged or to be replaced the operation must be carried ou...

Page 107: ...authorised technicians only The bottom surface and the power cord of the hob are not accessible after installation In accordance with Directive DEEE 2012 19 EU concerning the environment it is forbid...

Page 108: ...appliances must be collected separately in order to optimize the recovery and recycling of the materials they contain and reduce the impact on human health and the environment The crossed out wheeled...

Page 109: ......

Page 110: ...CONFORAMA France SA 80 Boulevard du Mandinet Lognes 77432 Marne la Vall e Cedex 2 FRANCE...

Reviews: