background image

20

EnOcean wireless pushbutton panel

Push Button configuration

e-Sense Organic provides the opportunity to connect an EnOcean wall switch, which are battery-free and communicate 
wirelessly, with the Organic installation.  The wall switch panels can be configured to control the selected zone, etc., all 

parameters are set using the E-Sense Organic app for Android or iOS. 

The wall switches are available with two or four button functions. The wall switch can be configured for a selection of fun

-

ctions via the app and “EnOcean Wall Switch Setup” in the menu. Refer to the figure below as a reference for the selection 

of function and position. The NFC function in the phone or tablet is used to transfer the selected settings in the app. This 
requires the phone or tablet to be held with the back against the panel so that the transfer can be performed securely. The 
app indicates when the transfer has been completed.

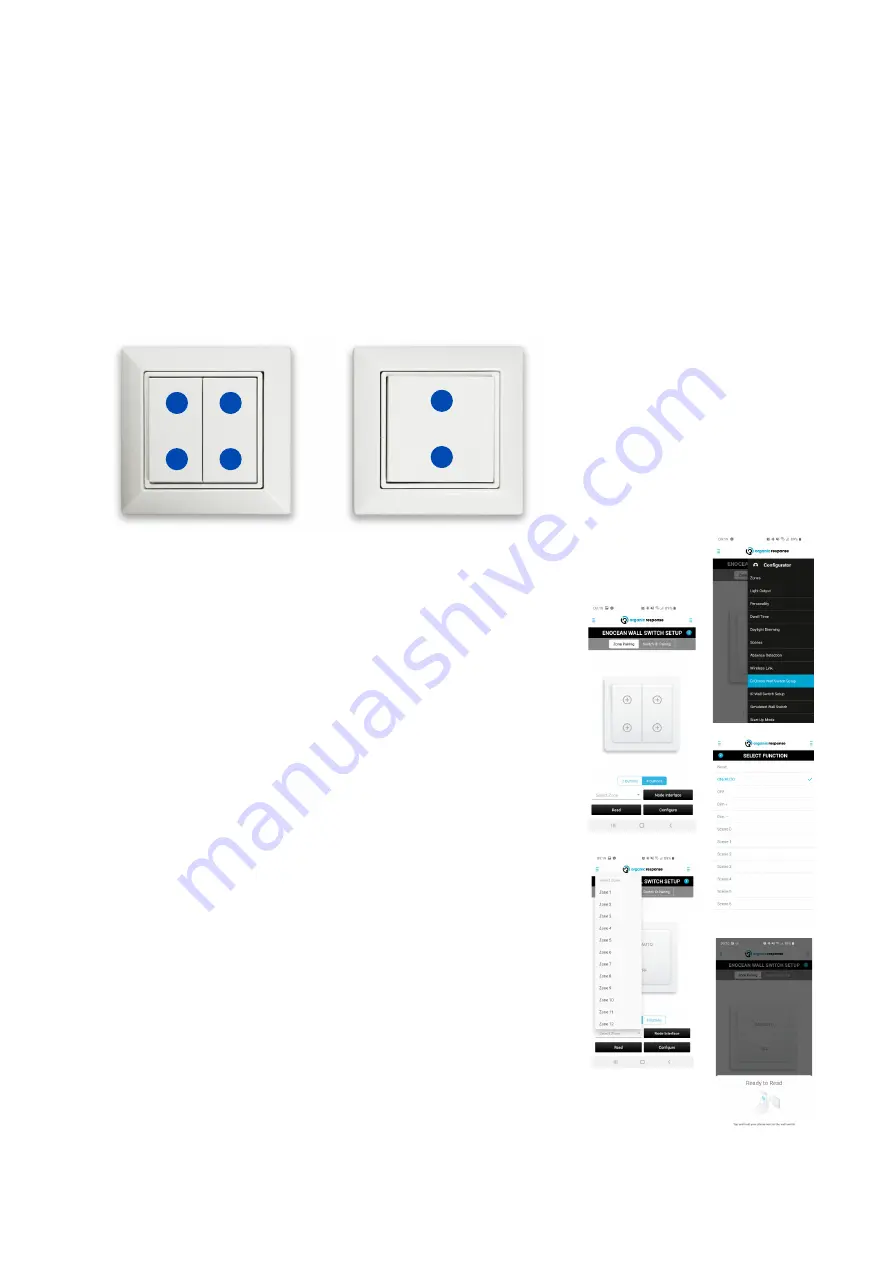
EnOcean Push Button Panel is available with 
two or four functions - (the numbers indicate 
only the position of the panel).

How to configure an EnOcean Panel:

1

3

1

2

4

2

1.  Open the Organic Response app and sign in with a “Configurator” 

approved Google- or Linkedin account. See page 4.

2.  Open “EnOcean Wall Switch" menu in the OR app.

3.  Choose ”Zone Pairing” or “Switch ID Pairing” (there’s more infor-

mation below on which settings are best suited for different application 

areas.)

4.  Select 2 or 4 button panel.

5.  Choose “Select function” from the following selection; On/Auto, Off, 
Dim up, Dim down, Scene 0 to Scene 6.

6.  For ”Zone Pairing” choose which zone the push button panel will con-
trol. The default setting on the sensor nodes are Zone 1.

7.  For “Switch ID Pairing One to One” functionality, tap the box “One to 

One Pair”

8.  Press ”Configure” and hold the back of the phone or tablet against the 
wall switch. Note that the NFC-chips placement varies between different 

manufacturers and models.

9.  Do not remove the phone or tablet until a message showing “Done” 

pops up in the app. If no message pops up, try moving the backside of the 

unit around until you’ve located the NFC-chip.

10.  After configurating a wall switch a push on any button on the wall 
switch is needed before it starts working. This first push does not affect the 

light.

Subject to change without notice. 

Version5_20200424


Summary of Contents for e-Sense Organic G3

Page 1: ...e Sense Organic G3...

Page 2: ...on 8 Temporary dimming 9 Pre programmed settings personality 10 11 Setting the time after last presence detected Dwell time 12 Daylight dimming 13 Simulating a wall panel 13 Zoning 14 Relay programmin...

Page 3: ...uminaires 1 0 3 0 meters e Sense Organic G3 The system functions immediately after power is supplied to the luminaires No programming is required during the installation stage An important and unique...

Page 4: ...tore or Google Play and includes programming assistance and links to manuals Immediately after down loading the app you sign in to your LinkedIn or Google account to access programming functions When...

Page 5: ...st PIR sensor sensitivity Change the PIR sensor s behaviour upon presence detection Auto or Manual activation Program Scenes can be reset on the touch panel Adjust functions on the touch panel Behavio...

Page 6: ...ast presence Factory setting is 10 minutes Lowlight Level The level and time for which the light will indicate that it will switch off If the light switches off completely or remains at a low level ea...

Page 7: ...ence Infrared Transmission increases or decreases the transmission strength of a sensor Sensor Node Settings option to save settings in the app for use in other installations Other Parameters setting...

Page 8: ...r will now flash once per second for 30 seconds The other sensors will have a solid red light under the PIR sensor This gives you time to ensure that all luminaires have received the information After...

Page 9: ...on After this you can relay the setting to other luminaires in the same zone they will immediately adjust to the same level as the first programmed sensor The same procedure is used for other levels W...

Page 10: ...office landscape Open Floor Saver office landscape but with fewer luminaires that switch on fully based in proximity to presence Super Saver huge saving potential in an office Corridor switches on mul...

Page 11: ...that the IR signal can be reflected to several luminaires in proximity to the presence which is why the description in the table may be considered somewhat extreme NOTE If specific parameters have bee...

Page 12: ...a or cause the luminaires to switch off This time and the time at low level prior to switch off can be set in Dwell Time in the menu The factory setting is set to 10 minutes for both of these times re...

Page 13: ...tab It gives an idea of the functions offered by the panel Setting Daylight Dimming Simulated Wall Switch Daylight dimming is an effective way to optimise energy saving For example luminaires at wind...

Page 14: ...t Remember that configuration of a zone is not relayed to other zones Zoning Zone All sensors luminaires are zoneed in Zone 1 upon delivery The Zone tab in the app allows you to rezone one luminaire a...

Page 15: ...You do not have to program all the lumin aires in Zone 1 just a few to ensure the information is correctly relayed Finish by saving the change You can also remove links with the Ignore button Note Thi...

Page 16: ...ighting farthest away will switch on This means that modern lighting require ments for office environments can be met In other words Zone X reacts to commands from all zones In this case the positioni...

Page 17: ...just the brightness of an luminaire or for the entire zone 3 Save the preferred setting 4 Test the different scenes using the Go to buttons 5 Under Scene Functions you can choose to revert to normal f...

Page 18: ...to low level then switches off now in normal operation 5 Exit times are used to automatically exit the scene value and revert to normal operation This is not contingent on presence 6 The Manual On Au...

Page 19: ...all Switch Setup from the app Press any button to wake the panel the top of the panel flashes blue when the command is sent Point the dongle at the panel and select which zone it will belong to The pa...

Page 20: ...to configure an EnOcean Panel 1 3 1 2 4 2 1 Open the Organic Response app and sign in with a Configurator approved Google or Linkedin account See page 4 2 Open EnOcean Wall Switch menu in the OR app 3...

Page 21: ...st application areas 1 Zone Pairing 2 Switch ID Pairing 3 Switch ID Pairing One to One When using Zone Pairing the EnOcean wall switch communicates to all sensor nodes in the zone within radio range a...

Page 22: ...R messages is distributed from a single sensor node the risk of a message being copied is reduced and dimming becomes more stable Because of this it s not recommended to pair more than one node within...

Page 23: ...n office area It s possible to pair more than one node within the wall switches range about 10m Since no messages is sent via IR the lighting control is very stable on the paired luminaires Note It is...

Page 24: ...here s no limitation in number of paired nodes to one wall switch The switch can only communicate with paired nodes within range of the RF around 10m Note A sensor node can be paired to a maximum of t...

Page 25: ...at when navigating to another function in the app s menu you lose the previously downloaded information 1 Press Read in the EnOcean Wall Switch Setup menu 2 Hold the back of the device against the wal...

Page 26: ...SN3 nodes do not have this function Used the Query function to see what version the node has Note Only works with iOS devices Any Sensor Node can be configured to Transmit occupancy or configuration m...

Page 27: ...Send button for either of above to be implemented while pointing the dongle towards the sensor node To configure Transmission Power press the button for the desired level while your dongle is pointed...

Page 28: ...node will flash red for approx 30 seconds If a node has poor reception it will only flash a few times In such a case it is necessary to amplify the out signal from the node sending the com mands Use...

Page 29: ...tc By increasing or decreasing the sensitivity you can avoid this type of problem Burn in Mode This function locks the system at 100 for 100 hours which is a sufficient amount of time for new fluoresc...

Page 30: ...s The function forces all sensors to maintain illumination at 100 for 90 minutes The function can only be recalled by cutting power to the luminaires After the 90 minutes the sensor reverts to normal...

Page 31: ...nction flexibility and energy saving solutions Fagerhult is part of the Fagerhult Group one of Europe s lead ing lighting groups with operations in more than 15 different countries AB Fagerhult is lis...

Reviews: