Pic. 4
Pic. 5
Pic. 6
This dimension depends
on distance B (Pic. 4)
PREPARATORY WORK WITH FIXING ACCESSORIES
First of all weld the front and rear xing brackets to the patch plates (not in the kit pack), perfectly levelled (Pic. 5).
It is advised that Nupi 66 be temporary xed to the gate, perfectly aligned, by means of clamps. Then override
the locking device and carry out a few manual cycles by opening and closing the gate to make sure the xing
geometry is correct and a proper 90° opening can so be achieved.
!
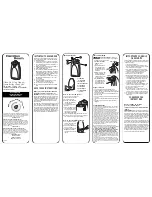
FIXING GEOMETRY WITH DISTANCES FOR THE GATES TO OPEN INWARDS
Metal patch plate to strengthen the xing point (optional). With heavy
installations it is recommended that the patch plate be adequate to the gate
type. With light gates made of aluminium sheeted panels or wood, counterplates
should be used to take the screws passing through.
90°
The actuator is to
be aligned in all
directions before
nal xing.
KIT with oil-hydraulic operators for swinging gates
up to 2,5 m per gate leaf
Shaft xing on
to the gate
Gate stop
in open
position
Gate stop in
closed position
90°
A=
130
970
Plate for xing
on to gate post
NUPI 66
13