background image

Matrix Software, cont’d

MVX Plus 128 VGA Matrix Switchers • Matrix Software

5-6

PRELIMINAR

Y

• 

To set up audio in follow mode (audio and video have the same tie 
confi guration), select the Follow box at the bottom of the window.  To set up 
audio in breakaway mode (audio and video have different tie confi gurations), 
deselect the Follow box.

• 

To make the control program easier to use, assign a device icon to each input 
and output.  Click on a box that represents an input or output, and drag the 
desired icon onto the box from the icon palette that appears.

• 

To create a tie, drag an input box to one or more output boxes.  To remove a 
tie, drag the output box to its tied input box or to the trash can.

• 

For quick display of information on a specifi c input or output device, position 
the cursor over that device in the control program window.  The program 
opens a window that details the connections to that device, the audio level, 
the RGB delay, and the frequency of the video signal input from or output to 
that device.  See the inset box in fi gure 5-4.

• 

If desired, on the task bar, click on 

Tools > IP Options

 to set the switcher’s IP 

parameters in the IP Settings/Options window (fi gure 5-5).

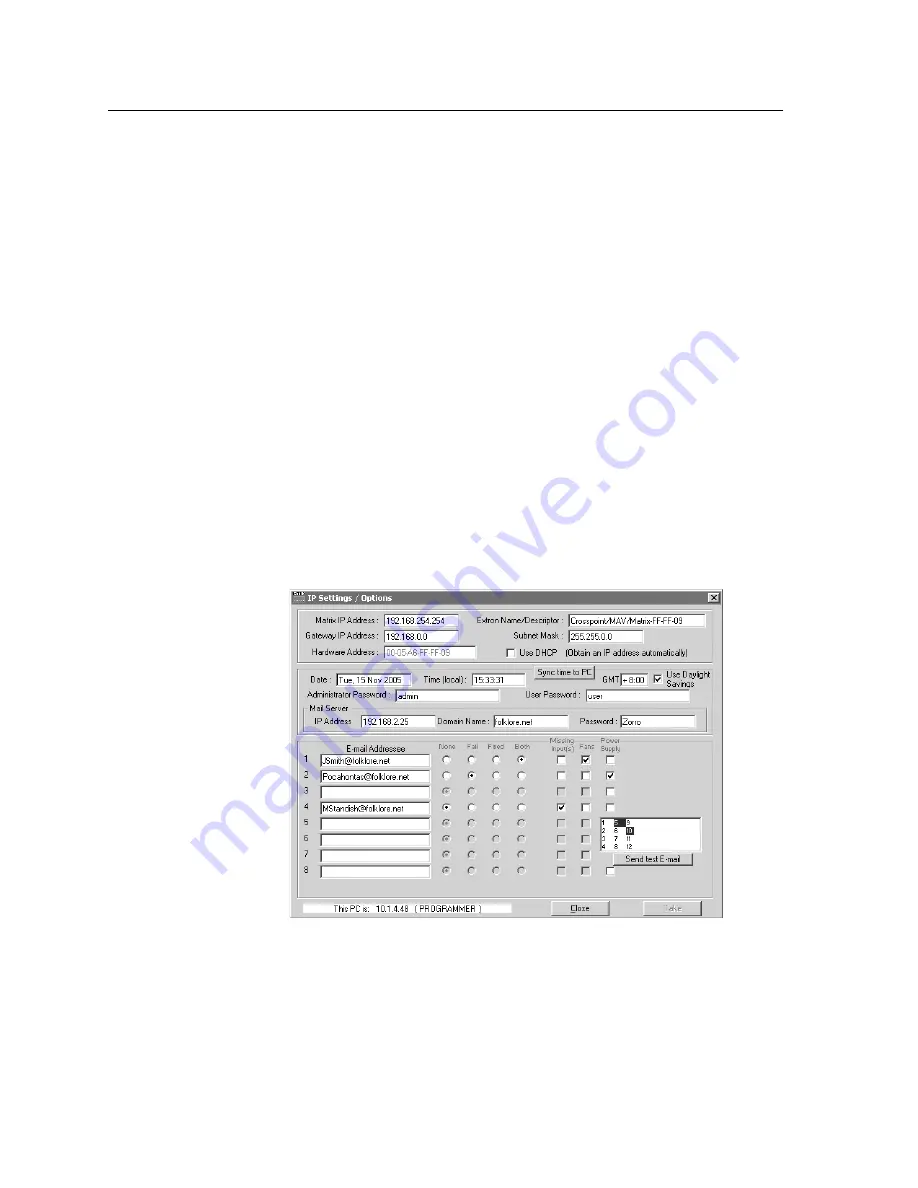
IP Settings/Options window

The IP Settings/Options window (fi gure 5-5) provides a location for viewing and,
if connected via the RS-232/RS-422 link or if you are logged on via the Ethernet 
port as an administrator, editing settings unique to the Ethernet interface.  See 
appendix A, 

Ethernet Connection

, for basic information about IP addresses.  You 

cannot edit any of the fi elds on this screen while you are logged on as a user.


Figure 5-5 — Control program IP setting/options window

N

  Editing variables on the IP Settings/Options screen while connected via the 

Ethernet port can immediately disconnect the user from the switcher.  Extron 
recommends editing the settings on this screen using the RS-232 link and 
protecting the Ethernet access to this screen by assigning an administrator’s 
password to qualifi ed and knowledgeable personnel only.

Summary of Contents for VGA MATRIX SWITCHERS MVX PLUS 128

Page 1: ...MVX Plus 128 VGA Matrix Switchers 68 521 30 Rev A 12 05...

Page 2: ...n da im Inneren des Geh uses dieses Produktes gef hrliche Spannungen die nicht isoliert sind und die einen elektrischen Schock verursachen k nnen herrschen Achtung Lesen der Anleitungen Bevor Sie das...

Page 3: ...en stored One global preset can be assigned to each input button When a global preset is retrieved from memory it becomes the current configuration Front Panel Controls Input and output buttons select...

Page 4: ...Red indicates audio only tie Green indicates the need to confirm the change PRESET PRESET PRESET PRESET Preset button blinks Press and hold 2 seconds Save a preset Recall a preset Preset button lights...

Page 5: ...ntrols 3 5 Button icons 3 6 Front Panel Operations 3 7 Power 3 7 Creating a configuration 3 7 Example 1 Creating a set of video and audio ties 3 8 Example 2 Adding a tie to a set of video and audio ti...

Page 6: ...43 Troubleshooting 3 44 Configuration Worksheets 3 44 Worksheet example 1 System equipment 3 44 Worksheet example 2 Daily configuration 3 45 Worksheet example 3 Test configuration 3 46 Configuration...

Page 7: ...5 8 Date field 5 8 Time local field 5 9 Sync Time to PC button 5 9 GMT offset field 5 9 Use Daylight Savings checkbox 5 9 Administrator Password field 5 10 User Password field 5 10 Mail Server IP Add...

Page 8: ...6 MAC Address field 6 6 Date Time Settings fields 6 7 Passwords page 6 8 Email Settings page 6 9 Mail IP Address field 6 9 Domain Name field 6 9 Email address fields 6 10 Firmware Upgrade page 6 10 Fi...

Page 9: ...and Esc key A 5 Local echo A 5 Set carriage return line feed A 5 Close A 5 Help A 5 Quit A 5 Subnetting A Primer A 6 Gateways A 6 Local and remote devices A 6 IP addresses and octets A 6 Subnet masks...

Page 10: ...Table of Contents cont d MVX Plus 128 VGA Matrix Switchers Table of Contents vi PRELIMINARY 68 521 30 A 12 05 All trademarks mentioned in this manual are the properties of their respective owners...

Page 11: ...PRELIMINARY MVX Plus 128 VGA Matrix Switchers 1 Chapter One Introduction About this Manual About the Matrix Switchers Definitions Features...

Page 12: ...vidually isolated and buffered and any input s can be switched to any one or all outputs with virtually no crosstalk or signal noise between channels INPUTS OUTP UTS RESET RS232 RS422 REMOTE LIS TE D...

Page 13: ...and or MKP 1000 remote keypad The matrix switchers are housed in rack mountable 2U high metal enclosures with mounting flanges for standard 19 racks The appropriate rack mounting kit is included with...

Page 14: ...tcher s RS 232 RS 422 or Ethernet port The frequency information can be displayed on any control system or in a Windows based control program on a local area network LAN or Internet IP connection figu...

Page 15: ...anel controller supports input and output selection I O grouping preset creation and selection RGB delay and audio gain and attenuation and volume control audio models The front panel features illumin...

Page 16: ...mode If a matrix switcher is installed in an open area where operation by unauthorized personnel may be a problem a security lockout feature can be implemented When the front panel is locked a specia...

Page 17: ...PRELIMINARY MVX Plus 128 VGA Matrix Switchers 2 Chapter Two Installation Mounting the Switcher Cabling and Rear Panel Views...

Page 18: ...harge precautions be electrically grounded when making connections Electrostatic discharge ESD can damage equipment even if you cannot feel see or hear it C Remove system power before making all conne...

Page 19: ...e high impedance 600 ohms 600 ohms 600 ohms Figure 2 2 Captive screw connector wiring for audio inputs C The captive screw audio connector can easily be inadvertently plugged partially into one recept...

Page 20: ...ch panel control or RS 232 capable PDA to the switcher via this 9 pin D connector for serial RS 232 RS 422 control figure 2 5 RS 232 Function Pin Function 1 2 3 4 5 6 7 8 9 TX RX Gnd Not used Transmit...

Page 21: ...cables and that they be properly terminated with the correct pinout Ethernet links use Category CAT 5e or CAT 6 unshielded twisted pair UTP or shielded twisted pair STP cables terminated with RJ 45 c...

Page 22: ...es four levels of reset to the matrix switcher Press and hold the button while the switcher is running or while you power up the switcher for different reset levels See Rear Panel Controls in chapter...

Page 23: ...INARY MVX Plus 128 VGA Matrix Switchers 3 Chapter Three Operation Front Panel Controls and Indicators Front Panel Operations Rear Panel Controls Optimizing the Audio Troubleshooting Configuration Work...

Page 24: ...is manual Tie An input to output connection Set of ties An input tied to two or more outputs An output can never be tied to more than one input Configuration One or more ties or one or more sets of ti...

Page 25: ...O Group mode See I O grouping on page 3 17 Select a preset See Using presets on page 3 23 Mute the output See Muting and unmuting video and or audio outputs on page 3 26 Display the audio level of the...

Page 26: ...S 422 port is set to 19200 baud in Serial Port Configuration mode See Selecting the RS 232 RS 422 protocol and baud rate on page 3 40 e View button The View button has two primary functions and eight...

Page 27: ...Port Configuration mode See Selecting the RS 232 RS 422 protocol and baud rate on page 3 40 Indicate that the RS 232 RS 422 port is set to 115200 baud in Serial Port Configuration mode See Selecting t...

Page 28: ...port in Serial Port Configuration mode See Selecting the RS 232 RS 422 protocol and baud rate on page 3 40 Indicate that the RS 232 RS 422 port is set to the RS 422 protocol in Serial Port Configurat...

Page 29: ...ntact If an error occurs during the self test the switcher locks up and does not operate If your switcher locks up on power up call the Extron S3 Sales Technical Support Hotline Creating a configurati...

Page 30: ...put and then try to select an output in a different group you cannot select the associated output button The associated input button remains lit Example 1 Creating a set of video and audio ties In the...

Page 31: ...Select the outputs N You can cancel the entire set of ties at this point by pressing and releasing the Esc button The Esc button flashes red once 5 Press and release the Enter button figure 3 7 ENTER...

Page 32: ...button lights green when selected Press the Audio button to toggle on and off The button is unlit or background illuminated when deselected Figure 3 10 Select RGBHV only 3 Press and release the input...

Page 33: ...onfiguration change The Enter button returns to unlit or background illumination Figure 3 13 Press the Enter button The current configuration figure 3 14 is now Input 5 video tied to output 1 output 3...

Page 34: ...und illuminated when deselected Press the Audio button to toggle on and off The button lights red when selected Figure 3 16 Select audio only 3 Press and release the input 5 button figure 3 17 INPUTS...

Page 35: ...t or background illumination Figure 3 19 Press the Enter button The current configuration figure 3 20 is now Video Video only models Input 5 tied to output 1 output 3 and output 8 Video and audio mode...

Page 36: ...the RGBHV button and or the Audio button 4 Select the desired input or output s whose ties you wish to view by pressing the input and output buttons N When you enter View Only mode the output buttons...

Page 37: ...O VIDEO AUDIO OUTPUTS 1 2 3 4 5 6 7 8 Until you select an input the buttons for all untied outputs light amber if no inputs are tied green if no video inputs are tied only audio is tied or red if no...

Page 38: ...t RGBHV to view audio ties only 6 Press and release the RGBHV button and the Audio button to toggle the RGBHV button on green and the Audio button either unlit or providing background illumination fig...

Page 39: ...I O grouping feature include Segregating specific video formats to prevent an input in one video format from being inadvertently applied to an output device that supports another video format figure 3...

Page 40: ...RGBHV and Audio button to exit the I O Group mode or allow the mode to time out after approximately 30 seconds N Ties between groups an input in group 1 tied to an output in group 2 can be created und...

Page 41: ...1 2 3 3 1 2 3 Press and hold the Input 1 button and Output 1 button Release the Input 1 button and Output 1 button Ungrouped input and output buttons light 2 seconds Figure 3 29 Select I O Group mode...

Page 42: ...e the input 5 through 8 and output 5 through 8 buttons figure 3 33 INPUTS 1 2 3 4 5 6 7 8 9 OUTPUTS 1 2 3 4 5 6 7 8 Press and release the Input 5 through Input 8 buttons The selected buttons light Pre...

Page 43: ...BHV button until the button begins to blink green then release the button 3 Press and release an output button to select an output Each lit input button from Input 1 through Input 10 indicates a half...

Page 44: ...Figure 3 36 Select an output 4 Press and release the Esc button once figure 3 37 to increase the RGB delay by a half second Press and release the Esc button twice more to increase the RGB delay by a...

Page 45: ...lled as the current configuration Presets can be viewed using Extron s Windows based control program See Chapter 5 Matrix Software for more details The current configuration and all presets are stored...

Page 46: ...3 Press and hold the Preset button until it blinks 2 seconds Blinking button All input buttons with assigned presets light red If you then save the configuration to a lit preset number the configurati...

Page 47: ...tion 1 Press and release the Esc button figure 3 44 C O N T R O L PRESET ENTER ESC VIEW Press the Esc button to clear all selections The button flashes once Figure 3 44 Clear all selections 2 Press an...

Page 48: ...ons or control button indications that may be on 2 Press and release the View button 3 Select video audio or both to mute or unmute by pressing the RGBHV button and or the Audio button 4 One at a time...

Page 49: ...ton lights red 3 To select both video and audio for viewing and muting if necessary press and release the RGBHV button and the Audio button figure 3 49 N This example shows the front panel indications...

Page 50: ...uted and the muted output is unmuted N If both RGBHV and audio are selected and only video is muted the output button flashes between green and amber If only audio is selected the output button flashe...

Page 51: ...15 19 18 21 21 24 VU dBu 0 3 6 9 12 15 High Audio Output Level 4 1 2 5 8 12 18 21 15 18 3 7 6 10 9 13 12 16 15 19 18 21 21 24 VU dBu 0 3 6 9 12 15 Output Level 4 1 2 5 8 12 18 21 15 18 3 7 6 10 9 13...

Page 52: ...configuration Example 10 Viewing and adjusting an input audio level In the following example an audio level is viewed and adjusted The steps show the front panel indications that result from your acti...

Page 53: ...3 4 5 6 7 8 2 1 3 4 5 6 7 8 2 1 3 4 5 6 7 8 2 1 3 4 5 6 7 8 2 1 3 4 5 6 7 8 2 1 3 4 5 6 7 8 2 1 3 4 5 6 7 8 2 1 3 4 5 6 7 8 2 1 3 4 5 6 7 8 2 1 3 4 5 6 7 8 2 1 3 4 5 6 7 8 2 1 3 4 5 6 7 8 2 1 3 4 5 6...

Page 54: ...e the input audio level by 1 dB Press and release the View button several more times figure 3 57 to decrease the input audio level by 1 dB per button push Note the output button indication changes tha...

Page 55: ...utton 3 Press and release an output button to select an output The input buttons display the volume level for the selected output As a general rule the more buttons that are lit the higher the volume...

Page 56: ...1 5 10 volume The Input 1 button begins to blink quickly Push Esc button nineteen times 10 19 1 5 38 5 volume Indicated by the Input 1 through 4 buttons lit steadily When all input buttons are lit th...

Page 57: ...3 3 Fast blink 3 Slow blink 4 4 Fast blink 4 Slow blink 45 44 32 5 34 43 42 35 5 37 41 40 38 5 40 39 38 41 5 43 37 36 44 5 46 35 34 47 5 49 33 32 50 5 52 5 Fast blink 5 Slow blink 31 53 5 30 55 29 28...

Page 58: ...utput 1 button figure 3 61 3 1 2 3 11 12 6 7 8 9 10 INPUTS 1 2 3 4 5 Press and release the Output 1 button The button lights green The input buttons display the selected output s audio volume level In...

Page 59: ...volume level In this example the green input buttons display 61 percent of the applied audio input The unlit input buttons indicate an audio volume attenuation of 26 dB 26 dB attenuation 61 volume Unl...

Page 60: ...buttons Figure 3 64 Toggle front panel lock on or off Performing a system reset from the front panel The front panel reset is identical to the EZXXX SIS command see chapter 4 Programmer s Guide A syst...

Page 61: ...mination can be turned off To toggle the background illumination on or off press and hold the Input 1 and Input 2 buttons simultaneously for approximately 2 seconds figure 3 66 1 2 3 1 2 3 Press and h...

Page 62: ...es the protocol as follows RGBHV RS 232 Audio RS 422 RS 485 In this example the port is set to RS 232 at 9600 baud Press and hold the Enter Preset View and Esc buttons Blinking button Figure 3 67 RS 2...

Page 63: ...the monitoring of events on or off if events monitoring was on this function turns it off if it was off it is turned on IP settings mode 4 reset The IP settings reset performs the following functions...

Page 64: ...with matrix sizes of 24 x 12 and above have a different appearance and do not have a rear panel Reset LED Release then immediately press and release again Release then immediately press and release a...

Page 65: ...OTE The Reset button on switchers with matrix sizes of 24 x 12 and above have a different appearance and do not have a rear panel Reset LED Figure 3 71 Hard reset Optimizing the Audio Each individual...

Page 66: ...uipment Figure 3 72 shows a worksheet for an MVX 128 in a fictional organization with the system hardware annotated Inputs 10 and 11 have no connection in this organization so they have been crossed o...

Page 67: ...nd system 1 Sound system 2 VCR VSC 500 Lobby monitor Classroom 2 VCR USP 405 Laptop RGB 202 Rack DVD USP 405 VTG 300 Input sources Output destinations Figure 3 73 Worksheet example 2 Daily configurati...

Page 68: ...to all audio systems outputs 1 2 3 4 and 8 1 2 3 4 5 6 7 8 1 2 3 4 5 6 7 8 9 10 11 12 Preset Title Video Audio Fill in the preset number and use colors or dashes etc to make connecting lines Indicate...

Page 69: ...2 3 4 5 6 7 8 1 2 3 4 5 6 7 8 9 10 11 12 Input sources Output destinations Preset Title Video Audio Fill in the preset number and use colors or dashes etc to make connecting lines Indicate if the con...

Page 70: ...Operation cont d MVX Plus 128 VGA Matrix Switchers Operation 3 48 PRELIMINARY...

Page 71: ...ammer s Guide RS 232 RS 422 Link Ethernet Link Host to Switcher Instructions Switcher Initiated Messages Switcher Error Responses Using the Command Response Tables Command Response Table for SIS Comma...

Page 72: ...X Gnd Not used Transmit data Receive data Not used Signal ground Not used Not used Not used Not used TX RX Gnd RX TX Not used Transmit data Receive data Not used Signal ground Not used Receive data Tr...

Page 73: ...ite orange 1 White orange 2 Orange 2 Orange 3 White green 3 White green 4 Blue 4 Blue 5 White blue 5 White blue 6 Green 6 Green 7 White brown 7 White brown 8 Brown 8 Brown Crossover cable Side 1 Side...

Page 74: ...system is connected using TCP IP or Telnet and the switcher is password protected This message means that the switcher requires an administrator or user level password before it will perform the comm...

Page 75: ...ror response to the host The error response codes are E01 Invalid input channel number too large E10 Invalid command E11 Invalid preset number too large E12 Invalid output number too large E13 Invalid...

Page 76: ...10 rooms each of which can consist of from 1 to 16 outputs X Mute executive mode power supply 0 off not OK 1 on OK X1 Group for I O grouping 1 through 4 groups 0 no group X1 Global preset 32 maximum...

Page 77: ...tchers Tie input X to output X audio only X X OutX InX Aud Audio breakaway Example 12 4 Out04 In12 Aud Tie input 12 video to output 4 Quick multiple tie E QX X X X Qik Example E Q3 4 3 5 3 6 Qik Tie i...

Page 78: ...ly07 Set the RGB interval for switches to output 13 to 3 5 seconds 7 x 0 5 seconds Read RGB delay EX D X1 Example E14D 05 Output 14 interval is 2 5 seconds 5 x 0 5 seconds Audio input gain and attenua...

Page 79: ...33 31 32 30 29 27 28 26 41 5 43 44 5 47 5 46 49 50 5 53 5 52 55 56 5 59 5 58 61 25 23 24 22 21 20 62 5 65 5 64 67 68 5 70 dB of attenuation Output volume 19 17 18 16 15 13 14 12 11 9 10 8 7 5 6 4 71 5...

Page 80: ...yet named the default name is Preset X1 If a room preset is saved but not yet named the default name is RmX PrstX1 Write input name EX X2 NI NmiX X2 Example E1 Podium camNI Nmi01 Podium cam Name input...

Page 81: ...eset each output position s tied input or no tied input remains unchanged unless overwritten or cleared If you do not clear the ties in a global preset number before you directly write a global preset...

Page 82: ...Exe0 Disable executive mode View lock status X X Resets Reset global presets and names EZG Zpg Clear all global presets and their names Reset one global preset EX1 ZG ZpgX1 Clear global preset X1 Rese...

Page 83: ...1 Output Response tied input input 12 tied to output 3 2 3 4 5 6 7 8 08 08 12 08 08 11 00 00 no tied input input 8 tied to output 4 13 14 15 16 09 10 11 12 outputs do not exist Vid Each position show...

Page 84: ...tory command differs depending on whether the command is sent via an RS 232 RS 422 or Telnet connection or sent via a Web browser connection View file directory RS 232 RS 422 port and Telnet EDF filen...

Page 85: ...e has a bad checksum or an invalid load indicates that firmware is not loaded Response description Ethernet protocol firmware version controller firmware version updated firmware version Example 0q Et...

Page 86: ...in passwords space and X4 Domain name Standard domain name rules apply for example nnnnn xxx com N The following characters are invalid in a domain name space and The character is acceptable only as t...

Page 87: ...ess EX3 CI IpiX3 Read IP address ECI X3 Read hardware address ECH X3 Read of open connections ECC X3 Set subnet mask EX3 CS IpsX3 Read subnet mask ECS X3 Set gateway IP address EX3 CG IpgX3 Read gatew...

Page 88: ...16 not present on this model PS Response Notify failed and fixed 3 1 1 0 0 0 0 0 1 0 0 0 0 0 0 0 0 1 01 Input 02 03 04 05 06 07 08 09 10 11 12 13 14 15 16 Power Supply E mail input 8 status Inputs no...

Page 89: ...PRELIMINARY MVX Plus 128 VGA Matrix Switchers 5 Chapter Five Matrix Software Matrix Switchers Control Program Button Label Generator Program...

Page 90: ...onfiguration of your switcher N The MVX Plus 128 switcher can support either RS 232 or RS 422 serial communication protocol and operate at 9600 19200 38400 or 115200 baud rates See Selecting the RS 23...

Page 91: ...wn at right in the Extron Electronics group or folder The Comm Port Selection window figure 5 1 appears Figure 5 1 Comm port selection window 2 Choose either the comm port that is connected to the MVX...

Page 92: ...recently used addresses Proceed to step 3b N If the local system administrators have not changed the value the factory specified default 192 168 254 254 is the correct value for this field b If the s...

Page 93: ...RY 4 The Extron Matrix Switcher Control Program window figure 5 3 and figure 5 4 appears The window displays the current configuration of the attached matrix Figure 5 3 Extron Matrix Switcher Control...

Page 94: ...o level the RGB delay and the frequency of the video signal input from or output to that device See the inset box in figure 5 4 If desired on the task bar click on Tools IP Options to set the switcher...

Page 95: ...mmediately disconnect the user from the matrix switcher Extron recommends editing this field using the RS 232 RS 422 link and protecting the Ethernet access to this screen by assigning an administrato...

Page 96: ...bnetting A Primer in Appendix A Ethernet Connection Edit this field as follows 1 Click in the Subnet Mask field The graphic cursor becomes a text cursor 2 Edit the mask as desired 3 Press the Tab key...

Page 97: ...witcher in a set time command GMT offset field The GMT field displays the amount of time in hours and minutes that the local time varies from the GMT international time reference If necessary adjust t...

Page 98: ...e Administrator Password field The graphic cursor becomes a text cursor 2 Edit the case sensitive password as desired 3 Press the Tab key on the keyboard or click in another field to exit the Administ...

Page 99: ...ail server Standard domain conventions such as nnnnn xxx com apply N The following characters are invalid in a domain name space and The character is only acceptable as the lead in to the domain name...

Page 100: ...pient Edit these fields and controls as follows 1 Click in the desired E mail Addressee field The graphic cursor becomes a text cursor 2 Edit the e mail address as desired Standard e mail address conv...

Page 101: ...ecompress the firmware file 3 Start the Matrix Switcher Control Program and connect to the MVX Plus 128 switcher See Using the software in this chapter steps 1 through 4 starting on page 5 3 N The Eth...

Page 102: ...es space and 1 Connect the PC to the MVX Plus 128 switcher via the switcher s RS 232 RS 422 port or Ethernet port 2 Start the Matrix Switcher Control Program and connect to the MVX Plus 128 switcher S...

Page 103: ...ent configuration Save as Allows the current set of ties to be saved as a preset Enter the preset number when prompted to do so Changes Take Allows you to save to file any changes made to the displaye...

Page 104: ...vel is expressed as a percentage of the input audio volume that is applied to the output 0 is full attenuation audio is silent 100 is full volume View input frequencies DSVP Displays the input horizon...

Page 105: ...Room configuration Allows you to assign outputs to rooms or delete outputs from rooms N A Room is a subset of outputs that are logically related to each other as determined by the operator The MVX Pl...

Page 106: ...d update the display whenever you make a configuration change set this option to On demand or by refresh Limit ties to same group Allows you to limit the creation of ties using the program to inputs a...

Page 107: ...es a blank setup to get you started 4 Enter the file name under which you want to save any changes to the file and click OK 5 Select the number of video boards audio boards and matrix model for which...

Page 108: ...the C BUTTONS directory if installed as a stand alone program The Button Label Generator icon is placed in the Extron Electronics group or folder Using the software 1 To run the Button Label Generator...

Page 109: ...LIMINARY MVX Plus 128 VGA Matrix Switchers 6 Chapter 6 HTML Operation Download the Startup Page System Status Page System Configuration Page File Management Page Set and View Ties Page Special Charact...

Page 110: ...Address field 3 Enter the Matrix IP address in the browser s Address field N If the local system administrators have not changed the value the factory specified default 192 168 254 254 is the correct...

Page 111: ...ry installed default startup page nortxe_index html figure 6 2 also known as the System Status page System Status Page The System Status page figure 6 2 provides an overall view of the status of the m...

Page 112: ...NARY DSVP page You can view a snapshot in time of the input frequencies of connected inputs on the Digital Sync Validation Processing DSVP page figure 6 3 Click the DSVP link to the left of the Status...

Page 113: ...elect Passwords Refresh Select Firmware Upgrade Select Email Settings Figure 6 4 System Configuration page On password protected connections there are two levels of protection administrator and user A...

Page 114: ...d switcher This value is encoded in the switcher s flash memory Valid IP addresses consist of four 1 2 or 3 digit numeric octets separated by dots periods Each field can be numbered from 000 through 2...

Page 115: ...ting the time set the local time The Zone variable allows you to then enter the offset from Greenwich Mean Time GMT N The Zone field identifies the standard time zone selected and displays the amount...

Page 116: ...upper case and lower case alphanumeric characters Each password must be entered twice once in the Password field and then again in the Re enter Password field Characters in these fields are masked by...

Page 117: ...gure 6 7 Email Settings page Mail IP Address field The Mail IP Address field displays the IP address and the domain name of the mail server that handles the e mail for the facility in which the MVX 12...

Page 118: ...nnel from the e mail list when they are unavailable such as on travel or vacation Deleting an e mail addressee and clicking the submit button removes the recipient from e mail notification completely...

Page 119: ...iginal factory installed firmware is permanently available on the MVX 128 switcher If the attempted firmware upload fails for any reason the switcher automatically reverts to the factory installed fir...

Page 120: ...e ties on the Set and View Ties page figure 6 10 Access the Set and View Ties page by clicking the Control tab Refresh Select Global Presets Select RGB Audio Settings Figure 6 10 Set and View Ties pag...

Page 121: ...and output associated with a specific button let the mouse rest over one of the tie buttons for a moment A field pops up as shown on figure 6 10 that identifies the input and output for that button N...

Page 122: ...level setting as follows 1 Click the Input drop box A drop down scroll box appears figure 6 12 Figure 6 12 Input selection drop box 2 Click and drag the slider or click on the scroll up button or the...

Page 123: ...utton or the scroll down button until the desired output is visible 3 Click the desired output 4 Click the Video Audio or Follow button to select video audio or both for muting or unmuting Each mouse...

Page 124: ...Change the RGB delay as follows 1 Click the Output drop box A drop down scroll box appears figure 6 16 Figure 6 16 Output selection drop box 2 Click and drag the slider or click on the scroll up butt...

Page 125: ...ut s audio level setting as follows 1 Click the output drop box A drop down scroll box appears figure 6 18 Figure 6 18 Output selection drop box 2 Click and drag the slider or click the scroll up butt...

Page 126: ...35 36 34 33 31 32 30 29 27 28 26 41 5 43 44 5 47 5 46 49 50 5 53 5 52 55 56 5 59 5 58 61 25 23 24 22 21 20 62 5 65 5 64 67 68 5 70 dB of attenuation Output volume 19 17 18 16 15 13 14 12 11 9 10 8 7 5...

Page 127: ...e a new preset click one of the unassigned buttons Overwrite an existing preset by clicking an already existing preset 3 If desired type over the current name in the box adjacent to the Save Preset bu...

Page 128: ...pecial Characters The HTML language reserves certain characters for specific functions The switcher does not accept these characters as part of preset names the switcher s name passwords or locally cr...

Page 129: ...PRELIMINARY MVX Plus 128 VGA Matrix Switchers A Appendix A Ethernet Connection Ethernet Link Subnetting A Primer...

Page 130: ...wisted Pairs Side 1 Side 2 Pin Wire color Pin Wire color 1 White orange 1 White orange 2 Orange 2 Orange 3 White green 3 White green 4 Blue 4 Blue 5 White blue 5 White blue 6 Green 6 Green 7 White bro...

Page 131: ...54 254 Pinging 192 168 254 254 with 32 bytes of data Reply from 192 168 254 254 bytes 32 time 10ms TTL 128 Reply from 192 168 254 254 bytes 32 time 10ms TTL 128 Reply from 192 168 254 254 bytes 32 tim...

Page 132: ...us 128 switcher via Telnet Open Connect to the MVX Plus 128 switcher using the Open command Once you are connected to the switcher you can enter the SIS commands the same as you would if you were usin...

Page 133: ...1 is the SIS command and In1 Out1 All is the response With local echo turned on all keystrokes are displayed even those that should be masked such as the password entry For example when entering a pa...

Page 134: ...see IP Settings Options window in chapter 5 Matrix Software and Email Settings page in chapter 6 HTML Operation When you are setting up the variables for e mail notification which may include subnetti...

Page 135: ...ntains the value 0 the related octets of the local device s and remote device s IP addresses are masked Masked octets are not compared indicated by X in figure A 6 If the unmasked octets of the two IP...

Page 136: ...Ethernet Connection cont d MVX Plus 128 VGA Matrix Switchers Ethernet Connection A 8 PRELIMINARY...

Page 137: ...PRELIMINARY MVX Plus 128 VGA Matrix Switchers B Appendix B Specifications Part Numbers Accessories Specifications Part Numbers and Accessories Button Labels...

Page 138: ...MHz DC offset max allowable 1 5 V Video output Number signal type 8 RGBHV RGBS RGsB HDTV component video component video S video composite video follows input type Connectors 8 female 15 pin HD Nomina...

Page 139: ...utput Number signal type 8 stereo balanced unbalanced Connectors 8 3 5 mm captive screw connectors 5 pole Impedance 50 ohms unbalanced 100 ohms balanced Gain error 0 1 dB channel to channel Maximum le...

Page 140: ...with included brackets Enclosure type Metal Enclosure dimensions 3 5 H x 19 0 W x 9 4 D 2U high full rack wide 8 9 cm H x 48 3 cm W x 23 9 cm D Depth excludes connectors Width includes rack ears Prod...

Page 141: ...Matrix Switchers Control Program and Button Label Generator Accessories These items can be ordered separately Adapters power supplies labels Part number MKP 1000 remote keypad Gray 60 239 01 Black 60...

Page 142: ...26 112 38 VGA 35 MHR 35 10 6 m 26 112 27 VGA 50 MHR 50 15 2 m 26 112 02 VGA 75 MHR 75 22 8 m 26 112 03 VGA 100 MHR 100 30 4 m 26 112 04 Male to male VGA molded connector cables Part number VGA M3 MHR...

Page 143: ...procedure to install new labels in the matrix switcher s front panel buttons 1 Make new labels using either the blanks on page B 9 or the Button Label Generator software Cut them out 2 Remove the butt...

Page 144: ...Specifications Part Numbers Accessories cont d MVX Plus 128 VGA Matrix Switchers Specifications Part Numbers Accessories B 8 PRELIMINARY...

Page 145: ...B 9 MVX Plus 128 VGA Matrix Switchers Specifications Part Numbers Accessories PRELIMINARY Button label blanks...

Page 146: ...Specifications Part Numbers Accessories cont d MVX Plus 128 VGA Matrix Switchers Specifications Part Numbers Accessories B 10 PRELIMINARY...

Page 147: ...nd Central America Extron Electronics Europe Extron Electronics Beeldschermweg 6C 1001 East Ball Road 3821 AH Amersfoort Anaheim CA 92805 USA The Netherlands Asia Japan Extron Electronics Asia Extron...

Page 148: ...sfoort The Netherlands 31 33 453 4040 Fax 31 33 453 4050 Extron Electronics Asia 135 Joo Seng Road 04 01 PM Industrial Building Singapore 368363 65 6383 4400 Fax 65 6383 4664 Extron Electronics Japan...

Reviews: