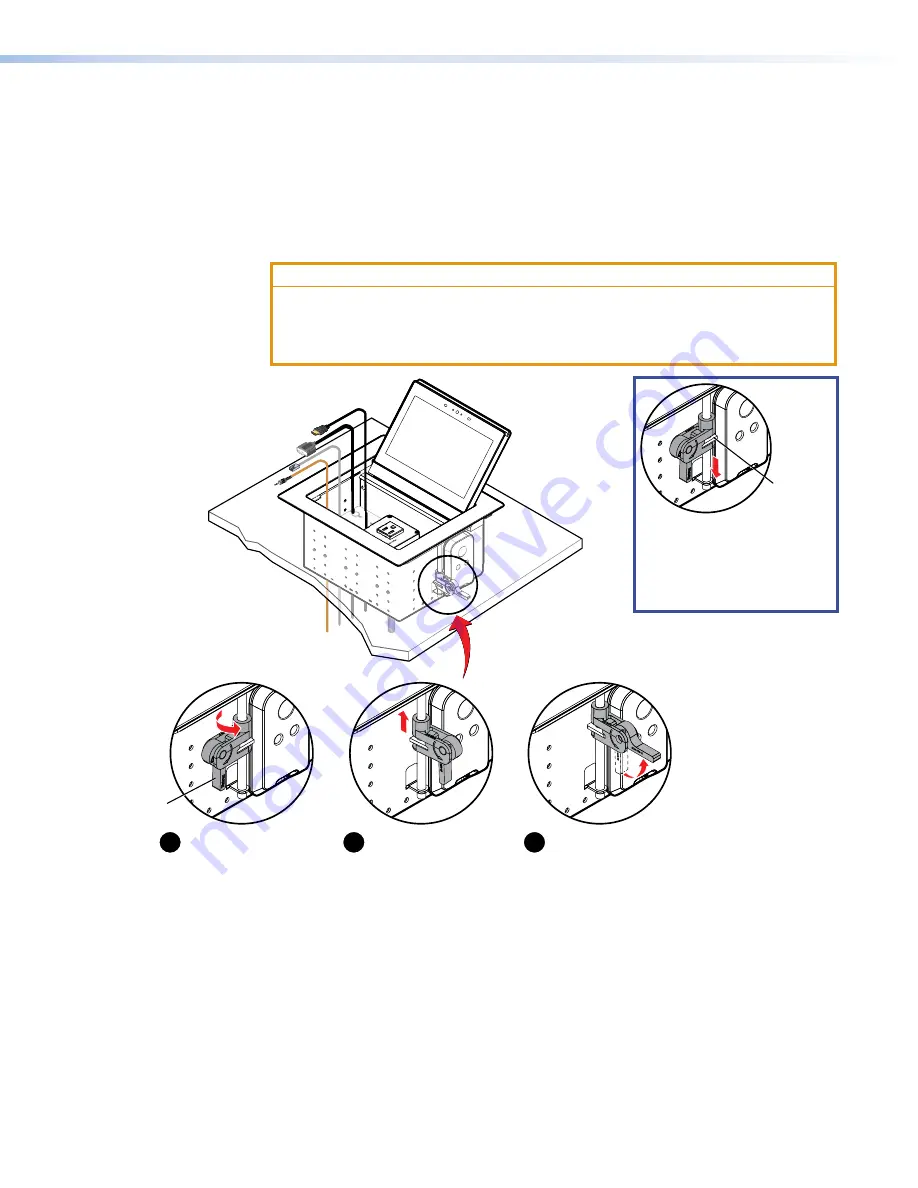
Mounting the TLP Pro 725C Enclosure
1.
Once the enclosure is permanently mounted, the
Menu
button (see
figure 13
,
E
, on
page 17) and the LAN/PoE port (
A
) are under the table and may be difficult to access.
Before mounting the touchpanel, you should use the setup menu to configure the
touchpanel (see
Setup Menu
on page 19) and connect an Ethernet cable to the
LAN/PoE port (see
figure 14
on page 18).
2.
Remove the edge grommet protecting the edges of the trim ring and the plastic film on the
finished surfaces.
ATTENTION:
•
Do not use isopropyl alcohol or other solvents to clean the Cable Cubby. Strong
solvents will ruin some finishes.
•
Ne pas utiliser de l’alcool isoproprylique ou d’autres solvants pour nettoyer le
Cable Cubby. Les solvants forts endommageront certaines finitions.
e
e
e
25V~
12A MAX
TOT
AL
21
-5
26
-0
1
21-52
5-01L
F
21-5
26-0
1LF
Rotate the clamp
outward and ensure that
the lever is down.
Slide the clamp all the
way up against the bottom
of the table.
Ensure the TLP Pro 725C
is firmly seated in the table.
Rotate the lever up to
secure the enclosure.
2
1
3
Lever
Figure 10.
Mounting the TLP Pro 725C Enclosure
Locking
Plate
NOTE:
To lower the side
clamp, turn the lever down,
then press and hold the
locking plate while sliding
down the clamp.
1.
Rotate the side clamps so that they are flush with the body of the enclosure.
2.
Carefully lower the enclosure into the hole cut in the table (see
Cutting the Table
on
page 9). Ensure the trim ring is flush with the top of the table.
3.
Once the enclosure is in position, rotate the side clamps outward (one on each side). Ensure
the lever is pointing down (see figure 11,
1
).
4.
Slide the side clamps up until they are firmly against the bottom of the table (
2
).
5.
With the enclosure firmly seated, rotate the levers up to secure the TLP Pro 725C in place
on both sides (
3
).
6.
Use cable ties (not provided) to secure cables under the table to prevent them from
becoming tangled.
TLP Pro 725C Series Touchpanels • Mounting
14


