ShareLink 200 N • Using the Embedded Web Pages
29
OSD Setup
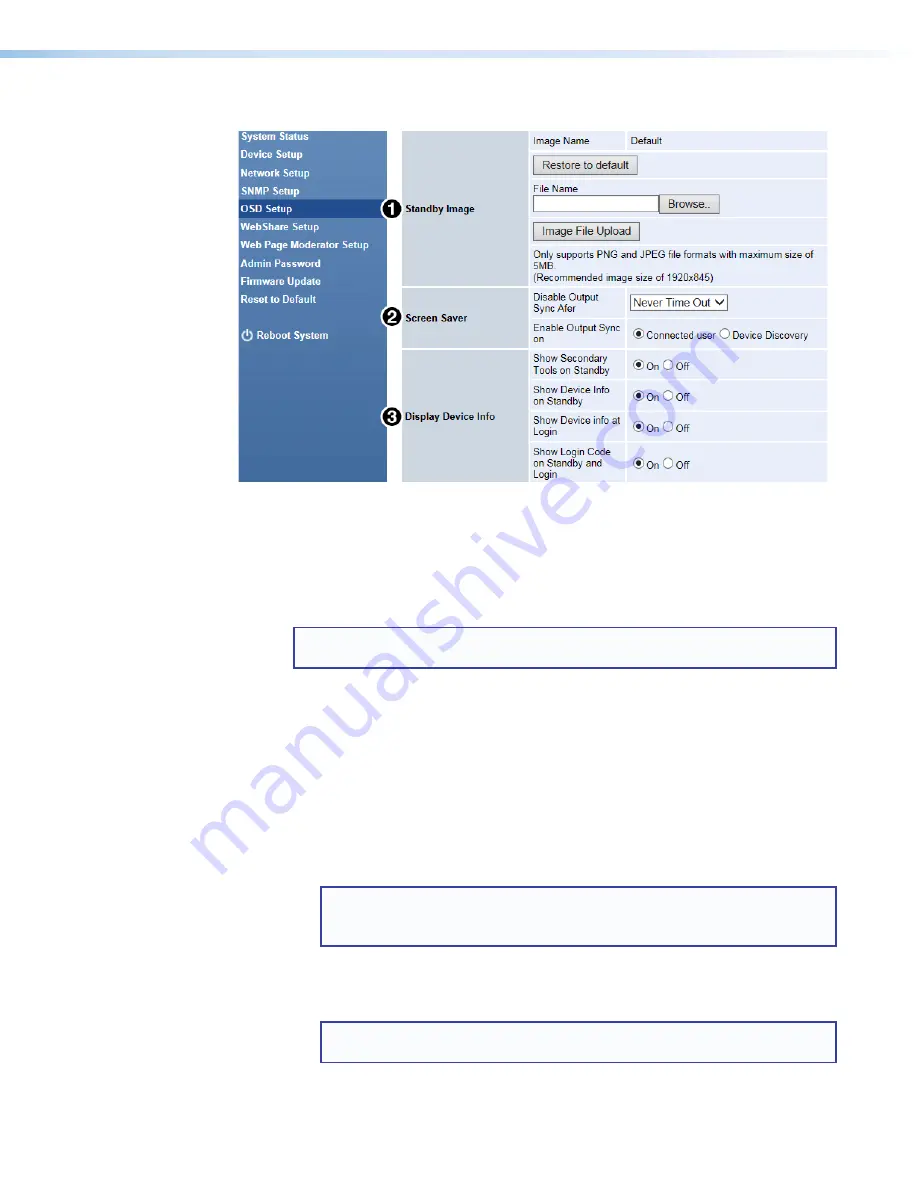
Figure 23.
OSD Setup
1
Standby Image
— Use this section to change the standby screen background image
, page 6).
•
Restore to default
: Click to restore default standby screen image.
•
Image File Upload
: Click
Browse
to select the image file for the standby screen,
then click
Image File Upload
.
NOTE:
The image file can be JPEG or PNG format with a maximum size of
5 MB and recommended resolution of 1920x845.
2
Screen Saver
— The screen saver feature is useful for displays with power saving
capability. This feature disables the video (HDMI and VGA) outputs of the ShareLink after a
specified amount of time, allowing the display to go into power save mode (if applicable).
•
Disable Output Sync After
: Click the drop-down menu and select the timeout
period. The video outputs are disabled after the specified timeout period, if there is no
activity on the ShareLink.
•
Enable Output Sync on
: Select one of these two options for re-enabling the video
outputs:
•
Connected user
: With this option, users must open the ShareLink software
and enter the IP address and login code in order to enable the video outputs.
NOTE:
Since the output is timed out, the login code will not be visible on the
display. If using the
Connected user
option, disable the login code
or
ensure that users know the code so they can connect to the ShareLink.
•
Device Discovery
: With this option, the video outputs are automatically
enabled when the ShareLink software is opened and the ShareLink device is
discovered.
NOTE:
If there are multiple ShareLink devices on the network, all of their
video outputs are automatically enabled upon device discovery.
PRELIMINARY
Summary of Contents for ShareLink 200 N
Page 6: ...PRELIMINARY ...


