background image

3-23

FPC 5000 Front Panel Controller • Matrix 12800 Operation

Status screen, BME area

The BME area of the Status screen shows more detailed status for a specific,
selected, BME.  BME 0 is the default display.  To select another BME for display,
touch the gray BME button in the System area.  

  Selecting another BME

does not update the System status area, it only changes the focus of the BME area.
The BME area provides additional information for that BME, including the physical
size of the selected BME and the number of and status of individual input cards,
output cards, power supplies, controllers, and fans.

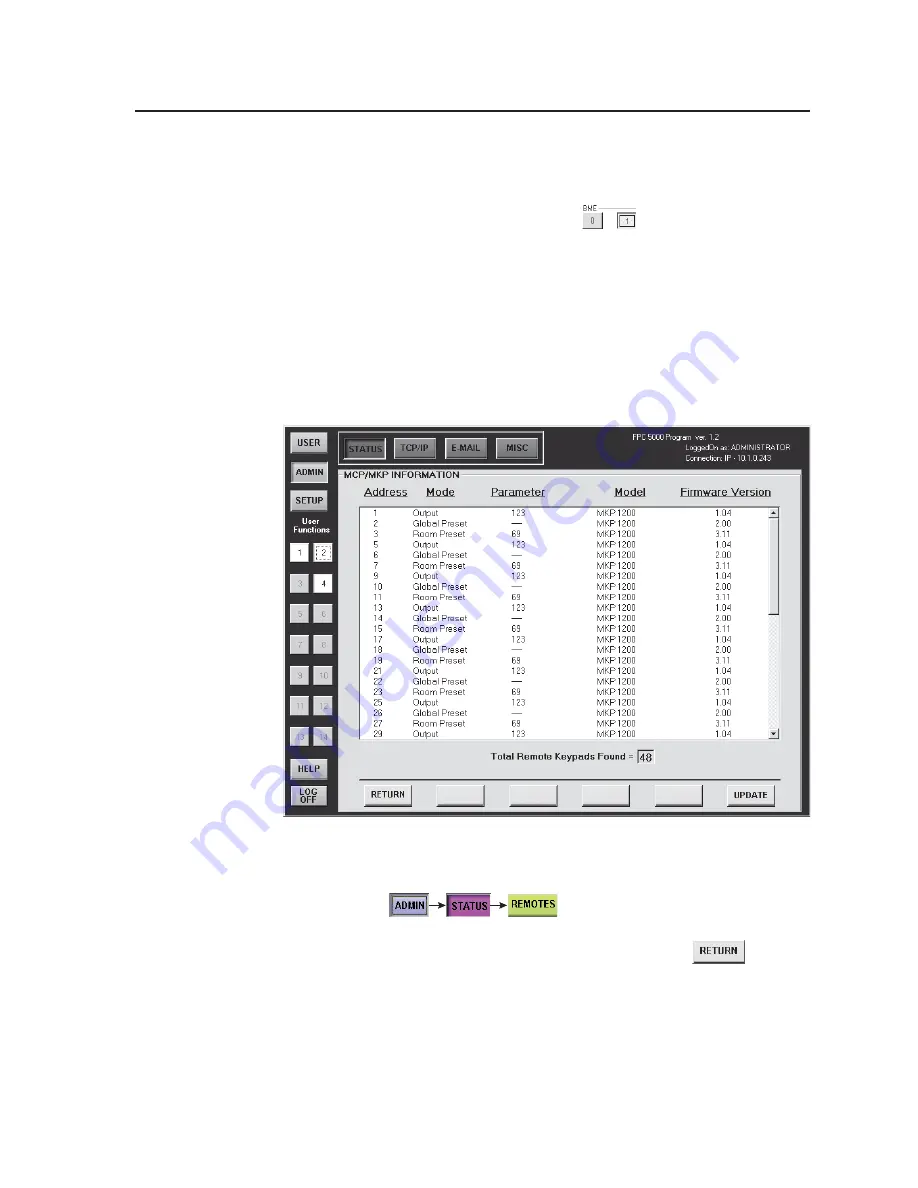
Remotes screen

The Remotes screen (figure 3-14) is a reference screen only, with no active functions.
The screen shows the status of all possible MKP 1200 Remote Keypads.
Information displayed includes: address, mode, parameter, model and firmware
version.

Figure 3-14 — Remotes screen

Access the Remotes screen by touching the blue 

Admin

 > purple 

Status

 > green

Remotes

 buttons. 

  Update the Remotes screen to display

the latest remote keypad configuration by touching the green 

Update

 button.

Return to the Status screen by touching the green 

Return

 button.  

Summary of Contents for FPC 5000

Page 1: ...FPC 5000 Matrix 12800 Switcher Front Panel Controller 68 556 05 Rev A Printed in the USA 05 03...

Page 2: ...n da im Inneren des Geh uses dieses Produktes gef hrliche Spannungen die nicht isoliert sind und die einen elektrischen Schock verursachen k nnen herrschen Achtung Lesen der Anleitungen Bevor Sie das...

Page 3: ...2800 Operation 3 1 Introduction 3 2 Operating the Touch Panel 3 2 Using the keyboards 3 2 Using the keypads 3 3 Using the on screen scroll boxes 3 3 Starting Up the Controller and Logging In and Out 3...

Page 4: ...ield 3 26 E Mail screen 3 26 Mail Server IP Address field 3 27 Mail Server E Mail User Name field 3 27 Mail Server Password field 3 27 E mail Addressee fields 3 27 Miscellaneous screen 3 28 File Manag...

Page 5: ...FPC 5000 Front Panel Controller 1 Chapter One Introduction About the Front Panel Controller About the Matrix 12800 System Definitions of Matrix Switcher Terms...

Page 6: ...f the matrix including configuration of the inputs and outputs and control of additional system features MATRIX SWICHER CONTROLLER RESET PWR HDD T R FPC 5000 Figure 1 1 Front panel controller The FPC...

Page 7: ...Hz FUSE 250V 5 0A T PRIMARY AC POWER INPUT POWER SUPPLIES CPU STATUS LISTED 1T23 I T E BME PRIMARY REDUNDANT CAUTION For protection against risk of fire replace only with same type and rating of fuse...

Page 8: ...LAN Definitions of Matrix Switcher Terms The following terms apply to Extron matrix switchers and are used throughout this manual Tie An input to output connection Set of ties An input tied to two or...

Page 9: ...2 Chapter Two FPC Installation and Operation Installation Overview Unpacking and Assembling the Front Panel Controller Rack Mounting the FPC Assembly Rear Panel Connections Front Panel Features and O...

Page 10: ...rom all of the BMEs 2 Secure the FPC computer to the FPC mounting panel See Unpacking and Assembling the Front Panel Controller in this chapter 3 Rack mount the front panel controller See Rack Mountin...

Page 11: ...k or other 1 high object under the computer to support it as it nests in the panel 4 With the tabs up angle one of the included mounting blocks and insert the block s two tabs into the slots on one co...

Page 12: ...he rack mounting panel Move the panel as necessary to ensure that the four screws contact the panel in the inset holes figure 2 3 CAUTION Do not overtighten the screws The screws may bend if overtight...

Page 13: ...e rack 2 Secure the controller assembly to the rack using the supplied machine screws Rear Panel Connections All connectors are on the rear of the FPC 5000 figure 2 5 EXT FDD MOUSE K B NET PRN AC 100V...

Page 14: ...IDEBAND VIDEO Figure 2 6 Connecting the FPC directly to a switcher BME For Ethernet connection to the Matrix 12800 system Plug the RJ 45 connector on the opposite end of the CAT 5e or higher cable int...

Page 15: ...ch Toggle the power switch to the on position After approximately 2 minutes observe that the LCD touch panel displays the FPC start up screen figure 2 8 See chapter 3 Matrix 12800 Operation for using...

Page 16: ...can occur The cable must be properly terminated for your application figure 2 9 Crossover cable Direct connection between the FPC and BME 0 Patch straight cable Connection of the FPC to an Ethernet LA...

Page 17: ...D panel displays front panel controller screens The touch panel responds to selections that the operator makes by touching the screen 2 Power indicator Lights to indicate power is connected and the FP...

Page 18: ...d Out in chapter 3 Matrix 12800 Operation 2 On the front panel LCD touch the blue Admin button 3 On the front panel LCD touch the purple Misc button 4 On the front panel LCD touch the gray Re Install...

Page 19: ...tray 7 On the rear of the FPC gently push the CD tray back into the FPC computer until it locks in place 8 On the front panel touch on the gray OK button 9 Follow the on screen instructions 10 When th...

Page 20: ...FPC Installation and Operation cont d FPC 5000 Front Panel Controller FPC Installation and Operation 2 12...

Page 21: ...ller 3 Chapter Three Matrix 12800 Operation Introduction Operating the Touch Panel Starting Up the Controller and Logging In and Out Demo Mode Navigating the Screens User Screens Admin Screens Setup S...

Page 22: ...strator privileges Fields and functions that exceed user privileges are inaccessible to users from the FPC Operating the Touch Panel Several of the FPC front panel operations require data entry and or...

Page 23: ...igits For the I O keypad the blue All key appears on the output keypad only on the Make Ties screen For the TCP IP keypad touching the Delete key clears the digits from right to left touching the Ente...

Page 24: ...utes the LCD touch panel displays the FPC startup screen figure 3 4 Observe the message NOT Logged On in the upper right corner of the blue field Figure 3 4 Startup screen The FPC 5000 LCD has an opti...

Page 25: ...ouch to change FPC s IP address network config banner in the IP Connection screen figure 3 5 The FPC 5000 TCP IP Properties screen appears figure 3 6 Figure 3 6 FPC 5000 TCP IP Properties screen On th...

Page 26: ...IP values If you touch the Cancel button proceed to step 6 m If you touched the OK button in step 5l a reboot warning screen appears If you touch the OK button the FPC computer will reboot Touch the O...

Page 27: ...emo Mode Demo mode has two functions When the FPC is connected and logged on to a Matrix 12800 system demo mode expands the configuration of the system as viewed from the FPC 5000 Demo mode adds dummy...

Page 28: ...s Adminstration Screens Setup Screens View Input Ties by Output Screen View Output Ties by Input Screen View Output Ties Alternate Screen View Input Ties Alternate Screen Make Ties Alternate Screen Gl...

Page 29: ...tion Screens Setup Screens Audio Screen Reset Screen User Screens Adminstration Screens Setup Screens Status Screen TCP IP Screen E mail Screen Miscellaneous Screen User Screens See figure 3 7a Delay...

Page 30: ...the DSVP screen I O screens There are six I O screens four for viewing ties and two for making ties When you touch the amber I O button the FPC displays one of the View Ties screens by default The gre...

Page 31: ...by input selection screen and View Outputs on the input by output selection screen When you touch the green Change View button the output area of the screen toggles between the all ties view and the...

Page 32: ...3 8 3 Select the video and or audio format s to view by touching the desired blue Signal Type button s The first virtual output among the selected signal types is displayed in the Virtual Output field...

Page 33: ...puts tied to the selected virtual input Outputs that are not tied to that virtual input are not included in the scroll box 5 Use the input keypad or scroll through the valid inputs to select another v...

Page 34: ...group of outputs on the Make Ties alternate view screen 6 You can make ties or groups of ties individually on the fly or create a series queue of potential ties or groups of ties to switch all at onc...

Page 35: ...ween the Make Ties dual keypad screen and the Make Ties alternate view screen Creating ties using the Make Ties dual keypad screen See 5 on figure 3 8 1 Use the input keypad or scroll through the vali...

Page 36: ...switch an immediate tie or to switch all of the ties in the queue touch the green Take button Creating ties using the Make Ties alternate view screen See 6 on figure 3 8 1 Use the input keypad or scro...

Page 37: ...up to 10 room presets in each of up to 32 rooms To create room presets you must have already created rooms and assigned outputs to the rooms when you virtualized the system refer to the Matrix 12800...

Page 38: ...e name in the preset button changes to Preset nnn retrieves the configuration to be the current configuration clears the configuration information and clears the preset name Global Presets screen Room...

Page 39: ...or room preset Presets that are unassigned cannot be named Only personnel logged in as administrators can name presets See 7 and 8 on figure 3 10 Name a global or room preset as follows 1 If necessary...

Page 40: ...that virtual output on or off Or touch the green Mute All Video Unmute All Video Mute all Audio or Unmute All Audio button to toggle all video or audio mutes on or off When an output is muted the RGB...

Page 41: ...sent the DSVP screen reports a snapshot in time of the frequencies in the horizontal and vertical frequency fields Where no active sync signals are present the DSVP screen shows in the horizontal and...

Page 42: ...a different family of screens you will not need to touch the Status button Update the Status screen to display the latest status by touching the green Update button Figure 3 13 Status screen Status sc...

Page 43: ...ze of the selected BME and the number of and status of individual input cards output cards power supplies controllers and fans Remotes screen The Remotes screen figure 3 14 is a reference screen only...

Page 44: ...er to the Matrix 12800 Wideband Sync or Audio Switchers User s Manual part 68 556 01 and protecting the FPC access to this screen by assigning an Administrator s password to qualified and knowledgeabl...

Page 45: ...gged in as administrators can edit the Matrix Name field The Matrix Name field contains the name used as the from information when the Matrix 12800 e mails notification of its failed or repaired statu...

Page 46: ...ing In and Out steps 3 4 and 5 beginning on page 3 4 to change this field E Mail screen Only personnel logged in as administrators can make changes to the E Mail screen The E Mail screen figure 3 16 c...

Page 47: ...the e mail server Standard e mail address conventions such as nnnnn xxx com apply Mail Server Password field Only personnel logged in as administrators can edit the Mail Server Password field The Mai...

Page 48: ...n key programming the I O connectors the screen saver touch screen calibration and updating the software Access the Miscellaneous screen by touching the blue Admin purple Misc buttons Figure 3 17 Misc...

Page 49: ...buttons Figure 3 18 File Manager screen files shown are for example only This screen displays the contents only files cannot be uploaded or deleted To upload or delete files refer to the Matrix 12800...

Page 50: ...al to define the Matrix 12800 SIS commands For detailed information on these commands refer to the Matrix 12800 Wideband Sync or Audio Switchers User s Manual part 68 556 01 Assign SIS commands to Use...

Page 51: ...tion toggle switch and two separate SIS commands or SIS macros are defined to it the first in the associated Activate field and the second in the Deactivate field The FPC issues the first command to t...

Page 52: ...igure 3 20 I O Physical Connectors screen Access the I O Physical Connectors screen by touching the blue Admin purple Misc gray I O Physical Connections buttons Touch the green View Inputs or View Out...

Page 53: ...ons in the Calibrate routine This screen times out after 30 seconds of non operation and the FPC returns to the Miscellaneous screen Use a pencil eraser or other small soft object to touch the Calibra...

Page 54: ...ithout glitches RGB delay is also known as Triple Action Switching or video mute switching Figure 3 21 Delay screen Access the Delay screen by touching the blue Setup cyan Delay buttons The Seconds fi...

Page 55: ...Figure 3 22 Audio screen Access the Audio screen by touching the blue Setup cyan Audio buttons The Gain field displays the level of gain or attenuation in 1dB increments Inputs without audio indicate...

Page 56: ...ing the blue Setup cyan Reset buttons Only the Current Ties button and Mute Settings button function for personnel logged on as Users The following Matrix 12800 system resets are available Global pres...

Page 57: ...r 3 digit numeric subfields separated by dots periods Each subfield can be numbered from 000 through 255 Leading zeroes up to 3 digits total per subfield are optional Values of 256 and above are inval...

Page 58: ...Matrix 12800 Operation cont d FPC 5000 Front Panel Controller Matrix 12800 Operation 3 38...

Page 59: ...sed by misuse improper handling care electrical or mechanical abuse abnormal operating conditions or non Extron authorized modification to the product If it has been determined that the product is def...

Page 60: ...The Netherlands 31 33 453 4040 Fax 31 33 453 4050 Extron Electronics Asia 135 Joo Seng Road 04 01 PM Industrial Building Singapore 368363 65 6383 4400 Fax 65 6383 4664 Extron Electronics Japan Daisan...

Reviews: