background image

EXTREME HEAT SOLAR 


 3


100

l


NO PRESSURE EVACUATED TUBE SYSTEM 

1


Introduction 

Thank you for obtaining an Extreme Heat Solar (EHS) Solar water heater. 
 

WARNING: Please read the complete manual before attempting to install the Solar water heater. 
Failure to do so can cause serious injury and/or damage. 

 
All EHS solar water heaters are very efficient thermal solar systems using advanced materials to 
convert sun energy into heat energy.  
 
This manual describes the safe and correct installation procedure for EHS solar water heaters. It 
assumes the general knowledge of a registered installer and provides guidance in terms of the 
installation of the solar thermal components. Systems must be installed by qualified plumbers and 
electricians, in accordance with relevant South Africa norms and standards, National Building 
regulations, Law and Regulations, Local by-Laws, including the following: 


SANS 198 - Functional control valves and safety valves for domestic hot and cold water supply. 


SANS 10106 - The installation, maintenance, repair and replacement of domestic solar water 
heating systems, edition three. 


SANS10252 - Water supply and drainage for Buildings. Part 1 – Water supply installations for 
buildings. 


SANS 10254 - The installation, maintenance, replacement and repair of fixed electric storage 
water heating systems. 


SANS 10142 - The wiring of premises. Part 1 - Low-voltage installations. 


SANS 10400 - Parts A, B, L, XA. 


Occupational Health and Safety Act (Act 85 of 1993). 


National Buildings Regulations Act 103 of 1977. 


Water Services Act (Act N0 108 of 1977). 

 
It is the responsibility of the installer to ensure that they and their staff are familiar with and 
competent in respect of the above. Responsibility for the safe and proper installation of a system 
rests with the installer. 
The solar hot water systems referred to herein must be installed in accordance with these 
instructions, local and national plumbing regulations, municipal building codes and any other 
relevant statutory regulations. 
 
Observation of these instructions is most important and failure to do so could void the warranty. 
The connection, attachment, integration or general association of other equipment or parts which 
either directly or indirectly affect the operation or performance of the solar system could void the 
warranty. Other such equipment or parts not supplied by EHS, which may affect its 
operation/performance, must first be authorised by EHS in writing to validate the full benefits of the 
warranty. 
EHS does not accept liability or responsibility for the final fitness of water for consumption from this 
water heater, as the water quality is not affected by the system and is a function of the water supply. 
This manual has been written with the intention of ensuring that the system is correctly installed and 
that the owner/user is fully informed. 


Summary of Contents for Geyser

Page 1: ...TUBE SYSTEM Instruction manual for the safe and correct installation and maintenance of the complete No Pressure Solar Hot Water System For use by qualified personnel Applicable to the following models 100l No Pressure Evacuated Tube System May 2015 ...

Page 2: ...e 6 4 4 Roof location 6 4 5 Structural strength 6 4 6 Mounting methods 6 4 6 1 Tile roofs 6 4 6 2 Metal roofs 7 5 Installation 7 6 System commissioning 14 6 1 Installation checklist 14 7 Emergency shutdown procedure 14 8 Troubleshooting 15 9 Maintenance and cleaning 15 10 Warrantee 15 10 1 Warrantee nature 15 10 2 Date of commencement 16 10 3 Notification of claim 16 10 4 Normal intended use 16 10...

Page 3: ...SANS 10142 The wiring of premises Part 1 Low voltage installations SANS 10400 Parts A B L XA Occupational Health and Safety Act Act 85 of 1993 National Buildings Regulations Act 103 of 1977 Water Services Act Act N0 108 of 1977 It is the responsibility of the installer to ensure that they and their staff are familiar with and competent in respect of the above Responsibility for the safe and proper...

Page 4: ...o as the thermosyphon effect This process results in a very efficient solar water heating system for a wide variety of weather conditions 2 1 2 Main Tank The Solar water tank is a no pressure tank and acts as storage and circulation reservoir for the water The vacuum tubes of the solar collector enter the tank close to the bottom at an angle creating a way for the water in the vacuum tube to enter...

Page 5: ...ith water expelled from these ports 3 2 Transport and handling The following instructions should be considered when transporting and handling the solar water heater Consider the maximum weight of the solar tank and vacuum tubes Take the dimensions of the total system into consideration Do not lift the vacuum tube carton by the straps since they can break Avoid impact or mechanical forces on the va...

Page 6: ...lar heating and thermosyphon effect of the water in the vacuum tubes A collector angle of more than 45 degrees will result in less sun exposed to the collector during summer and a collector angle of less than 25 degrees will reduce the thermosyphon effect resulting in a less efficient heat transfer between the water in the vacuum tube and the water in the storage tank The collector angle can be ad...

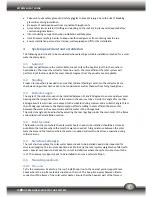
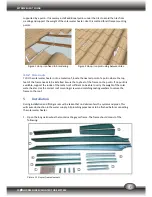
Page 7: ...he frame needs to be installed Secure the top feet of the frame on the purlin If no purlin is available support the inside of the metal roof sufficient to be able to carry the weight of the solar water heater Use the correct roof mounting screws and matching sealing washers to secure the frame to the roof 5 Installation During installation and fitting care must be taken that no debris enters the s...

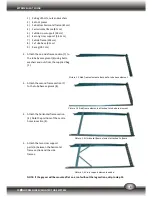
Page 8: ...and nuts from the supplied bag 1 3 Attach the second frame section 7 to the tube base segment 8 4 Attach the horizontal frame section 4 Note the positions of the centre holes in section 4 5 Attach the two cross support parts 6 between the horizontal frame section and the side frames NOTE If the geyser will be mounted flat on a roof without the leg sections skip to step 12 Picture 1 2 Side frame el...

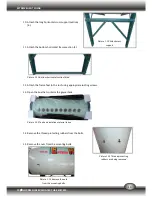
Page 9: ...6 Foot pieces attached to the legs 7 Attach the legs to the frame 8 Attach the second horizontal frame section 4 between the legs 9 Attach the side cross support sections 5 Picture 1 8 Horizontal frame element fitted Picture 1 9 Side cross support sections 5 fitted Picture 1 7 Leg segments attached to the frame ...

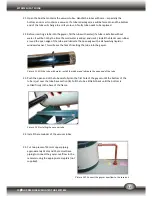
Page 10: ...ed 12 Attach the frame feet to the roof using appropriate roofing screws 13 Open the box that contains the geyser tank Picture 1 12 Tank and isolation material in box 14 Remove the thread protecting rubbers from the bolts 15 Remove the nuts from the mounting bolts Picture 1 13 Thread protecting rubbers are being removed Picture 1 14 Remove the nuts from the mounting bolts Picture 1 10 Attach cross...

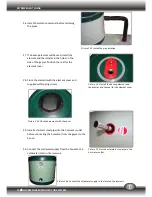
Page 11: ...alled at the cold water inlet of the geyser tank 18 Fit the rubber collar around the geyser s cold water inlet Picture 1 17 Collar installed around cold water inlet 19 Apply hem to the thread of the cold water inlet before installing the reservoir tank 20 Rotate the geyser tank until the reservoir tank is entirely vertical before fitting and tightening the four tank bolts to the frame These are lo...

Page 12: ... the open edge with a dishwashing liquid or window cleaner This will ease the task of inserting the tube into the geyser Picture 1 19 Fill the tube with water install the rubber and lubricate the open end of the tube 23 Push the open end of the tube carefully into the first hole of the geyser until the bottom of the tube is just over the tube base section 8 Pull the tube a little bit back until th...

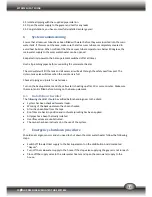
Page 13: ... the element cover and supplied self tapping screws 29 Install a stainless steel pipe into the hot water outlet before connecting the hot water from the geyser to the house 30 Connect the cold water supply from the house to the cold water inlet on the reservoir Picture 1 26 Connect the cold water supply to the inlet on the reservoir Picture 1 23 Install the backup element and thermostat and the se...

Page 14: ...hen the main tank is full Check all piping and joints for water leaks Turn on the backup element and check if water is heating up after 10 or more minutes Make sure the main tank is filled before turning on the backup element 6 1 Installation checklist The following checklist should be verified before handing over to the client System has been checked for water leaks Working of the backup element ...

Page 15: ...vy bird life is present close to where the solar water heater is installed more regular cleaning of the collector is required Maintenance that should be done once every 3 6 months Check all pipes and fittings for leaks and corrosion of the thermal isolation material Check if overflow port is properly connected to overflow pipe to avoid water from dripping on the cistern or main storage tank Inspec...

Page 16: ...ar water heater and does not apply where the solar water heater or components has been used for a different application or in a different manner 10 5 Installation of the EHS solar water heater The installation of this solar water heater needs to comply with the South African National Standards as set by the South African Burro of standards The standards may change and it is the duty of the install...

Page 17: ... temperature or neglections of any kind to the hot water unit and solar collector or their components Modifications alterations or repairs not approved by EHS or not conducted by an EHS approved installer Faulty or improper installation as described in this manual Vacuum tube glass is not covered by this warrantee Where the correct pressure valve is not installed on the cold water supply line feed...

Reviews: