background image

HPS-C - TS operating instructions 


Page 8 / 32 

Operating the system 


Introduction 

 
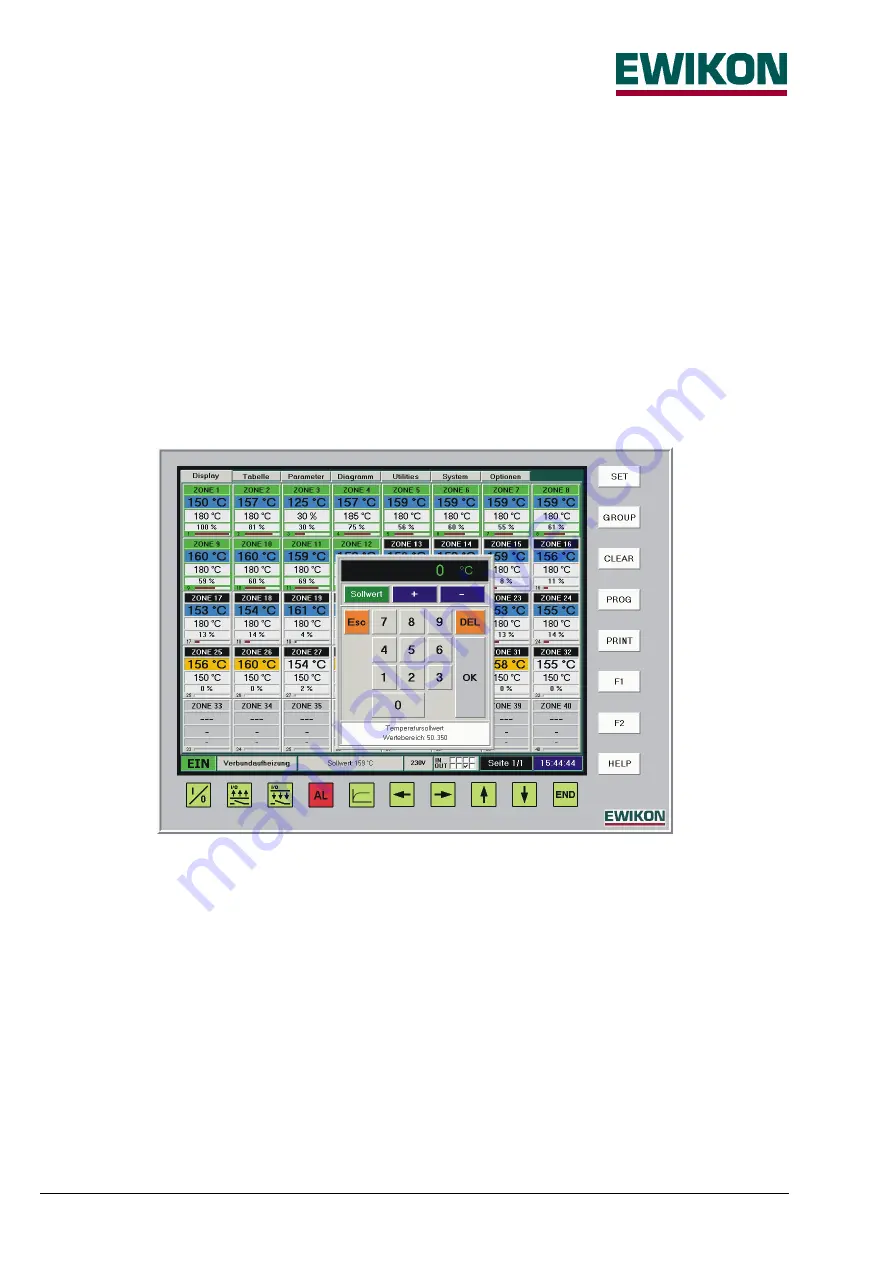
The HPS-C control system with control monitor is controlled using 26 surrounding keys and the corresponding buttons on 
the touchscreen surface. All the settings for the control system can be entered in the various menus described in detail in the 
following text. The buttons represented as tabs or the keys arranged directly above these (not shown in the figures) are used 
to switch between the menus. After starting up the system the "Display" menu is displayed in which, if the basic configuration 
is correct, all controller operations (switch on, switch off, set value changes, increase, ...) can take place. 
The following settings can be set or adjusted in the various menus; detailed explanations are given in the following chapters: 


"Display"


Operating the system, set value changes, display up to 40 zones per page as zone window 


"Table"


Operating the system, set value changes, display up to 20 zones per page in tabular form 


"Parameters"

  Basic mould setting (activate zones, operating mode, setpoint, increase and decrease values, ...) 


"Chart"  

Graphic display of the process values (temperature, output power, output current)


"Utilities"  

Image viewer for connection and wiring plans or mould drawings


"System"  

Setting/Adjusting the system parameters, system status overview, mould management


"Options" 

Password entry, special function selection, error log book, permanent data recording


To change set values, the relevant zones are selected in the "Display" and "Table" menus, after pressing the "SET" key the 
input window appears on the screen. In the other menus, immediately after "touching" the value to be changed the 
respective input window appears. Most values are entered using the number keypad and are accepted with "OK" or quit with 
"ESC". Information about which value is being changed and in which range the entry can be made appears in the lower 
information window. 
Above the number keypad there are three buttons which can be used to choose whether: 


"Set value"


the entered value is adopted as the new value  


"+ "


the entered value is added to the old value  


"- " 


the entered value is deducted from the old value  

 
The system status and other information are displayed in the bottom part of the screen: 


Hotrunner ON or OFF 

 Status 

display 

 Information 

display (e.g. ALARM) 


Operating voltage of the hotrunner system (5V, 230V or mixed operation) 


Status of each of the 4 digital signal inputs and outputs (assignment - see chapter: connector pin and terminal 
assignment) 


Information about current and total available pages per menu, page using arrow keys 


Time or date, switchover by touching the display surface 

Summary of Contents for HPS-C-TS

Page 1: ...HPS C TS Hotrunner Controllers Operating manual for multi zone controllers with Touch Screen Control Valid for all controllers with PC control item number 68010 120 from software version 1 8 0...

Page 2: ...Before putting into service the system is to be inspected in accordance with DIN EN 60204 1 11 1998 Safety of machinery electrical equipment and the generally recognised rules of sound engineering pra...

Page 3: ...ssages Extended functions after entering password Page 14 Data recording Level 1 Spare sensor Level 1 Thermocouple Level 1 Load type control parameters Level 1 Chart menu Page 16 Display Data printout...

Page 4: ...ia external contact Load error detection for short circuit interruption and partial load failure Thermocouple error detection for short circuit interruption or reverse polarity Multilingual display HP...

Page 5: ...Switch between display and setup in the chart menu 6 Cursor left Page move left 7 Cursor right Page move right 8 Cursor up Page move up 9 Cursor down Page move down 10 END Quit the program shutdown PC...

Page 6: ...r 4 zone controller module top zone 1 12 bottom zone 13 24 Zone fuse F 12 5A LEDs for status display of the modules Power mode error increase and decrease Control panel Art No 68010 300 Controller 24...

Page 7: ...uld or connection cable 5V to the front of the unit and the mould For 5V operation also connect the ground cable to the mould and the controller the assignment is described in greater detail in the ch...

Page 8: ...n and wiring plans or mould drawings System Setting Adjusting the system parameters system status overview mould management Options Password entry special function selection error log book permanent d...

Page 9: ...er zone is displayed in the single zone windows Name of the zone within the hotrunner system in order to enable faster assignment e g nozzle 1 When delivered corresponds to the zone number changes can...

Page 10: ...set value change The zone selection grouping is then individually cleared by touching the screen or is completely cancelled using the CLEAR key If necessary the grouping can be retained It is useful i...

Page 11: ...rrent 230V Maximum current through the heating conductor or input current of the 5V transformer Increase Set value for increase mode setting in the Parameters menu Decrease Set value for decrease mode...

Page 12: ...y pressing the button and setting the then available slide control Also after touching the display field an input window appears in which the zone number can be entered directly Adjusting a group of z...

Page 13: ...nt control the basic settings values set apply Set value input Depending on the operating mode the input window is opened by touching the corresponding set value field The required set value is mostly...

Page 14: ...ow appears in which data recording can be switched on or off This procedure must be separately carried out for the temperature and control values Further information about the data backup function is...

Page 15: ...ion determines size of the set power depending on the control difference Higher values mean a higher output with the same deviation lower values correspond to a smaller output The proportional compone...

Page 16: ...print window appears for selecting whether to print directly to an installed default printer or into a print file A printer with a USB connection can be set up as the default printer using the Windows...

Page 17: ...in the lower area a maximum of 10 different values are available for each diagram First the input window is opened by pressing the corresponding button then the required zone or zone number is either...

Page 18: ...a if the graphic images are larger or magnified only a part of them are displayed The Zoom in Zoom out Original size and Window size buttons can be used to adjust the graphic display to the respective...

Page 19: ...rance band deviations in order to allow the hotrunner system sufficient time to develop an adequately stable thermal condition after the heating up phase Limit values for tolerance band monitoring In...

Page 20: ...erial damage in the hotrunner system due to a continuously too high temperature level After the set time has expired increase mode is automatically discontinued if it was not previously quit manually...

Page 21: ...l mode Mould management In the Moulds menu it is possible to deposit complete settings for various hotrunner systems All set values increase and decrease values operating mode settings and the remaini...

Page 22: ...change the access code if it is too well known or known to too many people IMPORTANT In the other access levels settings can be made some of which have serious effects on the operating performance of...

Page 23: ...switch the log functions on and off These settings are kept even after a new program start The interval defines the time interval in seconds at which the data is saved The Information button is used...

Page 24: ...the following it is assumed that the reader is knowledgeable about this operating system The control PC can only be used in the Windows interface via the touchscreen therefore the options and possible...

Page 25: ...files with the saved process values if permanent data backup is active ErrLog Error files with the detected problems Help Help files which are opened when the HELP key is pressed Images Graphic diagra...

Page 26: ...range 0 50 C Control behaviour PID temperature control with adaptive parameter determination and manual optimization facility PID current control with manual optimization facility 5V operation Control...

Page 27: ...ions CPU 266MHz with 64 MB RAM 10 GByte hard disk 2 CANopen interface 2 USB ports for data exchange printer connection Ethernet connection 10 100 Windows 98 SE operating system Supply voltage 24V DC 1...

Page 28: ...the total load of the connection plug however must not exceed 0 5 A All inputs and outputs operate on the 24V DC voltage level 230 V AC signal socket Contact Use 1 230 V via unit switch 2 Fault messa...

Page 29: ...HPS C TS operating instructions Page 29 32 5V power circuits Zone Connection 1 A 2 B 3 C 4 D 5 E 6 F 7 G 8 H 9 I 10 J 11 K 12 L...

Page 30: ...up to 12 heaters Zone Contact 1 1 13 2 2 14 3 3 15 4 4 16 5 5 17 6 6 18 7 7 19 8 8 20 9 9 21 10 10 22 11 11 23 12 12 24 In controllers with a larger number of zones the other connector plugs are assig...

Page 31: ...11 4 4 12 5 5 13 6 6 14 7 7 15 8 8 16 9 17 25 10 18 26 11 19 27 12 20 28 13 21 29 14 22 30 15 23 31 16 24 32 In controllers 68010 316 and 68010 364 the connector plug is completely assigned with 16 z...

Page 32: ...Hei kanalsysteme GmbH Siegener Stra e 35 35066 Frankenberg Tel 49 64 51 50 10 Fax 49 64 51 50 12 02 E mail info ewikon com www ewikon com Item no 13805 Technical information subject to changes EWIKON...

Reviews: