background image

33 | 

P a g e


Settings 

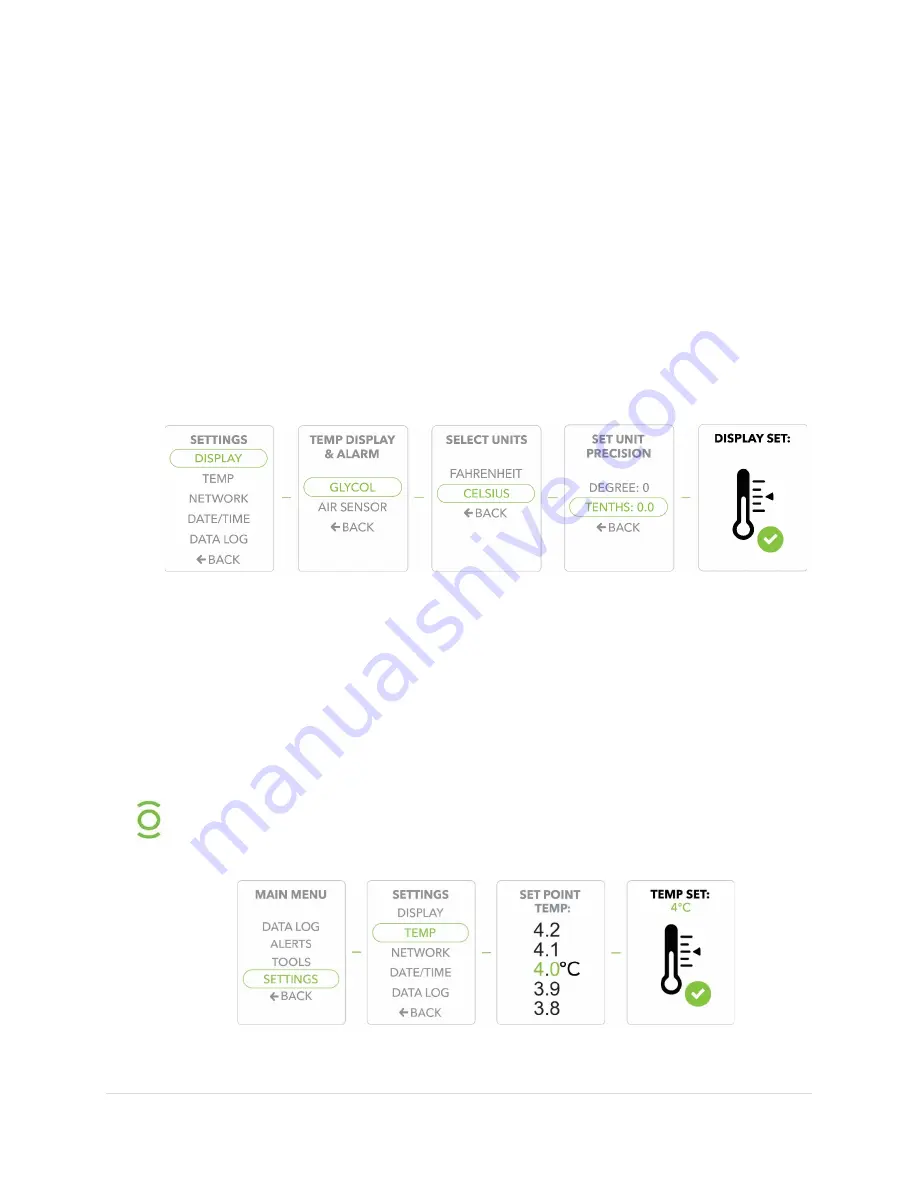
Adjusting the Display Settings 

1)


Press the Select/Control button to display the Main Menu. 

2)


Use the Scroll buttons to move to the Settings option, Press the Select/Control 
button to confirm/select Settings.  

3)


Scroll to the Display option, Press the Select/Control button to confirm/select 
Display. 

4)


Determine whether you want to display Glycol or Air temperature readings. Scroll to 
the desired setting and press the Select/Control button to confirm. 

5)


Scroll to select temperature readings in either Fahrenheit or Celsius and press the 
Select/Control button to confirm. 

6)


Scroll to select unit precision in single Degree or Tenths and confirm selection. 


Adjusting the Set Point Temperature 

1)


Press the Select/Control button to display the Main Menu. 

2)


Use the Scroll buttons to move to the Settings option, Press the Select/Control 
button to confirm/select Settings.  

3)


Scroll to the Temp option, Press the Select/Control button to confirm/select Temp. 

4)


Scroll to select the Set Point Temperature and press the Select/Control button to 
confirm. 

5)


Temp Set will display to confirm your selected Set Point Temperature. 


Setting the proper desired temperature is one of your most important 

display settings. The Evolve Compact Refrigerator will hold your set 

temperature to within 0.5 °C. 


Summary of Contents for ELR018SSA

Page 1: ...800 Capitola Drive Suite 7 Durham North Carolina 27713 www phononic com 844 476 4202 1 8 cu ft compact refrigerator product manual ...

Page 2: ...r 10 Wiring Diagram 10 Safety Precautions 11 Symbols used in this Manual 11 Refrigerant Pressure 12 Electrical Components 12 Unpacking Your Evolve Refrigerator 13 Inspecting for Damage 13 Lifting Carrying Locating and Unboxing 13 Identifying All Parts 13 Installation Requirements 14 Assembling and Mounting 14 Leveling 14 Supply Circuit 14 Ventilation 14 Providing Ventilation 14 Powering On and Pow...

Page 3: ...1 Pass Through Port 21 Activating the Data Monitoring Backup Battery 22 Replacing the Battery 22 Product Exterior Rear 22 Fans 23 Product Interior 23 Interior Components 23 Shelving 24 Navigating Evolve Controls 24 Controls Functionality 24 Reading the LCD Temperature Display 24 Interpreting System Icons 25 Interpreting System Alerts 25 Data Log 26 Downloading Data 26 Clearing the Data log After d...

Page 4: ... the Set Point Temperature 33 WiFi Connection Connecting to a Network 34 Setting the Date Time 35 Setting Retention Values 35 Periodic Product Maintenance 36 Frequently Asked Questions 37 Troubleshooting 39 LED Indicator Issues 39 Interior Concerns 39 WiFi related Issues 40 How do I connect to WiFi 41 See User guide to walk through steps 41 Replacement Parts 42 Product Warranty and Service 43 ...

Page 5: ...ulting in unprecedented cooling capabilities within the chamber Our compressor free design requires minimal maintenance consumes less power eliminates the use of toxic coolants and operates within whisper quiet noise levels As an added benefit Evolve products can continuously operate on UPS battery backup power to protect precious content during power outage events SilverPoint Temperature Monitori...

Page 6: ...6 P a g e Network Setup Details ...

Page 7: ...tem with Phononic solid state heat pump Refrigerant R744 non flammable zero ozone depleting low toxicity Refrigerant Charge Quantity 24 1 grams Refrigerant Pressure Rating 12410 kpa Energy Consumption 2047 btu 24 hrs 4 C Insulation CFC free insulation Display Full color 61 mm LCD with LED backlighting Power Cord 1 meter NEMA hospital grade plug Noise Level 30 dBA 1m Power Input Output Product IP r...

Page 8: ... g n compatible as equipped Memory 512 kb flash memory Access I O Ports One 3 5 mm port for expanded temperature monitoring Temperature Sensors Interior chamber air and glycol Environmental Operating Conditions Ambient Temperature Range 32 C maximum temperature environment Humidity Range Low humidity Not warranted for outdoor use Warranty Warranty 2 years on all parts and labor from date of purcha...

Page 9: ... relocate the receiving antenna Increase the separation between the equipment and receiver Connect the equipment into an outlet on a circuit different from that to which the receiver is connected Consult the dealer or an experienced radio TV technician for help Warning Hazardous voltages are present To reduce the risk of electric shock DO NOT remove the rear cover on this product There are no user...

Page 10: ...manufactured for pharmacy laboratory clinical hospital and extended use for cold storage of vaccines drugs and relative products designated for cold storage of temperatures between 2 C and 8 C Wiring Diagram Provided for informational purposes only For repairs or operating issues please call Technical Service ...

Page 11: ...g feet are on the countertop and that you can open and close the unit without unbalancing it Refer to Unpacking your Evolve Refrigerator for details on handling and moving the unit There are no user serviceable parts within the Evolve 52 L product Symbols used in this Manual Used to indicate an electrical shock hazard Used when advice is given to prevent malfunction or injury Used to prohibit flam...

Page 12: ...may need to be recharged with R744 However the pressure regulating valves are not to be defeated or capped Do not tamper with or alter the relief setting Service only by a factory authorized service person Electrical Components Do not remove the rear cover or operate unit with rear cover removed Removal of the rear cover can result in electrical shock Service only by a factory authorized service p...

Page 13: ...t was built inspected tested and packaged with extreme care Follow the directions provided to unpack your new product safely and easily Lifting Carrying Locating and Unboxing We recommend that you move the box as close as possible to its final location before you begin to unpack This unit is not provided with handles therefore it is recommended that 2 people move and remove the refrigerator from t...

Page 14: ...e adequate ventilation around your Evolve compact refrigerator We suggest three inches of rear clearance There are two rubber bumpers on the back of your refrigerator which must remain installed to ensure a minimum clearance for adequate ventilation The fans on your product will run at intervals of variable speeds and may turn off completely They do not run constantly If the fans run frequently th...

Page 15: ... Unit shall be located within reach to the power source Be careful not to plug into a wall outlet controlled by a wall switch to avoid accidentally switching off the refrigerator To function properly the refrigerator must continually receive power Caution risk of electrical shock If the cord or plug become damaged replace with a cord and plug of the same type and rating Uninterruptable Power Suppl...

Page 16: ...e the troubleshooting guide for ways to resolve the issue Checking the Glycol Sample Bottle The glycol sample bottle is pre installed inside your unit The sample bottle allows you to monitor the internal temperature of items being stored in the refrigerator Please verify 1 The cord for the sample bottle is firmly plugged into the back wall of the interior of your unit 2 The sample bottle is secure...

Page 17: ...mperature The unit is preset to 4 0 C 39 2 F o Upper Threshold Alarm preset to 8 0 C 46 4 F o Lower Threshold Alarm preset to 2 0 C 35 6 F SilverPoint Local Data Collection The unit is programmed to record a temperature reading every 15 minutes with a capacity of 4000 data points Preset alarms alerts The following alarms alerts are factory preset Set Point Temperature When you first turn on the un...

Page 18: ...re to rise To limit this effect there are a few simple steps you can follow to reduce the number of times the door is opened as well as the duration it is left opened List a detailed inventory of the refrigerator s contents on a chart posted outside the unit to reduce the time spent searching for items when the door is opened Use clearly labeled bins to organize and quickly identify contents Avoid...

Page 19: ...erator are available for purchase USB Port A USB port is available to download the data log to a USB memory device You will use the USB port to download and clear the data log when the storage is full The USB port can also be used to update the firmware Verify that the port is intact by inserting the USB drive not included and looking for the USB icon in the icon bar at the top of the LCD display ...

Page 20: ...u and acts like an enter button on a keyboard to confirm a selection Scroll Buttons Use Scroll Up and Scroll Down buttons to navigate through the menu options Operating the Control Panel The control panel is where you manage all of the features for the Evolve compact refrigerator Your refrigerator comes preprogrammed with temperature and alarm settings but you can change them ...

Page 21: ...d on the lower rear of the left side panel of the unit This battery only backs up the data monitoring system It does not run the cooling system The monitoring system is designed to display an alert when the battery drops below 30 remaining capacity The battery serves to support continuous temperature monitoring during power outages and will need to be replaced periodically When replacing the batte...

Page 22: ...through port and access panel 2 Remove the panel 3 Remove and replace with a CR123A or IEC16340 type battery 4 Replace the panel and tighten the 2 screws We recommend that you keep spare batteries on hand This battery will allow you to continue to monitor internal temperature even in the event of a power outage This battery will not power the refrigeration You must ensure uninterrupted power to th...

Page 23: ...he unit as shown They will run continuously until the preprogrammed temperature set point is achieved After that the fans will run at a slower speed when needed to stabilize temperature Do not insert objects into the fan screens to avoid damaging the unit Product Interior Interior Components Glycol temperature sensor port and sample bottle Air temperature sensor External pass through port Adjustab...

Page 24: ...CD Temperature Display The Temperature Display is preset to show the glycol sensor reading measured in Celsius and to the tenth of a degree The Range Indicator is based on the preset upper and lower thresholds displaying green or red symbols depending on temperature status During normal functioning Range is displayed with a green checkmark If the air temperature falls outside the preset range a re...

Page 25: ...25 P a g e Interpreting System Icons Interpreting System Alerts ...

Page 26: ...on to confirm Download and USB Status 6 When the Download is complete this will only take a few seconds the display will show Download Complete The display will continue to the Clear Log screen Clearing the Data log After downloading Clearing the log erases the memory and once erased the data cannot be recovered 1 Once the Data Download has completed the Clear Log screen will appear 2 Press the Se...

Page 27: ...ata Log option Press the Select Control button to confirm select Data Log 4 Scroll to select the Set Data Interval and press the Select Control button to confirm The Data Interval is the important setting for how often the unit pushes data to the SilverPoint portal and data recordings to local memory 5 Interval Set will display to confirm your selected Set Data Interval the unit is preprogrammed t...

Page 28: ...se the Scroll buttons to set the Door Ajar alert to On or Off and the Select Control button to confirm select your choice 5 When the Door Ajar is set your last display will be Interval Set The display will revert to the default screen Adjusting the Temperature Range Alert 1 Press the Select Control button to display the Main Menu 2 Use the Scroll arrows to move to the Alerts option Press the Selec...

Page 29: ... screen Adjusting the Memory Alert 1 Press the Select Control button to display the Main Menu 2 Use the Scroll buttons to move to the Alerts option Press the Select Control button to confirm select Alerts 3 Scroll to Memory Press the Select Control button to confirm select Memory 4 Use the Scroll buttons to set the Memory Alarm to On or Off and the Select Control button to confirm select your choi...

Page 30: ... to move to the Alerts option Press the Select Control button to confirm select Alerts 3 Scroll to Power Press the Select Control button to confirm select Power 4 Scroll to set the Power Out Alarm to On or Off and the Select Control button to confirm select your choice 5 Scroll to move through the numbers to set the delay and use the Select Control button to confirm select your choice 6 When the P...

Page 31: ...o one number at a time each time pressing the Select Control button to confirm 5 Scroll to either Control to calibrate the Display or to Glycol to calibrate the Sensor and press the Select Control button to confirm select Control or Glycol 6 Scroll to enter the desired Calibration offset and press the Select Control button to confirm select the offset 7 After a few seconds you will see confirmatio...

Page 32: ...hed the Defrost cycle Updating Firmware 1 The first step required to update Firmware is to insert a memory stick with the updated Firmware loaded onto the memory stick 2 Press the Select Control button to display the Main Menu 3 Use the Scroll buttons to move to the Tools option Press the Select Control button to confirm select Tools 4 Scroll to the Firmware option Press the Select Control button ...

Page 33: ...ress the Select Control button to confirm 6 Scroll to select unit precision in single Degree or Tenths and confirm selection Adjusting the Set Point Temperature 1 Press the Select Control button to display the Main Menu 2 Use the Scroll buttons to move to the Settings option Press the Select Control button to confirm select Settings 3 Scroll to the Temp option Press the Select Control button to co...

Page 34: ...ding to the next You must enter this information accurately with all upper and lower case letters numbers and symbols correctly identified 7 Use the Scroll buttons to enter the WiFi Password one letter number or symbol at a time Press the Select Control button to confirm select each character entered before proceeding to the next You must enter this information accurately with all upper and lower ...

Page 35: ...t ON reverts to default ON reverts to default Door Ajar Alarm Interval Setting 1 minute N A N A N A Temperature Set Point 4 0 C Yes Yes Yes Temperature Upper Alarm Threshold 8 0 C Yes Yes Yes Termperature Lower Alarm Threshold 2 0 C Yes Yes Yes Temperature Display Setting C Yes Yes Yes Temperature Resolution Setting 1 C Yes Yes Yes Temperature Display Control Glycol Glycol Yes Yes Yes Wi Fi Enable...

Page 36: ...void the use of chlorides cleaners with bleach as well as abrasive cleaners and scrubbers such as steel wool They will degrade the protective coating on the stainless steel and leave it vulnerable to rust Cleaning around fan area and precautions Periodically inspect and monitor the fan area of the rear cover for dust accumulation It may be cleaned with a duster or vacuum cleaner with a dust attach...

Page 37: ...hermal management solutions are tested according to the most demanding consumer and industrial product safely and reliability standards The heat pump meets or exceeds Telecordia and JEDEC electronic performance testing and certification standards In addition the heat pump is a UL recognized component Our products contain no mechanical parts eliminating the most common point of failure Our solid st...

Page 38: ...al Number Model Number MAC ID UI Firmware and TEC Firmware Main Menu Tools Info The product Serial Number can also be found on the shipping label on the shipping box and on the product label on the back of the unit behind the rear cover Is the unit calibrated Can I calibrate my refrigerator The refrigerator does not come pre calibrated to National Institute of Standards and Technology NIST standar...

Page 39: ... data log If continues flashing red possibly there s an issue with the backup battery power running low Replace it with a CR123A battery Not Lit Power failure and no battery backup power Change the battery Solid Green Normal operation No action required Flashing Green Data Logging is active in a power failure mode 15 second intervals Restore power to the system Interior Concerns I don t feel air f...

Page 40: ...r sensor is located along the back panel and represents the open air temperature A glycol sensor is the vial of liquid with a thermocouple inserted in the liquid The glycol sensor is most representative of the typical product stored in the refrigerator It will take the glycol sensor longer to reach the desired set point temperature and it will remain stable longer than the air sensor The display i...

Page 41: ...or Give the unit a few minutes to work through its connection and to eventually fail to make a connection At this time if you do not see a cloud on the icon bar then the display should be interactive again You may need to reenter the password in the network settings to make sure it connects correctly the next time it s needed My user display is unresponsive Do you see a cloud indicator on the disp...

Page 42: ...IP 02 10 1155227 KEY LOCK 01 28 1074005 POWER CORD 03 02 1205067 EVOLVE ABSORBENT CLOTH 04 99 1390153 DOOR GASKET 02 10 1155197 SHELF 01 05 1030042 SHELF CLIP 01 02 1005250 LEVELING FOOT 02 10 1155199 EVOLVE BADGE 04 07 1344692 STRAIN RELIEF 01 02 1005462 HINGE W COVER 01 17 1067218 REAR BUMPER 02 12 1165003 BATTERY TAB 02 10 1155226 ...

Page 43: ...n 5 Any defects or other damages resulting from shipment of the unit are not covered by this warranty Phononic advises customers to carefully examine all shipments prior to acceptance and note all potential damage concerns on the appropriate shipping papers 6 Labor charges resulting from security clearance procedures safety training travel time greater than one hour or 50 miles 80 km premium time ...

Reviews: