background image

Etaluma, Inc.  |  3129 Tiger Run Court, Suite 218  | Carlsbad, CA 92010  | 760-298-2355  |  www.etaluma.com 


E.


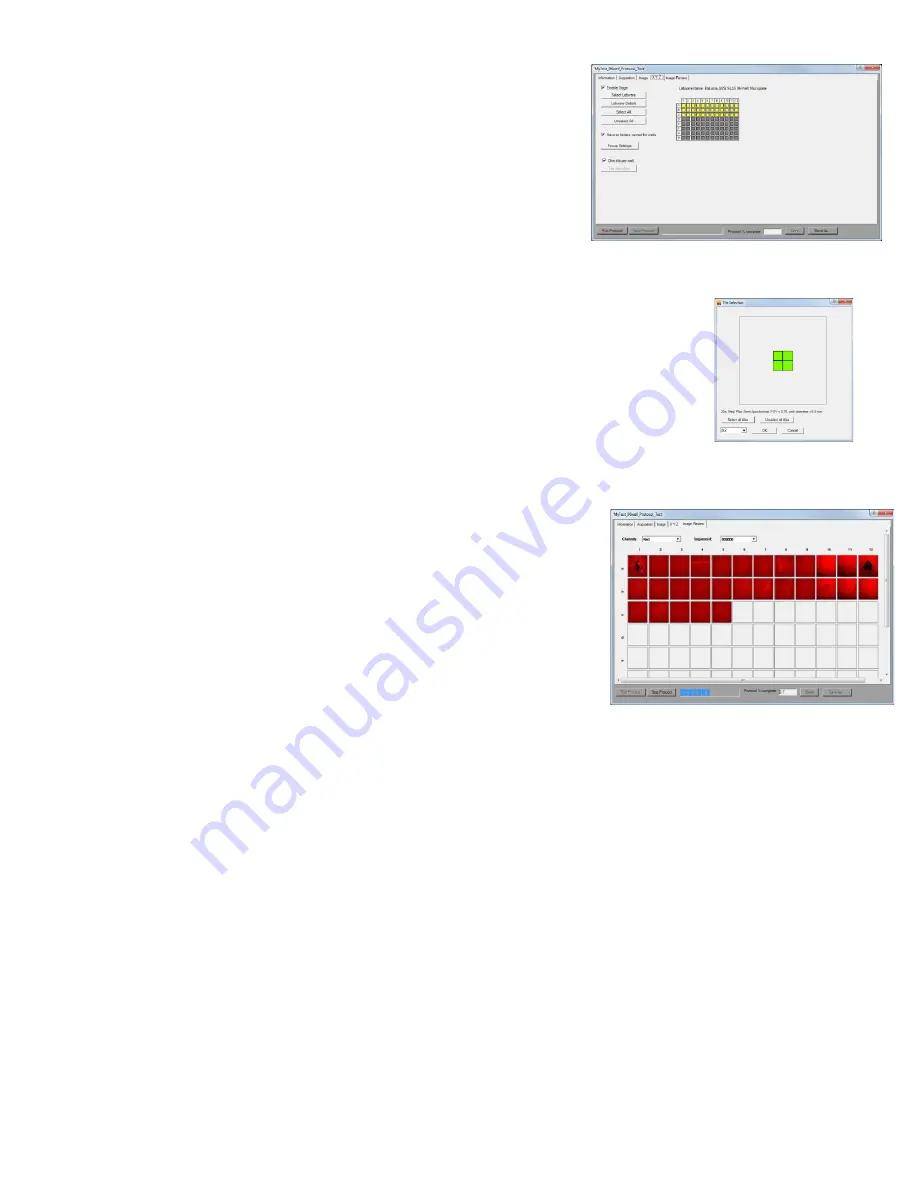
Tiling Across Locations 


1.


Tiling can carried out as part of a Protocol and set up in 
the Protocol XYZ tab.  First ensure that the One Tile Per 
Well is not checked.  Click the Tile Selection button to 
open its dialog box.  A  representative Location will be 
shown. 


2.


Select the number of tiles desired using the drop-down menu. The tile grid 
will then appear superimposed over the location based on the objective to 
be used and the location dimensions. Select the tiles to be imaged by 
clicking each individually or Select all. The tile number and tiles selected 
will apply to all locations to be imaged in the Protocol.  Click OK. 


3.


Autofocus will be carried out in all selected tiles. 


F.


Run Protocol 


1.


After entering all information and saving the Protocol, it is ready to       be 

run. 


2.


A message will remind you to install the correct objective and 

the Protocol will initiate


G.


The fifth tab is “

Image 

Review” and will present the

 images as 

they are captured. Channels, including multiples if a Composite, 

can be selected as well as the Sequence number of a  Time-Lapse. 
This allows the monitoring of images as they are collected in the 

Protocol.  Click on any location to enlarge the image.  Clicking on 
a tile will also enlarge that tile. 


H.


Live Cell Imaging with the LS720 Microscope in an Incubator 


1.


Prior to imaging in an incubator, place the microscope inside for at least 6 hr and preferably 

over-night to allow thermal equilibration. Before transferring to the incubator, disinfect the 
micro-scope using any of the suggested procedures in Appendix C.  Condensation on the 

microscope,  including on the objective, will form in the first minutes but will evaporate as 
thermal equilibrium is achieved.  Focus levels may change during this equilibration as materials 

expand. 


2.


Pass the communication and optional power cable through the incubator port, which is often 

located in the upper back wall. A plug or filtered stopper may be present. Every microscope 
comes with a foam plug that can be used to seal around the cables) going through the port. Or 

the existing plug can be adapted as well.  Make sure there is enough slack in the cables inside 
the incubator for sliding out the shelf.  Place the computer to be used on a flat and stable 

surface near to the incubator  and within the 3 M USB cable provided. 


WARNING: Do not extend the USB cable or use another USB cable other than 

that supplied,      particularly a longer one, as communication issues will arise.  To 

extend the user interface to microscope distance use a long HDMI for the 
monitor and wireless mouse and keyboard. 


Summary of Contents for LS720

Page 1: ... Manual With Etaluma s Lumaview Software For assistance please call 760 298 2355 or email support etaluma com Etaluma Inc Carlsbad California www etaluma com Lumaview is the trademark of Etaluma Inc 2009 2021 All rights reserved ...

Page 2: ...h Lumaview A Starting Conditions B Launching Lumaview C Initialization and Calibration D Instrument Setup E Finding a Live Image With Manual Focus F Focusing G Snapping Images H Generating Auto Composite Images I Videos From Time Lapse and Live Video J Setting Up Autofocus K Writing and Using Protocols L Creating a Z Map M Editing a Z Map N Tiling Across Locations O Live Video P Run Protocol Q Liv...

Page 3: ...ts inside Holder for 60 mm Petri dishes Holder for 60 mm Petri dishes Terasaki plates SBS outer dimensions Holder for microscope slides 50 mm Petri dishes SBS outer dimensions Holder for 4 microscope slides in parallel SBS outer dimensions Light Hood Lumaquant image analysis software Microvolution deconvolution software C Recommended Computer Specifications Windows 10 Core i7 or better processor 5...

Page 4: ...er If not removed the LS720 will be damaged 1 Using the supplied 3 mm hex wrench loosen slightly the 2 set screws on top of the installed shipping lock Loosen slightly the 2 set screws smaller and more internal on bottom of the lock 2 Unscrew completely the 2 larger 1 inch screws on bottom of the shipping lock Slide the shipping lock toward you to remove 3 Keep the 4 set screws screwed into the sh...

Page 5: ...are fully seated and arm is totally flush with the LS720 surface Tighten the large thumb screw at the backof the Phase Accessory arm b Connect the free end of the Phase Accessory power cable to the round socket nearby This allows the Phase Accessory to be controlled by Lumaview H Brightfield 1 Bright field imaging uses of the Phase Accessory with the included Slider in an open position no phase ri...

Page 6: ...e Lumaview software program The latest Lumaview version is downloadable from Etaluma s website and must be installed prior to connecting your computer for the first time 2 Lumaview requires Windows 10 Desktop computers and laptops can be used but the best visualization correlates with monitor resolution equal to the sensor resolution up to 1900x 1900 pixels Note The monitor does not affect image r...

Page 7: ...fault is a new Etaluma folder inside the Program Files x86 folder During installation a Device Driver Installation Wizard will open Click to continue twice and finish installing the two drivers Installation of Lumaview will then finish After installation a Lumaview shortcut orange logo icon convenient for launching the software will be present on the desktop L Connecting the LS720 Microscope 1 If ...

Page 8: ...Image Window is maximized Live Image Window transfers to the end of the Main Window title bar The Live Image Window status bar at the bottom shows communication with the camera sensor via continuous display of several useful metrics current frame rate data transfer rate number of frames collected thus far in the session frame size and session date and time start Note A variety of Windows configura...

Page 9: ...d to the lowest Z level No image can be obtained at the Home position because it is under the microplate carrier frame 2 If this is the first time the LS720 has been connected to the current computer it is first necessary to do a Calibration Once completed calibration is not needed again unless a different computer is connected a To calibrate the LS720 install the provided Calibration Motic EFN 4x...

Page 10: ...ibration recommended see Section I I check Brightfield in Manual Image to activate Gain and Exposure sliders Start with Gain as low as possible and adjust Exposure until a mid gray tone is shown inthe Live Image Window g If using the Phase Contrast Accessory for brightfield illumination Section I I move the phase slider to an open position without phase ring and move the phase condenser aperture s...

Page 11: ...e Live Image Window Make sure the centered well is A1 by moving to the left and up to confirm it is the corner well using the X Y Move arrows and then re center the A1 well i In Calibration click Accept Calibration The Calibration dialog box will now convert to the Manual XYZ dialog box ...

Page 12: ...ebsite www etaluma com products downloads Ensure that the correct model microscope being used is checked If it is necessary to change the LS Microscope model number that is checked you will be prompted to restart the program Be sure to restart so that all functions work correctly 3 Click the Objective button to open its dialog box called Objective Lens Selection Select the desired objective to hig...

Page 13: ... single channels Note Auto composite may not produce the optimal composite images and LumaQuant or third party compositing software may result in better images 8 Of the next 6 features listed on the left check those desired a Time date label will be displayed in the lower left corner of each image b Hot pixel removal Check if desired and then complete Instrument Setup To start this feature click U...

Page 14: ...sample labware using one of two options in Manual XYZ a Use the X Y Move arrows and Step size arrows if needed to move to different locations or wells in the sample labware or b Click on Select Labware to open its dialog box Click on the labware type desired to highlight it and click OK The appropriate Labware Map will then open Click on a location and the microplate carrier will move so the locat...

Page 15: ...sing the Focus Z up and down arrows and Step size adjustments if needed until a sharp image is achieved Adjust Illumination and Gain settings in Manual Image during the focus process as needed Click the Set Bookmark button to record the focus level for an easier return to this level 2 To facilitate the focusing process click on the Zoom icon on the Left Tool Bar The Zoom feature toggles between di...

Page 16: ...image is snapped If Click sound for manual imagesnap was checked in Instrument Setup the shutter like sound will be heard for each image b The fluorescence composite image will appear automatically in the Main Window matched 1 1 with the monitor resolution pixel pixel and with its Title Bar showing the full path where it is located 2 Composites including the transmitted channel phase contrast or b...

Page 17: ...s corresponding to the highest contrast value it found up to that point The autofocus set up allows a Center Range and Max Focus Time to be set The Center value is the expected focus often determined manually The expected focus in different locations can be different It is best to make the Center equal to the average focus in the sample locations unless using a Z Map or ROI Map where the z coordin...

Page 18: ...range and or increase the Max focus time 6 Upon successful autofocus move to other locations distant from the initial location Click Select Labware in Manual XYZ and the appropriate Labware Map will open see Section II E 3 above Select a location and repeat Steps 1 4 above 7 Continue to move to other locations far away from the initial ones and repeat autofocus It may be necessary to re enter the ...

Page 19: ...ividually clicking on the name of any row A B etc or column 1 2 etc or clicking on Select All 8 Click OK and Z Mapping will begin B Editing a Z Map 1 In Manual XYZ click the Edit Z Map button at the bottom to open its dialog box Select the Z Map File to be edited 2 Locations that were Z Mapped become shaded in yellow Click on any Z Mapped location and the Edit Z Map Well dialog box for that locati...

Page 20: ...e highlighted position Insert will place the current location above the highlighted location Move stage to Selected Coords will go to the location highlighted The ID field can be edited with simple text Using an ROI Map in the Protocol XYZ tab will look like this D Writing and Using Protocols 1 To configure an automated microscopy run including time lapse the Protocol feature is utilized Click the...

Page 21: ...You are now ready to create a new Protocol 5 On the Information tab if you enter User Notes they will become part of the new Protocol You can also enter User Notes from a previously saved Protocol in this tab 6 Click on the Acquisition tab to select the acquisition mode Single Image Time Lapse Video or Time Lapse Video a Single Image mode will snap an image of each location selected once and finis...

Page 22: ...22 LS720 Microscope Manual 2021 than a single still image ...

Page 23: ...the stack The stack will be centered on the Autofocus result the Z value of the Z Map or the Z value of the ROI map The center image will always be captured in addition to the slices If an even number of slices are requested it will be in addition to the slices and if an odd number are requested the center position will be imaged twice The Z Axis Starting position can be offset from the focus or Z...

Page 24: ...focus Parameters as described above in Step b this Section Follow steps described below in Section II L to create a Z Map for each location to be imaged in Protocol To use an existing Z Map select the file under Z Map File Selection e Under Select Focusing LED Channel s check the channels desired for autofocusing Currently channels are acquired in a fixed sequence of BF Blue Green Red Any selected...

Page 25: ...col Click on any location to enlarge the image Clicking on a tile will also enlarge that tile H Live Cell Imaging with theLS720 Microscope in an Incubator 1 Prior to imaging in an incubator place the microscope inside for at least 6 hr and preferably over night to allow thermal equilibration Before transferring to the incubator disinfect the micro scope using any of the suggested procedures in App...

Page 26: ...used to adjust any change in focus overtime 4 The system is now ready for live cell imaging I Creating Videos from Time Lapse and Live Video Several options are available for compiling videos from sets of time lapse and live video images A The optional Lumaquant software offered by Etaluma see Lumaquant Startup Guide for compiling images into video The Lumaquant Startup Guide can be downloaded fro...

Page 27: ...lens cap is not available Do NOT leave the optics block uncovered Lower the top deck onto the subdeck and lock with thumb screw In Lumaview open Manual XYZ and set Z to 0 bottom of travel 3 The LS720 has a subdeck has 2 vertical alignment marks on the front edge of the plate carrier near the thumbscrew and the top deck front edge 4 In Lumaview Manual XYZ set Z step size to 10mm move plate carrier ...

Page 28: ...m hex wrench official torque is 16 in pounds 6 Tighten the 4 set screws in the shipping lock with the 3 mm hex wrench untilthey are just touching the plate carrier then tighten a further quarter turn top 2 screws Fig 2 and deck surface bottom 2 screws Fig 3 Do NOT overtighten Set screw head to be approximately even with shipping lock surface 7 Test by gently trying to lift plate carrier at front w...

Page 29: ...ted as one of these two messages and can be solved by going to the Microsoft download page here https www microsoft com en us download details aspx id 21 Searching for Dotnet SP2 upgrade download should yield a Microsoft download page in your country if the above link is inappropriate After downloading and installing should be automatic restart Lumaview to confirm it has been upgraded successfully...

Page 30: ...fter a Windows Update or after installing another instrument software especially camera based instruments Generally this results in a blank Lumaview screen and one of the following messages in the upper left corner of Lumaview is observed These error messages may also be presented Restarting Lumaview unplugging and replugging in the USB cable or restarting the PC and relaunching Lumaview may resol...

Page 31: ...maview Setup Wizard dialog box will open select Repair Lumaview720 and click Finish The installation will proceed including the opening twice of the Device Driver Installation Wizard click Continue and Finish each time 4 Disconnect and then reconnect the USB cable from the computer to the LS Microscope Repeat Step 2 above to verify libusbK Usb Devices is now present 5 If this does not result in th...

Page 32: ...t the LS Microscope and verify that the one that turned lighter gray is now darker gray again This is the driver that conflicts with the LS Microscope drivers 7 Right click on the conflicting driver in this example BodeVib Vibration Data Processing System and in the pop up menu click on Update Driver Software 8 Inthe nextdialogbox thatappears clickonBrowse my computer for driver software 9 Inthe n...

Page 33: ...Next Windows should now install the LS Microscope driver over the conflicting driver 11 When installation is complete disconnect the LS Microscope from the computer andthen reconnect it These steps may need to be performed on every USB port that will be used with the LS Microscope NOTE Older versions of Windows may ask you to restart the computer before driver is functional ...

Page 34: ...tivity and are inexpensive and fast acting Hypochlorites the most widely used of the chlorine disinfectants are available in liquid e g sodium hypochlorite such as in household bleach and solid e g calcium hypochlorite sodium dichloroisocyanurate forms Household bleach has an available chlorine content of 5 25 or 52 500 ppm Because of its oxidizing power it loses potency quickly and should be made...

Page 35: ...er settings and choose your usual power plan if desired 4 Note if you do not wish to create a custom power plan you may simply change the advanced settings for your regular plan as described in step 2 above Connectivity Settings A Network connection NOT required recommended configuration Disconnect the Ethernet cable if wired connection is used and turn on Airplane Mode Navigate to Settings Networ...

Reviews: