Never soak grinding stones
Q2
,
Q4
in water and never use a wet
brush to clean their surface! Also, do not use any steel or other
metal brushers, steel wool etc. to clean the stones!
Cleaning Clogged Grinding Stones / Quick Cleaning before Use
Turn off the drive unit, remove the grinder, disassemble it and remove any food residues
from the area of the grinding stones. Attach the grinder back to the head of the drive unit.
Turn the regulating disc by 6 arresting positions (clicks) back. Pour about 150 g of regular
dry rice into the hopper and turn the appliance on at maximum speed. The rice helps clean
the clogged grinding stones. Pour the dry cereals to the hopper, set the same level of
coarseness of grinding or turn the regulating disc by one arresting position (click) back and
grind the required quantity.
Any impurities in gaps or corners and grinding stones may be easily cleaned with the
provided brush
Q10
.
When cleaning the grinding stones, be very careful
!
Make sure that the grinding edges / grooves of the stones do not come in contact with hard
objects that dull them and thus reduce their efficiency.
Take care that the binding surfaces and the sealing elements are functional
.
Some foods may stain the accessories in a certain way. This however has no effect on
the operation of the appliance and is not cause for a claim or complaint regarding the
appliance! After some time this staining usually goes away by itself. Never dry plastic
moulded parts above a heat source (e.g.
fire stove, electric/gas stove
).
Store the appliance thoroughly cleaned in a dry, dust-free location that is out of reach of
children and incapacitated persons.
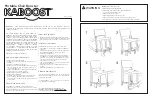
Procedure for Replacing Stones
(Fig. 5, 7)
When the grinding stones are damaged or worn out too much, it is necessary to purchase
new ones and replace them. Disassemble the grinder. Using a suitable tool (such as
a screwdriver), release the cover
Q1
by gradually inserting a screwdriver into the 4 pcs
screws
Q8
unscrew from the body
Q0
of the grinder. You can now easily remove the cover
Q1
. Remove (knock out) the fixed grinding stone
Q2
from the body of the grinder
Q0
.
Replace the stone with a new one. Them and thus reduce their efficiency.
Attention: Make sure that the cut created in the grinding stone precisely “fits” the
created protrusion on the body of the grinder.
If the distance ring
Q3
and seal
Q7
are worn out or damaged, replace it with a new one
(the same type).
Replace the assembled rotating grinding stone
Q4
with a new one. When assembling the
stones, proceed in the opposite order.
VII. ENVIRONMENT
If the dimensions allow, there are marks of materials used for production of packing,
components and accessories as well as their recycling on all parts. The symbols specifi
ed on the product or in the accompanying documentation mean that the used electrical
or electronic products must not be disposed of together with municipal waste. For proper
disposal, hand them over at the special collection places where they will be accepted free
of charge.
GB
35
/ 59
Summary of Contents for 0028
Page 64: ...e 33 2016 DATE 29 7 2016...