background image

239

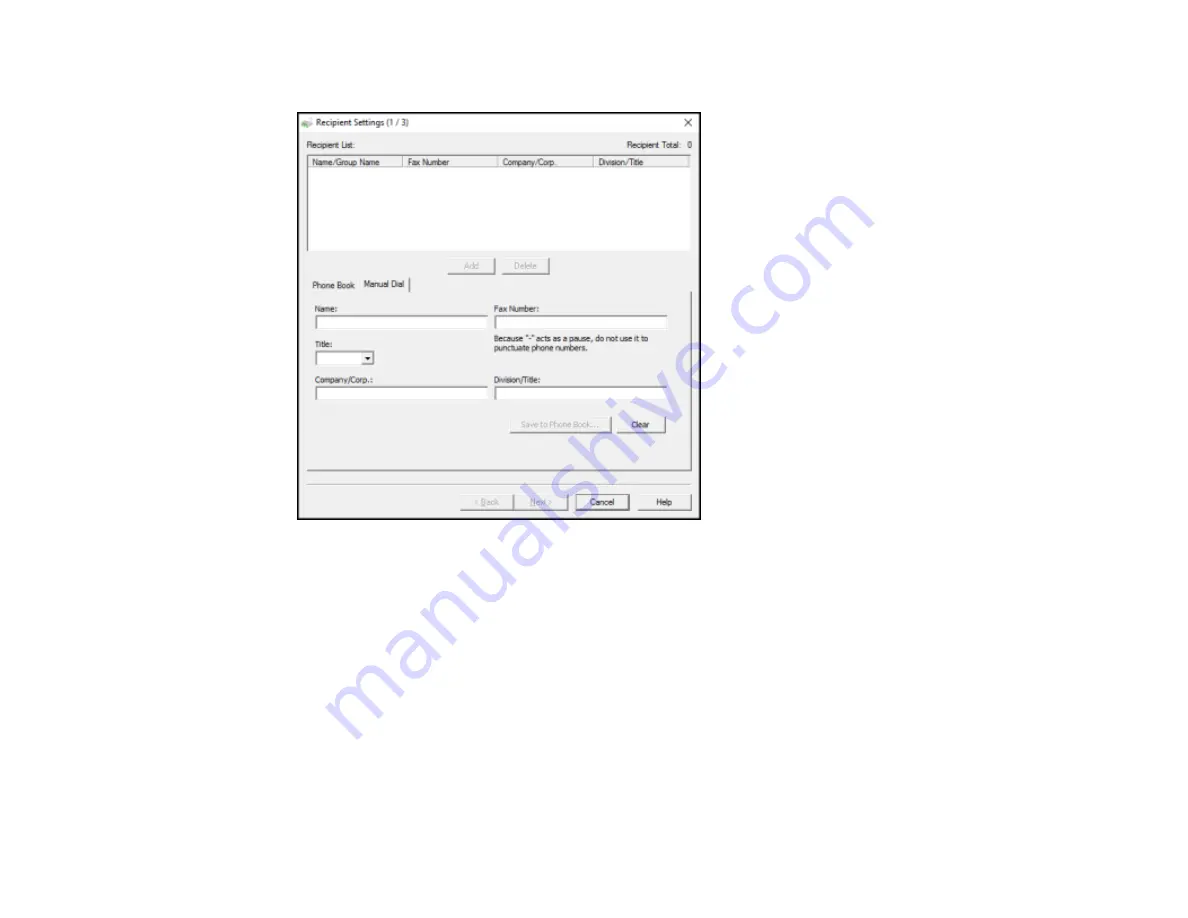
You see a window like this:

7.

Enter the recipient's name and fax number or select a recipient from the phonebook, then click

Next

.

Note:

For detailed instructions on using the Epson FAX Utility, click

Help

.

8.

Select a cover sheet and enter a subject and message, then click

Next

.

9.

Click

Send

to transmit your fax.

Parent topic:

Sending Faxes

Sending Faxes Using the Fax Utility - Mac

You can send a fax from a Mac printing program using the FAX Utility. You can fax up to 100 pages at a
time, including a cover sheet.

1.

Open the file you want to fax.

Summary of Contents for WF-4820 Series

Page 1: ...WF 4820 WF 4830 Series User s Guide ...

Page 2: ......

Page 3: ...usting Control Panel Sounds 27 Adjusting the Screen Brightness 28 Turning Off the Operation Time Out Setting 29 Preventing PC Connection via USB 30 Product Parts Locations 31 Product Parts Front 32 Product Parts Inside 34 Product Parts Back 36 Checking for Software Updates 36 Using Power Saving Settings 37 Changing the Sleep Timer Settings 37 Changing the Power Off Timer Settings 39 Epson Connect ...

Page 4: ...reless Printing from a Smart Device Using Epson Smart Panel 54 Wi Fi Direct Mode Setup 56 Enabling Wi Fi Direct Mode Simple AP 56 Enabling Wi Fi Direct Mode 58 Modifying the Wi Fi Direct Network Name or Password 60 Wi Fi Protected Setup WPS 62 Using WPS to Connect to a Network 62 Printing a Network Status Sheet 63 Printing a Network Connection Report 64 Network Connection Report Codes and Messages...

Page 5: ...lacing Originals on the Scanner Glass 96 Placing Originals in the Automatic Document Feeder 98 ADF Original Document Specifications 102 Copying 105 Copying Documents or Photos 105 Copying Options 106 Printing from a Computer 110 Printing with Windows 110 Selecting Basic Print Settings Windows 111 Paper Source Options Windows 114 Print Quality Options Windows 114 Multi Page Printing Options Windows...

Page 6: ...ettings Mac 140 Paper Source Options Mac 144 Print Quality Options Mac 144 Print Options Mac 145 Selecting Page Setup Settings Mac 145 Selecting Print Layout Options Mac 146 Selecting Double sided Printing Settings Mac 147 Double sided Printing Options and Adjustments Mac 148 Managing Color Mac 149 Color Matching and Color Options Mac 150 Selecting Printing Preferences Mac 151 Printing Preferences...

Page 7: ... Scan from a Smart Device 179 Scanning a Document in Epson ScanSmart 179 Saving a Scan 182 Attaching a Scan to Email 183 Sending a Scan to a Cloud Service 184 Printing a Scan 185 Selecting Epson ScanSmart Settings 187 Changing the Epson Product 187 Changing the Scan Settings 188 Changing the File Name Settings 190 Changing the Save Settings 191 Save Settings 193 Customizing Action Icons 195 Scanni...

Page 8: ...3 Creating a Contact 223 Editing or Deleting a Contact 226 Creating a Contact Group 227 Editing or Deleting a Contact Group 229 Sending Faxes 231 Sending Faxes from the Product Control Panel 231 Sending a Fax Using the Keypad Contact List or History 231 Fax Sending Options 234 Sending a Fax at a Specified Time 235 Sending Faxes Using the Fax Utility Windows 237 Sending Faxes Using the Fax Utility ...

Page 9: ...Check Cartridge and Maintenance Box Status 262 Checking Cartridge and Maintenance Box Status on the LCD Screen 262 Checking Cartridge and Maintenance Box Status Windows 263 Checking Cartridge and Maintenance Box Status Mac 266 Purchase Epson Ink Cartridges and Maintenance Box 267 Ink Cartridge and Maintenance Box Part Numbers 267 Removing and Installing Ink Cartridges 268 Printing with Black Ink a...

Page 10: ...nning a Product Check 307 Resetting Control Panel Defaults 308 Solving Setup Problems 309 Product Does Not Turn On or Off 310 Noise After Ink Installation 310 Software Installation Problems 310 Solving Network Problems 311 Product Cannot Connect to a Wireless Router or Access Point 311 Network Software Cannot Find Product on a Network 313 Product Does Not Appear in Mac Printer Window 313 Wireless ...

Page 11: ... Many Copies Print 332 Blank Pages Print 332 Incorrect Margins on Printout 332 Border Appears on Borderless Prints 333 Incorrect Characters Print 333 Incorrect Image Size or Position 334 Slanted Printout 335 Solving Print Quality Problems 335 White or Dark Lines in Printout 336 Blurry or Smeared Printout 336 Faint Printout or Printout Has Gaps 338 Grainy Printout 339 Incorrect Colors 340 Solving S...

Page 12: ...t 352 Fax Memory Full Error Appears 352 Fax Quality is Poor 353 Sent Fax is Received in an Incorrect Size 354 Received Fax is Not Printed 354 Solving USB Device Problems 355 Cannot View or Print from a USB Device 355 Cannot Save Files on a USB Device 355 Cannot Transfer Files To or From a USB Device 356 Uninstall Your Product Software 356 Uninstalling Product Software Windows 356 Uninstalling Prod...

Page 13: ...ctions 374 Ink Cartridge Safety Instructions 376 LCD Screen Safety Instructions 377 Wireless Connection Safety Instructions 378 Telephone Equipment Safety Instructions 378 Important Privacy Notice Printer Serial Number 378 FCC Compliance Statement 379 Binding Arbitration and Class Waiver 381 Trademarks 384 Copyright Notice 385 libTIFF Software Acknowledgment 386 A Note Concerning Responsible Use o...

Page 14: ......

Page 15: ...15 WF 4820 WF 4830 Series User s Guide Welcome to the WF 4820 WF 4830 Series User s Guide For a printable PDF copy of this guide click here ...

Page 16: ...e Epson Print Enabler Using the Mopria Print Service Using Fire OS Printing Using Windows 10 Mobile Printing Using Epson Print and Scan App with Windows Tablets Voice activated Printing Using the Control Panel See these sections to learn about the control panel and select control panel settings Control Panel Buttons and Lights Entering Characters on the LCD Screen Viewing Animations Selecting the ...

Page 17: ...asics Control Panel Buttons and Lights 1 power button and light 2 received fax light 3 home button 4 LCD screen 5 help button The LCD Screen Status Icon Information Navigating the LCD Screen Parent topic Using the Control Panel ...

Page 18: ...creen 2 Displays the network connection status Select to set up network connections 3 Select to change sound settings 4 Select to display the Fax Data Information screen 5 Displays various settings and functions Swipe to the left to see additional options ...

Page 19: ...action Parent topic Control Panel Buttons and Lights Status Icon Information Your product displays status icons on the LCD screen for certain product status conditions Press the icon to view or change the current network settings Icons Description Displays additional information or instructions such as loading paper or placing a document Displays the Supply Status screen ...

Page 20: ...nection An Ethernet connection is established No Wi Fi connection A Wi Fi network error has occurred or the product is searching for a connection A Wi Fi connection is established The number of bars indicates the connection s signal strength No Wi Fi Direct connection A Wi Fi Direct connection is established Parent topic Control Panel Buttons and Lights Navigating the LCD Screen Follow these guide...

Page 21: ...ering Characters on the LCD Screen Follow these guidelines to enter characters for passwords and other settings To move the cursor select the left or right arrows To change the case of letters select To delete the previous character select To enter numbers or symbols select To enter a space select Space Parent topic Using the Control Panel ...

Page 22: ...ns on common procedures 3 Select a topic from the list of available topics and follow the on screen instructions Parent topic Using the Control Panel Selecting the Date and Time Before faxing select the current date time and daylight saving phase in your area and choose your preferred date and time format 1 Press the home button if necessary 2 Select Settings 3 Select General Settings 4 Select Bas...

Page 23: ...h the season When you change from Winter to Summer your product automatically sets its clock ahead one hour When you change from Summer to Winter it sets its clock back one hour 8 Select Date Time 9 Select the date format you want to use 10 Use the numeric keypad to enter the current date 11 Select the time format you want to use 12 Use the numeric keypad to enter the current time Parent topic Usi...

Page 24: ...ssary 2 Select Settings General Settings Basic Settings Country Region You see a screen like this 3 Scroll up or down if necessary and select your country or region You see a confirmation screen 4 If the setting is correct select Yes If not select No and retry Parent topic Using the Control Panel Using Presets You can save frequently used copy fax and scan settings as presets This lets you easily ...

Page 25: ...reen like this 3 Select Add New 4 Select the function for which you want to set up a preset You see the main screen for that function such as the Copy screen 5 Select the settings you want to save and select Register ...

Page 26: ...x or scan you can use the preset by selecting Presets and selecting your preset name from the list Parent topic Using the Control Panel Related tasks Entering Characters on the LCD Screen Changing LCD Screen Language You can change the language used on the LCD screen 1 Press the home button if necessary 2 Select Settings 3 Select General Settings ...

Page 27: ...and select Language 6 Select a language Parent topic Using the Control Panel Adjusting Control Panel Sounds You can adjust the sound level heard when you press buttons on the control panel 1 Press the home button if necessary 2 Select Settings 3 Select General Settings ...

Page 28: ...et Mode 7 Select Button Press 8 Press to decrease or to increase the sound 9 Select OK to exit Note You can also adjust the Sound Type and the sound level for various product functions Parent topic Using the Control Panel Adjusting the Screen Brightness You can adjust the brightness of the LCD screen 1 Press the home button if necessary 2 Select Settings 3 Select General Settings ...

Page 29: ...elect a number from the on screen keypad and press OK 7 Select OK to exit Parent topic Using the Control Panel Turning Off the Operation Time Out Setting The Operation Time Out setting causes the LCD screen to return to the Home screen after a few minutes of inactivity This feature is enabled by default but you can turn it off 1 Press the home button if necessary 2 Select Settings 3 Select General...

Page 30: ...nt topic Using the Control Panel Preventing PC Connection via USB You can disable access from a USB connected computer This restricts non network access to the product and protects the security of confidential scanned documents 1 Press the home button if necessary 2 Select Settings 3 Select General Settings ...

Page 31: ... Select Printer Settings You see a screen like this 5 Scroll down and select PC Connection via USB 6 Select Disable Parent topic Using the Control Panel Product Parts Locations See these sections to identify the parts on your product ...

Page 32: ...t Product Parts Inside Product Parts Back Parent topic Product Basics Product Parts Front 1 Automatic Document Feeder ADF cover 2 ADF input tray 3 ADF edge guides 4 ADF document support 5 ADF output tray 6 Paper cassette 1 ...

Page 33: ...33 7 Paper cassette 2 WF 4830 Series 1 Output tray 2 Paper cassette edge guides 3 Paper cassette Parent topic Product Parts Locations ...

Page 34: ...34 Product Parts Inside 1 Document cover 2 Scanner glass 3 Control panel ...

Page 35: ...35 4 USB Type A port for external devices 1 Scanner unit 2 Ink cartridge holder do not remove Parent topic Product Parts Locations ...

Page 36: ...es to your product software Visit epson com support U S epson ca support Canada or latin epson com support Caribbean and select your product Note Your printer is designed to work only with genuine Epson brand ink cartridges Other brands of ink cartridges and ink supplies are not compatible and even if described as compatible may not function properly or at all Epson periodically provides firmware ...

Page 37: ...or Apps screens depending on your version of Windows OS X You can manually update the software by opening the Applications Epson Software folder and selecting EPSON Software Updater macOS 10 12 x 10 13 x 10 14 x or 10 15 x You can manually update the software by opening the App Store selecting Updates searching for a software update option for Epson Software and selecting Update Parent topic Produ...

Page 38: ...s 5 Select Sleep Timer You see a screen like this 6 Do one of the following Press the or icon to decrease or increase the number of minutes Press the number of minutes on the LCD screen select the number of minutes from the on screen keypad and press OK ...

Page 39: ...ts unintentional operations due to objects bumping the LCD touchscreen Select Scheduled to set a time range for the feature to be enabled Parent topic Using Power Saving Settings Changing the Power Off Timer Settings You can have the product turn off automatically if it is not used for a specified period of time 1 Press the home button if necessary 2 Select Settings 3 Select General Settings You s...

Page 40: ...ese Epson Connect solutions Epson Email Print Epson iPrint Mobile App Epson Remote Print Scan and send a file as an email or upload it to an online service directly from your Epson product with Epson Scan to Cloud or the Epson iPrint Mobile App Setting Up Epson Connect Services Using Epson Email Print Using the Epson Smart Panel Mobile App Using the Epson iPrint Mobile App Using Epson Remote Print...

Page 41: ...Service Settings 5 Select Epson Connect Services You see a screen like this 6 Select Register 7 Follow the instructions on the screen to activate your product s email address Parent topic Epson Connect Solutions for Smartphones Tablets and More ...

Page 42: ... Email Print address Note Go to epsonconnect com and log into your Epson Connect account to personalize your product s email adjust print settings and set up other Epson Connect services Parent topic Epson Connect Solutions for Smartphones Tablets and More Related topics Wi Fi or Wired Networking Using the Epson Smart Panel Mobile App Use this free Apple and Android app to print copy or scan with ...

Page 43: ...about Epson iPrint and check the compatibility of your mobile device 3 Download Epson iPrint from the Apple App Store or Google Play 4 Connect your mobile device to the same wireless network as your product 5 Open Epson iPrint and select your Epson product Now you are ready to print or scan with your mobile device and your Epson product Parent topic Epson Connect Solutions for Smartphones Tablets ...

Page 44: ...ail address or online services such as Box DropBox Evernote or Google Drive with your Epson Connect account 1 Connect your Epson product to your network See the link below 2 If you did not already set up an Epson Connect account when you installed your product software visit epsonconnect com to create your account and register your product to the Epson Connect service Note Make a note of your prod...

Page 45: ...evice to the same wireless network that your product is using 4 Print from your device to your product Note For details see the AirPrint page on the Apple website Parent topic Product Basics Related references Paper Source Settings Options Related topics Wi Fi or Wired Networking Setting Up Printing on a Chromebook Your Epson printer supports native printing on Chromebook allowing you to print fro...

Page 46: ... is on the screen Note If you do not see your product tap All Printers and select your product Parent topic Product Basics Related topics Wi Fi or Wired Networking Using the Mopria Print Service You can use the Mopria Print Service to print from your Android phone or tablet Android v4 4 or later to your Epson product or any Mopria certified product from other manufacturers You can download the Mop...

Page 47: ...int whatever is on the screen Note If you see a message telling you that a plug in is required tap OK and tap Download If your Amazon Fire product uses Fire OS 5 and above your device automatically uses the built in Mopria Print Service app to print Parent topic Product Basics Related topics Wi Fi or Wired Networking Using Windows 10 Mobile Printing You can wirelessly print from Windows 10 Mobile ...

Page 48: ... ready to print photos or scan Parent topic Product Basics Related topics Wi Fi or Wired Networking Voice activated Printing Take advantage of voice activated hands free printing from your Epson product with Alexa Siri and Google Assistant Depending on which voice assistant you use you can ask your product to print photos calendars recipes photo props and more Click here for more information 1 Con...

Page 49: ...49 Related topics Wi Fi or Wired Networking ...

Page 50: ...d can deter interception of traffic over the wireless LAN Your router may already have a default password enabled by your Internet service provider ISP See your ISP and router documentation for instructions on how to change the default password and better secure your network Connect your product only to a network protected by a firewall Connecting your product directly to the Internet may leave it...

Page 51: ...uter over a wireless or wired network 1 Epson product 2 Wireless router or access point 3 Computer with a wireless interface 4 Computer 5 Internet 6 Ethernet cable used only for wired connection to the wireless router or access point Selecting Wireless Network Settings from the Control Panel Setting Up Wireless Printing from a Smart Device Using Epson Smart Panel Parent topic Wi Fi or Wired Networ...

Page 52: ...r of this product may cause loss of fax and network data and settings Epson is not responsible for backing up or recovering data and settings during or after the warranty period We recommend that you make your own backup or print out your fax and network data and settings 1 Press the home button if necessary 2 Press the icon You see a screen like this 3 Select Wi Fi Recommended 4 Select Start Setu...

Page 53: ... enter numbers and symbols press To enter a space press Space 8 Press OK when you finish entering your password 9 Confirm the displayed network settings and select Start Setup to save them 10 If you want to print a network setup report select Print Check Report Otherwise select OK 11 Press the home button to exit You see the icon on the LCD screen and should be able to connect to your product dire...

Page 54: ...have the following A Bluetooth enabled device that is connected to a wireless network The Epson Smart Panel app installed on the device The wireless network name SSID and password Note Your device must be close enough to the product to create and maintain a Bluetooth connection 1 Make sure the product is turned on and is ready to print Note You must perform initial setup and ink installation befor...

Page 55: ...lect Change another Wi Fi SSID 7 Enter the password for the wireless network and select OK The app starts configuring the product Note Do not move the smart device away from the product during configuration The product s control panel may show a successful wireless connection before the process is completed on your device Wait for the completion message in the Epson Smart Panel app and do not canc...

Page 56: ...i Fi Direct Mode Simple AP Enabling Wi Fi Direct Mode Modifying the Wi Fi Direct Network Name or Password Parent topic Wi Fi or Wired Networking Related references Status Icon Information Enabling Wi Fi Direct Mode Simple AP You can enable Wi Fi Direct mode to allow direct communication between your product and computer mobile devices or other devices up to 8 without a wireless router or access po...

Page 57: ...57 1 Press the home icon if necessary 2 Select the icon You see a screen like this 3 Select Wi Fi Direct 4 Select Start Setup You see this screen ...

Page 58: ...the LCD screen For other types of devices select Other OS Devices Use your device to select the Wi Fi network name SSID displayed on the LCD screen and enter the password shown Select Next on the LCD screen to display your product information then follow the instructions on the LCD screen The Wi Fi Direct icon is displayed on the LCD screen and indicates if Wi Fi Direct is enabled on the product P...

Page 59: ...reen and should be able to connect to your product directly from your computer or device and then print If you are printing from a computer make sure you installed the network software as described on the Start Here sheet Note If you don t see the icon on the LCD screen you may have selected the wrong network name or entered the password incorrectly Repeat these steps to try again Parent topic Wi ...

Page 60: ... a more descriptive and secure Wi Fi Direct network Note If you are printing from a computer make sure you installed the network software as described on the Start Here sheet 1 Press the home button if necessary 2 Select the icon You see a screen like this 3 Select Wi Fi Direct 4 Select Start Setup 5 Select Change ...

Page 61: ...o enter your new Wi Fi Direct password Note Your password must be at least 8 and no more than 22 characters long Note If you have already connected devices or computers to your product via Wi Fi Direct they will be disconnected when you change the network name or password 7 When entering your Wi Fi Direct network name or password do the following To move the cursor press the left or right arrow To...

Page 62: ... your network uses a WPS enabled wireless router or access point you can quickly connect your product to the network using Wi Fi Protected Setup WPS Note To check if your router is WPS enabled look for a button labeled WPS on your router or access point If there is no hardware button there may be a virtual WPS button in the software for the device Check your network product documentation for detai...

Page 63: ...ter or device and then print If you are printing from a computer make sure you installed the network software as described on the Start Here sheet Note If you don t see the icon repeat these steps to try again Parent topic Wi Fi Protected Setup WPS Printing a Network Status Sheet You can print a network status sheet to help you determine the causes of any problems you may have using your product o...

Page 64: ...shown on the network status sheet to diagnose any problems you have Parent topic Wi Fi or Wired Networking Printing a Network Connection Report You can print a network connection report to view solutions to any problems you may have using your product on a network 1 Press the home button if necessary 2 Select Settings 3 Select General Settings ...

Page 65: ...work Settings 5 Select Connection Check 6 Select Print Check Report 7 Select Print Examine the error codes and solutions shown on the network connection report Network Connection Report Codes and Messages Parent topic Wi Fi or Wired Networking ...

Page 66: ...ote Error codes and messages listed here may not all apply to your product Error Codes and Messages Error code and message Solution E 1 Confirm that the network cable is connected and network devices such as hub router or access point are turned on Make sure your router access point and or hub are turned on and the network cable is securely connected to your device and to your product If you are t...

Page 67: ...t and remove any obstacles between them Also move your product away from devices such as wireless phones or microwaves Confirm that the SSID shown on the network connection report matches the label on your router or access point Also make sure your SSID uses only ASCII characters and symbols or your product cannot display the SSID correctly If you are trying to connect using the WPS push button me...

Page 68: ... product s MAC address so it is not filtered Locate the MAC address on the network connection report and check your router or access point documentation for instructions If your router or access point is using shared authentication with WEP security confirm that you are using the correct authentication key and index If your router or access point limits the number of connected devices raise the co...

Page 69: ...ned on and do the following If your product s Obtain IP Address setting is set to Manual check the IP address subnet mask and default gateway addresses on the network connection report to see if they are correct If not correct the settings If DHCP is enabled set your product s Obtain IP Address setting to Auto If you want to use the DHCP assigned address as a static address set the Obtain IP Addre...

Page 70: ...ork settings If your router or access point uses WEP security with several registered passwords make sure that the first registered password is set on your product E 13 Confirm the following Entered security key password is correct Index of the security key password is set to the first number Connection and network setup of the PC or other device is correct Contact your network administrator for a...

Page 71: ...t one of the connected devices if you want to add another one You can connect up to 8 computers or other devices to your product using a Wi Fi Direct Simple AP connection If you want to add another device disconnect an existing connected device first The same SSID as Wi Fi Direct exists in the environment Change the Wi Fi Direct SSID if you cannot connect a smart device to the printer Change the W...

Page 72: ...lect Advanced 6 Select Email Server 7 Select Server Settings You see a screen like this 8 Select one of the options shown above then select the settings you want to use Contact your internet service provider if necessary to confirm the authentication method for the email server ...

Page 73: ...The mail server needs to support SMTP authentication POP before SMTP Authenticates on the POP3 server receiving mail server before sending the email When you select this item set the POP3 server Authenticated Account Lets you enter a user name or email address for the mail server Used with the POP before SMTP and SMTP AUTH methods Authenticated Password Lets you enter a password for the authentica...

Page 74: ...these sections to change or update how your product connects to a network Accessing the Web Config Utility Changing a USB Connection to a Wi Fi Connection Changing a Wi Fi Connection to a Wired Network Connection Connecting to a New Wi Fi Router Disabling Wi Fi Features Parent topic Wi Fi or Wired Networking Accessing the Web Config Utility You can select your product s network settings and confir...

Page 75: ...oftware 3 Download and install your product software from the Epson website using the instructions on the Start Here sheet Parent topic Changing or Updating Network Connections Changing a Wi Fi Connection to a Wired Network Connection If you have already connected your product to your computer wirelessly you can change to a wired network connection if necessary 1 Disable your product s Wi Fi featu...

Page 76: ...on for instructions 1 Do one of the following Windows Uninstall your product software Mac Go to the next step 2 Download and install your product software from the Epson website using the instructions on the Start Here sheet Parent topic Changing or Updating Network Connections Disabling Wi Fi Features You may need to disable your product s Wi Fi features if you change your network connection type...

Page 77: ...7 You see a screen like this 3 Select Wi Fi Recommended 4 Select Change Settings 5 Select Others 6 Select Disable Wi Fi 7 Select Yes to disable Wi Fi Parent topic Changing or Updating Network Connections ...

Page 78: ... Media Type Settings Printing Software Selecting the Paper Settings for Each Source Control Panel Selecting the Default Paper Source Settings Selecting the Universal Print Settings Loading Paper in the Cassette You can load paper up to this size in the paper cassette Legal 8 5 14 inches 216 356 mm Note Before loading paper make sure your product is not currently printing scanning or copying 1 Pres...

Page 79: ... remove or insert the paper cassette during printing Load only the recommended number of sheets Load paper short edge first and printable side facedown Make sure the paper is under the tabs on the edge guides and not sticking out from the rear end of the cassette If you have trouble loading a stack of envelopes press each envelope flat before loading it or load one envelope at a time If print qual...

Page 80: ...ette select User Defined as the paper size setting Make sure the end of the paper is cut perpendicularly and do not touch paper that is being fed or ejected Paper Loading Capacity Double sided Printing Capacity Borderless Paper Type Compatibility Parent topic Loading Paper Related references Paper Specifications Paper Loading Capacity See the table here for the loading capacity of the paper casset...

Page 81: ...cio 8 5 13 4 inches 216 340 mm or Executive 7 25 10 5 inches 184 267 mm size Up to the line indicated by the triangle mark 250 sheets Half Letter 5 5 8 5 inches 140 216 mm A6 4 1 5 8 inches 105 148 mm size Up to the line indicated by the triangle mark 250 sheets User defined paper size from 8 5 11 inches 216 297 mm to 8 5 14 inches 216 356 mm 1 250 sheets 250 sheets User defined paper size from 3 ...

Page 82: ...paper size from 7 2 14 inches 182 356 mm to 8 5 47 2 inches 216 1200 mm long2 1 sheet Epson Bright White Premium Paper Epson Bright White Pro Paper Epson Multipurpose Plus Paper 250 sheets Epson Presentation Paper Matte 100 sheets Epson Premium Presentation Paper Matte Epson Premium Presentation Paper Matte Double sided Epson Brochure Flyer Paper Matte Double sided Epson Photo Paper Glossy 3 Epson...

Page 83: ... 105 148 mm size 50 sheets User defined paper size from 8 5 11 inches 216 297 mm to 8 5 14 inches 216 356 mm 1 50 sheets User defined paper size from 3 5 5 inches 89 127 mm to 8 5 14 inches 216 297 mm 1 50 sheets User defined paper size from 3 5 14 inches 89 356 mm to 8 5 47 2 inches 216 1200 mm 1 1 sheet Envelopes 10 envelopes 1 The minimum paper width for Cassette 1 is 3 5 inches 89 mm 2 The min...

Page 84: ...ts Legal 8 5 14 inches 216 356 mm 8 5 13 inches 216 330 mm Oficio 9 8 46 12 4 inches 215 315 mm Mexico Oficio 8 5 13 4 inches 216 340 mm Half Letter 5 5 8 5 inches 140 216 mm A6 4 1 5 8 inches 105 148 mm 30 sheets1 User defined paper size from 8 5 11 inches 216 297 mm to 8 5 14 inches 216 356 mm 250 sheets 30 sheets User defined paper size from 3 5 5 inches 89 127 mm to 8 5 14 inches 216 297 mm Ca...

Page 85: ... 5 11 inches 216 279 mm 250 sheets 30 sheets Epson Premium Presentation Paper Matte Epson Premium Presentation Paper Matte Double sided Epson Brochure Flyer Paper Matte Double sided Epson Photo Paper Glossy 1 Epson Premium Photo Paper Glossy1 Epson Ultra Premium Photo Paper Glossy1 Epson Premium Photo Paper Semi gloss1 Letter 8 5 11 inches 216 279 mm and smaller ...

Page 86: ...er defined paper size from 8 5 11 inches 216 297 mm to 8 5 14 inches 216 356 mm 50 sheets 10 sheets User defined paper size from 3 5 5 inches 89 127 mm to 8 5 14 inches 216 297 mm 10 sheets User defined paper size from 3 5 14 inches 89 356 mm to 8 5 47 2 inches 216 1200 mm 1 sheet Envelopes No 10 4 1 9 5 inches 105 241 mm 1 The minimum paper width for Cassette 2 is 7 2 inches 182 mm 2 Card Stock c...

Page 87: ...ouble sided Epson Brochure Flyer Paper Matte Double sided These paper types may scuff the print head resulting in smeared printouts Borderless Paper Sizes 4 6 inches 102 152 mm 5 7 inches 127 178 mm 16 9 wide 4 7 1 inches 102 181 mm A4 8 3 11 7 inches 210 297 mm Letter 8 5 11 inches 216 279 mm Parent topic Loading Paper in the Cassette Compatible Epson Papers You can purchase genuine Epson ink mai...

Page 88: ...ches 216 279 mm S041062 100 Legal 8 5 14 inches 216 356 mm S041067 100 Epson Premium Presentation Paper Matte 8 10 inches 203 254 mm S041467 50 Letter 8 5 11 inches 216 279 mm S041257 S042180 50 100 Epson Premium Presentation Paper Matte Double sided Letter 8 5 11 inches 216 279 mm S041568 50 Epson Brochure Flyer Paper Matte Double sided Letter 8 5 11 inches 216 279 mm S042384 150 Epson Photo Pape...

Page 89: ... 152 mm S042181 S042174 60 100 5 7 inches 127 178 mm S041945 20 8 10 inches 203 254 mm S041946 20 Letter 8 5 11 inches 216 279 mm S042182 S042175 25 50 Epson Premium Photo Paper Semi gloss 4 6 inches 102 152 mm S041982 40 Letter 8 5 11 inches 216 279 mm S041331 20 Parent topic Loading Paper Paper or Media Type Settings Printing Software For this paper Select this paper Type or Media Type setting P...

Page 90: ...Presentation Paper Matte Double sided Epson Brochure Flyer Paper Matte Double sided Premium Presentation Paper Matte Epson Presentation Paper Matte Presentation Paper Matte Note The settings listed here are available only when printing from your computer they do not apply to your product s control panel settings Parent topic Loading Paper Selecting the Paper Settings for Each Source Control Panel ...

Page 91: ... you loaded Paper type loaded Paper Type setting Plain paper Epson Bright White Pro Paper Plain Paper Letterhead paper Letterhead Recycled paper Recycled Colored paper Color Pre printed paper Preprinted High quality plain paper Epson Bright White Premium Paper Epson Multipurpose Plus Paper High Quality Plain Paper Envelopes Envelope Thick paper Card Stock Epson Ultra Premium Photo Paper Glossy Ult...

Page 92: ...ange default paper source settings using the control panel on the product 1 Press the home button if necessary 2 Select Settings General Settings Printer Settings You see a screen like this 3 Select one of these Auto Error Solver options Turn on this setting to display a warning and print single sided when a 2 sided printing error occurs or to print only what the printer could process when a memor...

Page 93: ...per from any source containing paper that matches your paper settings Fax Other Error Notice Paper Size Notice Select On for either of these settings to display an error message when the selected paper type or size does not match the loaded paper Paper Type Notice Paper Setup Auto Display On Select On to automatically display a menu that lets you select the paper size and type when you load paper ...

Page 94: ...o use for your print jobs Universal Print Settings option Available settings Description Top Offset Adjust the top or left margin Left Offset Top Offset in Back Adjust the top or left margin of the back page when printing double sided Left Offset in Back Check Paper Width On Select On to check the paper width before printing This prevents printing beyond the edges of the paper when the paper size ...

Page 95: ...95 Universal Print Settings option Available settings Description Skip Blank Page On Select On to skip printing of blank pages automatically Off Parent topic Selecting the Universal Print Settings ...

Page 96: ...acing Originals in the Automatic Document Feeder Placing Originals on the Scanner Glass You can place originals up to this size on the scanner glass Letter 8 5 11 inches 216 279 mm or A4 8 3 11 7 inches 210 297 mm Note To view animated instructions on how to place originals on the scanner glass press the help button and select How To Place Originals Scanner Glass Note When originals are placed in ...

Page 97: ...97 1 Open the document cover ...

Page 98: ...wn on the document cover or scanner glass or you may damage the product Remove your originals after scanning If you leave the originals on the scanner glass for a long time they may stick to the glass surface Parent topic Placing Originals on the Product Related topics Copying Scanning Faxing Placing Originals in the Automatic Document Feeder You can place single or multi page original documents i...

Page 99: ...erials that could obstruct the feeder Note To view animated instructions on how to place originals in the ADF press the help button and select How To Place Originals ADF Note When originals are placed in the ADF and on the scanner glass priority is given to the originals in the ADF 1 Open the ADF document support ...

Page 100: ...100 2 Slide the ADF edge guide outward 3 Fan your stack of originals and tap them gently on a flat surface to even the edges ...

Page 101: ...101 4 Insert the originals into the ADF faceup and short edge first Note Do not load originals above the arrow mark on the ADF edge guide The ADF icon on the Copy Scan and Fax screens lights up ...

Page 102: ...t too tightly ADF Original Document Specifications Parent topic Placing Originals on the Product Related topics Copying Scanning Faxing ADF Original Document Specifications You can load original documents that meet these specifications in the ADF WF 4820 Series ...

Page 103: ...216 279 mm 17 to 24 lb 64 to 90 g m Approximately 50 sheets A4 8 3 11 7 inches 210 297 mm Executive 7 25 10 5 inches 184 267 mm Half Letter 5 5 8 5 inches 140 216 mm Legal 8 5 14 inches 216 356 mm Approximately 10 sheets 8 5 13 inches 216 330 mm Caution Do not load the following types of originals in the ADF or they may be damaged or may damage the scanner Use the scanner glass for these types Rip...

Page 104: ...labels stickers or sticky notes Thermal paper Originals with carbon paper backing Originals that are bound Transparencies Irregularly cut or angled originals Parent topic Placing Originals in the Automatic Document Feeder ...

Page 105: ... are the same unless otherwise noted Copying Documents or Photos Copying Options Copying Documents or Photos You can copy documents or photos onto various sizes and types of paper including Epson special papers 1 Place your original document or photo on the scanner glass or place multi page documents in the ADF 2 Load the paper you want to print on 3 Press the home button if necessary 4 Select Cop...

Page 106: ... Parent topic Copying Related references Copying Options Compatible Epson Papers Related tasks Using Presets Loading Paper in the Cassette Related topics Placing Originals on the Product Copying Options Select the copying options you want to use for your copies Note Not all options or settings may be available depending on other copying settings Basic Settings Copying option Available settings Des...

Page 107: ...iginal at a smaller size than the Reduce Enlarge value to fit within the paper size Various conversion options Automatically converts from one size to another 2 Sided 1 1 Sided Select to make 2 sided copies When you select 1 2 Sided or 2 1 Sided also select the Advanced tab to select the orientation and binding edge for your originals or copies Note The 2 2 Sided and 2 1 Sided options are only ava...

Page 108: ...rint multiple copies of a multi page document in unordered groups Collate Page Order Select to print multiple copies of a multi page document in ordered sets Orientation Original Readable Direction Specifies the orientation of your originals Readable Direction Left Direction Left Direction ...

Page 109: ...ckground color Select to make the background lighter or to make the background darker Binding Margin Off Select On to adjust the margin and orientation of the pages when copying a book On Reduce to Fit Paper Off Copies the original at a smaller size than the Reduce Enlarge value to fit within the paper size On Remove Shadow Off Select On to erase the shadows that appear in the center of a document...

Page 110: ...lt in Epson Driver Windows 10 S Printing on a Mac Printing from a Smart Device Cancelling Printing Using the Product Printing with Windows You can print with your product using any Windows application as described in these sections Note If you are using your Epson product with the Windows 10 S operating system you cannot use the software described in this section You also cannot download and insta...

Page 111: ...a photo or document for printing 2 Select the print command in your application Note You may need to select a print icon on your screen the Print option in the File menu or another command See your application s help utility for details 3 If necessary select your product name as the printer you want to use Note You may also need to select Properties or Preferences to view your print settings ...

Page 112: ...aded as the Document Size setting Note You can also select the User Defined setting to create a custom paper size 6 If you are printing a borderless photo select Borderless You can click Settings to access additional options for borderless printing Note You must select a compatible borderless paper type and size to print without borders Check the borderless paper compatibility list for details ...

Page 113: ...tions you want 12 To print multiple pages on one sheet of paper or print one image on multiple sheets of paper select one of the settings in the Multi Page menu and select the printing options you want 13 To print multiple copies and arrange their print order select the Copies options 14 To preview your job before printing select Print Preview 15 To save your print job as a project that can be mod...

Page 114: ...ality of your print Some settings may be unavailable depending on the paper type and border setting you have chosen Draft For draft printing on plain paper Standard For everyday text and image printing High For photos and graphics with high print quality Parent topic Selecting Basic Print Settings Windows Multi Page Printing Options Windows You can select any of the available options in the Multi ...

Page 115: ...lipping the paper on the long edge Auto Short edge binding to print your double sided print job by automatically flipping the paper on the short edge Manual Long edge binding to print your double sided print job by printing one side and prompting you to flip the paper over on the long edge to print the other side recommended for paper types that do not support automatic duplexing Manual Short edge...

Page 116: ...116 You see this window 3 Select the double sided printing options you want to use 4 Click OK to return to the Main tab 5 Click the Print Density button ...

Page 117: ... the selected settings 10 Follow any instructions displayed on the screen during printing Double sided Printing Options Windows Print Density Adjustments Windows Parent topic Printing with Windows Double sided Printing Options Windows You can select any of the available options on the Binding Settings window to set up your double sided print job Binding Edge Options Select a setting that orients d...

Page 118: ...Basic Print Settings Windows Print Density Adjustments Windows You can select any of the available options on the Print Density Adjustment window to adjust the print quality of your double sided print job Print Density Sets the level of ink coverage for double sided printing Increase Ink Drying Time Sets the amount of time required for drying ink after printing on one side of the paper before prin...

Page 119: ...ion to size your image to fit the paper you loaded Select the size of your document or photo as the Document Size setting and the size of your paper as the Output Paper setting If you want to center your image on the paper select the Center option Select the Zoom to option to reduce or enlarge your document or photo by a specific percentage Select the percentage in the menu 2 Select one of the fol...

Page 120: ...copied Watermark adds a visible watermark to your printout Note Click the Add Delete button to create your own watermark and click the Settings button to customize the watermark Header Footer adds information such as the date and time to the top or bottom of your printout Note Click the Settings button to customize the text and location of the header or footer 4 Select any of the Additional Settin...

Page 121: ...or tones Depending on the selected color mode you can also adjust the midtone density using the Gamma setting Fix Photo Improves the color contrast and sharpness of flawed photos Note Fix Photo uses a sophisticated face recognition technology to optimize photos that include faces For this to work both eyes and the nose must be visible in the subject s face If your photo includes a face with an int...

Page 122: ...o increase readability Emphasize Thin Lines Adjusts the weight of printed lines to increase visibility Edge Smoothing Smooths jagged edges in low resolution images such as screen captures or images from the Web Fix Red Eye Reduces or removes red eye in photos Print Text in Black Prints colored text in black For Color Text Prints colored text on a background pattern or underlined For Color Graphs a...

Page 123: ...ft to right Parent topic Selecting Additional Layout and Print Options Windows Header Footer Settings Windows You can select any of the Header Footer Settings options to add headers or footers when you print The items are available to print at the top or bottom of your pages in either the left right or center of the page Note These settings are not saved with your document ...

Page 124: ...name computer name date and time come from the Windows Control Panel on your computer Parent topic Selecting Additional Layout and Print Options Windows Selecting a Printing Preset Windows For quick access to common groups of print settings you can select a printing preset on the Main or More Options tab Note You can create your own preset by clicking the Add Remove Presets button 1 Click the Main...

Page 125: ...lace your cursor over one of the Printing Presets to view its list of settings 3 Click on a preset to change its settings or use any of the available options on the screen to control your printing presets 4 To choose a preset for printing select it 5 Click OK ...

Page 126: ...y to all the print jobs you send to your product 1 Access the Windows Desktop and right click the icon for your product in the right side of the Windows taskbar or click the up arrow and right click 2 Select Printer Settings 3 Click the Maintenance tab You see the maintenance options 4 Click the Extended Settings button ...

Page 127: ...able EPSON Status Monitor 3 Enables product monitoring for ink and paper supplies and other issues Check Paper Width Before Printing Prevents printing beyond the edges of the paper if the paper size setting is incorrect may reduce print speed Thick Paper and Envelopes Prevents ink from smearing when you print on envelopes or other thick paper Separator Page Before each document prints a separator ...

Page 128: ... color matching Always Use the Driver s Paper Source Setting Prints using the paper source setting in the printer driver rather than the setting in your application Output 1 page documents facedown in 2 Sided mode Outputs single sided pages in a 2 sided print job facedown instead of faceup Output documents for filing Outputs all landscape portrait 1 sided and 2 sided documents in the same orientat...

Page 129: ...vent unauthorized changes 1 Do one of the following Windows 10 Click and select Settings Devices Printers scanners Select your product name and select Manage Printer properties Windows 8 x Navigate to the Apps screen and select Control Panel Hardware and Sound Devices and Printers Right click your product and select Printer properties Windows 7 Click and select Devices and Printers Right click you...

Page 130: ... the Optional Settings tab by changing the user or group permissions in the Security tab 3 Click Driver Settings You see this window 4 Select the checkbox for each setting you want to lock To lock all print settings select All Document Settings 5 Under Advanced Settings select the setting option you want to use for each locked setting 6 Click OK Locked Setting Options Parent topic Printing with Wi...

Page 131: ... you select the size position and other watermark settings Header Footer Off Prohibits headers or footers On Allows headers and footers Settings Lets you select the text and position for printing headers and footers Color Color Allows color printing Grayscale Allows printing in black or shades of gray only 2 sided printing Off Allows printing on one side of the paper only On Allows printing on bot...

Page 132: ...n a program the changes apply only while you are printing in that program session If you want to change the print settings you use in all your Windows programs you can select new default print settings 1 Access the Windows Desktop and right click the icon for your product in the right side of the Windows taskbar or click the up arrow and right click 2 Select Printer Settings You see the printer se...

Page 133: ... Language of the Printer Software Screens Parent topic Printing with Windows Changing the Language of the Printer Software Screens You can change the language used on the Windows printer software screens 1 Access the Windows Desktop and right click the icon for your product in the right side of the Windows taskbar or click the up arrow and right click 2 Select Printer Settings You see the printer ...

Page 134: ...Parent topic Selecting Default Print Settings Windows Changing Automatic Update Options Your printer software for Windows automatically checks for updates to the product software You can change how often the software checks for updates or disable this feature 1 Access the Windows Desktop and right click the icon for your product in the right side of the Windows taskbar or click the up arrow and ri...

Page 135: ...ndows 10 S You can print with the built in Epson printer driver using any printing program on Windows 10 S as described in these sections Note The built in Epson driver in Windows 10 S does not include all the available print settings for your product To print with additional settings download and install the Epson Print and Scan utility from the Windows Store You cannot download and install any E...

Page 136: ...in the File menu or another command See your application s help utility for details 2 If necessary select your product name as the printer you want to use Note You may also need to select Properties or Preferences to view your print settings You see a window like this 3 Select the type of paper you loaded as the Media setting Note The setting may not exactly match the name of your paper Check the ...

Page 137: ...e of the paper you loaded as the Paper Size setting 6 To print multiple copies select or enter the number as the Copy Count setting 7 To print multiple copies of multi page documents in sets select the Collated checkbox 8 Click OK You return to the printing preferences window ...

Page 138: ...138 9 Select the Layout tab 10 Select the orientation of your document as the Orientation setting ...

Page 139: ... s Print window 13 Click OK or Print to start printing Parent topic Printing with the Built in Epson Driver Windows 10 S Printing on a Mac You can print with your product using any Mac printing program as described in these sections Note If you have an Internet connection it is a good idea to check for updates to your product software on Epson s support website Selecting Basic Print Settings Mac S...

Page 140: ...basic settings for the document or photo you want to print 1 Open a photo or document for printing 2 Select the print command in your application Note You may need to select a print icon on your screen the Print option in the File menu or another command See your application s help utility for details 3 Select your product as the Printer setting 4 If necessary click the arrow next to the Printer s...

Page 141: ...ding on the Mac OS version and the application you are using 5 To use an existing set of print settings select Presets and choose a preset from the list 6 Select the Copies and Pages settings as necessary Note If you do not see these settings in the print window check for them in your application before printing ...

Page 142: ...ow check for them in your application before printing They may be accessible by selecting Page Setup from the File menu 8 Select any application specific settings that appear on the screen such as those shown in the image above for the Preview application 9 Select Print Settings or Printer Features from the pop up menu ...

Page 143: ...0 Series 11 Select the type of paper you loaded as the Media Type setting Note The setting may not exactly match the name of your paper Check the paper type settings list for details 12 Select the Print Quality setting you want to use 13 Select the Borderless checkbox if you want to print a borderless photo If the option is grayed out change the Media Type setting to a paper type that supports bor...

Page 144: ... any of the available options in the Paper Source menu to print on the paper loaded in that source WF 4830 Series Auto Select Automatically selects the paper source based on the selected paper size Cassette 1 Selects the paper in cassette 1 as the paper source Cassette 2 Selects the paper in cassette 2 as the paper source Parent topic Selecting Basic Print Settings Mac Print Quality Options Mac Yo...

Page 145: ...ing at the edges of borderless prints Grayscale Prints text and graphics in black or shades of gray Mirror Image Lets you flip the printed image horizontally Note If you select the Min option for the Expansion setting you may see white borders on your printed photo Parent topic Selecting Basic Print Settings Mac Selecting Page Setup Settings Mac Depending on your application you may be able to sel...

Page 146: ...paper compatibility list for details 2 Select the orientation of your document or photo as shown in the print window Note If you are printing an envelope select the icon Note You can reduce or enlarge the size of the printed image by selecting Paper Handling from the pop up menu and selecting a scaling option Parent topic Printing on a Mac Related references Borderless Paper Type Compatibility Sel...

Page 147: ...o invert or flip the printed image select the Reverse page orientation or Flip horizontally settings Parent topic Printing on a Mac Selecting Double sided Printing Settings Mac You can print on both sides of the paper by selecting Two sided Printing Settings from the pop up menu on the print window Note Some options may be pre selected or unavailable depending on other settings you have chosen or ...

Page 148: ... document to test the selected settings 5 Follow any instructions displayed on the screen during printing Double sided Printing Options and Adjustments Mac Parent topic Printing on a Mac Double sided Printing Options and Adjustments Mac You can select any of the available options in the Two sided Printing Settings or Output Settings pop up menu to set up your double sided print job Long Edge bindi...

Page 149: ...de of the paper before printing the other side in double sided printing Parent topic Selecting Double sided Printing Settings Mac Managing Color Mac You can adjust the Color Matching and Color Options settings to fine tune the colors in your printout or turn off color management in your printer software 1 Select Color Matching from the pop up menu in the print window 2 Select one of the available ...

Page 150: ...lick the arrow next to Advanced Settings and select settings for Brightness Contrast Saturation and individual color tones You can also select a color Mode setting for printing photos and graphics and the Fix Red Eye setting to reduce or remove red eye in photos Depending on the selected color mode you can also adjust the midtone density using the Gamma setting Fix Photo Improves the color contras...

Page 151: ...our product and select Options Supplies 3 Select Driver or Options You see a screen like this 4 Select any of the available printing preferences 5 Click OK Printing Preferences Mac Parent topic Printing on a Mac Printing Preferences Mac You can select these settings on the Options or Driver tab Note Automatic Cassette Switching is available only if your product has two cassettes Thick Paper and En...

Page 152: ...t 1 sided and 2 sided documents in the same orientation for easier filing Remove white borders Removes white margins that may appear when you print borderless photos Warning Notifications Lets you choose whether or not to receive warning notifications from the printer software for various operating conditions Establish bidirectional communication Allows the product to communicate with the computer...

Page 153: ...g Print Status Mac Parent topic Printing on a Mac Checking Print Status Mac During printing you can view the progress of your print job control printing and check ink status 1 Click the printer icon when it appears in the Dock You see the print status window ...

Page 154: ...the Epson Smart Panel app Note Your device must be connected to the same wireless network as your Epson product and Epson Smart Panel must be configured for use with your product 1 Download the Epson Smart Panel app from your device s app store or from Epson s website See the link below 2 Open the Epson Smart Panel app and select a print menu on the home screen 3 Follow the on screen instructions ...

Page 155: ...ng to a Network Folder or FTP Server Starting a Scan Using the Epson Scan 2 Icon Starting a Scan from a Scanning Program Starting a Scan from a Smart Device Parent topic Scanning Starting a Scan Using the Product Control Panel You can scan an image to a variety of destinations using your product s control panel 1 Make sure you installed the product software and connected the product to your comput...

Page 156: ...your saved scan settings Memory Device saves your scan file on a USB device and lets you select the file format quality and other settings Cloud sends your scanned files to a destination that you have registered with Epson Connect WSD lets you manage network scanning in Windows 10 Windows 8 x Windows 7 or Windows Vista English only To use this feature you must first set up a WSD Web Services for D...

Page 157: ...original and email the scanned file using your product s control panel You need to have a preconfigured email server before you can scan to email You can either enter the email address directly on the product s control panel or select an address from the Contacts list Make sure the date and time are set correctly so the time stamps on your emails are accurate 1 Place your original on the product f...

Page 158: ...4 Select Email You see a screen like this 5 Do one of the following Select Contacts and choose an email address from the Contacts list Select Keyboard to use the displayed keyboard to enter the address for the recipient and press OK ...

Page 159: ...Server Settings Entering Characters on the LCD Screen Related topics Placing Originals on the Product Scanning to a Connected Computer You can scan an original and save it to a connected computer using your product s control panel The computer must be connected using a USB cable or connected to the same network as your product You can save the scanned file as a JPEG or PDF file or attach it to an ...

Page 160: ...160 3 Select Scan You see a screen like this 4 Select Computer You see a screen like this ...

Page 161: ...ter using WSD Web Services for Devices You must first set up a WSD port on your Windows 7 or Windows Vista system the port is set up automatically on Windows 10 and Windows 8 x Before you set up a WSD port make sure you installed your product software and connected your product and computer to the same network 1 Turn on your product 2 Print a network status sheet so you can identify the network na...

Page 162: ...n you use WSD select your product name to scan over the network Parent topic Starting a Scan Using the Product Control Panel Related references Control Panel Scanning Options Related topics Placing Originals on the Product Scanning to the Cloud You can use the control panel to send your scanned files to a destination that you have registered with Epson Connect Note Make sure to set up your product...

Page 163: ...163 You see a screen like this 4 Select Cloud You see a screen like this Note You must register your product with Epson Connect to select a destination ...

Page 164: ... destination Parent topic Starting a Scan Using the Product Control Panel Related references Control Panel Scanning Options Related topics Placing Originals on the Product Scanning to a Memory Device You can scan an original and save the scanned image to a memory card or external USB device 1 Insert a memory card into your product s memory card slot or connect an external USB device to the port on...

Page 165: ...ab press the Save icon to start scanning Your product scans your original and saves the scanned file to the memory card or USB device Parent topic Starting a Scan Using the Product Control Panel Related references Control Panel Scanning Options Related topics Placing Originals on the Product Control Panel Scanning Options Select the options you want to use for scanning Note Not all options or sett...

Page 166: ...mages Color Mode Color Select whether to scan images in color or black and white B W File Format JPEG Select for photos You can also select the Compression Ratio PDF Single Page PDF Multi Page PDF A Single Page PDF A Multi Page Select for documents You can also select the Compression Ratio and PDF Settings TIFF Single Page Select for scanned files that you can print from a device Multi Page TIFF d...

Page 167: ...ess of scanned images Remove Shadow On Erases the shadows that appear in the center of a document when copying a book or the shadows that appear around a document when copying thick paper Off Remove Punch Holes On Erases the binding holes on a document Off Subject Lets you enter a subject for your email Attached File Max Size Various sizes Lets you select the maximum file size that can be attached...

Page 168: ...g a shared network folder on a Mac see your Mac documentation for instructions on creating the folder The instructions here are for Windows First make sure you connected your product and computer to the same network Note If you are running a Home version of the Windows operating system you cannot create a shared folder on your Windows desktop or in the Documents or Pictures folder unless you have ...

Page 169: ...ows Explorer 4 Create a folder on the Windows desktop with a folder name of 12 characters or less otherwise your product may not be able to access the folder Note You need to be logged into Windows as an administrator to access the desktop folder and the document folder under each User folder 5 Right click the folder you created and select Properties 6 On the General tab deselect the Read only che...

Page 170: ...folder path to your product contacts list Parent topic Setting Up and Scanning to a Network Folder or FTP Server Related tasks Registering Contacts for Email Network or FTP Scanning Control Panel Registering Contacts for Network Folder or FTP Scanning Web Config Scanning to a Network Folder or FTP Server Registering Contacts for Email Network or FTP Scanning Control Panel You can register a list o...

Page 171: ...e displayed keyboard to enter the address and press OK For a network folder or FTP location select the Communication Mode field and select Network Folder SMB or FTP Then select the Location field use the displayed keyboard to enter the network path to the shared folder and select OK Enter the folder path name for the Location setting in one of the following formats depending on the Communication M...

Page 172: ...nt to use for the contact you are adding and click Edit 6 Select Network Folder SMB or FTP as the Type setting 7 Enter the following information for the contact Name The name to display in your product s contact list Index Word Enter a word to identify this entry when searching for it up to 30 characters This field is optional Assign to Frequent Use If you want to identify the contact as a frequen...

Page 173: ...ou can scan an image and save it to a network folder on your computer or on an FTP server using your product s control panel You can either enter the folder path directly on the product s control panel or select a folder from the Contacts list Note Make sure the date and time are set correctly before using this feature 1 Place your original on the product for scanning Note To scan a double sided o...

Page 174: ...g formats depending on the Communication Mode setting you selected SMB host_name folder FTP ftp host_name folder_name For a network folder or FTP location with a password select the User Name field and use the displayed keyboard to enter the user name Then select the Password field and enter the password For an FTP location enter the FTP server port number in the Port Number field If there is a fi...

Page 175: ...oduct Starting a Scan Using the Epson Scan 2 Icon You can start the Epson Scan 2 program to select scan settings scan and save the scanned image to a file Note If you are using your Epson product with the Windows 10 S operating system you cannot use the software described in this section You also cannot download and install any Epson product software from the Epson website for use with Windows 10 ...

Page 176: ...176 You see an Epson Scan 2 window like this ...

Page 177: ...n You also cannot download and install any Epson product software from the Epson website for use with Windows 10 S you must obtain software only from the Windows Store 1 Open your scanning program and select its scanning option See your scanning program help for instructions 2 Select your product Note In certain programs you may need to select your product as the source first If you see a Select S...

Page 178: ...178 You see an Epson Scan 2 window like this ...

Page 179: ...e App Setting Up Wireless Printing from a Smart Device Using Epson Smart Panel Scanning a Document in Epson ScanSmart You can scan and review documents and photos in Epson ScanSmart Note The images in this guide show Windows screens Mac screens may be slightly different Depending on your product model and software version not all options may be available 1 Load your original into the product 2 Ope...

Page 180: ...elect an option for the Scan area setting if necessary Note The Scan area setting limits the scan area to a selected size starting at the placement arrow on the scanner bed It does not scale the image to the selected size 4 Select SCAN ...

Page 181: ...Stitch Images and follow the on screen instructions to combine them into a single image 6 If Photo Mode is automatically detected the following enhancement options are available Auto Color Enhancement automatically adjusts the brightness contrast and saturation of your photos Restore Faded Colors restores the colors in faded photos automatically Remove Red Eye automatically removes the red eye eff...

Page 182: ...ow Saving a Scan Attaching a Scan to Email Sending a Scan to a Cloud Service Printing a Scan Parent topic Scanning Saving a Scan You can save a scanned image to your computer in a variety of formats 1 Make sure your originals are scanned and reviewed See the link below 2 In the Select Action window click Save ...

Page 183: ...ng a Document in Epson ScanSmart Attaching a Scan to Email You can attach a scanned image to an email as a file attachment Note Your email app and account settings should be configured before scanning You must install a MAPI type email program such as Outlook Express Windows Live Mail Entourage or Mac Mail Attach to Email only supports 32 bit MAPI compatible mail apps Web based email services such...

Page 184: ...Character Recognition language If you also want to save a copy of the scanned image to your computer make sure the checkbox is selected and select the folder on your computer in which to save the file 4 Click Attach to E mail Your email program opens with the file attached to a new email Parent topic Scanning a Document in Epson ScanSmart Sending a Scan to a Cloud Service You can upload scanned im...

Page 185: ...t type and scan date for the file name are automatically detected You can change them as necessary You can save the scanned image in a variety of formats If you select Searchable PDF as the File type setting you can select the OCR Optical Character Recognition language If you also want to save a copy of the scanned image to your computer click the checkbox 5 Click Send Parent topic Scanning a Docu...

Page 186: ...change the print settings if necessary Select the number of copies you want to print If you also want to save a copy of the scanned image to your computer click the checkbox The document type and scan date for the file name are automatically detected You can change them as necessary You can save the scanned image in a variety of formats If you select Searchable PDF as the File type setting you can...

Page 187: ... Changing the Save Settings Customizing Action Icons Parent topic Scanning Changing the Epson Product If you are using more than one Epson product with Epson ScanSmart you can change the product that you are using with your computer Note A product connected to your computer via USB takes priority over a product with a Wi Fi connection 1 On the main screen click Change You see a screen like this ...

Page 188: ... such as the resolution document size and more Note If you select Auto Mode you cannot change the scan settings 1 Click the Settings button You see a screen like this 2 Do one of the following To change Document Mode settings select Document Mode Custom Settings To change Photo Mode settings select Photo Mode and click Close When you start a scan you will be prompted to select scan settings ...

Page 189: ...189 You see a screen like this 3 Change the settings as necessary and click Save Parent topic Selecting Epson ScanSmart Settings Related references Additional Scanning Settings Main Settings Tab ...

Page 190: ...nning Settings Advanced Settings Tab Changing the File Name Settings You can change the default file naming method for your scans 1 Click the Settings button You see a screen like this 2 Click the File Name Settings tab ...

Page 191: ...a prefix for the file name Select the date format Select a numbering format as the counter format 4 Click Close Parent topic Selecting Epson ScanSmart Settings Changing the Save Settings You can change the file type options for saving your scans 1 Click the Settings button ...

Page 192: ...192 You see a screen like this 2 Click the Save Settings tab ...

Page 193: ...ange the settings as necessary 4 Click Open folder after saving to open the file folder after a file is saved 5 Click Close Save Settings Parent topic Selecting Epson ScanSmart Settings Save Settings You can change the settings for how scanned images are saved PDF Options ...

Page 194: ...ly Standard Images load from top to bottom in a web browser It takes longer to load the entire image Progressive Images first load completely at low resolution and then adjust to high resolution in a web browser Embed ICC Profile Windows only Allows you to add ICC profiles to the image TIFF Options Setting Options Description Byte Order Windows Macintosh Specifies the operating system where the sc...

Page 195: ... Icons You can customize which scan action icons appear on the Select Action screen Note You can also customize them by clicking the Customize icon on the Select Action screen 1 Click the Settings button You see a screen like this 2 Click the Customize Actions tab ...

Page 196: ...an your document and save the scanned image in various file formats in your operating system s Documents or My Documents folder or open it in your scanning program You can preview the scanned image and select or change settings as necessary Note If you are using your Epson product with the Windows 10 S operating system you cannot use the software described in this section You also cannot download ...

Page 197: ...197 You see this window ...

Page 198: ...necessary 6 Select the image type of your original and how you want it scanned as the Image Type setting 7 Select the Resolution setting you want to use for your scan 8 Select the Rotate setting to rotate the scanned image 9 Select the Correct Document Skew setting to correct skewed originals image contents or both 10 Click the Preview button Epson Scan 2 previews your original and displays the re...

Page 199: ...gs Tab Additional Scanning Settings Advanced Settings Tab Saving Scanned Documents as a Searchable PDF Using Epson Scan 2 Image Format Options Scan Resolution Guidelines Parent topic Scanning Additional Scanning Settings Main Settings Tab You can select these additional scanning settings on the Epson Scan 2 Main Settings tab Not all adjustment settings may be available depending on other settings ...

Page 200: ...ancement Sharpens the appearance of letters in text documents Auto Area Segmentation Makes black and white images clearer and text recognition more accurate by separating the text from the graphics Threshold Adjusts the level at which black areas in text and line art are delineated improving text recognition in OCR Optical Character Recognition programs Color Enhance Enhances the shades of the col...

Page 201: ...ments as a Searchable PDF Using Epson Scan 2 You can scan a document and save the text in a searchable PDF In a searchable PDF text is recognized using Optical Character Recognition OCR and then embedded in the scanned original Note The required Epson Scan 2 OCR Component Pro is installed automatically when you install your product software as instructed on the Start Here sheet If you install your...

Page 202: ...he PDF or protect printing or editing properties 12 Click OK 13 Confirm the File Name setting and select a Folder setting for your document 14 Click Scan The scanned image is saved as a searchable PDF Parent topic Scanning in Epson Scan 2 Image Format Options You can select different image formats and related options For details on available options click the icon on the Epson Scan 2 Image Format ...

Page 203: ...mat that is readable by Windows and Mac systems using Adobe Reader Acrobat or other programs You can save multi page documents in one PDF file Recognized text in the scanned document can be searched Parent topic Scanning in Epson Scan 2 Scan Resolution Guidelines The Resolution setting measured in dpi dots per inch controls the amount of detail captured in your scans Increasing the resolution rais...

Page 204: ...i dots per inch and you will double the image size later change the Resolution setting to 600 dpi You will scan the image at 100 or a smaller size Select the Epson Scan 2 Resolution setting based on how you will use the scanned image Email view on a computer screen post on the web 96 to 200 dpi Print fax convert to editable text OCR create searchable PDF 200 to 300 dpi Parent topic Scanning in Eps...

Page 205: ...s are the same unless otherwise noted Connecting a Telephone or Answering Machine Setting Up Fax Features Setting Up Contacts and Contact Groups Sending Faxes Receiving Faxes Checking Fax Status Printing Fax Reports Connecting a Telephone or Answering Machine You must connect your product to a telephone wall jack to send or receive faxes If you want to use the same telephone line to receive calls ...

Page 206: ...our product Note If you have a DSL or ISDN connection you must connect the appropriate DSL filter or ISDN terminal adapter or router to the wall jack to be able to use the line for faxing or voice calls using your product Contact your DSL or ISDN provider for the necessary equipment ...

Page 207: ...a telephone or answering machine to your product using a second phone cable remove the cap from the EXT port on your product 3 Connect a second phone cable to your telephone or answering machine and to the EXT port on your product ...

Page 208: ... fax features you want to use Note If you leave your product unplugged for a long period of time you may need to reset the date and time settings for faxes Setting Up Basic Fax Features Selecting Advanced Fax Settings Setting Up the Fax Utility Windows Setting Up Fax Features Using the Fax Utility Mac Parent topic Faxing Setting Up Basic Fax Features See these sections to select the basic settings...

Page 209: ...ax source such as your name or a business name You can enter up to 40 characters Select OK when you are done 5 On the Your Phone Number screen use the displayed keypad to enter your fax number up to 20 characters Select OK when you are done Note The name and phone number in the fax header identifies the source of the faxes you send 6 On the Distinctive Ring Setting screen do one of the following I...

Page 210: ...he check again If the Select Line Type screen appears select the correct line type If the Dial Tone Detection screen appears select Do Not Detect However disabling the dial tone detection function may drop the first digit of a fax number and send the fax to the wrong number Parent topic Setting Up Basic Fax Features Related tasks Entering Characters on the LCD Screen Selecting the Line Type If you...

Page 211: ... If you connect an external answering machine and select to receive faxes automatically make sure the Rings to Answer setting is correct The number of rings should be higher than the number of rings your answering machine is set to for answering a call Note This setting can be locked by an administrator If you cannot access or change this setting contact your administrator for assistance 1 Press t...

Page 212: ... and start receiving faxes If you answer the phone and hear a fax tone check that the product has started receiving the fax then hang up the phone Parent topic Setting Up Basic Fax Features Selecting Advanced Fax Settings You can select a variety of advanced fax settings Note These settings can be locked by an administrator If you cannot access or change these setting contact your administrator fo...

Page 213: ...button Note These shortcuts are displayed on the Fax Settings tab in the main Fax screen 4 Select the group of settings you want to change Basic Settings Fax Send Settings Fax Receive Settings Fax Report Settings Fax Security Settings Fax Parent topic Setting Up Fax Features Basic Settings Fax Set the basic options you want to use for incoming and outgoing faxes ...

Page 214: ...e product is connected to a PBX Private Branch Exchange or a TA Terminal Adapter However turning this setting off may cause the product to drop the first digit of a fax number Line Type PSTN Selects a standard phone line Public Switched Telephone Network PBX Selects Private Branch Exchange the type of phone line used in office environments where an access code such as 9 must be used to call an out...

Page 215: ... number of rings your answering machine is set to answer a call Remote Receive Off Lets you start receiving faxes using your phone instead of operating the product if the Receive Mode is set to Auto When you select On you must also set a Start Code If you are using a cordless handset with its base connected to the product you can start receiving the fax by entering the code using the handset On St...

Page 216: ...PDFs and saves them on a computer connected to the product Yes Yes and Print Save to Memory Device No Converts received faxes to PDFs and saves them on an external memory device connected to the printer You can also create a folder on the memory device by selecting Create a folder to save fax data and following the on screen instructions Yes Yes and Print Print Settings Setting Options Description...

Page 217: ...the document First Page Received Select to print incoming faxes as soon as the product receives the first page of the document Collation Stack On Select On to print incoming faxes so that the pages are stacked in the correct page order When the product is low on memory this option may not be available Off Print Suspend Time Off Select On to set a time period to stop automatic printing of faxes or ...

Page 218: ...document Report Format Simple Prints a simple fax report Detail Prints a fax report that includes error codes Parent topic Selecting Advanced Fax Settings Security Settings Fax Set the security options you want to use for fax data Setting Options Description Direct Dialing Restrictions Off Does not restrict dialed fax numbers On Allows faxing only to numbers stored in the contacts list or history ...

Page 219: ...et up the FAX Utility for Windows for use with your product Note Before using the FAX Utility for Windows make sure you have set up the fax features on your product using the product control panel Also first confirm that you can send and receive faxes using the control panel 1 Do one of the following Windows 10 Click and select EPSON Software Windows 8 x Navigate to the Apps screen Windows other v...

Page 220: ...220 The first time you use the FAX Utility you see this introduction window 3 Read about the FAX Utility and click Return to the main window at the bottom of the window ...

Page 221: ...ansfer your product s fax settings to the FAX Utility Note For detailed information click Help or Open Online Help Parent topic Setting Up Fax Features Setting Up Fax Features Using the Fax Utility Mac You can set up your fax header and select your fax settings using the FAX Utility for Mac ...

Page 222: ... 5 Follow the prompts that appear on the screen to enter your fax header information and select your fax settings Note For detailed information select the FAX Utility icon Parent topic Setting Up Fax Features Setting Up Contacts and Contact Groups You can set up a list of contacts and their fax numbers so you can quickly select them for faxing You can also set up contact groups to send a fax messa...

Page 223: ... or Deleting a Contact Creating a Contact Group Editing or Deleting a Contact Group Parent topic Setting Up Contacts and Contact Groups Related tasks Receiving Faxes Manually Creating a Contact You can create a list of contacts to save frequently used fax numbers Note You can create up to 100 contacts and contact groups combined You can also enter contacts and contact groups using Web Config 1 Pre...

Page 224: ...224 You see a screen like this 3 Select Contacts Enter the administrator password if necessary You see a screen like this 4 Select the icon 5 Select Add Contact ...

Page 225: ...y populated after you enter the name This field is optional 9 Select the Fax Number field and use the numeric keypad on the LCD screen or the buttons on the product to enter the fax number You can enter up to 64 characters Select OK when you are done Note If necessary enter an outside line access code such as 9 at the beginning of the fax number If the access code has been set up in the Line Type ...

Page 226: ...or delete any of the contacts on your list 1 Press the home button if necessary 2 Select Fax You see a screen like this 3 Select Contacts Enter the administrator password if necessary 4 Select the icon next to the contact you want to edit or delete ...

Page 227: ... to change enter the correct information and select OK When you are finished editing select OK Parent topic Setting Up Contacts Using the Product Control Panel Creating a Contact Group You can create a group of contacts so that you can easily send faxes to multiple recipients Note You can create up to 200 contacts and contact groups combined 1 Press the home button if necessary 2 Select Fax ...

Page 228: ...228 You see a screen like this 3 Select Contacts Enter the administrator password if necessary 4 Select the icon 5 Select Add Group You see a screen like this ...

Page 229: ... This field is automatically populated after you enter the group name This field is optional 9 Select Contact s Added to the Group You see your contacts list 10 Select each contact you want to include in your group Each selected contact is highlighted 11 Select Close 12 Select OK Parent topic Setting Up Contacts Using the Product Control Panel Editing or Deleting a Contact Group You can edit an ex...

Page 230: ...230 You see a screen like this 3 Select Contacts Enter the administrator password if necessary 4 Select the icon next to the group you want to edit or delete You see a screen like this ...

Page 231: ...Mac Dialing Fax Numbers from a Connected Telephone Parent topic Faxing Sending Faxes from the Product Control Panel See these sections to send faxes using the product s control panel Sending a Fax Using the Keypad Contact List or History Fax Sending Options Sending a Fax at a Specified Time Parent topic Sending Faxes Sending a Fax Using the Keypad Contact List or History You can send a fax from yo...

Page 232: ...lor 4 Do one of the following to select fax recipients Select Keypad and enter a fax number Select OK when done To add another fax number repeat the same steps You can also use the numeric keypad on the control panel to enter a fax number Note If direct dialing has been restricted you can only select the number from the contact list or fax history If necessary enter an outside line access code suc...

Page 233: ...view screen for the amount of time selected as the Settings General Settings Fax Settings Send Settings Fax Preview Display Time setting your product sends the fax automatically You cannot preview images when the Direct Send setting is turned on 7 If you want to save your fax settings for later use select Presets and add a new entry 8 Select the Send icon Note To cancel faxing select the stop butt...

Page 234: ...ets you select from various levels of background color adjustment Sharpness Varying levels available Lets you adjust the sharpness level of outgoing faxes ADF 2 Sided WF 4830 Series Off Select On to enable 2 sided faxing from the ADF The Direct Send option and color faxing are disabled when you turn on this setting On Continuous Scan ADF Off Select On to have the product to ask if you want to scan...

Page 235: ...ou include a header your phone number or a destination list in the selected location on your outgoing faxes Outside of Image Inside of Image Transmission Report Print on Error Lets you select when to print transmission reports Print Do Not Print Parent topic Sending Faxes from the Product Control Panel Sending a Fax at a Specified Time You can send a fax at a time of your choice Note Make sure the...

Page 236: ...layed keypad on the LCD screen to enter your desired time and select OK 9 Select the Send icon Note To cancel faxing select the stop button After scanning your originals your product dials the number and sends the fax at the specified time Note If the product is turned off at the specified time the fax is sent when it is powered on Parent topic Sending Faxes from the Product Control Panel ...

Page 237: ... the FAX option as the printer 3 To change the Paper Size Orientation Color Image Quality or Character Density settings click the Preferences or Properties button change the necessary settings and click OK Note If you see a Setup Printer or Options button click it Then click Preferences or Properties on the next screen For more information about selecting fax print settings click Help 4 Select the...

Page 238: ...238 If you re faxing for the first time you see a window like this one 6 Enter your sender information so that recipients can identify the origin of the fax Then click OK to save the sender information ...

Page 239: ...ng the Epson FAX Utility click Help 8 Select a cover sheet and enter a subject and message then click Next 9 Click Send to transmit your fax Parent topic Sending Faxes Sending Faxes Using the Fax Utility Mac You can send a fax from a Mac printing program using the FAX Utility You can fax up to 100 pages at a time including a cover sheet 1 Open the file you want to fax ...

Page 240: ...your application s help utility for details 3 Select your product FAX option as the Printer setting 4 If necessary click the arrow next to the Printer setting or the Show Details button to expand the print window 5 Select the number of pages you are faxing as the Pages setting Note Leave the Copies setting set to 1 6 Select Recipient Settings from the pop up menu ...

Page 241: ...following to choose your recipient Select a name or group from the Recipient List Enter a name company and fax number and click the button Click the icon and select a recipient from your address book 8 Select Fax Settings from the pop up menu ...

Page 242: ...mber from the connected telephone If the recipient s phone number and fax number are the same you can speak to the recipient before sending the fax 1 Place your original on the product for faxing 2 Press the home button if necessary 3 Dial the fax number from the connected telephone Speak to the recipient if necessary Note If you are using a pre paid calling card enter the number and password requ...

Page 243: ...olling Viewing a Fax on the LCD Screen Using the Inbox Saving Faxes to an External USB Device Parent topic Faxing Fax Reception Your product will automatically receive and print faxes when you set the Receive Mode to Auto If you connected a telephone to your product so you can use the same phone line for faxes and voice calls you can also set your product to receive faxes manually This allows you ...

Page 244: ...t topic Receiving Faxes Related references Basic Settings Fax Related tasks Receiving Faxes Manually Receiving Faxes Manually You can set up your product to receive faxes manually by setting the Receive Mode to Manual This lets you check for a fax tone on the connected telephone before receiving a fax 1 To change the Receive Mode select Settings General Settings Fax Settings Basic Settings Receive...

Page 245: ...x from a fax information service that uses audio guidance 1 Press the home button if necessary 2 Select Fax You see a screen like this 3 Select the icon 4 Select Extended Fax 5 Set Polling Receive to On 6 Select Close 7 Select Close 8 Enter the fax number you expect to receive the fax from 9 Select the Polling icon to start receiving the fax Parent topic Receiving Faxes ...

Page 246: ...u can save received faxes in your product s memory and view them on the LCD screen 1 Press the home button if necessary 2 Select Settings 3 Select General Settings 4 Scroll down and select Fax Settings 5 Select Receive Settings 6 Select Fax Output Settings ...

Page 247: ...3 Select the fax you want to view You see the fax displayed on the screen 14 Press the icon 15 Select one of the printing or deleting options and follow the on screen instructions Note Delete faxes after you print or view them to prevent the product s memory from filling up When the memory is full you can only print or refuse incoming faxes Parent topic Receiving Faxes Saving Faxes to an External ...

Page 248: ... 4 Select Save to Memory Device 5 Select Yes to save the fax or Yes and Print to save and print the fax Parent topic Receiving Faxes Checking Fax Status You can check the status of current fax jobs or faxes that have been received or sent on the product control panel 1 Press the home button if necessary 2 Select Fax ...

Page 249: ...our product s LCD screen or the received fax light is flashing received faxes have been temporarily saved to the product s memory Parent topic Faxing Printing Fax Reports You can print several types of fax reports whenever necessary You can also print the fax log printed automatically by turning on Fax Log Auto Print 1 Press the home button if necessary 2 Select Fax ...

Page 250: ...hat was sent or received through polling You can use the Fax Settings Transmission Report setting to print the report automatically Fax Log View or print a report on recent fax transmissions You can use the Settings General Settings Fax Settings Report Settings Fax Log Auto Print setting to print the report automatically Fax Settings List Print a list of the current fax communication settings Prot...

Page 251: ...251 Parent topic Printing Fax Reports ...

Page 252: ...not guarantee the compatibility of your device Make sure the files on the device are compatible with the product USB Device Photo File Specifications Parent topic Using External USB Devices with Your Product Related tasks Disconnecting a USB Device USB Device Photo File Specifications You can use USB devices with your product containing files that meet these specifications File format JPEG with th...

Page 253: ... the removable disk icon for your USB device from the desktop into the trash Caution Do not remove a USB device before completing the procedure above or you may lose data from the flash drive 2 Pull the USB device or cable out of the USB port on the front of the product Parent topic Using External USB Devices with Your Product Viewing and Printing from the LCD Screen See these sections to view and...

Page 254: ...to Print 6 To change the print settings select Basic Settings and select the necessary settings 7 To adjust the photos adjustments modify only your printed copies not the original files select Advanced and make the necessary adjustments 8 Select Copies on the LCD screen and use the numeric keypad on the screen to select the number of copies up to 99 9 When you are ready to print select the Print i...

Page 255: ...ct Cancel again to confirm Parent topic Viewing and Printing from the LCD Screen Related references Print Setting Options Device Mode Print Setting Options Device Mode Print Setting Options Device Mode Select the print settings you want to use when printing from a USB device Note Not all options or settings may be available depending on the file format Basic Settings Print settings Available optio...

Page 256: ...ormat you select Fix Photo Auto Automatically adjusts the brightness contrast and saturation of the photo based on the setting that is selected People Landscape Night Scene Enhance Off Turns off automatic adjustments see Note below Fix Red Eye On Automatically fixes the red eye effect in photos Off Print Order Last Page on Top Select the order for printing multi page TIFF files First Page on Top N...

Page 257: ... Product Setting Up File Sharing for File Transfers from Your Computer Before you transfer files from a computer to a USB device inserted into the USB port on the front of your product you may need to set up your product s file sharing settings Caution Remove the USB device before you change this setting or you may lose data from the device 1 Press the home button if necessary 2 Select Settings 3 ...

Page 258: ...re printing from the device 1 Make sure your product is connected to a computer 2 Insert a USB device or its USB cable into the USB port on the front of your product 3 Do one of the following to access your USB device files from your computer Windows Open the My Computer Computer This PC or Windows Explorer utility then select the removable disk icon Mac with a USB connection Look for the removabl...

Page 259: ...d folder on your computer or on your USB device Note Your product s LCD screen does not update to display new information about your USB device after you copy files to it or delete files from it Remove and insert the USB device to update the information Parent topic Transferring Files on a USB Device ...

Page 260: ...tridges Printing with Black Ink and Expended Color Cartridges Conserving Low Black Ink with Windows Replacing the Maintenance Box Ink Safety Precautions Keep ink cartridges and maintenance box out of the reach of children and do not drink the ink Keep the ink cartridges out of direct sunlight Store ink cartridges in a cool dark place do not store the ink cartridges in high or freezing temperatures...

Page 261: ...ormal operation Make sure to install all ink cartridges The printer only works when all ink cartridges are properly installed Do not turn off the product during ink charging If ink charging is incomplete you may not be able to print If you remove an ink cartridge for later use protect the ink supply area from dirt and dust and store it in the same environment as the product Note that there is a va...

Page 262: ...ot use the cartridges that came with the printer as replacement cartridges To maintain optimum print head performance some ink is consumed from all ink cartridges during maintenance operations Ink may also be consumed when you replace an ink cartridge or turn the printer on When printing in monochrome or grayscale color inks may be used instead of black ink depending on the paper type or print qua...

Page 263: ...ce Box Status Windows A low ink reminder appears if you try to print when ink is low and you can check your cartridge or maintenance box status at any time using a utility on your Windows computer Note You can continue printing while the low ink message is displayed Replace the ink cartridges when required 1 To check your status access the Windows Desktop and double click the icon for your product...

Page 264: ...en Note If any of the cartridges installed in the product is broken incompatible with the product model or improperly installed Epson Status Monitor will not display an accurate cartridge status 3 To disable the low ink reminder right click the product icon in the Windows taskbar and select Monitoring Preferences ...

Page 265: ...w 4 Deselect the See Low Ink Reminder alerts checkbox at the bottom of the screen 5 To disable promotional offers deselect the Display Epson Offers checkbox 6 Click OK Parent topic Check Cartridge and Maintenance Box Status ...

Page 266: ...nce box using a utility on your Mac Note You can continue printing while the low ink message is displayed Replace the ink cartridges when required 1 In the Apple menu or the Dock select System Preferences Select Print Fax Print Scan or Printers Scanners select your product and select Options Supplies Select Utility and select Open Printer Utility 2 Select EPSON Status Monitor You see this window ...

Page 267: ...dges and ink supplies are not compatible and even if described as compatible may not function properly or at all Epson periodically provides firmware updates to address issues of security performance minor bug fixes and ensure the printer functions as designed These updates may affect the functionality of third party ink Non Epson branded or altered Epson cartridges that functioned prior to a firm...

Page 268: ... new cartridges immediately after removing the old ones Caution Leave your old cartridges in the printer until you are ready to replace them to prevent the print head nozzles from drying out Do not open ink cartridge packages until you are ready to install the ink Cartridges are vacuum packed to maintain reliability 1 Turn on your product If an ink cartridge is expended you see a message on the LC...

Page 269: ...eplacement position If the ink cartridge holder returns to the home position far right repeat steps 1 and 2 Caution Do not move the print head by hand or use any kind of tool to remove a cartridge otherwise you may damage your product Do not touch the flat white cable inside the printer ...

Page 270: ...s carefully Do not take the used cartridge apart or try to refill it Warning If ink gets on your skin wash it thoroughly with soap and water If ink gets into your eyes flush them immediately with water If ink gets into your mouth spit it out and see a doctor right away Keep ink cartridges out of the reach of children ...

Page 271: ...Do not shake the cartridges after opening the packages or ink may leak 5 Remove the cartridge from the package Caution Do not touch the green chip on the cartridge Install the new cartridge immediately after removing the old one if you do not the print head may dry out and be unable to print ...

Page 272: ... Remove the yellow tape from the base of the cartridge Caution Do not remove any other labels or seals or ink will leak 7 Insert the new cartridge into the holder and push it down until it clicks into place ...

Page 273: ...e ink cartridge down until it clicks into place When you re finished select OK If you remove a low or expended ink cartridge you cannot re install and use the cartridge Caution If you remove an ink cartridge for later use protect the ink supply area from dirt and dust and store it in the same environment as the printer The valve in the ink supply port is designed to contain any excess ink but do n...

Page 274: ...gs to print on plain paper or on an envelope Note If you are using your Epson product with the Windows 10 S operating system you cannot use the software described in this section You also cannot download and install any Epson product software from the Epson website for use with Windows 10 S you must obtain software only from the Windows Store Note To use this feature Epson Status Monitor must be e...

Page 275: ...the printer icon in the Dock 2 If you see a message telling you that you can temporarily print with only black ink click the Delete or button to cancel your print job If you see an error message click OK 3 In the Apple menu or the Dock select System Preferences 4 Select Print Fax Print Scan or Printers Scanners select your product and select Options Supplies 5 Select Driver or Options You see a sc...

Page 276: ... low and there is more color ink Note The window appears only when you have selected Plain Paper Bright White Paper as the paper type setting and depends on other selected print settings To use this feature Epson Status Monitor must be enabled Click Yes to use a mixture of color inks to create black or No to continue using the remaining black ink for the document you are printing Click Disable thi...

Page 277: ... printing when the absorbing capacity of the maintenance box has reached its limit Whether and how often this is required will vary according to the number of pages you print the type of material you print on and the number of cleaning cycles that the printer performs Caution Do not reuse a maintenance box that has been removed and left uninstalled for more than a week Keep the maintenance box awa...

Page 278: ...roughly with soap and water If ink gets into your eyes flush them immediately with water If ink gets into your mouth spit it out and see a doctor right away Keep the maintenance box out of the reach of children and do not drink the ink 5 Place the used maintenance box in the plastic bag that came with the new maintenance box Seal the bag and dispose of it carefully ...

Page 279: ...box into the holder and push it all the way in 7 Press the tab on the maintenance box cover and reattach it Parent topic Replacing Ink Cartridges and Maintenance Boxes Related concepts Purchase Epson Ink Cartridges and Maintenance Box ...

Page 280: ...ed Print Head Maintenance Aligning the Print Head Using the Product Control Panel Adjusting the Print Quality Using the Product Control Panel Cleaning the Paper Guide Checking the Number of Sheets on the LCD Screen Print Head Maintenance If your printouts become too light or you see dark or light bands across them you may need to clean the print head nozzles Cleaning uses ink so clean the nozzles ...

Page 281: ...Head Maintenance Checking the Nozzles Using the Product Control Panel You can check the print head nozzles using the control panel on your product 1 Make sure there are no errors on the LCD screen 2 Load a few sheets of plain paper in the product 3 Press the home button if necessary 4 Select Settings Maintenance 5 Select Print Head Nozzle Check You see a screen like this 6 Select Start The nozzle ...

Page 282: ...e print head check the nozzles and repeat the process as necessary Caution Never turn off the product or open the front cover during a cleaning cycle or you may not be able to print If you don t see any improvement after cleaning the print head up to 4 times wait at least 6 hours without printing or longer if printing Then try cleaning the print head again If quality still does not improve contact...

Page 283: ...cess the Windows Desktop and right click the icon for your product in the right side of the Windows taskbar or click the up arrow and right click Mac In the Apple menu or the Dock select System Preferences Select Print Fax Print Scan or Printers Scanners select your product and select Options Supplies Select Utility and select Open Printer Utility 3 Select Print Head Nozzle Check You see a window ...

Page 284: ...e Check Related concepts Print Head Cleaning Print Head Cleaning If print quality has declined and the nozzle check pattern indicates clogged nozzles you can clean the print head Note You cannot clean the print head if an ink cartridge is expended and may not be able to clean it when a cartridge is low You must replace the cartridge first Cleaning the Print Head Using the Product Control Panel Cle...

Page 285: ... Cartridges Cleaning the Print Head Using the Product Control Panel You can clean the print head using the control panel on your product 1 Make sure there are no errors on the LCD screen 2 Load a few sheets of plain paper in the product 3 Press the home button if necessary 4 Select Maintenance You see a screen like this 5 Select Print Head Cleaning ...

Page 286: ... you don t see any improvement after cleaning the print head up to 4 times wait at least 6 hours without printing or longer if printing Then try cleaning the print head again If quality still does not improve contact Epson Parent topic Print Head Cleaning Related tasks Loading Paper in the Cassette Cleaning the Print Head Using a Computer Utility You can clean the print head using a utility on you...

Page 287: ... Print Fax Print Scan or Printers Scanners select your product and select Options Supplies Select Utility and select Open Printer Utility 4 Select Print Head Cleaning You see a window like this 5 Click Start to begin the cleaning cycle The power light flashes throughout the cleaning cycle and stays on when the cleaning cycle is finished Caution Never turn off the product or open the scanner unit d...

Page 288: ...n to clean the print head again If you don t see any improvement after cleaning the print head up to 4 times wait at least 6 hours without printing Then try cleaning the print head again If quality still does not improve contact Epson Parent topic Print Head Cleaning Related tasks Loading Paper in the Cassette Aligning the Print Head Using the Product Control Panel You can align the print head usi...

Page 289: ...if your printout contains horizontal banding 7 Follow the on screen instructions to print an alignment sheet Note Do not cancel printing while you are printing head alignment patterns 8 Check the printed patterns on the alignment sheet and select the following on the LCD screen depending on the alignment pattern you printed Ruled Line Alignment For patterns 1 and 2 select the number representing t...

Page 290: ...roduct 1 Make sure there are no errors on the LCD screen 2 Load a few sheets of plain paper in the product 3 Press the home button if necessary 4 Select Settings Maintenance Print Quality Adjustment 5 Follow the on screen instructions to print an alignment sheet Note Do not cancel printing while you are printing head alignment patterns 6 Check the printed patterns on the alignment sheet and select...

Page 291: ...ent topic Adjusting Print Quality Cleaning the Paper Guide If you see ink on the back of a printout you can clean the paper guide rollers to remove any excess ink If paper does not feed correctly from the rear paper feed slot you can use a cleaning sheet to clean the rollers 1 If printouts are smeared or scuffed load plain paper in the paper source that you want to clean in this size Letter 8 5 11...

Page 292: ...several times try cleaning the other paper sources WF 4830 Series Parent topic Adjusting Print Quality Related tasks Loading Paper in the Cassette Checking the Number of Sheets on the LCD Screen Checking the Number of Sheets on the LCD Screen You can view the number of sheets of paper that have fed through the product on the LCD screen 1 Press the home button if necessary 2 Select Settings Print C...

Page 293: ...293 Related tasks Loading Paper in the Cassette ...

Page 294: ...uct Transporting Your Product Cleaning Your Product To keep your product working at its best you should clean it several times a year Caution Do not use a hard brush alcohol or paint thinner to clean the product or you may damage it Do not use oil or other lubricants inside the product or let water get inside it 1 Turn off the product 2 Unplug the power cord 3 Disconnect any connected cables 4 Pul...

Page 295: ...295 5 Open the document cover ...

Page 296: ...s area on the left with a soft lint free cloth microfiber is recommended moistened with a little glass cleaner Caution Do not spray glass cleaner directly on the glass and do not press the glass surface with any force 7 Close the document cover ...

Page 297: ...297 8 Open the ADF cover ...

Page 298: ...clean and damp cloth If there are stubborn stains use a damp cloth with a mild detergent Parent topic Cleaning and Transporting Your Product Transporting Your Product If you need to store your product or transport it a long distance prepare it for transportation as described here Caution During transportation and storage follow these guidelines Avoid tilting the product placing it vertically or tu...

Page 299: ...nt head from drying out Store your product in a cool dry place 1 Turn off the product 2 Wait for the power light to go out then unplug the power cable 3 Disconnect any connected cables 4 Remove all the paper from the product 5 Close the output tray and paper support 6 Remove any memory device inserted in the product 7 Lift up the scanner unit and check to see if the print head is in the far right ...

Page 300: ...e equivalent materials with cushioning around the product Keep the product level during transportation Be sure to remove the tape from the ink cartridge holder before turning on your product If print quality has declined when you print again clean and align the print head Parent topic Cleaning and Transporting Your Product Related concepts Print Head Nozzle Check Print Head Cleaning ...

Page 301: ...Network Problems Solving Copying Problems Solving Paper Problems Solving Problems Printing from a Computer Solving Page Layout and Content Problems Solving Print Quality Problems Solving Scanning Problems Solving Scanned Image Quality Problems Solving Faxing Problems Solving USB Device Problems Uninstall Your Product Software Where to Get Help Viewing the Help Screen You can view troubleshooting o...

Page 302: ...e not compatible and even if described as compatible may not function properly or at all Epson periodically provides firmware updates to address issues of security performance minor bug fixes and ensure the printer functions as designed These updates may affect the functionality of third party ink Non Epson branded or altered Epson cartridges that functioned prior to a firmware update may not cont...

Page 303: ... off and on again If the problem persists contact Epson Support Turn the product off and then back on again If the error persists check for and remove any jammed paper or protective materials from the product If the error still persists contact Epson for support Printer error Contact Epson Support Non printing features are available The printer may be damaged Contact Epson for support Non printing...

Page 304: ...tion setting Turning off the Dial Tone Detection setting may cause the product to drop the first digit of a fax number The combination of the IP address and the subnet mask is invalid See your documentation for more details There is a problem with the network connection to your product Set up your product on the network again To use cloud services update the root certificate from the Epson Web Con...

Page 305: ...e shared folder path matches the path registered to your product contacts list Make sure the IP address of the computer is correct If using DHCP obtain the IP address again If using a static IP address change the computer name in the shared folder path to the IP address and try again For example change EPSON02 SCAN to 192 168 xxx xxx SCAN Make sure the DNS setting is correct and that the computer ...

Page 306: ...ning to the shared folder again Scanned file s are too large Only XX pages have been sent Check if the Location has enough space The storage on the computer you are trying to scan to does not have enough space to store your scan Increase the free space and try again Note In some print cycles a very small amount of surplus ink may be collected in the borderless printing ink pad To prevent ink leaka...

Page 307: ...ms Wi Fi or Wired Networking Running a Product Check Running a product check helps you determine if your product is operating properly 1 Disconnect any interface cables connected to your product 2 Load plain paper in the product 3 Press the home button if necessary 4 Select Maintenance You see a screen like this 5 Select Print Head Nozzle Check ...

Page 308: ...stalling your printer software If the page prints but the nozzle check pattern has gaps clean the print head If the page does not print the product may have a problem Check the other solutions in this manual If they do not work contact Epson Parent topic Solving Problems Related concepts Uninstall Your Product Software Print Head Cleaning Related tasks Aligning the Print Head Using the Product Con...

Page 309: ...tions Network Settings Resets all network settings Copy Settings Resets all settings for copying Scan Settings Resets all settings for scanning Fax Settings Resets all settings for faxing Clear All Data and Settings Resets all control panel settings including the contacts list You see a confirmation screen 5 Select Yes to reset the selected settings Select No if you want to cancel the operation Pa...

Page 310: ...n off the product or it may charge improperly and use excess ink the next time you turn it on If the product s print head stops moving or making noise and the charging process has not finished after approximately 5 minutes turn off your product Turn it back on and check to see if charging is still in progress If it is still in progress contact Epson for help Parent topic Solving Setup Problems Sof...

Page 311: ...e Cannot Find Product on a Network Product Does Not Appear in Mac Printer Window Wireless Network Connection is Unstable on a Mac Wired Network Connection Becomes Unstable Cannot Print Over a Network Cannot Scan Over a Network Parent topic Solving Problems Product Cannot Connect to a Wireless Router or Access Point If your product has trouble finding or connecting to a wireless router or access po...

Page 312: ...access point has security enabled determine the kind of security it is using and any required password or passphrase for connection Then make sure to enter the exact WEP key or WPA passphrase correctly Check if your computer is restricting the available wireless channels If so verify that your wireless access point is using one of the usable channels and change to a usable channel if necessary If ...

Page 313: ... online you will lose your Internet connection when you restart your router so note the next step before restarting it 4 Download your product software from the Epson website using the instructions on the Start Here sheet If you have replaced your router reinstall your product software to connect to the new router Check to see if your wireless router or access point has an enabled Privacy Separato...

Page 314: ...ter documentation or contact your internet service provider for instructions Parent topic Solving Network Problems Wired Network Connection Becomes Unstable When you connect the product to a wired network using a router or access point that supports IEEE 802 3az Energy Efficient Ethernet the connection may become unstable you may be unable to connect to the product and the communication speed may ...

Page 315: ...ct is 169 254 XX XX and the subnet mask is 255 255 0 0 the IP address may not be assigned correctly Check the IP address and subnet mask assigned to the product Settings General Settings Network Settings Advanced then restart the wireless router or reset the network settings for the product Make sure your computer and product are both using the same wireless network If network printing is slow pri...

Page 316: ...a different router access point switch or hub Try connecting with a different Ethernet cable Try printing to your product from another computer on the network If you are connecting the product via EpsonNet Setup and the Wi Fi icon does not appear lit on the LCD screen make sure your product software was installed correctly If necessary reinstall your software Parent topic Solving Network Problems ...

Page 317: ...cted If necessary select the Other tab and click Reset You may need to disable the firewall and any anti virus software on your wireless router or access point If you see the message Network product is not available currently being used by user there may be a communication error between the product and computer Restart the product If the Firewall function is active the product may not be discovere...

Page 318: ...w the onscreen instructions to clear the error Parent topic Solving Copying Problems Product Makes Noise But Nothing Copies If your product makes a noise but nothing copies try these solutions Run a nozzle check to see if any of the print head nozzles are clogged Then clean the print head if necessary If the nozzle check page does not print but the product s power is on make sure your product soft...

Page 319: ...e size weight and number of your originals are supported by the ADF Make sure the originals are loaded correctly Slide the edge guides against the edges of the originals Make sure the document is not curled or creased Try cleaning the inside of the ADF Do not load originals above the arrow mark on the ADF edge guide Parent topic Solving Copying Problems Related references Document Jams in the Auto...

Page 320: ...bove the tab on the edge guides inside the cassette If multiple pages feed at once remove the paper fan the edges to separate the sheets and reload it Do not load more than the recommended number of sheets Make sure your paper meets the specifications for your product If paper jams when you print on both sides of the paper try loading fewer sheets If too many pages are fed when you are performing ...

Page 321: ...matic Document Feeder Paper Jam Problems in the Cassette If paper has jammed in the cassette follow the steps here to clear the jam Note Your product may look different than the one shown but the steps are the same unless otherwise noted 1 Cancel the print job if necessary 2 Pull out the paper cassette 3 Carefully remove any paper jammed inside the product ...

Page 322: ... still see a paper jam message check the other paper jam solutions Parent topic Solving Paper Problems Related references Paper Jam Problems in the Rear Cover Document Jams in the Automatic Document Feeder Related tasks Loading Paper in the Cassette Paper Jam Problems in the Rear Cover If paper has jammed in the rear cover follow the steps here to clear the jam 1 Cancel the print job if necessary ...

Page 323: ... paper jam message check the other paper jam solutions Parent topic Solving Paper Problems Related references Paper Jam Problems in the Cassette Document Jams in the Automatic Document Feeder Related tasks Loading Paper in the Cassette Document Jams in the Automatic Document Feeder If you have problems with document jams in the automatic document feeder ADF follow the steps here to clear the jam 1...

Page 324: ...324 3 Open the ADF cover 4 Carefully remove any jammed pages ...

Page 325: ...the ADF input tray and carefully remove any jammed pages 9 Lower the ADF input tray 10 Reload your originals Caution Make sure you do not load the ADF beyond its capacity for your paper size Also make sure your originals are not bent folded or curled and do not have tape staples or other materials that could obstruct the feeder ...

Page 326: ...ct the paper Select the correct paper size when you reprint If paper falls from the output tray extend the paper stopper If paper is wrinkled when it ejects it may be damp or too thin Load new paper Parent topic Solving Paper Problems Related references Paper or Media Type Settings Printing Software Related tasks Cancelling Printing Using the Product Loading Paper in the Cassette Solving Problems ...

Page 327: ... you are printing a high resolution image you may need more than the minimum requirements Print the image at a lower resolution or if necessary increase your system s memory In Windows make sure your product is selected as the default printer and the printer port setting matches the printer connection port In Windows delete all jobs from the Windows Spooler Click Print Queue on the Maintenance tab...

Page 328: ... select Printing Preferences and select your product name again if necessary Windows Vista Click select Control Panel and click Printer under Hardware and Sound Right click your product name select Printing Preferences and select your product name again if necessary 2 Click the Maintenance tab 3 Click the Extended Settings button 4 Select Enable EPSON Status Monitor 3 and click OK 5 Click the Moni...

Page 329: ... is turned off Clear space on your hard drive or run a defragmentation utility to free up existing space Close any programs you are not using when you print If your product is connected to a USB hub connect it directly to your computer instead If printing becomes slower after printing continuously for a long time the product may have automatically slowed down to protect the print mechanism from ov...

Page 330: ...Options Supplies select Options or Driver and enable the Bidirectional printing setting Enable the bidirectional setting on the product control panel Settings General Settings Printer Settings Bidirectional If printing is still slow and you are using Windows 7 or Windows Vista try the following 1 Click and select Computer or My Computer Double click the C drive and open these folders ProgramData E...

Page 331: ...ncorrect Margins on Printout Border Appears on Borderless Prints Incorrect Characters Print Incorrect Image Size or Position Slanted Printout Parent topic Solving Problems Inverted Image If your printed image is inverted unexpectedly try these solutions Turn off any mirror or inversion settings in your printing application Turn off the Mirror Image Flip horizontally or Reverse page orientation set...

Page 332: ... the print head if necessary Make sure your product is selected as the printer in your printing program Parent topic Solving Page Layout and Content Problems Related tasks Selecting Basic Print Settings Windows Selecting Extended Settings Windows Selecting Basic Print Settings Mac Selecting Page Setup Settings Mac Cleaning Your Product Incorrect Margins on Printout If your printed page has incorre...

Page 333: ...lect a supported borderless page width Windows Make sure you selected the Borderless setting in your printer software Mac Make sure you selected the Borderless checkbox or a paper size with a Borderless option in your printer software Adjust the Expansion setting to adjust the amount of image expansion on the edges of borderless prints Make sure the image size and the paper size are set correctly ...

Page 334: ...u selected the correct paper size and layout settings in your printing program and printer software Make sure you selected the correct paper size on the control panel Make sure your paper is positioned correctly for feeding into the printer Slide the edge guides against the edges of the paper Clean the scanner glass and document cover If the edges of a copy are cropped slightly move the original a...

Page 335: ... is not printing while tilted or at an angle Parent topic Solving Page Layout and Content Problems Related tasks Loading Paper in the Cassette Solving Print Quality Problems Check these sections if your printouts have problems with print quality but your image looks fine on your computer screen Note When printing using AirPrint the available print settings are different from those covered in this ...

Page 336: ...product software If you are copying from the ADF copy from the scanner glass instead or use a higher quality setting When vertical banding appears or the paper is smeared clean the paper path You may need to replace the ink cartridges Parent topic Solving Print Quality Problems Related concepts Print Head Nozzle Check Print Head Cleaning Related references Paper or Media Type Settings Printing Sof...

Page 337: ...on thick paper or envelopes make sure you select the appropriate settings When manually printing 2 sided make sure the ink is completely dry before loading the paper Remove each sheet from the output tray as it is printed Do not stack printouts immediately after printing Turn off any high speed settings in your product software If you print on both sides of a sheet of paper smudges may appear on t...

Page 338: ...ptions Windows Faint Printout or Printout Has Gaps If your printouts are faint or have gaps try these solutions Run a nozzle check to see if any of the print head nozzles are clogged Then clean the print head if necessary The ink cartridges may be old or low on ink and you may need to replace them Make sure your paper is not damp curled old or loaded incorrectly in your product When copying increa...

Page 339: ...re You may need to increase the image resolution or print a smaller size see your software documentation Note Images from the Internet may be low resolution and not result in a high quality printout If you enlarged the image size in an image editing program you need to increase the image resolution setting to retain a high image quality Increase the image resolution by the same amount you increase...

Page 340: ...s in your printout need time to set as the ink dries During this time the colors may look different than you expect To speed up drying time do not stack your printouts on top of each other Your printed colors can never exactly match your on screen colors However you can use a color management system to get as close as possible Try using the color management options in your printer software Try sel...

Page 341: ...tly try these solutions Make sure your computer has adequate memory and meets the system requirements for your operating system Make sure your computer is not running in a power saving mode such as sleep or standby If so wake your system and restart your scanning software If you upgraded your operating system but did not reinstall your scanning software try reinstalling it In Windows make sure you...

Page 342: ... the Other tab and click Reset Windows 8 x Navigate to the Apps screen and select Epson Scan 2 Utility Make sure the correct product is selected If necessary select the Other tab and click Reset Windows other versions Click or Start All Programs or Programs EPSON Epson Scan 2 Epson Scan 2 Utility Make sure the correct product is selected If necessary select the Other tab and click Reset Mac Open t...

Page 343: ...nd try again If you still cannot scan to the shared folder your network type may be set to Public You cannot scan to a shared folder when using a public network Follow the steps here to check and change your network type if necessary Be sure to log into your Windows computer as an administrator Note The name of available network types varies in the different Windows versions For details on selecti...

Page 344: ...ivate network Windows 7 1 Click or press the Windows key on your keyboard 2 Type Network and Sharing Center into the search field 3 Under View your active networks make sure Home network or Work network is selected when connected to a private network so you can save a scan to a shared folder If you need to change the network type click the network type name If you select Public network you cannot ...

Page 345: ...he ADF and remove and dirt or dust on your originals Do not press on the document cover or the original with too much force Your product will not operate properly while tilted at an angle Place your product on a flat stable surface that extends beyond its base in all directions Adjust these Epson Scan 2 or Epson ScanSmart settings if available and try scanning again Make sure you select the correc...

Page 346: ...e printers and monitors use different color systems monitors use RGB red green and blue and printers typically use CMYK cyan magenta yellow and black Check the color matching and color management capabilities of your computer display adapter and the software you are using to see if they are affecting the palette of colors you see on your screen To adjust the colors in your scanned image adjust the...

Page 347: ...ds Keep the document cover closed to prevent dirt or dust from getting inside If you are scanning from the ADF make sure the ADF edge guides fit against the loaded originals You can also try cleaning the ADF and scanning again Parent topic Solving Scanned Image Quality Problems Related tasks Cleaning Your Product Straight Lines in an Image Appear Crooked If straight lines in an original appear cro...

Page 348: ...re blurry try these solutions Make sure you do not move the product or original while scanning Operate the product on a flat stable surface Make sure the originals are ejecting properly Select Settings Scan Settings and try adjusting these settings and scanning again On the Main Settings tab make sure you select the correct Image Type for your original On the Main Settings tab try increasing the R...

Page 349: ...your scanned images try these solutions Clean the scanner glass with a soft dry lint free cloth or use a small amount of glass cleaner on the cloth if necessary Paper towels are not recommended Keep the document cover closed to prevent dirt or dust from getting inside Parent topic Solving Scanned Image Quality Problems Scanned Image Edges are Cropped If the edges of a scanned image are cropped mak...

Page 350: ...ine Make sure Receive Mode is set to Auto so you can receive faxes automatically Check that the cable connecting your telephone wall jack to your product s LINE port is secure Print a fax connection report using your product control panel or fax software to help diagnose the problem Verify that the telephone wall jack works by connecting a phone to it and testing it Check the Line Type setting and...

Page 351: ...ormation or is not registered in your contacts list as necessary If you have not connected a telephone to the printer set the Receive Mode setting to Auto on the control panel If you are receiving faxes using the Epson FAX Utility check that your product is registered as a fax product in your operating system Windows Make sure the product appears in Devices and Printers Printer or Printers and Oth...

Page 352: ...en answering a call that is a fax wait until the product s LCD screen displays a message that a connection has been made before you hang up Parent topic Solving Faxing Problems Related tasks Connecting a Telephone or Answering Machine Using the Fax Setup Wizard Fax Memory Full Error Appears If you see an error message telling you that the product s fax memory is full try these solutions If you set...

Page 353: ...end the fax Parent topic Solving Faxing Problems Related references Fax Sending Options Related tasks Viewing a Fax on the LCD Screen Using the Inbox Saving Faxes to an External USB Device Fax Quality is Poor If you receive a poor quality fax try these solutions Try enabling the error correction mode ECM setting Contact the fax sender and ask them to send the fax in a higher resolution Try reprint...

Page 354: ...ou are sending a fax using the scanner glass make sure your original is placed correctly and that the correct paper size is selected on the control panel Clean the scanner glass and document cover Parent topic Solving Faxing Problems Related tasks Cleaning Your Product Related topics Placing Originals on the Product Received Fax is Not Printed If a received fax is not printed try these solutions M...

Page 355: ...vice are in the correct format If you see an X on the photo selection screen the image file format is not supported Parent topic Solving USB Device Problems Related references External USB Device Specifications USB Device Photo File Specifications Related tasks Setting Up File Sharing for File Transfers from Your Computer Related topics Viewing and Printing from the LCD Screen Cannot Save Files on...

Page 356: ...ure there is enough free space on the device Make sure your product is securely connected to your computer Make sure that the file sharing setting for your product is enabled Parent topic Solving USB Device Problems Related references External USB Device Specifications Related tasks Transferring Files from a USB Device to Your Computer Uninstall Your Product Software If you have a problem that req...

Page 357: ...es or Continue In the next window select your product and click OK Then follow any on screen instructions 5 Do one of the following to uninstall Epson Event Manager then follow any on screen instructions Windows 10 8 x Select Epson Event Manager and click Uninstall Windows 7 Windows Vista Open the Windows Control Panel utility Select Programs and Features In Classic view select Programs and click ...

Page 358: ...ystem click Utilities locate the Uninstaller utility and click Download 4 Run the file you downloaded 5 Double click the Uninstaller icon 6 In the Epson Uninstaller screen select the checkbox for each software program you want to uninstall 7 Click Uninstall 8 Follow the on screen instructions to uninstall the software 9 Reinstall your product software Note If you uninstall the printer driver and y...

Page 359: ...AM to 8 PM Pacific Time Monday through Friday and 7 AM to 4 PM Pacific Time Saturday Canada 905 709 3839 6 AM to 8 PM Pacific Time Monday through Friday and 7 AM to 4 PM Pacific Time Saturday Days and hours of support are subject to change without notice Toll or long distance charges may apply Purchase Supplies and Accessories You can purchase genuine Epson ink and paper at epson com U S sales eps...

Page 360: ...ecifications Printable Area Specifications Automatic Document Feeder ADF Specifications Scanning Specifications Fax Specifications Ink Cartridge Specifications Dimension Specifications Electrical Specifications Environmental Specifications External USB Device Specifications Interface Specifications Network Interface Specifications Safety and Approvals Specifications Windows System Requirements To ...

Page 361: ...OS X 10 11 x OS X 10 10 x OS X 10 9 x OS X 10 8 x OS X 10 7 x OS X 10 6 8 Note For the latest product software available for your operating system visit the Epson support site at epson com support U S epson ca support Canada or latin epson com support Caribbean select your product and select Downloads Parent topic Technical Specifications Paper Specifications Note Since the quality of any particul...

Page 362: ...es 216 340 mm Oficio 9 8 46 12 4 inches 215 315 mm Half Letter 5 5 8 5 inches 140 216 mm Paper types Plain paper and thick paper Note Your product also supports compatible papers distributed by Epson See the link at the end of this topic for a list of compatible Epson papers Weight Plain paper 17 lb 64 g m2 to 24 lb 90 g m2 Thick paper 25 lb 91 g m2 to 68 lb 256 g m2 Envelopes Size No 10 4 1 9 5 i...

Page 363: ...ity may decline in the expanded printable area Single sheets borders 1 Top bottom left right margins 0 12 inch 3 mm minimum 2 Reduced print quality area top 1 85 inches 47 mm minimum 3 Reduced print quality area bottom 1 77 inches 45 mm minimum Single sheets borderless ...

Page 364: ...ed print quality area right 0 71 inch 18 mm minimum 4 Reduced print quality area left 1 85 inches 47 mm minimum Parent topic Technical Specifications Automatic Document Feeder ADF Specifications Paper input Faceup loading Paper output Facedown ejection Paper size WF 4820 Series US letter 8 5 13 legal or A4 size WF 4830 Series US letter A5 8 5 13 legal or A4 size Paper type Plain paper Paper weight...

Page 365: ...40 pixels at 1200 dpi Document size Maximum 8 5 11 7 inches 216 297 mm Scanner glass US letter or A4 Scanning resolution 1200 dpi main scan 2400 dpi sub scan Output resolution 50 to 9600 dpi in 1 dpi increments Image data Color 48 bits per pixel internal 16 bits per pixel per color internal 24 bits per pixel external 8 bits per pixel per color internal Grayscale 16 bits per pixel internal 8 bits p...

Page 366: ...Super Fine 203 pixels per inch 392 lines per inch 8 pixels per mm 15 4 lines per mm Ultra Fine 406 pixels per inch 392 lines per inch 16 pixels per mm 15 4 lines per mm Photo 203 pixels per inch 196 lines per inch 8 pixels per mm 7 7 lines per mm Color Fine 200 200 dpi Photo 200 200 dpi Error correction mode ITU T Super Group 3 Speed dial group dial numbers Up to 100 speed dial or 99 group dial Pa...

Page 367: ... resold After setup the remaining ink is available for printing Yields are based on ISO 24711 in default mode printing continuously Yields vary due to print images settings and temperatures Printing infrequently or primarily with one color reduces yields All cartridges must be installed with ink for printing and printer maintenance For print quality some ink remains in replaced cartridges Color Cy...

Page 368: ...s Height Stored 13 inches 330 mm Printing 13 inches 330 mm Width Stored 16 7 inches 425 mm Printing 16 7 inches 425 mm Depth Stored 15 3 inches 388 mm Printing 19 8 inches 503 mm Weight without ink cartridges or power cord 26 2 lb 11 9 kg Parent topic Technical Specifications Electrical Specifications Power supply rating 100 to 240 V Input voltage range 90 to 264 V Rated frequency range 50 60 Hz I...

Page 369: ...Operating 20 to 80 RH Storage 5 to 85 RH Parent topic Technical Specifications External USB Device Specifications Do not use devices with the following requirements Dedicated driver Security settings such as passwords encryption etc Built in USB hub Note Use only external storage devices with independent AC power sources External storage devices that are powered via USB are not recommended Epson c...

Page 370: ...upported Note Epson cannot guarantee the operation of externally connected devices Parent topic Technical Specifications Related references USB Device Photo File Specifications Network Interface Specifications Wi Fi Standards IEEE802 11a b g n ac IEEE802 11n available only on the 20 MHz channel Frequency ranges IEEE802 11b g n 2 4 GHz IEEE802 11a n ac 5 GHz U S and Canada Wi Fi channels 2 4 GHz 1 ...

Page 371: ...ds with support for WPA WPA2 Personal WPA3 SAE AES Note Wi Fi Direct supports only WPA2 PSK AES The availability of outdoor use over these channels varies by location as described in the table below Limitations for Using 5GHz Frequencies Outdoors U S and Canada Frequency range W52 W53 W56 W58 Frequency 5150 5250 MHz 5250 5350 MHz 5470 5725 MHz 5725 5850 MHz Channel 36 40 44 48 52 56 60 64 100 104 ...

Page 372: ...s Specifications United States Safety UL60950 1 EMC FCC part 15 Subpart B class B Canada Safety CAN CSA C22 2 No 60950 1 EMC CAN ICES 3 B NMB 3 B This equipment contains the following wireless module Manufacturer Seiko Epson Corporation Type J26H005 This product conforms to Part 15 of FCC Rules and RSS 210 of the IC Rules Epson cannot accept responsibility for any failure to satisfy the protection...

Page 373: ...nt complies with FCC IC radiation exposure limits set forth for an uncontrolled environment and meets the FCC radio frequency RF Exposure Guidelines in Supplement C to OET65 and RSS 102 of the IC radio frequency RF Exposure rules This equipment should be installed and operated so that the radiator is kept at least 7 9 inches 20 cm or more away from a person s body excluding extremities hands wrist...

Page 374: ...nstructions LCD Screen Safety Instructions Wireless Connection Safety Instructions Telephone Equipment Safety Instructions Parent topic Notices General Product Safety Instructions Be sure to follow all warnings and instructions marked on the product Use only the type of power source indicated on the product s label Use only the power cord that comes with the product Use of another cord may cause f...

Page 375: ...ugh space in front of the product for the paper to be fully ejected Avoid locations that are subject to rapid changes in heat or humidity shocks or vibrations or dust Do not place or store the product outdoors Do not place the product near excessive heat sources or in direct sunlight Leave enough room around the product for sufficient ventilation Do not block or cover openings in the case or inser...

Page 376: ...e far right position When storing or transporting the product do not tilt it stand it on its side or turn it upside down otherwise ink may leak Parent topic Important Safety Instructions Ink Cartridge Safety Instructions Keep ink cartridges out of the reach of children and do not drink the ink Be careful when you handle used ink cartridges there may be ink remaining around the ink supply port If i...

Page 377: ...east three hours before using it Store ink cartridges with their bottoms down Do not store cartridges upside down Parent topic Important Safety Instructions LCD Screen Safety Instructions Use only a dry soft cloth to clean the LCD screen Do not use liquid or chemical cleansers If the LCD screen is damaged contact Epson If the liquid crystal solution gets on your hands wash them thoroughly with soa...

Page 378: ...n product near water Avoid using a telephone during an electrical storm There may be a remote risk of electric shock from lightning Do not use a telephone to report a gas leak in the vicinity of the leak Caution To reduce the risk of fire use only a No 26 AWG or larger telecommunication line cord Parent topic Important Safety Instructions Important Privacy Notice Printer Serial Number As part of s...

Page 379: ...or products approved after July 23 2001 the REN for this product is part of the product identifier that has the format US AAAEQ TXXXX The digits represented by are the REN without a decimal point e g 03 is a REN of 0 3 For earlier products the REN is separately shown on the label If this equipment causes harm to the telephone network the telephone company will notify you in advance that temporary ...

Page 380: ...ter in the AC outlet to which this equipment is connected Telephone companies report that electrical surges typically lightning transients are very destructive to customer terminal equipment connected to AC power sources and that this is a major nationwide problem This equipment has been tested and found to comply with the limits for a Class B digital device pursuant to Part 15 of the FCC Rules Th...

Page 381: ...une combinaison quelconque de dispositifs à la seule condition que la somme des IES de tous les dispositifs n excède pas cinq CAN ICES 3 B NMB 3 B Parent topic Notices Related tasks Using the Fax Setup Wizard Binding Arbitration and Class Waiver 1 DISPUTES BINDING INDIVIDUAL ARBITRATION AND WAIVER OF CLASS ACTIONS AND CLASS ARBITRATIONS 1 1 Disputes The terms of this Section 1 shall apply to all D...

Page 382: ... of the Dispute shall include the sender s name address and contact information the facts giving rise to the Dispute and the relief requested the Dispute Notice Following receipt of the Dispute Notice Epson and you agree to act in good faith to resolve the Dispute before commencing arbitration 1 4 Small Claims Court Notwithstanding the foregoing you may bring an individual action in the small clai...

Page 383: ...ither you or Epson decides to arbitrate a Dispute both parties agree to the following procedure i Write a Demand for Arbitration The demand must include a description of the Dispute and the amount of damages sought to be recovered You can find a copy of a Demand for Arbitration at http www jamsadr com Demand for Arbitration ii Send three copies of the Demand for Arbitration plus the appropriate fi...

Page 384: ...the requirement to provide notice prior to litigation 1 8 Amendments to Section 1 Notwithstanding any provision in this Agreement to the contrary you and Epson agree that if Epson makes any future amendments to the dispute resolution procedure and class action waiver provisions other than a change to Epson s address in this Agreement Epson will obtain your affirmative assent to the applicable amen...

Page 385: ...rwise without the prior written permission of Seiko Epson Corporation The information contained herein is designed only for use with this Epson product Epson is not responsible for any use of this information as applied to other products Neither Seiko Epson Corporation nor its affiliates shall be liable to the purchaser of this product or third parties for damages losses costs or expenses incurred...

Page 386: ...OR A PARTICULAR PURPOSE IN NO EVENT SHALL SAM LEFFLER OR SILICON GRAPHICS BE LIABLE FOR ANY SPECIAL INCIDENTAL INDIRECT OR CONSEQUENTIAL DAMAGES OF ANY KIND OR ANY DAMAGES WHATSOEVER RESULTING FROM LOSS OF USE DATA OR PROFITS WHETHER OR NOT ADVISED OF THE POSSIBILITY OF DAMAGE AND ON ANY THEORY OF LIABILITY ARISING OUT OF OR IN CONNECTION WITH THE USE OR PERFORMANCE OF THIS SOFTWARE Parent topic C...

Page 387: ...387 Parent topic Copyright Notice Copyright Attribution 2021 Epson America Inc 2 21 CPD 58814R2 Parent topic Copyright Notice ...

Reviews: