background image

For Auto Sheet Feeder / Cut 
Sheet(1 sheet)

Configure the following settings after loading paper in
the Auto Sheet Feeder or loading Cut Sheet(1 sheet).

Paper Type Settings

This is the most important setting to obtain the
optimum print results. Not setting a paper type that
matches the loaded paper will cause wrinkles, scuffing,
uneven colors, and other trouble.

Paper Size Setting

The paper size of paper loaded in the auto sheet feeder
or loaded Cut Sheet(1 sheet) is not detected
automatically. Set the size of the loaded paper.

How to Set

A

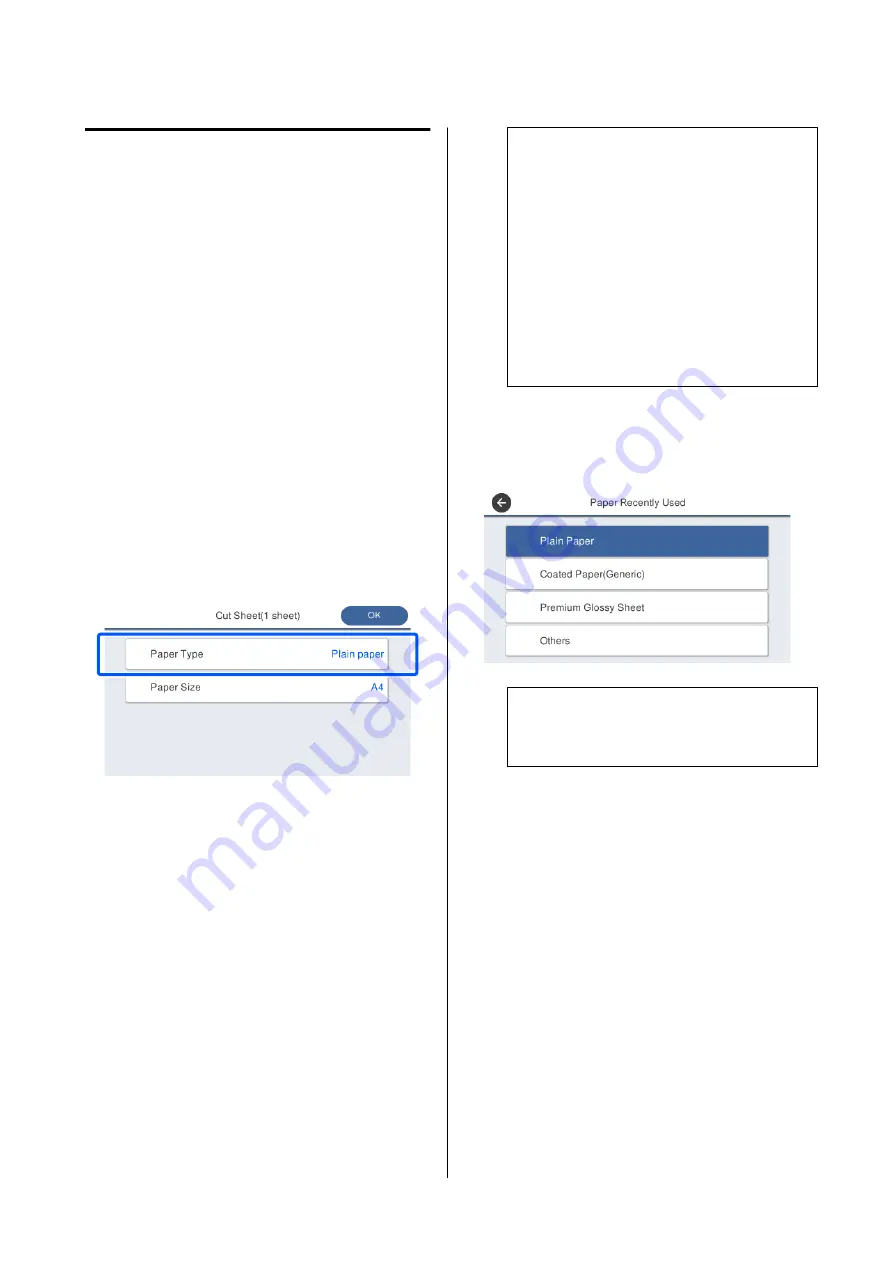
The currently set paper type is shown on the
screen displayed after loading cut sheet.

When changing Paper Type

Proceed to step 2.

When changing Paper Size without changing
Paper Type

Proceed to step 4.

When not changing either of them

Touch 

OK

. You can start printing once 

Ready

appears on the screen.

Note:

The settings are confirmed if no operations are
performed for 90 seconds on the above screen. To
change the settings later, touch the following in
order from the Home screen and then configure
the settings.

Auto Sheet Feeder

Paper Setting

 - 

Auto Sheet Feeder

 - 

Change

Paper Type/Paper Size

Cut Sheet(1 sheet)

Paper Setting

 - 

Cut Sheet(1 sheet)

 - 

Change

Paper Type/Paper Size

B

Touch 

Paper Type

.

The following paper type selection screen
appears.

Note:

The most recently selected three paper types are
displayed in addition to 

Others

.

C

Select the paper type that matches the loaded
paper.

Epson Special Media

Select the same product name as the one shown
on the package of the paper.

Commercially available non-Epson paper

Select from the following commercially
available paper types.

Plain paper

Coated Paper(Generic)

Photo Paper(Generic)

Tracing Paper

Tracing Paper <LowDuty>

Matte Film

SC-T5100 Series/SC-T3100 Series/SC-T5100N Series/SC-T3100N Series     User's Guide

Loading and Setting the Paper


41

Summary of Contents for SC-T3100 Series

Page 1: ...User s Guide CMP0139 00 EN ...

Page 2: ...he Auto Sheet Feeder 34 Attaching and Removing the Stacker for Plain Paper 34 Loading Paper in the Auto Sheet Feeder 34 Removing Paper from the Auto Sheet Feeder 36 Loading and Removing Cut Sheet 1 sheet 37 Loading Cut Sheet 1 sheet 37 Removing Cut Sheet 1 Sheet 38 Setting Loaded Paper 39 For Roll Paper 39 For Auto Sheet Feeder Cut Sheet 1 sheet 41 Optimizing Paper Settings Media Adjust 43 Notes o...

Page 3: ...ar Print Head Clogs 134 Checking for Clogged Print Head and Cleaning 134 Powerful Cleaning 134 Replacing Consumables 135 Handling of Used Consumables 135 Replacing Ink Cartridges 135 Maintenance Box Replacement 137 Replacing the Cutter 138 Problem Solver What to do When a Message is Displayed 140 When a Maintenance Call Printer Error Occurs 141 Troubleshooting 142 You cannot print because the prin...

Page 4: ...elp for Users in Australia 175 Help for Users in Singapore 176 Help for Users in Thailand 176 Help for Users in Vietnam 176 Help for Users in Indonesia 176 Help for Users in Hong Kong 177 Help for Users in Malaysia 177 Help for Users in India 177 Help for Users in the Philippines 178 SC T5100 Series SC T3100 Series SC T5100N Series SC T3100N Series User s Guide Contents 4 ...

Page 5: ...r Preview Mac Setup Guide booklet Provides information on how to setup the printer after unpacking it from the box Make sure you read this manual to perform operations safely Operator s Guide booklet or PDF Provides selected information on how to use the printer and frequently used features of the printer General Information PDF Provides important safety instructions printer specifications and con...

Page 6: ...rch toolbar For Mac Select Find in the Edit menu to open the search toolbar F To enlarge the text in the display that is too small to see well click Click to reduce the size To specify a part of an illustration or screenshot to enlarge do the following For Windows Right click on the page in the PDF manual and select Marquee Zoom in the menu that is displayed The pointer changes to a magnifying gla...

Page 7: ...ng the Cutter on page 138 C Paper basket Output from the printer collects in this basket keeping the media clean and free of creases A dedicated stand that comes with a paper basket is provided as an option for SC T3100N Series and SC T5100N Series U Options and Consumable Products on page 154 SC T5100 Series SC T3100 Series SC T5100N Series SC T3100N Series User s Guide Introduction 7 ...

Page 8: ...g Cut Sheet 1 sheet on page 37 G Edge guides Slide these guides against the left and right edges of the paper loaded in the auto sheet feeder It can prevent paper from being fed skewed H Auto sheet feeder This allows you to load multiple sheets of A3 to A4 cut sheet The loaded paper is automatically fed and printed continuously U Loading Paper in the Auto Sheet Feeder on page 34 I Cut sheet cover ...

Page 9: ...fed during printing Feed single sheets one at a time C Ink cartridges Install cartridges into all slots U Replacing Ink Cartridges on page 135 D Cartridge cover Open when replacing ink cartridges E Spindle When loading roll paper into the printer insert this through the roll paper F Movable flange transparent This fixes the roll paper placed on the spindle Attach or detach it when placing or remov...

Page 10: ...le in this holder after it is attached to the roll paper There is a holder on both the left and right sides U Loading Roll Paper on page 28 SC T5100 Series SC T3100 Series SC T5100N Series SC T3100N Series User s Guide Introduction 10 ...

Page 11: ...U Maintenance Box Replacement on page 137 C AC inlet Connect the supplied power cable here D LAN port Connects the LAN cable E Status light green orange The color indicates the network transmission speed Off Orange Green 10BASE T 100BASE T 1000BASE T SC T5100 Series SC T3100 Series SC T5100N Series SC T3100N Series User s Guide Introduction 11 ...

Page 12: ...ed Receiving data G OPTION port Connect a scanner to perform enlarged copying U Making Enlarged Copies with an A3 or A4 Scanner on page 96 H USB port Connects the USB cable I Vents Do not block the vents U Installation space on page 17 SC T5100 Series SC T3100 Series SC T5100N Series SC T3100N Series User s Guide Introduction 12 ...

Page 13: ...played on this screen by gently touching tapping them and scroll the screen by moving your finger while it remains touching the screen Home screen operations Overview of Home screen operations U Operator s Guide booklet or PDF A Information display area Displays the printer s status error messages and so on B Roll paper information area When roll paper is loaded Displays information on the loaded ...

Page 14: ...uching each item displays instructions on what to do If you do not perform the actions the badge will not disappear G Network icon The network connection status is indicated by an icon as shown below Touching the icon allows you to switch the net work connection status U Changing the Network Connection Methods on page 93 Not connected to a wired LAN or the wired LAN or wireless LAN not set Connect...

Page 15: ...canner to the printer Enlarged Copy appears to allow you to easily make enlarged copies U Making Enlarged Copies with an A3 or A4 Scanner on page 96 SC T5100 Series SC T3100 Series SC T5100N Series SC T3100N Series User s Guide Introduction 15 ...

Page 16: ...at Epson printers so you will have no trouble finding a location to place it The model without a stand can even be placed on a drawing storage cabinet or the like See the following for dimensions U Specifications Table on page 171 Automatic switching between auto sheet feeder cut sheet and roll paper This printer allows not only roll paper to be loaded but also multiple sheets of A3 size or smalle...

Page 17: ...eless LAN on page 93 U Directly Connection Wirelessly Wi Fi Direct on page 94 U Printing Using AirPrint on page 95 Notes on Usage and Storage Installation space Make sure that you secure the following space clear of any other objects so that paper ejection and consumable replacement are not obstructed See the Specifications Table for the external dimensions of the printer U Specifications Table on...

Page 18: ...Even when printing is not performed some of each color of ink will be consumed by ink cartridge replacement print head cleaning and other maintenance operations needed to keep the print head in good condition The printer may automatically perform print head cleaning to maintain good printing quality Please wait until cleaning finishes without opening any of the covers or turning off the power Note...

Page 19: ...moving the tape the printer may become unable to print properly Never peel off anything else such as the film or label Ink may leak Do not touch the IC chips on the ink cartridges You may not be able to print properly U Replacing Ink Cartridges on page 135 Install the ink cartridges for all the colors Printing is not possible if they are not all installed Do not leave the printer without ink cartr...

Page 20: ...paper in the printer for a long time its quality may decline Notes on handling printed paper To maintain long lasting high quality print results note the following points Do not rub or scratch print outs If they are rubbed or scratched the ink may peel off Do not touch the surface of print outs The ink may peel off Make sure the print outs are completely dry before folding of stacking otherwise th...

Page 21: ...210 minutes At default settings the printer enters sleep mode if no operations are performed for 15 minutes The delay can be changed from the Basic Settings menu U General Settings Basic Settings on page 115 Note When the printer enters sleep mode the control panel s screen goes blank as if the power has been turned off but the P light remains lit Power Off Timer This function automatically turns ...

Page 22: ... printer U Updating Software or Installing Additional Software on page 25 LFP Print Plug In for Office Windows Only Plug in software for Microsoft Office applications Word Excel and PowerPoint Installing this plug in displays ribbon items in Office applications that give quick access to horizontal and vertical banner printing and enlarged printing It can be installed by selecting it in the Additio...

Page 23: ...Software Name Function Web Config The network security settings can be configured from Web Config This software also has an email notification function for notifying of printer errors and other problems U How to Use Web Config on page 24 SC T5100 Series SC T3100 Series SC T5100N Series SC T3100N Series User s Guide Introducing the Software 23 ...

Page 24: ...p IP address of printer Example IPv4 http 192 168 100 201 IPv6 http 2001 db8 1000 1 Closing Close the Web browser Function Summary This section introduces the main functions of Web Config For more details see the Administrator s Guide Main Functions Check the printer s status such as the remaining amount of ink Check and update the printer s firmware version Configure the printer s network setting...

Page 25: ...hen type the software name in the search box of the displayed window the software appears immediately The software can also be started by clicking the printer icon on the Taskbar of the desktop and then selecting Software Update Mac Select Go Applications Epson Software EPSON Software Updater C Select the software or manuals to be updated and then update them Follow the on screen instructions cImp...

Page 26: ...XX Printer Uninstall E Select the printer icon and then click OK F Follow the on screen instructions to continue When the delete confirmation message appears click Yes Restart the computer if you are reinstalling the printer driver Mac When reinstalling or upgrading the printer driver or other software follow the steps below to uninstall the target software first Printer Driver Use the Uninstaller...

Page 27: ...rled paper may cause paper jams or soiled prints Flatten the paper before use by bending it in the opposite way or use paper with no problem Unsupported paper Do not use paper that is wavy torn cut folded too thick too thin has a sticker affixed etc Doing so may cause paper jams or soiled prints See the following for paper supported by the printer U Epson Special Media Table on page 157 U Supporte...

Page 28: ...moving the roll paper Before printing on roll paper remove the stacker U Removing Paper from the Auto Sheet Feeder on page 36 U Attaching and Removing the Stacker for Plain Paper on page 34 Loading Roll Paper Caution Make sure to grip the flanges of the spindle when loading a roll paper If you hold and load the roll paper by gripping the other parts your hand or finger may get injured Note You can...

Page 29: ... leading edge of the roll paper is not bent and then insert it into the paper slot until you hear a beep cImportant Hold the paper edges and insert the paper straight into the paper slot Inserting it skewed will cause a skew error or paper jam Note If the leading edge of the roll paper is not horizontal or not cut cleanly it will be cut automatically after loading completes However it will not be ...

Page 30: ...t want to cut each page or you want to cut at a desired position see the following procedure Cutting after Last Page Printed or at Desired Position Turn off auto cut in the printer driver print and then cut using the Feed Cut Paper menu of the printer after printing finishes A Select Off in Advanced Roll Paper Option Auto Cut of the printer driver and then print Leave the auto cut setting of the p...

Page 31: ...hen using such paper cut the paper with scissors as described in the following procedure Do not use a cutter The printer may be damaged A Turn off the auto cut setting and then print To print cut lines turn off the auto cut setting of the printer When printing via the printer driver also turn off the setting of the printer driver Printer settings Roll paper information area Advanced Media Setting ...

Page 32: ...rinted paper is held in the printer pull out the paper toward you by holding both edges of the paper with your hands The printed paper will drop out automatically if the next printing is started B Open the cut sheet cover C Release the central lock and then open the roll paper cover D Touch Remove The paper is rewound and ejected Note If printed paper is not cut and remains a confirmation screen a...

Page 33: ...the original package H Attach the transparent flange to the spindle and return the spindle in the printer I Close the roll paper cover and cut sheet cover SC T5100 Series SC T3100 Series SC T5100N Series SC T3100N Series User s Guide Loading and Setting the Paper 33 ...

Page 34: ...es in the front of the printer How to remove Remove the stacker by pulling it toward you Loading Paper in the Auto Sheet Feeder Note The number of sheets that can be loaded in the auto sheet feeder differs depending on the paper See the following for more details U Cut Sheet on page 158 U Supported Commercially Available Paper on page 160 You can load the paper while viewing the procedure on the s...

Page 35: ...des against the edges of the paper If the edge guides are positioned away from the paper edges the paper could be fed skewed which may cause a skew error or paper jam E On the displayed screen set the paper type and size that match the loaded paper Not setting the appropriate paper type will cause print quality trouble See the following for more details on the paper types and sizes U For Auto Shee...

Page 36: ...en the edge guides and then remove the paper B Fold down the auto sheet feeder and then tilt it to the front C Close the cut sheet cover SC T5100 Series SC T3100 Series SC T5100N Series SC T3100N Series User s Guide Loading and Setting the Paper 36 ...

Page 37: ...rk line on the right and its left edge with the mark line for the paper size cImportant Insert all paper in portrait orientation Inserting paper in landscape orientation may cause a decline in print quality D Insert the leading edge of the paper straight into the paper slot until you hear a beep cImportant Hold the paper edges and insert the paper straight into the paper slot Inserting it skewed w...

Page 38: ... the paper basket attached to the stand is open Removing Cut Sheet 1 Sheet When Removing Unprinted Cut Sheet Touch Paper Setting Cut Sheet 1 sheet Remove from the Home screen The paper is ejected When Removing Printed Cut Paper Pull out the paper toward you by holding the edges of the paper with your hands The trailing edge of the paper stops in the state in which is held in the printer after prin...

Page 39: ...hs register the width of one of them in Custom Paper Setting Custom Paper Setting registration adds a new paper type setting Perform the registration in Settings General Settings Printer Settings Custom Paper Setting For details on Custom Paper Setting see the following Custom Paper Setting menu U General Settings Printer Settings on page 117 How to Set A The currently set paper type is shown on t...

Page 40: ... E Touch Paper Remaining F Touch Setup The setting changes to On and Remaining Amount and Remaining Alert are enabled Touch each one and enter a value as follows Remaining Amount Total length of roll paper see the manual supplied with the roll paper Remaining Alert Remaining amount value that will be the timing for displaying the remaining amount warning notification Note On the keypad screen for ...

Page 41: ...ady appears on the screen Note The settings are confirmed if no operations are performed for 90 seconds on the above screen To change the settings later touch the following in order from the Home screen and then configure the settings Auto Sheet Feeder Paper Setting Auto Sheet Feeder Change Paper Type Paper Size Cut Sheet 1 sheet Paper Setting Cut Sheet 1 sheet Change Paper Type Paper Size B Touch...

Page 42: ...h OK Auto Sheet Feeder Cut Sheet 1 sheet Select a category and select the target paper size Note Setting non standard size For a non standard size touch User Defined at the end of the list and then enter the paper width and length On the keypad screen for entering a numeric value enter numbers that include a number of the first decimal place For example if you want to enter 5 m touch 5 and 0 E Whe...

Page 43: ...rect adjustment may not be possible Remove curled wavy or folded sections by cutting them off Adjustment Procedure The adjustment procedure is performed in wizard format When you proceed with operations in accordance with the instructions displayed on the screen a set of adjustment patterns will be printed twice Adjustment is performed by visually checking both the first and second sets of pattern...

Page 44: ...ment patterns of 4 in the same way as for 3 G Touch OK Printing of the second set of adjustment patterns starts For cut sheet smaller than A2 size load the second sheet of paper cImportant When using A2 size or larger cut sheet or using roll paper with the auto cut turned off the part with the first set of patterns printed on it is pulled inside the printer in order to print the second set of patt...

Page 45: ...f the currently selected paper type The optimal printing results can be obtained from the next time by simply selecting that paper type SC T5100 Series SC T3100 Series SC T5100N Series SC T3100N Series User s Guide Loading and Setting the Paper 45 ...

Page 46: ...er Properties The printer driver dialog will be displayed Note When printing a PDF file In the Print dialog box of Adobe Acrobat select the Actual size or Page Scaling None radial button and Choose paper source by PDF page size check box To enlarge or reduce the size configure the setting in the printer driver settings dialog box D Check Document Size on the Printer Settings tab of the printer dri...

Page 47: ... appears For Roll Paper Width Paper Size when cut sheet and Media Type the settings configured in the control panel of the printer are applied automatically Note If the paper is loaded or changed after opening the printer driver s dialog box the paper size and paper type settings configured on the printer will not be applied In this case click the Acquire Info button to apply the settings G Select...

Page 48: ...right side See the help for more details Note See the printer driver help for more details on setting items You can display the help in the following two ways Click Help at the bottom right of the screen Right click the item you want to check and then click Help This is not possible in the print preview screen Canceling Printing There are a few ways to stop printing operations depending on the sit...

Page 49: ...Used Settings If you start the printer driver from the Control Panel change the settings to those you use frequently and then save the settings the printer driver s dialog box will be displayed with the saved settings from any application that it is displayed A Open View devices and printers or Devices and Printers Windows 10 8 1 8 7 Click in the following order Hardware and Sound or Hardware View...

Page 50: ...o 100 The saved select settings can be recalled from Select Setting Note How to share Select Setting with multiple computers Select the settings you want to share click Export and then export the settings to a file Display the same screen of the printer driver on another computer click Import and then import the settings Rearranging display items The display items of Select Setting Media Type and ...

Page 51: ...r click Delete Group Drag and drop unnecessary items to Not Display Note When Delete Group is performed the group folder is deleted but the settings in the deleted group folder remain Delete them individually from List in the save location D Click Save SC T5100 Series SC T3100 Series SC T5100N Series SC T3100N Series User s Guide Printing with the Printer Driver from Your Computer 51 ...

Page 52: ...here are three options for each paper size For example if you click the A2 size the following three options appear A2 A2 Retain Scale A2 Roll Paper Banner Normally select the option without parenthesis A2 in the example above Select the other two options at the following times Retain Scale PDF and image data may be printed reduced slightly even when the output size is set to Same as Paper Size in ...

Page 53: ... and check the roll paper width paper size when cut sheet and paper type Select from Roll Paper Auto Sheet Feeder and Sheet If you select a paper source for which paper is not loaded in the printer appears For Roll Paper Width Paper Size when cut sheet and Media Type the settings configured in the control panel of the printer are applied automatically Note If the paper is loaded or changed after o...

Page 54: ...ing the menus on the right side See the help for more details Note See the printer driver help for more details on setting items Click in the printer driver settings dialog box to display Help How to Select the Dedicated Printer Driver for This Printer You can print using AirPrint from a Mac computer However printing by automatically fitting the document to the width of the roll paper and selectin...

Page 55: ...e middle of printing It may take a while before the printer returns to the ready status However print jobs in the print queue on a computer cannot be deleted in this way Use the procedure of Canceling from a Computer to delete print jobs in the print queue Customizing the Printer Driver You can assign a name to frequently used setting information paper size and each item of the basic settings and ...

Page 56: ...sets Deleting from Presets A Click Show Presets in Presets of the Print dialog box B Select the setting you want to delete click Delete and then click OK SC T5100 Series SC T3100 Series SC T5100N Series SC T3100N Series User s Guide Printing with the Printer Driver from Your Computer 56 ...

Page 57: ...L 2 or HP RTL mode This method is best suited for printing CAD and GIS drawings such as maps and blueprints You can print from an application that supports HP GL 2 compatible with HP Designjet 750C and HP RTL See the following for more details U Printing Using the HP GL 2 or HP RTL Mode from a Computer on page 91 A Open the data to be printed and then click Plot B Select the printer in Printer plo...

Page 58: ...list Windows Mac F Check other settings and then start printing Note If the output size is portrait and the height is smaller than the width of the roll paper the print image is printed rotated 90 to save paper This function is enabled if the Auto Rotate check box is selected in Roll Paper Option on the Advanced tab SC T5100 Series SC T3100 Series SC T5100N Series SC T3100N Series User s Guide Pri...

Page 59: ...e to fit the roll paper width Fit to Output Size Automatically enlarges or reduces the image size to fit the paper size Specify Size You can specify the enlargement or reduction ratio Use this method for a non standard paper size Note When printing from applications designed expressly for horizontal or vertical banners adjust printer driver settings as described in the application documentation Wh...

Page 60: ...this printer is selected in Printer and check the paper size Select a paper size that does not have Retain Scale or Roll Paper Banner If the size is different select the correct size from the pull down menu U Basic Operating Procedures Mac on page 52 Note In the case of an application without a page setup menu item you can set the paper size if you open the Print dialog box from the Print menu ite...

Page 61: ...s tab of the printer driver Windows Display the Printer Settings tab of the printer driver from the application and check that the document size is the same as the setting of the application If it differs click Settings and specify the correct size in the Change Paper Size dialog box U Basic Operating Procedures Windows on page 46 Mac Open the page setup screen of the application and check that th...

Page 62: ...to Output Size on the Printer Settings tab of the printer driver Windows Mac C Select the desired size from the Output Size pull down menu Windows Mac D Check other settings and then start printing SC T5100 Series SC T3100 Series SC T5100N Series SC T3100N Series User s Guide Printing with the Printer Driver from Your Computer 62 ...

Page 63: ...in Printer and check the paper size Select a paper size that does not have Retain Scale or Roll Paper Banner If the size is different select the correct size from the pull down menu U Basic Operating Procedures Mac on page 52 Note In the case of an application without a page setup menu item you can set the paper size if you open the Print dialog box from the Print menu item B Display the Output Si...

Page 64: ...idth SC T5100 Series SC T5100N Series 89 to 914 mm SC T3100 Series SC T3100N Series 89 to 610 mm Paper Length 127 to 18000 mm The paper length can be longer when using an application that supports banner printing However the actual print size depends on the application the paper size loaded in the printer and the computer environment cImportant The smallest size supported by the printer is 89 mm w...

Page 65: ...e list on the left To delete a saved paper size select the paper size name from the list on the left of the screen and then click Delete You can save up to 100 paper sizes C Click OK to close the User Defined Paper Size dialog box Also close the printer driver s dialog box Registration of the user defined size is now complete D Select the registered paper size in for example the page size settings...

Page 66: ...e from the list on the left To duplicate a saved paper size select its name from the list on the left of the screen and click Duplicate To delete a saved paper size select its name from the list on the left of the screen and click The custom paper size setting differs depending on the operating system version See your operating system s documentation for details D Click OK to close the Custom Pape...

Page 67: ...alog box The registered paper size is displayed in Document Size on the Printer Settings tab U Basic Operating Procedures Mac on page 52 G Check other settings and then start printing SC T5100 Series SC T3100 Series SC T5100N Series SC T3100N Series User s Guide Printing with the Printer Driver from Your Computer 67 ...

Page 68: ...ck box you can check which of the above color correction methods is used Standard of Select Target is the most suitable setting for the currently selected paper type Clicking the Settings button allows you to for example finely adjust the Gamma Brightness Contrast Saturation and color balance Use this option when the application in use does not have a color correction function Note The color corre...

Page 69: ...ct Color Management select Printer Manages Colors in Color Handling and click Print B Display the Printer Settings tab of the printer driver and then clear the Simple Settings check box in the Print Quality area U Basic Operating Procedures Windows on page 46 C Select the print target If you want to select the color correction method yourself select Custom at the very bottom of the list D When Cus...

Page 70: ...ement setting to Printer Manages Colors Adobe Photoshop CS3 or later Adobe Photoshop Elements 6 or later Adobe Photoshop Lightroom 1 or later In other applications set No Color Management Note For information on supported platforms see the website for the application in question Setting example of Adobe Photoshop CC Open the Print dialog box Select Color Management select Printer Manages Colors in...

Page 71: ...ustom is selected for the print target select the color and color correction method settings G If necessary click Settings and then adjust items such as the Gamma Brightness Contrast Saturation and color balance See the printer driver help for more details on each item H Check other settings and then start printing SC T5100 Series SC T3100 Series SC T5100N Series SC T3100N Series User s Guide Prin...

Page 72: ... You cannot match the colors on the printed results and display by color management between the input device and the printer To match both colors you need to perform color management between the input device and the display as well Color Management Print Settings You can perform color management printing using this printer s printer driver in the following two ways Choose the best method according...

Page 73: ...rinter driver s settings screen U Color Management Printing by Driver ICM Windows Only on page 77 U Color Management Printing by Host ICM Windows on page 75 U Color Management Printing by ColorSync Mac on page 76 U Setting color management with the applications on page 73 Setting color management with the applications Print using applications with a color management function Make the color managem...

Page 74: ... Service Pack 2 or later and NET 3 0 Off No Color Adjustment is selected automatically For Mac Select Printer Settings from the list and clear the Simple Settings check box in the Print Quality area and select Off No Color Adjustment from the print target list D Check other settings and then start printing SC T5100 Series SC T3100 Series SC T5100N Series SC T3100N Series User s Guide Printing with...

Page 75: ...NET 3 0 or later Windows XP other than the above No Color Management In other applications set No Color Management Note For information on supported platforms see the website for the application in question Setting example of Adobe Photoshop CC Open the Print dialog box Select Color Management select Printer Manages Colors in Color Handling and click Print When using an application without a color...

Page 76: ...on the application color management printing by ColorSync may not be supported A Disable the color management functions in the application B Display the Print screen U Basic Operating Procedures Mac on page 52 C Select Color Matching from the list and then click ColorSync The printer profile corresponding to the currently selected paper type is specified automatically and displayed at the bottom o...

Page 77: ... later Adobe Photoshop Elements 6 0 or later Adobe Photoshop Lightroom 1 or later OS Color Management Settings Windows 8 1 Windows 8 Windows 7 Windows Vista Printer Manages Colors Windows XP Service Pack 2 or later and NET 3 0 or later Windows XP other than the above No Color Management In other applications set No Color Management Note For information on supported platforms see the website for th...

Page 78: ...lorimetric Converts the data so that a set of color gamut and white point or color temperature coordinates in the original data match their corresponding print coordinates This feature is used for many types of color matching Absolute Colorimetric Assigns absolute color gamut coordinates to the original and print data and converts the data Therefore color tone adjustment is not performed on any wh...

Page 79: ...k the Settings button U Basic Operating Procedures Windows on page 46 B Set Number of pages per sheet and Page Order in the Print Layout dialog box If the Print page frames check box is selected page frames are printed on each page C Check other settings and then start printing Settings in Mac A Display the Print dialog box select Layout from the list and specify the number of pages per sheet and ...

Page 80: ...side of the paper Performing 2 sided printing continuously may cause the print quality to decline or a paper jam If the print quality declines reduce the ink density in the printer driver or print one sheet at a time If 2 sided printing is performed continuously the inside of the printer may become soiled with ink If the paper is soiled from the rollers after printing perform cleaning U Smearing o...

Page 81: ... differ depending the application used Selecting the Folded Booklet check box enables printing to make a booklet In the example in the figure below the pages that will be on the inside when the paper is folded into two pages 2 3 6 7 10 and 11 are printed first D Check other settings and then start printing E When the guide screen appears after printing of the odd pages is finished load the paper a...

Page 82: ...out tab of the printer driver and select the Page Layout check box Then select Folded Double Side and click the Settings button U Basic Operating Procedures Windows on page 46 B Set Binding Edge and Binding Margin in the Folded Double Side Setting dialog box C Check other settings and then start printing SC T5100 Series SC T3100 Series SC T5100N Series SC T3100N Series User s Guide Printing with t...

Page 83: ...c Operating Procedures Windows on page 46 B Set Number of panels in the Poster dialog box C If you want to print marks to serve as a guide when joining together paper printed with poster printing select the Print Cutting Guides check box Overlapping Alignment Marks Prints guides for joining the paper with overlapping The finished size is smaller only for the overlapping portions SC T5100 Series SC...

Page 84: ...ines drawn through and around the X marks in the illustration below will be printed on each sheet Note If the output is in color the join guides will be in blue and the cut guides in red otherwise all the guides will be printed in black The following section describes how to join four printed pages together SC T5100 Series SC T3100 Series SC T5100N Series SC T3100N Series User s Guide Printing wit...

Page 85: ...mporarily fasten them using an adhesive tape on the back C With the two sheets overlapping trim the excess by cutting along the line joining the two cut guides the lines to the left of the X marks D Rejoin the two sheets Use an adhesive tape to stick the backs of the sheets together E Repeat steps 1 to 4 for the lower two sheets SC T5100 Series SC T3100 Series SC T5100N Series SC T3100N Series Use...

Page 86: ...the X marks as shown in the illustration below and temporarily fasten them using an adhesive tape on the back H With the two sheets overlapping trim the excess by cutting along the line joining the two cut guides the lines above the X marks SC T5100 Series SC T3100 Series SC T5100N Series SC T3100N Series User s Guide Printing with the Printer Driver from Your Computer 86 ...

Page 87: ...k the backs of the sheets together J After joining all the sheets trim off the borders by cutting along the cut guides outside the X marks SC T5100 Series SC T3100 Series SC T5100N Series SC T3100N Series User s Guide Printing with the Printer Driver from Your Computer 87 ...

Page 88: ...you want to print in your application B Select the Layout Manager check box on the Printer Settings tab of the printer driver and check that the size set in the application is displayed in Document Size U Basic Operating Procedures Windows on page 46 Note Document Size is the size of the document to be placed on the Layout Manager screen The actual printing paper size is set in the screen in Step ...

Page 89: ...See the Layout Manager screen help for more details on each function F Click Properties in the File menu and set the print settings in the printer driver dialog box Set Print Quality in the Media Settings dialog box G Click the File menu in the Layout Manager screen and then click Print Printing starts Saving and Recalling Settings The layout and setting information on the Layout Manager screen ca...

Page 90: ...r Open the Utility tab of the printer driver and click the Monitoring Preferences Select the Register the shortcut icon to the taskbar check box in the Monitoring Preferences dialog box B Click Open in the File menu on the Layout Manager screen C Select the location and open the required file SC T5100 Series SC T3100 Series SC T5100N Series SC T3100N Series User s Guide Printing with the Printer D...

Page 91: ...gins Universal Print Settings and HP GL 2 specific settings such as palette settings HP GL 2 Unique Settings Basic Print Settings A Touch Settings General Settings Printer Settings Universal Print Settings from the Home screen B Check Paper Source and change the setting if necessary The default setting is Roll Paper When HP GL 2 or HP RTL print data is sent an error occurs if paper is not loaded f...

Page 92: ...Auto to HP GL 2 When the computer and printer are connected via a network Select Settings General Settings Printer Settings Printing Language Network from the Home screen and then change the setting from Auto to HP GL 2 To print from the printer driver as usual after HP GL 2 or HP RTL finishes return the setting to Auto CAD Application Settings Set the output device as follows according to your mo...

Page 93: ...nnect your router and the printer with a LAN cable See the following for the location of the printer s LAN port U Back on page 11 Switching to Wireless LAN The SSID network name and password of the access point to which the printer is to be connected are required Confirm them in advance The printer can be connected to a wireless LAN while the LAN cable is still connected Note If your access point ...

Page 94: ...he connection status U Home screen operations on page 13 B Touch Wi Fi Direct When Wi Fi Direct is already enabled the network SSID password number of connected devices etc are displayed Proceed to step 5 Note When any of the displayed network SSID device name etc is partially not visible because it is cut off at the right edge of the screen touch the corresponding item to display the entire setti...

Page 95: ...river for This Printer on page 54 A Connect the smart device and printer via wireless LAN or Wi Fi Direct See the following for more details U Switching to Wireless LAN on page 93 U Directly Connection Wirelessly Wi Fi Direct on page 94 B Load the paper in the printer C Open the document or photo to be printed on your smart device D Tap the share icon to display the print option E Tap the printer ...

Page 96: ... to 610 mm for SC T3100 Series SC T3100N Series Supported paper Roll paper only Enlarged copying to cut sheet is not possible Unsupported paper types The following paper cannot be used for enlarged copying Enhanced Adhesive Synthetic Paper Enhanced Low Adhesive Synthetic Paper U Epson Special Media Table on page 157 Connecting the Scanner A Ready both the printer and the scanner For information on...

Page 97: ...per loaded in the printer cImportant The image quality may decline or streaks may appear depending on the document or magnification If streaks appear try performing paper adjustment U Optimizing Paper Settings Media Adjust on page 43 If the problem is not resolved refer to the scanner manual and then clean the inside of the scanner Note If you touch Presets you can assign a name to frequently used...

Page 98: ... multiple copies will be made The original is printed on thick stock e g postcards or photographs When multiple copies are made from an original placed on the glass the original may be scanned once for each copy Wait until all the copies have been printed before opening the scanner cover Use the ADF to scan multi page documents If multiple copies are set for scanning multiple sheets continuously t...

Page 99: ...rd Forward Cut Media Adjust Start Advanced Media Setting Platen Gap 1 6 2 1 2 6 Displayed when in Paper Type Custom Paper is selected Top Bottom Margins Standard Top 3 mm Bottom 3 mm Top 15 mm Bottom 15 mm Top 45 mm Bottom 15 mm Back Tension Auto Standard High Extra High Drying Time Drying Time per Pass 0 to 10 0 sec Drying Time per Page 0 to 60 min Auto Cut On Off Manage Remaining Amount Setup On...

Page 100: ...Sheet Others Auto Sheet Feeder Media Adjust Start Change Paper Type Paper Size Paper Type Plain paper Display supported paper types Coated Paper Generic Premium Glossy Sheet Others Paper Size Display supported paper sizes Cut Sheet 1 sheet SC T5100 Series SC T3100 Series SC T5100N Series SC T3100N Series User s Guide Using the Menu 100 ...

Page 101: ...s User Defined Display paper size input screen Printer Status Details of each item U Printer Status menu on page 114 Settings item Settings value Supply Status Display approximate remaining amounts as well as product number of consumables Message List Display list of messages communicating printer status Firmware Version Display firmware version Print Status Sheet Configuration Status Sheet Print ...

Page 102: ...2 Sleep Timer 1 to 210 minutes Power Off Timer Off 30minutes 1h 2h 4h 8h 12h Circuit Breaker Interlock Startup On Off Date Time Settings Date Time Date yyyy mm dd mm dd yyyy dd mm yyyy Time 12h 24h Time Difference 12 45 to 13 45 15 minute increments Language Display supported languages Operation Time Out On Off Keyboard QWERTY AZERTY QWERTZ Length Unit m ft in SC T5100 Series SC T3100 Series SC T5...

Page 103: ...play settings items Change Name Registered name input screen Change Reference Paper Plain paper Display supported paper types Matte Paper Photo Paper CAD Others Advanced Media Setting Platen Gap 1 6 2 1 2 6 Top Bottom Margins Standard Top 3 mm Bottom 3 mm Top 15 mm Bottom 15 mm Top 45 mm Bottom 15 mm Back Tension Auto Standard High Extra High Drying Time Drying Time per Pass 0 0 to 10 0 sec Drying...

Page 104: ...dard 300dpi 600dpi 1200dpi Color Mode Common EPSON Standard sRGB Business Graphics GIS Line Drawing Off No Color Management HP GL 2 Unique Settings Rotate 0 90 180 270 Origin Setup Left Edge Center Mirror Image On Off Line Merge On Off Color Mode HP GL 2 EPSON Standard sRGB Business Graphics GIS Line Drawing Off No Color Management Select Palette Software Default Palette A Palette B Print Color Pa...

Page 105: ...formation Wi Fi Setup Wizard Push Button Setup WPS Others PIN Code Setup WPS Wi Fi Auto Connect Disable Wi Fi Wi Fi Direct Wi Fi Direct When Wi Fi Direct disabled Display Wi Fi Direct wizard When Wi Fi Direct enabled Display settings information and number of connected devices Change Password Disable Wi Fi Direct Delete Registered Device Wired LAN Setup Start Setup Displayed when connected to a wi...

Page 106: ...X System Administration Details of each item U General Settings System Administration on page 130 Security Settings Admin Settings Admin Password Register Change Clear All Settings Lock Setting Off On Restore Default Settings all Wi Fi network settings Yes No Clear All Data and Settings Yes No Firmware Update Update Start Checking Notification Off On Supply Status Display approximate remaining amo...

Page 107: ...dure Replace Cutter Start Powerful Cleaning Start Discharging Charging Ink Start Language Display supported languages Printer Status Print Details of each item U Printer Status Print on page 132 Print Status Sheet Configuration Status Sheet Print Network Display General Settings Network Settings Network Status SC T5100 Series SC T3100 Series SC T5100N Series SC T3100N Series User s Guide Using the...

Page 108: ...ettings value Copies 1 to 99 Color Mode Black White Color Original Size A4 A5 A3 B5 B4 Letter 13 x 18 cm 5 x 7 in User Defined Reduce Enlarge Auto Fit Page On Off Custom Size A0 US E 34x44in JIS B1 A1 US D 22x34in JIS B2 US C 17x22in A2 User Defined Only SC T5100 Series SC T5100N Series is displayed Density 4 to 4 Quality Speed Fine SC T5100 Series SC T3100 Series SC T5100N Series SC T3100N Series...

Page 109: ...oving Roll Paper on page 32 Feed Cut Paper Backward Use Backward and Forward to move the paper to the desired position Touch Cut to cut the paper using the built in cutter U Cutting the Roll Paper on page 30 Forward Cut Media Adjust Start Run this adjustment when there is a problem with print results or after registering custom paper settings Touch Start to print an adjustment pattern Then follow ...

Page 110: ...0 0 to 10 0 seconds 0 0 Select the time the print head pauses to allow drying after each pass Choose from values between 0 0 and 10 0 seconds Depending on the paper type the ink may take a while to dry If the ink blurs on the paper set a longer time for drying the ink Increasing the drying time increases the time needed to print Drying Time per Page 0 0 to 60 minutes 0 0 Specify how long the print...

Page 111: ...n the printer driver screen In Remaining Alert set the limit at which to display a warning when the amount of remaining roll paper drops below that limit You can set in 0 1 m increments Remaining Alert 1 0 to 15 0 m 5 0 Change Paper Type Paper Type Plain paper Select the type of paper loaded The three options other than Others display the most recently selected paper type When the desired paper ty...

Page 112: ... Change Paper Type Paper Size Paper Type Plain paper Select the type of paper loaded The three options other than Others display the most recently selected paper type When the desired paper type is not displayed touch Others to display these and select U For Auto Sheet Feeder Cut Sheet 1 sheet on page 41 Coated Paper Generic Premium Glossy Sheet Others Paper Size A4 Select the size of paper loaded...

Page 113: ...cted paper type settings U Optimizing Paper Settings Media Adjust on page 43 Change Paper Type Paper Size Paper Type Plain paper Select the type of paper loaded The three options other than Others display the most recently selected paper type When the desired paper type is not displayed touch Others to display these and select U For Auto Sheet Feeder Cut Sheet 1 sheet on page 41 Coated Paper Gener...

Page 114: ...ever ensure that a new ink cartridge of that color or a new Maintenance Box is readied in advance Furthermore the ink color codes beside the bars indicate the following K Black M Magenta Y Yellow C Cyan Message List Display a list of messages communicating printer status Select a message from the list to display detailed information Firmware Version Display the printer firmware version Print Statu...

Page 115: ...he control panel screen and of the confirmation sound when inserting paper into the paper slot when loading paper Pattern2 Sleep Timer 1 to 210 minutes 15 The printer will enter sleep mode if no errors have occurred no print jobs have been received and no actions are performed on the control panel for an extended period of time This setting selects the amount of time until the printer enters sleep...

Page 116: ...tch Polish Russian Korean Simplified Chinese Traditional Chinese Operation Time Out On Setting this to On will if no operations are made for a fixed amount of time on a screen display other than on the Home screen display a message and return to the Home screen Off Keyboard QWERTY Select the key arrangement for the text input screen displayed when entering the Custom Paper registered name or simil...

Page 117: ...nes are not printed if Auto Cut is On or when cut sheets are used Note however that if the roll width selected with the computer is narrower than the paper loaded in the printer cut lines will be printed regardless of the option selected for Auto Cut The setting selected with the printer driver takes priority when the printer driver is used Off After Print Options Hold Paper After printing select ...

Page 118: ...phabet letters 123 Enters numbers and symbols To change the key layout of the full keyboard use Keyboard in the Basic Settings menu U General Settings Basic Settings on page 115 Change Reference Paper Plain paper You can select the media type that is the closest to the paper you are using Matte Paper Photo Paper CAD Others Advanced Media Setting Platen Gap 1 6 This is the Platen Gap distance betwe...

Page 119: ...fy how long the printer pauses to allow the ink to dry after printing each page choose from values between 0 and 60 minutes Depending on the ink density or paper type the ink may take a while to dry If the ink blurs on the paper set a longer time for drying the ink The longer the drying time the more time required for printing Auto Cut On Choose On to automatically cut roll paper using the built i...

Page 120: ...Paper Type settings selected in Paper Source Speed Fine Super Fine Color Mode Color Specify whether to print in color or switch to black and white and then print Black White Page Margins option Clip By Margins Depending on the base output size setting adds the value selected for the page margin area of in the following illustration inside the hard clip area of the PS command of the data or the siz...

Page 121: ... of the data area of in the following illustration When set to a standard size or user defined size Adds the value selected for page margin area of in the following illustration outside the size selected for base output size area of in the following illustration With the actual output size the margin section becomes larger than the selected size the area of in the following illustration SC T5100 S...

Page 122: ...ion When the data does not contain a PS command the smallest rectangle area of in the following illustration including the print object becomes the base output size A Series The compatible standard sizes for the selected Paper Source are displayed therefore select the Base Output Size The actual output size depends on the Page Margins option For a cut sheet this setting is available only when the ...

Page 123: ...and other line drawings Off No Color Management Do not perform color correction HP GL 2 Unique Settings Print settings inherent to HP GL 2 or HP RTL modes Rotate 0 You can rotate the coordinates of the drawn data counterclockwise in units of 90 before printing Note that objects drawn by RTL are not rotated When both this setting and the RO command specify rotation rotation is performed using the c...

Page 124: ...and of the data On or move lines to be printed later to the front at intersections Off Off Color Mode HP GL 2 EPSON Standard sRGB Optimize the sRGB space and correct the color Business Graphics Perform color correction to sharpen your images based on the sRGB space GIS Perform color correction suitable for when printing GIS Geographic Information System topographical maps or similar Line Drawing P...

Page 125: ... to 12 00 mm In Select Palette selecting Palette A will print in accordance with settings defined here You can define a unique built in palette by specifying the pen width and color for the 16 types of logical pen Select the pen number and then define the pen width and pen color for each pen You can use Print Color Palette to print and check the colors corresponding to the color number for the pen...

Page 126: ...connected computer Setting this to Disable does not allow access Disable USB I F Timeout Set ting 0 5 to 300 seconds 60 If printing stops mid way when the printer and computer are connected by a USB cable set a longer time SC T5100 Series SC T3100 Series SC T5100N Series SC T3100N Series User s Guide Using the Menu 126 ...

Page 127: ...nnection Input of SSID and password is not required After selecting this menu item touch and hold the push button on the access point until it flashes then again touch Start Setup on the printer screen to connect Others PIN Code Setup WPS If the access point to use supports WPS Wi Fi Protected Setup then this menu item can be used for connection Touch this to display the PIN code and Start Setup I...

Page 128: ...ct function on an Android smart device to connect to the printer a screen upon which to select whether to approve or refuse this connection will be displayed on the printer If refuse is selected then subsequent connection with this device will not be possible To connect with devices for which connection has been refused open this menu and delete registered device information Wired LAN Setup Touch ...

Page 129: ...se and set the server name and port number Do Not Use IPv6 Address Enable Select whether to enable or disable the IPv6 function Disable Link Speed Duplex Auto Normally set this to Auto 10BASE T Half Duplex 10BASE T Full Duplex 100BASE TX Half Duplex 100BASE TX Full Duplex Redirect HTTP to HTTPS Enable Select whether to enable or disable the function to auto redirect HTTP to HTTPS Disable Disable I...

Page 130: ...ing Off Setting this to On means that input of the administrator password will be requested when selecting the following menu items and unless the password is entered changing of configurations or running functions will not be possible When selecting On first set the Admin Password Sleep Timer Power Off Timer Circuit Breaker Interlock Startup Date Time Settings Operation Time Out Printing Language...

Page 131: ...ttern U Checking for Clogged Print Head and Cleaning on page 134 Head Cleaning Start Perform if the printed check pattern has faint or missing areas U Checking for Clogged Print Head and Cleaning on page 134 Paper Guide Cleaning Start Perform if there is soiling on the printed surface when printing from the auto sheet feeder U Smearing occurs on printed matter from the auto sheet feeder on page 14...

Page 132: ...power turns off automatically U Handling if Transporting Leaving the Printer in an Environment of 10 C or Less on page 167 Printer Status Print Settings item Settings value Explanation Print Status Sheet Configuration Status Sheet Print a list of current printer settings Use this to view all information at a glance Network Display current network settings details Displayed details are the same as ...

Page 133: ...arged so that the short edge of the document fits the width of the roll paper currently loaded in the printer If the short edge of the document is wider than the roll paper this will be printed at actual size If the printer is unable to detect the width of the roll paper then an error will occur when copying is started Off Custom Size Actual Size A0 US E 34x44in JIS B1 A1 US D 22x34in JIS B2 US C ...

Page 134: ...f clean nozzles If none of the pattern is missing then the print head nozzles are not clogged Touch to end the nozzle clogging check Example of clogged nozzles If the pattern has missing areas touch to display the Head Cleaning screen Proceed to the next step D Touch Start to start cleaning When cleaning is complete Print the pattern will be displayed Touch Yes to return to Step 2 Repeat Steps 2 t...

Page 135: ...ining amount falls below the minimum amount However if an ink cartridge with not much ink remaining is removed and reinstalled it may not be usable because some ink is consumed to ensure the reliability of the printer Supported ink cartridges U Options and Consumable Products on page 154 cImportant Epson recommends the use of genuine Epson ink cartridges Epson cannot guarantee the quality or relia...

Page 136: ...perpendicularly Push the area marked Push firmly Repeat Steps 3 to 7 Except step 5 to replace other ink cartridges cImportant Install ink cartridges into all slots You cannot print if any of the slots are empty H Close the cartridge cover and front cover Ink charging starts When Replacement is complete is displayed ink cartridge replacement is complete cImportant Do not turn off the printer during...

Page 137: ...from the Home screen touch Settings Maintenance Replace Maintenance Box A Open the Maintenance Box cover on the back of the printer B Pull out the Maintenance Box C Place the used Maintenance Box in the clear bag included with the new Maintenance Box and make sure that the zipper is closed tight cImportant Until the fastener is closed securely do not tilt the Maintenance Box Waste ink may leak D A...

Page 138: ...e on the new cutter Do not remove them until you are instructed to do so A From the Home screen touch Settings Maintenance Replace Cutter The Replace Cutter screen appears B Touch Start and open the cutter cover C Loosen the screw holding the cutter in place using a cross head screwdriver and pull the cutter straight out Note Place the used cutter in a plastic bag then dispose of in accordance wit...

Page 139: ...ive material shown below cImportant Do not remove the protective sheet with hands F Touch OK The cutter will move and the protective sheet will come off Remove the protective sheet from the printer G Close the cutter cover SC T5100 Series SC T3100 Series SC T5100N Series SC T3100N Series User s Guide Maintenance 139 ...

Page 140: ...n continue printing until replacement is required The Maintenance Box does not have enough capacity to store ink discharged in print head cleaning therefore do not perform cleaning To perform cleaning replace the Maintenance Box with a new one The used Maintenance Box may be reinstalled after cleaning is completed U Maintenance Box Replacement on page 137 Command Error Check the printer driver set...

Page 141: ...ervice call occurs if you continue to use the printer Printer Error Printer error Turn the power off and on again If the problem persists contact Epson Support XXXXXX Turn off the printer disconnect the power cable from the outlet and from the AC inlet on the printer and then reconnect Turn on the printer again multiple times If the same error is displayed on the LCD panel contact your dealer or E...

Page 142: ...e option selected for Print to the following port s USB USBxxx x stands for the port number for the USB connection Network The correct IP address for the network connection If it is not indicated the printer driver is not installed correctly Delete and reinstall the printer driver U Uninstalling Software on page 26 The printer driver is not installed properly Mac o Is the printer added to the prin...

Page 143: ...your system administrator or refer to the manual for your network system Printing from iPhone or iPad is not possible o Check printer settings Connect the iPhone or iPad to the same network SSID as the printer In Web Config enable AirPrint settings U How to Use Web Config on page 24 The printer has an error o View the message displayed in the control panel U What to do When a Message is Displayed ...

Page 144: ...nter and computer is correct Go to the next section If the test page is not printed correctly check the items above again U You cannot print because the printer does not work on page 142 The Driver Version shown on the test page is the version number of the Windows internal driver This differs from the Epson printer driver version that you installed The printer sounds like it is printing but nothi...

Page 145: ...change it U Setting Loaded Paper on page 39 If print results do not improve Perform Media Adjust Paper settings are optimized for the paper loaded U Optimizing Paper Settings Media Adjust on page 43 If print results do not improve Check for clogged print head and perform cleaning Check for print head nozzle clogging and if these are clogged carry out cleaning U Checking for Clogged Print Head and ...

Page 146: ...5 If these measures do not resolve the issue check the following items o Is the Color Density setting appropriate If you feel that lines in drawings are too light then on the printer driver Advanced screen click Paper Configuration and increase the ink density Conversely on tracing paper if the ink density is too high then either reduce the ink density or in printer Paper Type settings select Trac...

Page 147: ...ted for Detect Paper Meandering in the Printer Settings menu printing will continue even if the paper is skewed resulting in data being printed off the edges of the paper In the Printer Settings menu set Detect Paper Meandering to On U General Settings Printer Settings on page 117 o Is the roll paper margin set wide If margins narrower than the margins set in the roll paper Advanced Media Setting ...

Page 148: ... Top Bottom Margins change the edge setting to 45 mm and try printing o Is the print head scuffing the trailing edge of the paper Depending on the paper usage storage conditions and the content of the print data the bottom edge may be scuffed when printing In this situation it is best to create your data with a wider bottom margin The same smearing or soling occurs on the printed surface of both r...

Page 149: ...n the roll paper information field Advanced Media Setting Back Tension select High or Extra High The reverse side of the printed paper is soiled o Is ink dry on the printed surface Depending on the printing density and media type the ink may take a while to dry Do not stack the paper until the printed surface is dry Additionally setting the drying time on the printer in Roll Paper Advanced Media S...

Page 150: ...the paper just before printing Do not use wavy or curled paper For roll paper cut off the wavy or curled parts and then load it again For cut sheets use new paper U Notes on Loading the Paper on page 27 o Are the edges of the roll paper uneven Loading roll paper with the right and left edges uneven may cause paper feeding problems or paper meandering may occur during printing Rewind the paper to m...

Page 151: ...lot and continue to lightly support it until printing is complete Roll paper jam To remove jammed paper follow the steps below A Open the cut sheet cover B Release the central lock and then open the roll paper cover C Cut the top portion of any torn or crinkled areas using a commercially available cutter D Close the roll paper cover and cut sheet cover E When ejecting paper from the front grasp th...

Page 152: ... on page 34 U Loading Cut Sheet 1 sheet on page 37 Others The control panel display keeps turning off o Is the printer in sleep mode Sleep mode is exited if a print job is received or the screen of the control panel is touched The delay before entering sleep mode can be changed from the Basic Settings menu U General Settings Basic Settings on page 115 Color ink runs out quickly even when printing ...

Page 153: ... perform head cleaning when the printer is turned on or before starting printing The printer turned off due to a power cut o Turn off the printer and then turn it back on When the printer is not turned off normally the print head may not be capped correctly If the print head is left uncapped for a long time the print quality may decline When you turn on the printer capping is performed automatical...

Page 154: ...ies and under certain circumstances may cause erratic printer behavior Information about non genuine ink levels may not be displayed and use of non genuine ink is recorded for possible use in service support Printer model Ink color Product Number 80ml 50ml 26ml SC T5100 SC T3100 SC T5100N SC T3100N Black T40D1 T40C1 Cyan T40D2 T40C2 Magenta T40D3 T40C3 Yellow T40D4 T40C4 SC T5130 SC T3130 SC T3130...

Page 155: ... Blade except for SC T5180 SC T5180N SC T3180N S210055 U Replacing the Cutter on page 138 Auto Cutter Spare Blade for SC T5180 SC T5180N SC T3180N S210056 Stand 36 except for SC T5180 SC T5180N SC T3180N C12C933091 Dedicated stand with a paper basket for models without a stand Select the width in accordance with a model you are using Stand 36 for SC T5180 SC T5180N SC T3180N C12C933101 Stand 24 ex...

Page 156: ...the printer Select the width in accordance with a model you are using Roll Feed Spindle 36 for SC T5180 SC T5180N SC T3180N C12C933141 Roll Feed Spindle 24 except for SC T5180 SC T5180N SC T3180N C12C933211 Roll Feed Spindle 24 for SC T5180 SC T5180N SC T3180N C12C933221 SC T5100 Series SC T3100 Series SC T5100N Series SC T3100N Series User s Guide Appendix 156 ...

Page 157: ...s in the following table are displayed by the paper type settings in the menu of the printer driver or the printer Some parts of paper names may be omitted Example Premium Glossy Photo Paper 170 may be abbreviated to Premium Glossy 170 Roll Paper Paper Name Size Singleweight Matte Paper 420 mm A2 432 mm 17 in 515 mm B2 594 mm A1 610 mm 24 in 728 mm B1 914 mm 36 in Doubleweight Matte Paper 594 mm A...

Page 158: ...4 in 914 mm 36 in Available only with SC T5100 Series Cut Sheet Paper Name Size Auto Sheet Feeder Availability Loadable Number of Sheets Photo Quality Inkjet Paper A4 Letter Legal A3 5 Super A3 B SuperB A2 US C Archival Matte Paper A4 Letter A3 5 Super A3 B SuperB A2 US C Photo paper Glossy A4 Letter A3 5 A3 SuperB US B SC T5100 Series SC T3100 Series SC T5100N Series SC T3100N Series User s Guide...

Page 159: ...Glossy Photo Paper A4 Letter 11 x 14 in A3 5 Super A3 B SuperB A2 US C Premium Semigloss Photo Paper A4 Letter A3 5 Super A3 B SuperB A2 US C Premium Luster Photo Paper A4 Letter A3 5 A2 US C SC T5100 Series SC T3100 Series SC T5100N Series SC T3100N Series User s Guide Appendix 159 ...

Page 160: ...m or less Paper width SC T5100 Series SC T5100N Series 329 to 914 mm 36 inch SC T3100 Series SC T3100N Series 329 to 610 mm 24 inch Paper thickness 0 05 to 0 21 mm Roll weight 3 kg or less Cut Sheet Auto Sheet Feeder Paper type Plain paper coated paper photo paper Paper size A4 to A3 Paper thickness 0 12 to 0 27 mm The maximum number of sheets that can be set in the auto sheet feeder is 50 for pla...

Page 161: ...Length 279 4 mm Letter to 1 189 mm Paper thickness 0 12 to 0 27 mm SC T5100 Series SC T3100 Series SC T5100N Series SC T3100N Series User s Guide Appendix 161 ...

Page 162: ...ings General Settings Printer Settings Custom Paper Setting and register a custom paper After registering the paper perform Media Adjust Paper adjustment results will be saved as the newly added paper type settings Refer to the following menu for details on custom paper settings U General Settings Printer Settings on page 117 Select the paper type from the following Epson Special Media settings an...

Page 163: ...wn in the table below Top Bottom Margins settings U Roll Paper menu on page 109 The default setting is Standard Top Bottom Margins Settings Margin Values Standard A C 30 mm B D 3 mm Top 3 mm Bottom 3 mm A C 3 mm B D 3 mm Top 15 mm Bottom 15 mm A C 15 mm B D 3 mm Top 45 mm Bottom 15 mm A 45 mm C 15 mm B D 3 mm 3 mm A B C D 3 mm 5 mm A B C D 5 mm If Standard is selected when the following two condit...

Page 164: ...Make sure the trailing edge does not come inside the printing area If the print range settings width is smaller than the print data width then the sections beyond the printable width will not be printed SC T5100 Series SC T3100 Series SC T5100N Series SC T3100N Series User s Guide Appendix 164 ...

Page 165: ...ion of the ejected paper Cut Sheet 1 Sheet The gray area in the illustration below shows the printable area The arrow in the illustration indicates the direction of the ejected paper 1 SC T5100 Series SC T5100N Series 2 SC T3100 Series SC T3100N Series SC T5100 Series SC T3100 Series SC T5100N Series SC T3100N Series User s Guide Appendix 165 ...

Page 166: ... 167 Moving to a Different Location in the Same Building Preparations for Moving This explains preparations for moving the printer a short distance for example within the same building See the following section for information on moving the printer between floors or to another building U When Transporting on page 167 For models with stands moving the printer on casters is possible providing there ...

Page 167: ...er U Removing Roll Paper on page 32 U Removing Cut Sheet 1 Sheet on page 38 B From the Home screen touch Settings Maintenance Discharging Charging Ink C Touch Start Move the ink cartridge to the replacement position D Open the front cover E Open the cartridge cover and remove all ink cartridges After ink discharge reinstall the ink cartridges Place the removed ink cartridges nearby with the ink su...

Page 168: ...nter is next used The next time the power is turned on if the amount of ink required in order to perform ink charging filling with ink until the print head nozzle section readying the device for printing is not available then the printer will not be usable until the ink cartridge is replaced SC T5100 Series SC T3100 Series SC T5100N Series SC T3100N Series User s Guide Appendix 168 ...

Page 169: ...or more Available memory space 1 GB or more Hard disk Available volume to install 32 GB or more Display resolution WXGA 1280 800 or better Connection method with the printer USB Ethernet or Wi Fi For details on the connection methods interface specifications see the following U Specifications Table on page 171 Mac Operating system Mac OS X v10 6 8 or later CPU Intel Core 2 Duo 3 05 GHz or more Ava...

Page 170: ...on method with the printer 2 Ethernet or Wi Fi 1 Use the latest version 2 See the following for details on the network interfaces U Specifications Table on page 171 Smart device Operating system iOS 1 Android OS 1 Browser Safari 1 Default browser Connection method with the printer 2 Wi Fi Wi Fi 1 Use the latest version 2 See the following for details on the network interfaces U Specifications Tabl...

Page 171: ...hin a month at 40 C Ink discharged 1 20 to 25 C within a month at 25 C Humidity Printer Specifications Printing 20 to 80 40 to 60 is recommended Without condensation In storage 5 to 85 without condensation Temperature and humidity range for operating the range shown by diagonal lines is recommended Dimensions Width Depth Height Maximum 2 A 1268 982 913 mm B 970 982 913 mm C 1268 811 230 mm D 970 8...

Page 172: ...v4 and IPv6 Warning To prevent radio interference to the licensed service this device is intended to be operated indoors and away from windows to provide maximum shielding Equipment or its transmit antenna that is installed outdoors is subject to licensing Ink Specifications Type Dedicated ink cartridges Pigment ink Black Cyan Magenta Yellow Use by date See the expiration date printed on the ink c...

Page 173: ...ess http www epson eu conformity Radio Equipment Information This product intentionally emit radio wave described as follows a frequency band in which the radio equipment operates 2 4 to 2 4835 GHz b maximum radio frequency power transmitted in the frequency band in which the radio equipment operates 20dBm eirp power SC T5100 Series SC T3100 Series SC T5100N Series SC T3100N Series User s Guide Ap...

Page 174: ...the problem using the troubleshooting information in your product documentation contact Epson support services for assistance If Epson support for your area is not listed below contact the dealer where you purchased your product Epson support will be able to help you much more quickly if you give them the following information Product serial number The serial number label is usually on the back of...

Page 175: ...http www epson ca Canadian sales Help for Users in Europe Check your Pan European Warranty Document for information on how to contact Epson support Help for Users in Australia Epson Australia wishes to provide you with a high level of customer service In addition to your product documentation we provide the following sources for obtaining information Your Dealer Don t forget that your dealer can o...

Page 176: ...eb http www epson co th Information on product specifications drivers for download Frequently Asked Questions FAQ and e mail are available Epson Hotline Phone 66 2685 9899 Our Hotline team can help you with the following over the phone Sales enquiries and product information Product usage questions or problems Enquiries on repair service and warranty Help for Users in Vietnam Contacts for informat...

Page 177: ...wers to Frequently Asked Questions FAQs Latest versions of Epson product drivers Users can access our World Wide Web home page at http www epson com hk Technical Support Hotline You can also contact our technical staff at the following telephone and fax numbers Phone 852 2827 8911 Fax 852 2827 4383 Help for Users in Malaysia Contacts for information support and services are World Wide Web http www...

Page 178: ...number For Service CDMA Mobile Users 3900 1600 9AM 6PM Prefix local STD code Help for Users in the Philippines To obtain technical support as well as other after sales services users are welcome to contact the Epson Philippines Corporation at the telephone and fax numbers and e mail address below Trunk Line 63 2 706 2609 Fax 63 2 706 2665 Helpdesk Direct Line 63 2 706 2625 E mail epchelpdesk epc e...

Reviews: