FX-2180 Service Manual
Disassembly and Assembly
Rev. A
4-7
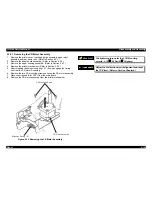
4.2.3 Removing the Printhead
1.
Remove the printer cover and ribbon cartridge. (Refer to Section 4.2.1.)
2.
Remove two CBS screws (3
×
10)securing the printhead to the CR
assembly.
3.
Remove the printhead from the CR assembly.
4.
Disconnect two wide FFCs from the printhead and then disconnect the
narrow FFC from the connector on the CR cover.
C B S ( 3 x 1 0 )
P r i n t h e a d
F F C s
C R A s s e m b l y
Figure 4-5. Removing the Printhead
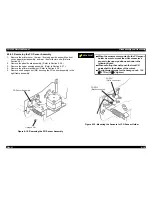
CHECK POINT
9
The FFC must be connected properly, as shown
in the following figure.
The tightening torque for the screws : 0.59 ~
0.78 Nm (6 ~ 8 Kgf-cm)
$'-8670(17
Adjust the platen gap. (Refer to Chapter 5.)
F F C s f o r P r i n t h e a d
D i r e c t i o n i n w h i c h t h e e x p l o s e d t e r m i n a l s f a c e s
P r i n t H e a d
Figure 4-6. Method for Connecting the Printhead FFC
Summary of Contents for FX-2180 - Impact Printer
Page 1: ...EPSON EPSON EPSON France S A SERVICE MANUAL FX 2180 PRODUIT ...
Page 2: ...6 59 0 18 3LQ PSDFW RW 3ULQWHU EPSON FX 2180 4009047 ...
Page 6: ...REVISION STATUS Rev Date Page s Contents A 1998 04 02 All First release ...
Page 11: ...PRODUCT DESCRIPTIONS 3 7 5 ...
Page 24: ...OPERATING PRINCIPLES 3 7 5 ...
Page 28: ...TROUBLESHOOTING 3 7 5 ...
Page 43: ...DISASSEMBLY AND ASSEMBLY 3 7 5 ...
Page 76: ...ADJUSTMENT 3 7 5 ...
Page 86: ...MAINTENANCE 3 7 5 ...
Page 89: ...APPENDIX 3 7 5 ...
Page 101: ......
Page 104: ......


