s
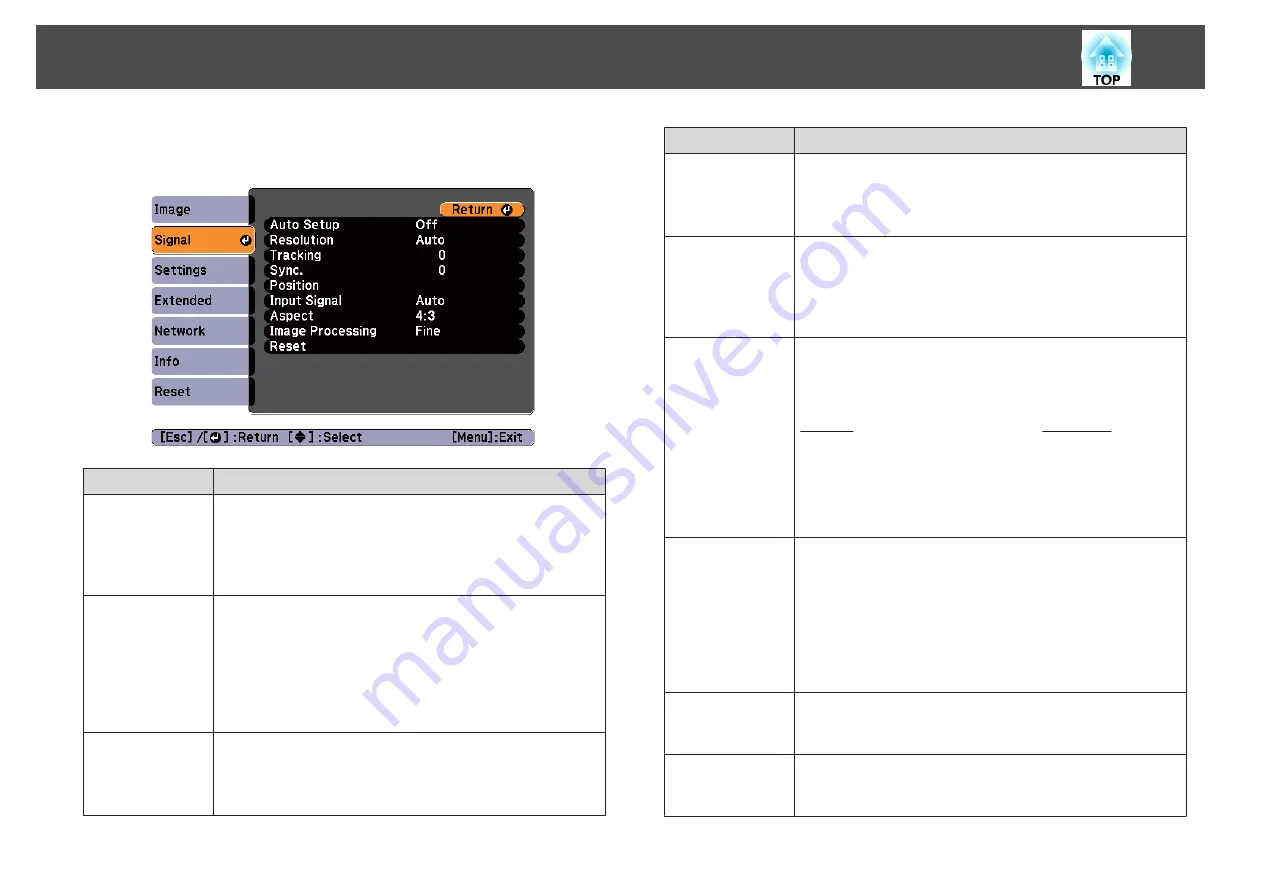
"Automatically Detect Input Signals and Change the Projected Image
Submenu
Function
Auto Setup
(Only available when an analog RGB computer signal is
being input.)
Set to
On
to automatically adjust Tracking, Sync., and
Position to the optimum state when the input signal
changes.
Resolution
(Only available when an analog RGB computer signal is
being input.)
Set to
Auto
to automatically identify the resolution of the
input signal. If images are not projected correctly when set
to
Auto
, for example if some of the image is missing, adjust
to
Wide
for wide screens, or set to
Normal
for 4:3 or 5:4
screens depending on the connected computer.
Tracking
(Only available when an analog RGB computer signal is
being input.)
You can adjust computer images when vertical stripes
appear in the images.
Submenu
Function
Sync.
(Only available when an analog RGB computer signal is
being input.)
You can adjust computer images when flickering, fuzziness,
or interference appear in the images.
Position
(This item cannot be set when the source is HDMI or
DisplayPort.)
You can adjust the display position up, down, left, and right
when a part of the image is missing so that the whole image
is projected.
Progressive
(This setting can only be adjusted when a composite video
signal is being input. When a component video or RGB
video is being input, this setting can only be adjusted if the
signal being input is an interlaced signal (480i/576i/1080i).)
Interlace
(i) signal is converted to Progressive
(p). (IP
conversion)
Off
: Ideal for images with a large amount of movement.
Video
: Ideal for general video images.
Film/Auto
: This is ideal for movie films, computer graphics,
and animation.
Noise Reduction
(This cannot be set when a digital RGB signal is input,
when projecting an interlaced signal while
Progressive
is set
to
Off
, or when a 480p, 576p, or 1080p signal is input while
Image Processing
is set to
Fast
.)
Smoothes out rough images. There are two modes. Select
your favorite setting. It is recommended that this is set to
Off
when viewing image sources in which noise is very low,
such as for DVDs.
HDMI Video
Range
When the projector's HDMI port is connected to a DVD
player, set the projector's video range according to the DVD
player's video range setting.
DisplayPort Vid‐
eo Range
When the projector's DisplayPort port is connected to a
computer, set the projector's video range according to the
computer's video range setting.
List of Functions
89
Summary of Contents for EB-1930
Page 1: ...User s Guide ...
Page 7: ...Introduction This chapter explains the projector s features and the part names ...
Page 22: ...4 3 Screen Size For EB 1960 EB 1950 EB 1930 Installing the Projector 22 ...
Page 29: ...Basic Usage This chapter explains how to project and adjust images ...
Page 84: ...Configuration Menu This chapter explains how to use the Configuration menu and its functions ...
Page 127: ...Appendix ...


