


❏
Make sure the scanner is turned on.
❏
Wait until the status light stops flashing indicating that the scanner is ready to scan.
❏
Connect the scanner directly to the computer’s USB port. The scanner may not work properly when connected
to the computer through one or more USB hubs.
❏
If you are using any TWAIN-compliant applications, make sure that the correct scanner is selected as the
scanner or source setting.
Pressing a Scanner Button Does Not Start the Correct Application
❏
Make sure the scanner is connected to your computer properly.
❏
Make sure Epson Scan 2 and other applications are installed correctly.
❏
Make sure Document Capture Pro (Windows) or Document Capture (Mac OS X) is installed correctly.
❏
Check the correct setting is assigned to the scanner button in Document Capture Pro (Windows) or Document
Capture (Mac OS X).
❏
When using a wireless connection, you cannot run the job assigned to a scanner button by pressing it because
Document Capture Pro and Document Capture do not support scanning from the button over a wireless
connection.
To start scanning by pressing the button, launch Epson Scan 2 on your computer before scanning.
Related Information
&
“Scanning Using a Scanner Button” on page 61
Paper Feeding Problems
Multiple Originals Are Fed
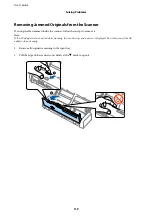
If multiple originals are fed, open the scanner cover and remove the originals. Next, close the scanner cover.
If multiple originals are fed frequently, try the following.
❏
If you load unsupported originals, the scanner may feed multiple originals at a time.
❏
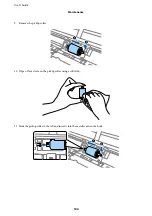
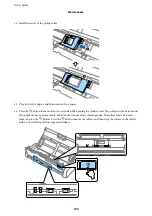
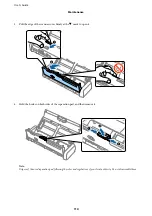
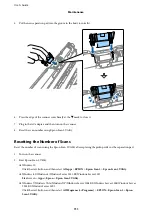
Clean the rollers inside the scanner.
❏
Reduce the number of originals being placed at a time.
❏
Use
Automatic Feeding Mode
in Epson Scan 2, and scan originals one by one.
❏
Fan the originals, align the edges of the originals, and then slide the leading edge into a wedge shape before
loading into the input tray.
Related Information
&
“Cleaning Inside the Scanner” on page 100
&
“Scanning Different Sizes or Types of Originals One by One (Automatic Feeding Mode)” on page 63
&
“Placing Standard Size Originals” on page 30
User's Guide
Solving Problems
118


