background image

Scanning Problems

107

The image is 
distorted or blurred 

• Make sure the document is flat against the document table.

• Do not move the document while scanning.

• Change the 

Display Gamma

 setting for your output device, 

such as a monitor or the CX11N, in the Configuration window.

• Select 

Unsharp Mask Filter

 in Professional Mode. 

• Select 

Color Control

 and check 

Continuous auto exposure

 in 

the Configuration window, or click the 

Auto Exposure

 button 

in the Professional Mode.

• Change the Resolution setting for your scan.

Colors are patchy or 
distorted at the 
edges of the image

• If your original is very thick or warped at the edges, cover the 

edges with paper to block external light.

• Adjust the 

Gamma

 setting in the Histogram Adjustment 

window in Professional Mode.

The image is too dark • Check the 

Brightness

 setting using the Image Adjustment 

window in Home Mode, or the Histogram Adjustment window 
and the Image Adjustment window in Professional Mode.

• Check the brightness and contrast settings of your monitor.

• Select 

Color Control

 and check 

Continuous auto exposure

 in 

the Configuration window, or click the 

Auto Exposure

 button 

in Professional Mode.

• Change the 

Display Gamma

 setting for your output device, 

such as a monitor or CX11N, in the Configuration window.

• Change the 

Destination

 setting in Home Mode or Professional 

Mode.

Moiré (crosshatch) 
patterns appear in the 
scanned image 

When you scan printed materials, interference can occur due to 
the difference between the pitches of the scanning and the 
halftone screens.

Try one or more of the following solutions:

• Select the 

Descreening Filter 

in Home or Professional Mode.

• In Professional Mode, set the 

Screen Ruling

 of the 

Descreening Filter 

setting to an appropriate setting for your 

document.

• Deselect 

Clear Unsharp Mask Filter

 in Professional Mode.

• Place a transparent sheet, such as an overhead projector 

sheet, between your original and the document table.

• Reposition your original slightly.

• Make the image size slightly smaller.

Problem 

Solution

Basic.book  Page 107  Monday, August 22, 2005  12:35 PM

Summary of Contents for AcuLaser CX11N

Page 1: ...Epson AcuLaser CX11N CX11NF Basics Guide Basic book Page 1 Monday August 22 2005 12 35 PM ...

Page 2: ...e of any options or any consumable products other than those designated as Original Epson Products or Epson Approved Products by Seiko Epson Corporation A Note Concerning Responsible Use of Copyrighted Materials Printers digital cameras and scanners like photocopiers and conventional cameras can be misused by improper copying and reprinting of copyrighted material While some countries laws permit ...

Page 3: ...ing 14 3 Printing Printing in Windows 19 Printing in Macintosh 23 Using Epson Status Monitor 3 29 Canceling Printing 32 4 Copying Basic Copying 35 Canceling Copying 36 Customizing Copy Settings 36 5 Scanning Starting EPSON Scan 43 Selecting EPSON Scan Settings 46 Using the Control Panel Buttons 65 6 Using the Control Panel Accessing the Mode Menus 67 Accessing the Setup Menu 70 Basic book Page 3 M...

Page 4: ... 97 8 Solving Problems Status and Error Messages 99 Printing Problems 102 Scanning Problems 105 Copying Problems 109 Paper Handling Problems 111 Clearing Jammed Paper 112 Printing a Status Sheet 127 Where To Get Help 128 9 Notices System Requirements 131 Important Safety Instructions 132 Restrictions on Copying 136 FCC Compliance Statement 137 Declaration of Conformity 138 Epson America Inc Limite...

Page 5: ...een Network Guide You need to install this guide from the software CD ROM to your computer s hard disk before referring to it For more detailed information about your product see your on screen User s Guide If you have purchased the CX11NF see your Fax Guide for details about sending and receiving faxes Note The CX11N instructions also apply to the CX11NF unless otherwise indicated The illustratio...

Page 6: ...ontrol how your scans look You can t scan without it Tip It s a good idea to check Epson s support web site periodically for free updates to your Epson AcuLaser CX11N software Visit http support epson com Download instructions are posted for your convenience Epson Web to Page automatically adjusts web pages to fit your printed page Windows only Presto BizCard lets you scan business cards and creat...

Page 7: ... Paper You can load paper in the MP multi purpose tray or the optional paper cassette tray All printed materials are output to the output tray shown on page 11 Using the MP Tray Follow these steps to load paper into the MP tray 1 Open the MP tray cover 2 Pinch the knob and paper guide together then slide the right paper guide outward MP tray cover Basic book Page 7 Monday August 22 2005 12 35 PM ...

Page 8: ...e of the stack for a snug fit Note When loading paper do not exceed the maximum stack height marker inside the paper guide 4 Close the MP tray cover Note After loading paper press the Setup button on the control panel press the r button to select Printer Settings press the d button to select Tray Menu and match the MP Tray Size and MP Type settings to the loaded paper size Basic book Page 8 Monday...

Page 9: ...Paper Cassette Unit Follow these steps to load paper into the optional Paper Cassette Unit 1 Pull out the optional paper cassette 2 Pinch the knob in the front as you slide the paper guides outward Basic book Page 9 Monday August 22 2005 12 35 PM ...

Page 10: ...te with the short edge first and the printable surface facing up Note When loading paper do not exceed the maximum stack height marker inside the paper guide 4 Pinch the knob in the front as you slide the paper guide inward against the paper stack for a snug fit Basic book Page 10 Monday August 22 2005 12 35 PM ...

Page 11: ...ray Size and LC Type settings Lower Cassette with the loaded paper size Removing Printouts from the Output Tray The output tray is located on the top of cover B and can hold up to 250 sheets Since printouts are output face down this tray is also referred to as the face down tray Note If your printouts do not stack neatly open the stopper on the extension tray Stopper Basic book Page 11 Monday Augu...

Page 12: ...bove The product will search for a paper source containing the specified paper size in the MP tray If the optional 500 Sheet Paper Cassette Unit is installed then it will also search its cassette Note If you select paper size or paper source settings in your application these settings may override the printer driver settings Selecting a Paper Tray Before you load paper you need to select a paper t...

Page 13: ...A5 B5 Letter LT Government Letter GLT Half Letter HLT Legal LGL Government Legal GLG F4 Executive EXE Custom size paper 3 54 in 4 33 in minimum to 8 66 in 14 in maximum Total stack thickness 0 8 in Envelopes C5 C6 C10 DL Monarch ISO B5 Up to 20 sheets Total stack thickness 0 8 in Labels A4 Letter LT Up to 75 sheets Thick paper A4 A5 B5 Letter LT Government Letter GLT Half Letter HLT Legal LGL Gove...

Page 14: ...inals on both the Auto Document Feeder and the document table only the documents in the Auto Document Feeder are scanned Coated paper A4 A5 B5 Letter LT Government Letter GLT Half Letter HLT Legal LGL Government Legal GLG F4 Executive EXE Custom size paper 3 54 in 4 33 in minimum to 8 66 in 14 in maximum Total stack thickness 0 8 in Paper Type Paper Size Capacity Plain paper A4 Letter LT Up to 500...

Page 15: ...m the top and left edges so all of it will be scanned If you plan to scan multiple photographs position each one at least 0 8 in apart from the others Note The area with a width of maximum 0 06 in from the horizontal edge and 0 06 in from the vertical edge is not scanned Caution Do not place heavy objects on the document table or press the glass surface with too much force 2 Close the document cov...

Page 16: ...ht up If you need to press the document flat while you copy or scan it do not press too hard and be careful not to move it Caution Do not use excessive force on the document cover and do not twist it diagonally You may damage the document cover When you are done replace the document cover by inserting the tabs back into the slots Basic book Page 16 Monday August 22 2005 12 35 PM ...

Page 17: ...ned or copied first is on the top of the stack Note Pages are fed from the top and ejected face down 3 Insert up to 50 originals short edge first and face up in the Auto Document Feeder until it meets resistance Slide the edge guides inward against the edges of your originals Paper Type Paper Size Capacity Plain paper Recycled paper B5 A4 Letter LT Legal LGL Up to 50 sheets Total stack thickness 0...

Page 18: ...18 Handling Paper and Originals Basic book Page 18 Monday August 22 2005 12 35 PM ...

Page 19: ...ting printer settings in Windows Printing from an Application below Customizing Windows Print Settings on page 21 Printing from an Application After you create a document in a software program follow these steps to print it using the basic printer settings 1 Open the File menu and select Print You see a window like this one Select EPSON AL CX11 Advanced Open your printer properties preferences Bas...

Page 20: ...sure Automatic is selected 5 Select from these Print Quality options Draft For rough drafts with reduced print quality Text For text only documents with higher text quality Text Image For documents with text and images with higher quality Web For text and images on a web site Photo For photos and graphics with good quality and speed Note For more information about print settings click the or Help ...

Page 21: ...eed more control over your printout or want to make detailed settings you can customize your print settings 1 Open the File menu and select Print 2 Click the Properties or Preferences button If you see a Setup Printer or Options button click it Then click Properties or Preferences on the next screen You see the basic print settings window 3 Select Advanced A predefined settings list appears below ...

Page 22: ...lack as the Color setting Choose desired a resolution from 300 dpi or 600 dpi using the Resolution slider Note This screen may vary in appearance depending on your operating system version For more information about print settings click the or Help button Tip The Web Smoothing setting may not be fully effective for the following types of documents Images with fewer than 256 colors Non photo images...

Page 23: ...elow Customizing Mac OS X Print Settings on page 26 Printing from an Application After you create a document in a software program follow these steps to print it 1 Open the File menu and select Page Setup You see the Page Setup window 2 Select AL CX11 in the Format for pop up menu 3 Select your Paper Size 4 Select portrait or landscape as the orientation setting 5 Click OK Basic book Page 23 Monda...

Page 24: ...from the Printer pop up menu 8 Select Printer Settings from the pop up menu 9 Make sure the Paper Type and Paper Size settings match the paper you ve loaded 10 Click Automatic Select AL CX11 Select Printer Settings Click Automatic Select a Resolution Basic book Page 24 Monday August 22 2005 12 35 PM ...

Page 25: ...uch as Reverse print order ColorSync or Color Management Select ColorSync or adjust the color controls change the gamma setting or turn off color adjustments in the printer software Summary View a list of all your selections 13 To save your selections for future use select Save As from the Presets pop up menu 14 Click Print 15 To monitor the progress of your print job click the printer icon when i...

Page 26: ...use printing Click a print job marked Hold and click Resume to resume printing 16 When you are finished close the printer window or Print Center Customizing Mac OS X Print Settings If you need more control over your printout or want to make detailed settings you can customize print settings 1 Open the File menu and select Print 2 Select Printer Settings from the pop up menu Basic book Page 26 Mond...

Page 27: ...ght of the radio buttons 4 Select the most appropriate setting from the predefined list for the type of document or image you want to print Other settings such as Resolution Screen and Color Management are set automatically Select Advanced Basic book Page 27 Monday August 22 2005 12 35 PM ...

Page 28: ...rmation about printer settings click the button 6 Select Color or Black as the Color setting 7 Choose a printing Resolution either Fast 300 dpi or Fine 600 dpi 8 Click OK to return to the Basic Settings screen 9 Click Print to print Basic book Page 28 Monday August 22 2005 12 35 PM ...

Page 29: ...Note Windows XP users Shared Windows XP LPR connections and shared Windows XP Standard TCP IP connections with Windows clients do not support the Job Management function EPSON Status Monitor 3 is not available when printing from a Remote Desktop connection 1 Open the File menu and select Print 2 Click the Optional Settings tab Basic book Page 29 Monday August 22 2005 12 35 PM ...

Page 30: ...nitor printer status and see information on toner levels paper levels and the remaining life of the photoconductor Note This screen may vary depending on your operating system version Macintosh 1 Open the File menu and select Print Basic book Page 30 Monday August 22 2005 12 35 PM ...

Page 31: ... Monitor 3 31 2 Select Printer Settings from the pop up menu then select the Utility tab 3 Click your printer s icon You see a window like this Click your printer s icon Basic book Page 31 Monday August 22 2005 12 35 PM ...

Page 32: ...ur operating system below Windows Double click the printer icon in your taskbar Select the print job in the list then open the Document menu and click Cancel After the last page is output to the tray the Print green light on the control panel turns on The current job is canceled You can also cancel the current print job by pressing the y Cancel button on the control panel Be careful not to cancel ...

Page 33: ...r in the print queue Then select Delete Job from the jobs menu After the last page is output to the tray the Print green light turns on The current job is canceled You can also cancel the current print job by pressing the y Cancel button on the control panel Be careful not to cancel print jobs sent by other users Basic book Page 33 Monday August 22 2005 12 35 PM ...

Page 34: ...34 Printing Basic book Page 34 Monday August 22 2005 12 35 PM ...

Page 35: ...age 7 2 Place your original on the document table or in the Auto Document Feeder CX11NF only For instructions see page 14 3 Press the Copy button on the control panel The Copy light turns on The LCD panel displays Copy Mode for a few seconds then changes to the copy mode screen 4 Specify your copy settings as necessary For details see page 36 5 Press the x B W Start to make a black and white copy ...

Page 36: ...cting a value from 1 to 99 The default setting is 1 1 Make sure the product is in Copy mode If not press the Copy button 2 Make sure the Copies value is highlighted in the LCD panel Then enter the number of copies you want using the numeric keypad You can also use the r or l button to increase or decrease the number Selecting the Paper Size You can specify the size of paper you loaded in the MP tr...

Page 37: ...htness or darkness of your copy density by selecting from 7 levels 3 to 3 The higher the level the darker the image The default level is 0 1 Make sure the product is in Copy mode If not press the Copy button 2 Press the u or d button several times to select Density The current Density value is highlighted 3 Press the r button to darken the copy Press the l button to lighten the copy Document Type ...

Page 38: ...blue B The higher the level the richer the color The default level is 0 Note RGB adjustment is available only for color copies 1 Make sure the product is in Copy mode If not press the Copy button 2 Press the u or d button several times to select a color R G or B The current R G or B value is highlighted 3 Press the r button to increase the color strength Press the l button to decrease the color st...

Page 39: ... page is included in the copy If you need to turn off this slight reduction to make an exact size image copy you can turn off the full copy function 1 Make sure the product is in Copy mode If not press the Copy button 2 Press the d button to select Full Copy The current Full Copy value is highlighted 3 Press the l or r button to select On or Off Zoom Ratio Settings Zoom LGL LTR Legal to Letter 78 ...

Page 40: ... 2 Pages per Sheet then press the r button 5 Adjust any other copy settings as necessary 6 Press the x B W Start button to make a black and white copy or press the x Color Start button to make a color copy If you placed the first page of your original on the document table you see a message prompting you to place the next page Place your next original and follow the instructions on the LCD screen ...

Page 41: ...her way to reset the copy settings is through the Setup menu Follow these steps to reset all copy settings 1 Press the Setup button The Setup light turns on and the Setup menu appears in the LCD panel 2 Press the d button to select Copy Settings then press the r button 3 Press the d button to select Copy Factory Settings then press the r button Factory Settings is selected 4 Press the r button 5 T...

Page 42: ...42 Copying Basic book Page 42 Monday August 22 2005 12 35 PM ...

Page 43: ...EPSON Scan is explained using Windows examples Scanning Modes EPSON Scan offers three scanning modes that let you control all aspects of scanning Home Mode lets you customize scanning settings and check their effects with a preview image Home Mode is best when you want to preview images of photos before scanning them You can size the image as you scan adjust the scan area and adjust many image set...

Page 44: ...m If you just want to save scanned images without editing them start EPSON Scan directly Scanned images are automatically saved as files in your system 1 Do one of the following to start EPSON Scan Windows Double click the EPSON Scan icon on your desktop Or select Start All Programs or Programs EPSON Scan EPSON Scan Mac OS X Open the Applications folder and click the EPSON Scan icon The EPSON Scan...

Page 45: ...All Programs or Programs program folder program icon Mac OS X Open the Applications folder select the program folder and click the program icon 2 Select your program s scanning option See your scanning program help for instructions Note In some programs you must select the Epson AL CX11 as the source first If you see a Select Source option choose it and select your Epson AL CX11 there first 3 Sele...

Page 46: ...rea on page 51 Adjusting the Color and Other Image Settings on page 56 Selecting the Scan Size on page 59 Finishing the Scan on page 61 Selecting File Save Settings on page 63 Note For Mac OS X users most illustrations shown in this section are for Windows so they may vary in appearance from what actually appears on your screen The instructions are the same except as noted Basic book Page 46 Monda...

Page 47: ... EPSON Scan Settings 47 Selecting Basic Settings When you start EPSON Scan in Home or Professional Mode you see the main EPSON Scan window Home Mode Office Mode Basic book Page 47 Monday August 22 2005 12 35 PM ...

Page 48: ...can select the correct default resolution scan quality for you Follow these steps to select the basic settings for a document or photo in EPSON Scan 1 Do one of the following to select your document type Home Mode Click the arrow to open the Document Type list and select the type of original you are scanning Then click the Color Grayscale or Black White button to select the colors in the original ...

Page 49: ... Optical Character Recognition program Other if you want to select a specific resolution for other purposes Office Mode Select ADF from the Document Source drop down list Select the size of your original document as the Size setting Professional Mode Click the arrow to open the Image Type list and select the detailed image type you are scanning 3 EPSON Scan selects a default resolution setting bas...

Page 50: ...er you can accept the Resolution setting selected by EPSON Scan based on your original and destination settings You will enlarge the images as you scan them increase the Target Size setting If you will enlarge the images in EPSON Scan so you can use them at a larger size you can accept the Resolution setting selected by EPSON Scan based on your original and destination settings You will scan the i...

Page 51: ... images in their entirety You must select the scan area and make any image quality adjustments manually Normal is the default preview type in Professional Mode but you can also select it in Home Mode if available Thumbnail preview displays your previewed images as thumbnails EPSON Scan automatically locates the edges of your scan area and applies automatic exposure settings to the images Thumbnail...

Page 52: ...ailable EPSON Scan prescans your image s and displays them in one of the following Preview windows Office Mode The ADF loads your first document page then EPSON Scan prescans it and displays it in the Preview window The ADF then ejects your first page The ADF also loads and ejects your second page without scanning it Place your document pages back in order after they are ejected Normal Preview Thu...

Page 53: ...the image s To select your scan area click the auto locate icon to place a marquee that marks the edges of your image area You can move the marquee to change the scan area See page 54 for instructions Note If you are going to scan at a different size than your original you must first select your Target Size and automatically create a marquee that is proportioned to that size See page 59 for instru...

Page 54: ... in separate scan files Follow these steps 1 To draw a marquee move your cursor over a preview image The pointer becomes a set of cross hairs 2 Position the pointer in the area where you want to place the corner of your marquee and click Hold down the mouse button and drag the cross hairs over the image to the opposite corner of the desired scan area Then release the mouse button You see the movin...

Page 55: ...e Note To restrict movement of the marquee to vertical or horizontal only hold down the Shift key as you move the marquee To restrict sizing of the marquee to the current proportions hold down the Shift key as you resize the marquee 4 To draw multiple marquees up to 50 Normal preview only you can just draw them as described in steps 1 through 3 or click the copy marquee icon to create additional m...

Page 56: ...low describes the settings available in Home and or Professional Mode For details on adjusting these settings click Help in the EPSON Scan window When you are finished making adjustments you can size your scanned images see page 59 or go ahead and scan see page 61 Setting Available mode s and description Color Restoration Home Office and Professional Restores the colors in faded photos automatical...

Page 57: ...lick the Auto Exposure button To turn it on continuously click the Configuration button click the Color tab and select Continuous auto exposure You can adjust the level of exposure adjustment using the slider Unsharp Mask Filter Home Automatically applied Office and Professional Turn on to make the edges of image areas clearer for an overall sharper image The level of sharpness is adjustable Turn ...

Page 58: ... available turn off the setting or preview your image again Histogram Professional only Provides a graphical interface for adjusting highlight shadow and gamma levels individually For advanced users only Click the Histogram Adjustment button to use the Histogram settings Tone Correction Professional only Provides a graphical interface for adjusting tone levels individually For advanced users only ...

Page 59: ... in Home or Professional Mode If you are going to scan your image to a particular size such as 8 10 inches you should select the Target Size setting after previewing it but before adjusting your scan area indicated by the marquee This sets the scan area to the correct proportions so your image will not be cropped unexpectedly Home Mode Professional Mode Basic book Page 59 Monday August 22 2005 12 ...

Page 60: ...quee dotted line proportioned for that size appears on your preview image 2 If you need to create a scan size that is not in the Target Size list you can create a custom size Click the arrow in the list and select Customize You see the Target Size window Type a name for your custom size enter the size click the Save button then click OK Your new size appears in the Target Size list Proportioned ma...

Page 61: ... your scan size you can click and drag the marquee to the area in the image you want to scan For details see page 54 The marquee proportions are retained as you adjust it If you need to rotate the marquee for a landscape or portrait image click the orientation icon Not available if you are scanning at the Original Target Size Note For more information about using the Target Size tools click Help i...

Page 62: ...he program window Click Close to close the EPSON Scan window and view your image s in the program Be sure to save it using the steps below using Adobe Photoshop Elements as an example 1 Select Save As from the File menu in Adobe Photoshop Elements 2 Type a file name and select a file format The following formats are available BITMAP BMP windows only EPS format EPS JPEG JPG Multi TIFF TIF PDF PDF P...

Page 63: ...s 1 In the File Save Settings window specify the file folder in which you want to save your scanned image Click Browse Windows or Choose Macintosh and select the folder 2 Specify a file name prefix with an alphanumeric character string A 3 digit number is automatically added to the file name but you can change the Start Number if you like If you are scanning multiple images at once each image will...

Page 64: ...s you need a program that supports it TIFF TIF A file format created for exchanging data between many programs such as graphic and DTP software When scanning black white images you can specify the compression type PDF PDF A document format that can be read on both Windows and Macintosh systems platform independent To use PDF documents you need Adobe Reader or Acrobat Multi page documents can be sa...

Page 65: ...your scanned image is saved when EPSON Scan finishes scanning 5 Click OK The scanned image is saved The scanned image is saved in the file and location you chose Using the Control Panel Buttons You can scan an image to your computer using the buttons on the CX11N control panel Push Scan Before using this feature make sure you have installed EPSON Scan EPSON Creativity Suite and Presto PageManager ...

Page 66: ... a message on your computer screen Select your scanning program scan your document and close your scanning program The CX11N returns to the Print mode When you select Network PC the network computer name appears in the LCD screen Press the u or d button to select your network computer and then press the r button 5 Press the l or r button to select a file format 6 Press the x B W Start or x Color S...

Page 67: ...nters the Print mode automatically To change modes just press a mode button In addition you can also use the Setup button for making various settings Note If no button is pressed for more than 3 minutes any changes are canceled and you return to Print mode If you press a mode button while the product is in that mode such as pressing the Fax button in Fax mode you return to the Print mode You canno...

Page 68: ...reen appears Print mode is automatically selected when you turn on the CX11N and you return to it when you exit other modes Copy Mode To copy press the Copy button When the CX11N is in Copy mode the following screen appears Note You can receive faxes even while copying Basic book Page 68 Monday August 22 2005 12 35 PM ...

Page 69: ...ars Note While sending or receiving a fax you cannot scan or print with the CX11NF Scan Mode To scan press the Scan button When the CX11N is in Scan mode the following screen appears Note You can scan and print from your computer and receive faxes when the Scan light is on Basic book Page 69 Monday August 22 2005 12 35 PM ...

Page 70: ... to select settings you cannot make in your software or printer driver 1 Make sure the CX11N is turned on then press the Setup button The Setup light turns on and the LCD screen displays Setup Mode for a few seconds then changes to the Setup menu screen 2 Use the u and d buttons to select a submenu then press the r button to view items in the submenu 3 Use the u and d buttons to select submenu ite...

Page 71: ...ts you check the toner level and the remaining service life of consumable products You can also print status and sample sheets showing the printer s current settings available fonts and a brief summary of available features Setup submenu Available menu items Printer settings Information see page 71 Tray see page 72 Setup see page 73 Reset see page 74 Host I F Settings USB Settings see page 75 Netw...

Page 72: ...er2 E F Displays the amount of magenta toner left in the toner cartridge Y Toner2 E F Displays the amount of yellow toner left in the toner cartridge K Toner2 E F Displays the amount of black toner left in the toner cartridge Photocon2 E F Remaining service life of the photoconductor unit Total Pages2 0 to 99999999 Total number of pages printed by the CX11N Color Pages2 0 to 99999999 Total number ...

Page 73: ...goes into sleep mode MP Mode On Off Normal Last Determines whether the MP tray has higher or lower priority when Auto is selected as the Paper Source setting in the printer driver When you select On Normal the MP tray has higher priority When you select Off Last the MP tray has lower priority Size Ignore Off On The CX11N usually stops printing when a paper size error occurs If you want to ignore a...

Page 74: ...the Time Setting The letters DD MM and YY indicate the Date Month and Year respectively Item Description Clear Warning Clears every warning message except for consumable products or mandatory replacement parts Clear All Warnings Clears all warning messages that appear on the LCD screen Reset Stops printing and clears the current job You may want to reset when there is a problem with a print job an...

Page 75: ... from Panel or PING to Auto the panel setting values are saved The saved setting values are displayed on the network status sheet 192 168 192 168 if the settings are not made from the panel Item Settings USB I F On Off USB Speed HS FS Item Settings Network I F On Off Network Config No Yes If Yes is selected then Get IPAddress IP SM GW Appletalk MS Network Rendezvous and Link Speed appear as availa...

Page 76: ...lected then press the r button The Printer settings menu appears 4 Make sure Information Menu is selected then press the r button 5 Press the d button to select Status Sheet then press the r button The Data light flashes the status sheet starts printing and the LCD screen displays Printing If options are installed correctly they appear under Hardware Configurations If they are not listed try reins...

Page 77: ...mory including jobs the CX11N is currently receiving or printing Using the Reset Menu Selecting Reset from the Setup menu stops printing clears the print job being received from the active interface and clears errors that may have occurred 1 Press the Setup button 2 Make sure Printer settings is selected then press the r button 3 Press the d button several times until Reset is selected then press ...

Page 78: ...78 Using the Control Panel Basic book Page 78 Monday August 22 2005 12 35 PM ...

Page 79: ...hotoconductor how to clean the CX11N and how to order more toner Identifying the Product Parts Auto Document Feeder CX11NF only Cover CX11NF only Paper stopper CX11NF only Output tray Extension tray Control panel Cover A MP tray Cover C Cover B Option cover Power switch Basic book Page 79 Monday August 22 2005 12 35 PM ...

Page 80: ...nnector Networkinterface connector Telephone interface connectors CX11NF only Cleaner cover Fuser Paper guides MP tray Photoconductor access lever Photoconductor Cleaning knob access lever Toner cartridge Basic book Page 80 Monday August 22 2005 12 35 PM ...

Page 81: ...ar in this position indicating the color of the empty toner cartridge 2 Even if this message is displayed in the LCD screen you can continue to print for a short time by pressing the x B W Start or x Color Start button on the control panel The message in the LCD screen changes from Replace Photocondctr to Worn Photoconductor Messages appear for one consumable product at a time After replacing a pa...

Page 82: ...y cause damage to your printer not covered by Epson s warranty When handling toner cartridges always place them on a clean smooth surface If you move a toner cartridge from a cool to a warm environment wait for at least one hour before installing it to prevent damage from condensation Warning Do not touch the toner and keep it away from your eyes If toner gets on your skin or clothes wash it off w...

Page 83: ...ton 3 Use the u or d button to select Reset Menu then press the r button 4 Use the u or d button to select Change Toner C M Y K for the color of the toner cartridge you want to change then press the r button 5 Continue with the steps in the next section to remove and replace the toner cartridge Removing and Replacing an Empty Toner Cartridge 1 Make sure the CX11N is turned on 2 Check the color of ...

Page 84: ... toner cartridge 5 Remove the new toner cartridge from its package and gently shake it as shown below Warning Do not touch the toner Keep the toner away from your eyes If toner gets on your skin or clothes wash it off with soap and water immediately Basic book Page 84 Monday August 22 2005 12 35 PM ...

Page 85: ...idge with the arrow mark facing you Push it all the way into its slot pushing on both sides evenly until it stops securely 8 Push down the right lever to lock the toner cartridge Note The toner cartridge is installed securely when the lock lever cannot be turned any further Basic book Page 85 Monday August 22 2005 12 35 PM ...

Page 86: ...t any longer than necessary Be careful not to scratch the surface of the drum and belt Also avoid touching the drum oil from your skin may permanently damage its surface and affect print quality Do not store the photoconductor in an area subject to direct sunlight dust salty air or corrosive gases such as ammonia Avoid locations subject to extreme or rapid changes in temperature or humidity Do not...

Page 87: ...d Replacing the Photoconductor 1 Make sure the CX11N is turned on 2 Remove any paper loaded in the ADF CX11NF only 3 Slowly flip back the scanner until it stops 4 Close the output tray extension Basic book Page 87 Monday August 22 2005 12 35 PM ...

Page 88: ...88 Maintenance 5 Lift up cover B 6 Pull up the orange lever inside cover B Basic book Page 88 Monday August 22 2005 12 35 PM ...

Page 89: ...kage and pull off the protective sheet Caution Do not touch the belt on the top of the photoconductor or the blue area otherwise print quality may decrease Avoid exposing the photoconductor to light any longer than necessary Do not touch any other components inside the CX11N Basic book Page 89 Monday August 22 2005 12 35 PM ...

Page 90: ...oconductor by its handle and insert it into the slots marked with blue arrows inside the CX11N Push it in until it clicks into place 10 Flip down the orange lever then close cover B Basic book Page 90 Monday August 22 2005 12 35 PM ...

Page 91: ... Caution Never use alcohol or paint thinner to clean the CX11N these chemicals can damage the components and the case Be careful not to get water on the CX11N mechanisms or any electrical components To clean other parts of the CX11N see these sections Cleaning the Pickup Roller on page 92 Cleaning the Print Head on page 93 Cleaning the Exposure Window and Document Table on page 95 Cleaning the ADF...

Page 92: ...Cleaning the Pickup Roller 1 Open the MP tray cover and remove any loaded paper 2 Gently wipe the pickup roller inside the MP tray with a moistened cloth Pickup roller Basic book Page 92 Monday August 22 2005 12 35 PM ...

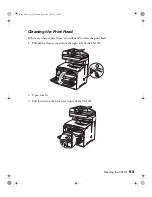
Page 93: ... there are white vertical lines you will need to clean the print head 1 Pull off the cleaner cover from the right side of the CX11N 2 Open cover A 3 Pull forward on the blue lever inside of the CX11N Basic book Page 93 Monday August 22 2005 12 35 PM ...

Page 94: ...ve it out and in once Note Move the cleaner all the way out and in otherwise the CX11N may not be cleaned completely 5 Push in the blue lever inside the CX11N 6 Close cover A and replace the cleaner cover Basic book Page 94 Monday August 22 2005 12 35 PM ...

Page 95: ...an or copy quality clean the exposure window You can use a soft dry cloth to clean the document table Caution Do not spray cleaning solution on the document table glass or the exposure window or you will damage the CX11N Exposure window Document table Basic book Page 95 Monday August 22 2005 12 35 PM ...

Page 96: ... CX11NF Only If the Auto Document Feeder fails to feed paper open the ADF cover on the left side Then close the cover and wipe the rollers with a soft moist cloth to remove paper dust Pickup rollers Basic book Page 96 Monday August 22 2005 12 35 PM ...

Page 97: ...r toner cartridges or a photoconductor online click the Order Online button in the EPSON Status Monitor 3 window or in the printer driver Basic Settings window You see the Order Online window Then click the Order Now Find Dealer button This opens your internet browser to Epson s web site Basic book Page 97 Monday August 22 2005 12 35 PM ...

Page 98: ...l for recycling your old toner cartridges Part Product code High Capacity Toner Cartridge Yellow 0187 High Capacity Toner Cartridge Magenta 0188 High Capacity Toner Cartridge Cyan 0189 High Capacity Toner Cartridge Black 0190 Standard Capacity Toner Cartridge Yellow 0191 Standard Capacity Toner Cartridge Magenta 0192 Standard Capacity Toner Cartridge Cyan 0193 Photoconductor 1104 Basic book Page 9...

Page 99: ...one minute depending on the status of the CX11N While this message is displayed do not open any covers or turn off the CX11N Cancel All Print Job This message appears when the y Cancel button has been pressed down for more than three seconds The CX11N is canceling all print jobs in memory including jobs currently being received or printed Cancel Print Job This message appears when the y Cancel but...

Page 100: ...hen held down the x B W Start or x Color Start button for more than three seconds Install C M Y K TnrCart The indicated toner cartridges are not installed in the product Install the Cyan Magenta Yellow or Black cartridges as indicated See page 82 for instructions Insufficient memory Wait for a few minutes until the current copy job is finished Then try copying again If it still doesn t work you ne...

Page 101: ...ition Then press the x B W Start or x Color Start button to restart the incomplete scanning job Replace Toner C M Y K The indicated toner cartridge is empty Replace the cartridge with a new one See page 83 for instructions Scanner ADF error You turned on the CX11NF with the ADF installed Turn off the CX11NF install the ADF and turn it on again If the error occurs again contact Epson as described o...

Page 102: ...ons Your application software is not set up correctly Make sure that the CX11N is selected in your software Your computer system s memory is too small to handle the volume of data in your document Try reducing the image resolution in your application software or install more memory in your computer Information about the toner cartridges or photoconductor on the LCD seems incorrect The time interva...

Page 103: ...ct type of paper for the CX11N For best results use Epson paper See page 12 for information on choosing paper types The paper path inside the product may be dusty Print three pages containing only one character per page to clean the internal components There may be a problem with the photoconductor Replace the photoconductor as described on page 86 If you still have toner smudging contact Epson as...

Page 104: ...osh The color in your printout looks different from the screen colors Printed colors cannot exactly match the colors on your monitor screen since printers and monitors use different color systems monitors use RGB red green and blue and printers use CMYK cyan magenta yellow and black Although it is difficult to match colors perfectly selecting the printer driver s ICM setting for Windows or ColorSy...

Page 105: ...port or through one hub only Pressing the Start button does not start scanning Make sure EPSON Scan EPSON Creativity Suite and Presto PageManager are installed on your computer For Windows XP users From the Start menu select Settings then Control Panel Double click Scanners and Cameras then right click EPSON AL CX11 and select Properties from the pop up menu Click the Events tab and make sure EPSO...

Page 106: ...em requirements on page 131 and for the software you are using Make sure the computer has enough memory for your software If it does not see your software and computer documentation for instructions on freeing up available memory or upgrade your RAM Problem Solution Your original is not scanned or only a few dots appear as the scanned image Make sure the document is placed on the document table wi...

Page 107: ... in Professional Mode Check the brightness and contrast settings of your monitor Select Color Control and check Continuous auto exposure in the Configuration window or click the Auto Exposure button in Professional Mode Change the Display Gamma setting for your output device such as a monitor or CX11N in the Configuration window Change the Destination setting in Home Mode or Professional Mode Moir...

Page 108: ...inal image Try different combinations of the image settings in your scanner software especially the data format bits pixel and color gamma correction and color correction settings Check the color matching and color management capabilities of your computer display adapter and software Some computers can change the color palette to adjust the colors on your screen See your software and hardware manu...

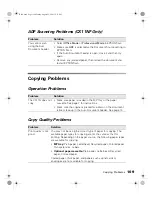
Page 109: ...e paper cassette See page 7 for instructions Make sure the original is placed face down on the document table or face up in the Auto Document Feeder See page 14 Problem Solution Print quality is not good You may not be using the correct type of paper for copying The available paper types for copying are not the same as that for printing Depending on the paper source the following paper types are a...

Page 110: ...the contrast If the original has a colored background images in the foreground may blend too much or the background may be in a different shade Completely blank pages are output You may have loaded the original upside down In the Auto Document Feeder load the original with the short edge facing in and the side to be scanned facing up On the document table place the original face down with the top ...

Page 111: ...paper or load new paper If paper does not feed from the optional paper cassette it may not be installed properly For instructions on installing it see page 9 Problems Using Options To confirm your options are installed correctly print a status sheet See page 127 for details Paper does not feed from the optional paper cassette The optional paper cassette may not be installed properly See page 9 for...

Page 112: ...e and may cause other paper jams Pull it gently to avoid tearing Always remove jammed paper with both hands to avoid tearing it If jammed paper remains in the product or if it is jammed in an area not mentioned in this section contact Epson as described on page 128 Make sure you load the same paper type as the selected Paper Type setting in the printer driver Warning Be careful not to touch the fu...

Page 113: ...ng up the scanner make sure that the document cover is closed 1 Flip back the scanner Warning Do not touch the lever under the scanner or the document cover may fall down damaging the CX11N and causing injury Don t touch Basic book Page 113 Monday August 22 2005 12 35 PM ...

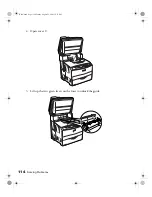
Page 114: ...114 Solving Problems 2 Open cover C 3 Lift up the two green levers on the fuser to unlock the guide Basic book Page 114 Monday August 22 2005 12 35 PM ...

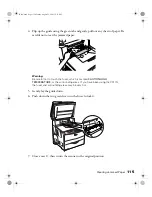
Page 115: ...t to touch the fuser which is marked CAUTION HIGH TEMPERATURE or the surrounding areas If you have been using the CX11N the fuser and surrounding areas may be very hot 5 Gently lay the guide down 6 Push down the two green levers on the fuser to lock it 7 Close cover C then return the scanner to the original position Basic book Page 115 Monday August 22 2005 12 35 PM ...

Page 116: ...ms Removing Jams From Cover E 1 Open cover E on the back of the CX11N 2 Gently pull out any paper with both hands Be careful not to tear the jammed paper 3 Close cover E Basic book Page 116 Monday August 22 2005 12 35 PM ...

Page 117: ...aising the scanner make sure the document cover is closed 1 Flip back the scanner Warning Do not touch the lever under the scanner or the document cover may fall down damaging the CX11N and causing injury Don t touch Basic book Page 117 Monday August 22 2005 12 35 PM ...

Page 118: ...118 Solving Problems 2 Open cover C then pull up the two green levers on the fuser to unlock the guide 3 Open cover E on the back then open cover F Basic book Page 118 Monday August 22 2005 12 35 PM ...

Page 119: ...per with both hands Be careful not to tear the jammed paper 5 Close cover F and cover E 6 Push down the two green levers on the fuser then close cover C 7 Lower the scanner to its original position Basic book Page 119 Monday August 22 2005 12 35 PM ...

Page 120: ... the MP Tray 1 Open the MP tray cover and remove any loaded paper 2 Gently pull out any sheets of paper that have fed part way into the product 3 Reload the paper and close the MP tray cover Basic book Page 120 Monday August 22 2005 12 35 PM ...

Page 121: ...1 4 Open and close cover A to clear the error message Removing Jams From the Optional Paper Cassette and Cover G 1 Pull out the paper cassette from the optional paper cassette Basic book Page 121 Monday August 22 2005 12 35 PM ...

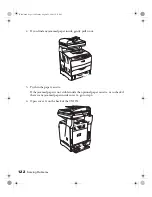
Page 122: ...ull it out 3 Push in the paper cassette If the jammed paper is not visible inside the optional paper cassette or to check if there is any jammed paper inside cover G go to step 4 4 Open cover G on the back of the CX11N Basic book Page 122 Monday August 22 2005 12 35 PM ...

Page 123: ...any paper with both hands Be careful not to tear the jammed paper 6 Close cover G Removing Jammed Transparencies From the MP Tray 1 Open the MP tray cover and remove all the loaded transparencies Basic book Page 123 Monday August 22 2005 12 35 PM ...

Page 124: ...cover E on the back and gently pull out any transparencies with both hands Be careful not to tear the jammed transparency 3 Close cover E 4 Reload transparencies into the MP tray Basic book Page 124 Monday August 22 2005 12 35 PM ...

Page 125: ...sage Removing Jams From the Auto Document Feeder 1 Open the Auto Document Feeder cover 2 Gently pull out any paper with both hands Be careful not to tear the jammed paper If you cannot pull out the jammed paper go to step 3 Basic book Page 125 Monday August 22 2005 12 35 PM ...

Page 126: ...126 Solving Problems 3 Roll the knob counterclockwise to help remove any jammed paper 4 Close the Auto Document Feeder cover Basic book Page 126 Monday August 22 2005 12 35 PM ...

Page 127: ...er settings is selected then press the r button The Printer settings menu appears 5 Make sure Information Menu is selected then press the r button 6 Make sure Status Sheet is selected then press the r button The Data light flashes and the status sheet starts printing If options are installed correctly they appear under Hardware Configurations If they are not listed try reinstalling them or securel...

Page 128: ...11NF Product serial number located on the back of the printer Proof of purchase such as a store receipt and date of purchase Computer configuration and operating system version Description of the problem Service Access World Wide Web From the Internet you can reach Epson Support at http support epson com At this site you can download drivers and other files look at product documentation access tro...

Page 129: ... S sales only In Canada please call 800 463 7766 for reseller referral Other Software Technical Support Software Telephone Fax Online and E mail OfficeReady Essentials 617 441 3171 8 30 AM 5 30 PM Pacific Time Monday Friday Fax 617 344 5992 www kmt com support kmt com Presto BizCard Presto PageManager 510 445 8616 Fax 510 445 8601 www newsoftinc com contactus newsoftinc com Basic book Page 129 Mon...

Page 130: ...130 Solving Problems Basic book Page 130 Monday August 22 2005 12 35 PM ...

Page 131: ...B or more recommended VGA or better display adapter and monitor CD ROM or DVD drive for installing the printer software A Windows compliant USB port A shielded USB AB cable up to 6 5 feet 2 meters long Macintosh An Apple iMacTM series or Power Macintosh G3 G4 or G5 with a built in USB port Macintosh OS X 10 2 4 to 10 4 x At least 128MB RAM 256MB recommended At least 100MB free hard disk space 200M...

Page 132: ...ll toner contact with your eyes If toner is spilled use a broom and dustpan or a damp cloth with soap and water to clean it up Because the fine particles can cause a fire or explosion if they come into contact with a spark do not use a vacuum cleaner Do not dispose of used toner cartridges and or the fuser in fire as they can explode and cause injury Dispose of them according to local regulations ...

Page 133: ... those controls that are covered by the operating instructions Improper adjustment of other controls may result in damage and will often require extensive work by a qualified technician to restore the product to normal operation If it has been dropped or the cabinet has been damaged If it exhibits a distinct change in performance indicating a need for service When Using the CX11N The CX11N weighs ...

Page 134: ... Do not use the CX11NF near water Avoid using a telephone during an electrical storm There may be a remote risk of electric shock from lightning Do not use the telephone to report a gas leak in the vicinity of the leak Caution Be sure the telephone s AC power cord meets the relevant local safety standards Use only the power cord that comes with the product and don t use the cord with other equipme...

Page 135: ...gulations for laser products on August 2 1976 Compliance is mandatory for products marketed in the United States The label shown below indicates compliance with the CDRH regulations and must be attached to laser products marketed in the United States Ozone Safety Information Ozone Emissions Ozone gas is generated by laser printers as a by product of the printing process Ozone is produced only when...

Page 136: ...aw Bank bills coins government issued marketable securities government bond securities and municipal securities Unused postage stamps pre stamped postcards and other official postal items bearing valid postage Government issued revenue stamps and securities issued according to legal procedure Exercise caution when copying the following items Private marketable securities stock certificates negotia...

Page 137: ...earlier products the REN is separately shown on the label 5 If this terminal equipment Model EU 96 causes harm to the telephone network the telephone company will notify you in advance that temporary discontinuance of service may be required But if advance notice isn t practical the telephone company will notify the customer as soon as possible Also you will be advised of your right to file a comp...

Page 138: ...e aux spécifications techniques applicables d Industrie Canada 2 The Ringer Equivalence Number is an indication of the maximum number of devices allowed to be connected to a telephone interface The termination on an interface may consist of any combination of devices subject only to the requirement that the sum of the RENs of all the devices does not exceed five L indice d équivalence de la sonner...

Page 139: ...pair center Epson will arrange and pay for shipping to and from the repair location In the case of an exchange of the defective unit Epson will ship a replacement product to you freight prepaid so long as you use an address in the U S excluding Puerto Rico and U S Possessions or Canada Shipments to other locations will be made freight collect You are responsible for securely packaging the defectiv...

Page 140: ...LIMITED TO THE WARRANTY PERIOD IDENTIFIED ABOVE UNLESS STATED HEREIN ANY STATEMENT OR REPRESENTATIONS MADE BY ANY OTHER PERSON OR FIRM ARE VOID EXCEPT AS PROVIDED IN THIS WRITTEN WARRANTY NEITHER EPSON AMERICA INC NOR ITS AFFILIATES SHALL BE LIABLE FOR ANY LOSS INCONVENIENCE OR DAMAGE INCLUDING DIRECT SPECIAL INCIDENTAL OR CONSEQUENTIAL DAMAGES RESULTING FROM THE USE OR INABILITY TO USE THE EPSON ...

Page 141: ...panel copying 35 Fax mode 69 mode menus accessing 67 Print mode 68 Reset menu 77 Scan mode 69 scanning 65 Setup menu 70 Copies setting 25 Copy function settings 76 Copying 2 pages per sheet 40 basic 35 canceling 36 77 contrast setting 38 customizing settings 36 density setting 37 document type setting 37 full page copy 39 lightness or darkness 37 number of copies 36 problems 109 reset settings 41 ...

Page 142: ...p Epson 128 Home Mode color adjusting 56 description 43 finishing scan 61 image settings 56 marquee adjusting 54 previewing 51 resolution 50 scan area 51 scan size 59 selecting settings 46 to 61 L Laser internal radiation label 135 printer precautions 132 safety labels 134 Layout settings Macintosh 25 Loading paper 7 to 11 MP tray 7 optional paper cassette 9 Location of printer 132 M Macintosh pri...

Page 143: ...hick originals 16 Placing originals 14 to 17 Previewing scanned images 51 Printer cable 131 cleaning print head 93 information 71 Printer driver settings customizing Macintosh 26 customizing Windows 21 Printer settings menu paper source settings 72 printer information 71 reset 74 setup settings 73 Printer status Macintosh 32 Printer status Windows 30 Printing canceling 77 canceling Macintosh 33 ca...

Page 144: ...access 70 LCD settings 70 menu settings 71 Software about 6 Start button 65 Status messages 99 Status sheet printing 76 127 Support 128 to 129 System requirements 131 T Target Size selecting 59 Technical support 128 to 129 Telephone equipment 134 Toner cartridges ordering 97 to 98 replacing 82 to 86 Toner recycle program 98 Transportation lock 106 Troubleshooting color matching 108 copy quality 10...

Reviews: