16
Setting Up the Smart Reader
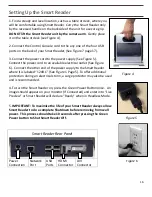
1. Find a steady and level location, such as a table or desk, where you
will be comfortable using Smart Reader. Carry the Smart Reader only
by the recessed handle on the backside of the unit for a secure grip.
DO NOT lift the
Smart Reader
unit by the camera arm
. Gently place
it on the table or desk (see Figure 4).
2. Connect the Control Console cord to the any one of the four USB
ports on the back of your Smart Reader, (See Figure 7 page 17).
3. Connect the power cord to the power supply (See Figure 5).
Connect the power cord to an available electrical outlet (See Figure
6). Connect the other end of the power supply to the Smart Reader
where it is labeled “12VDC” (See Figure 1 Page 5). To offer additional
protection during an electrical storm, a surge protector may also be used
and is recommended.
4. To turn the Smart Reader
on, press the Green Power Button once. An
image should appear on your monitor (If Connected) and enter into “Live
Preview” or Smart Reader will declare “Ready” when in Headless Mode.
5.
IMPORTANT: To maximize the life of your Smart Reader always allow
Smart Reader to do a complete Shutdown before removing from wall
power. This process should take 10 seconds after pressing the Green
Power button to Shut Smart Reader Off.
Smart Reader Rear Panel
Power
Connection
Network
Port
USB
Ports
HDMI
Connector
DVI
Connector
Figure 5
Figure 4
Figure 6
Summary of Contents for Smart Reader
Page 1: ...0 User Manual ...
Page 8: ...7 ...

